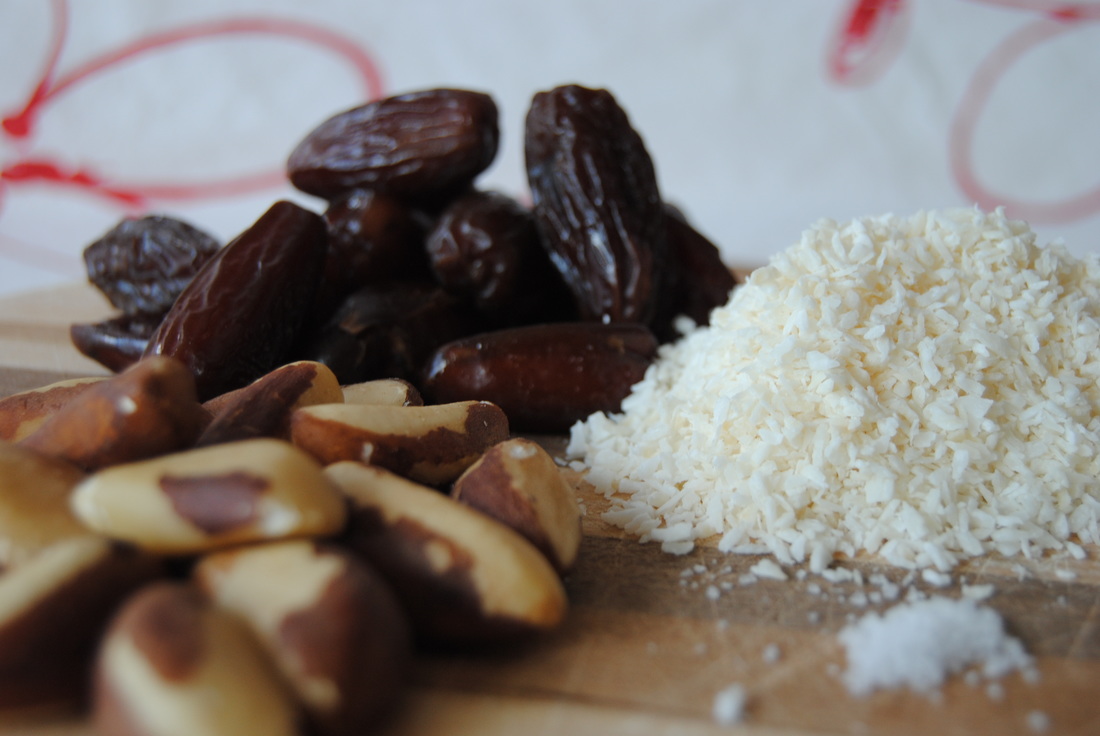
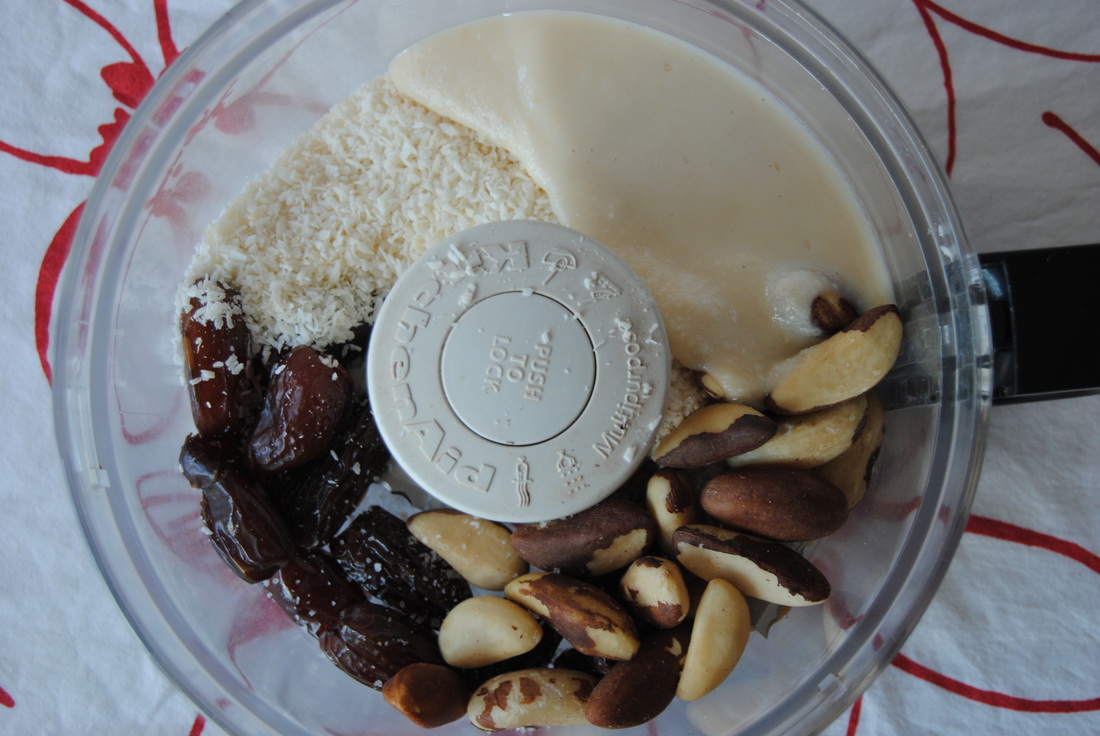
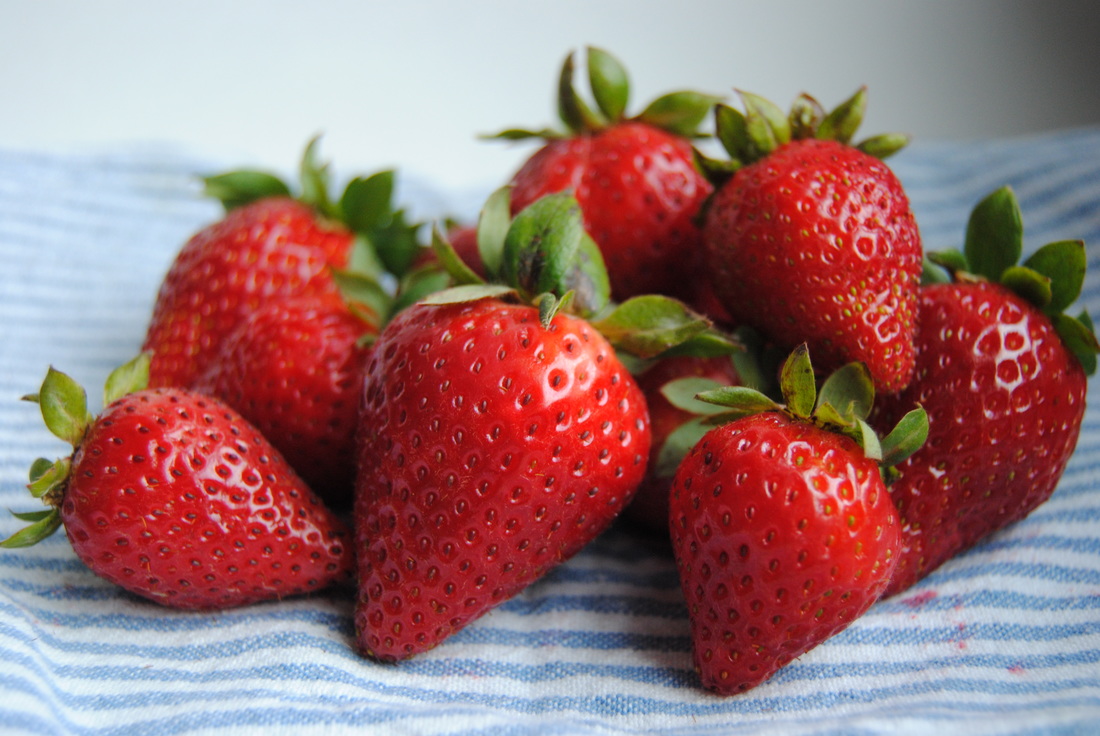
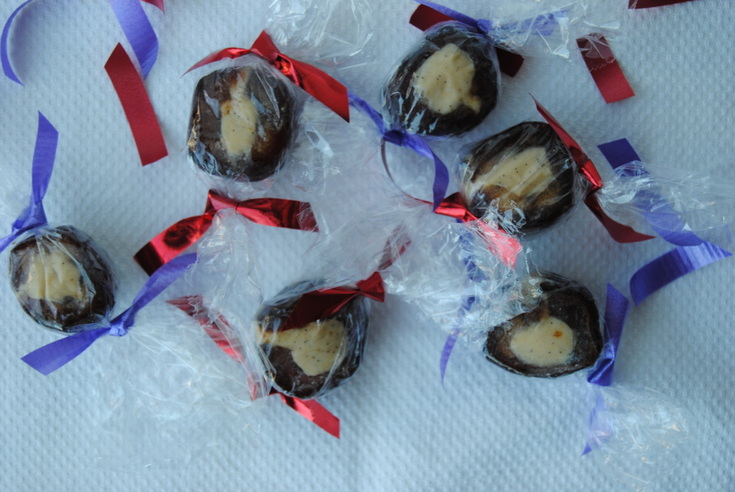
 The sweet celebration of Valentine's Day this past weekend got us thinking about candy - big surprise! And though chocolates are the traditional sweet during this time, we were thinking a little differently. We wanted to try to make a candy with no added sugar, sounds crazy right?! Well not if you utilize nature's candy, a little piece of food perfection called the date. 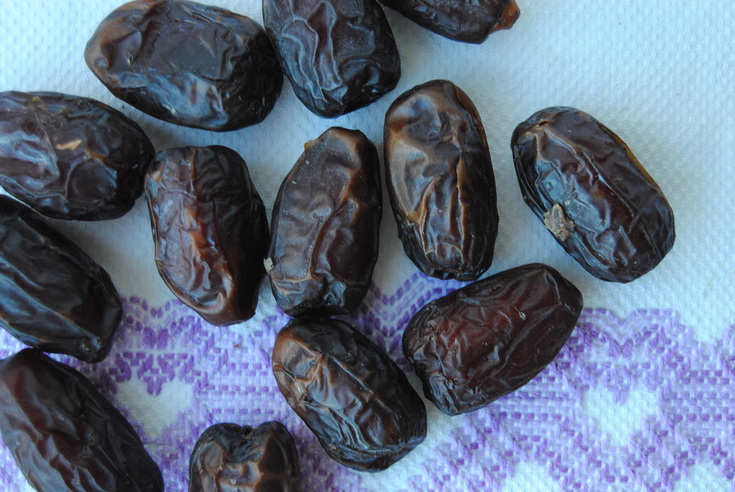 Dates are a flowering edible plant from the palm family that grow in hot climates. They grow in clusters on a species of palm tree well named "date palms" and are most commonly eaten once dried. A date palm can take up to 7-10 years to mature and once mature may produce a crop of up to 300 lb per harvest season. Our favorite variety of date is the Medjool date native to the Middle East and North Africa but also grown in other desert like regions across the globe. In our opinion, Medjool dates are superior to all other dates because they are the largest in size, have the softest texture, and the sweetest taste.....AKA nature's candy! Dates can be enjoyed on their own as a sweet snack, blended into beverages to add a little sweetness, or chopped up and added to baked or raw recipes. They are also great stuffed in savory or sweet recipes similar to our post this week. They provide, of course, sweetness but also a caramel reminiscent flavor and a chewy and slightly sticky texture. If blended, this sticky texture can even be used as a binder in raw granola bar recipes. But we will save that for another post. Today, no-added sugar candies! 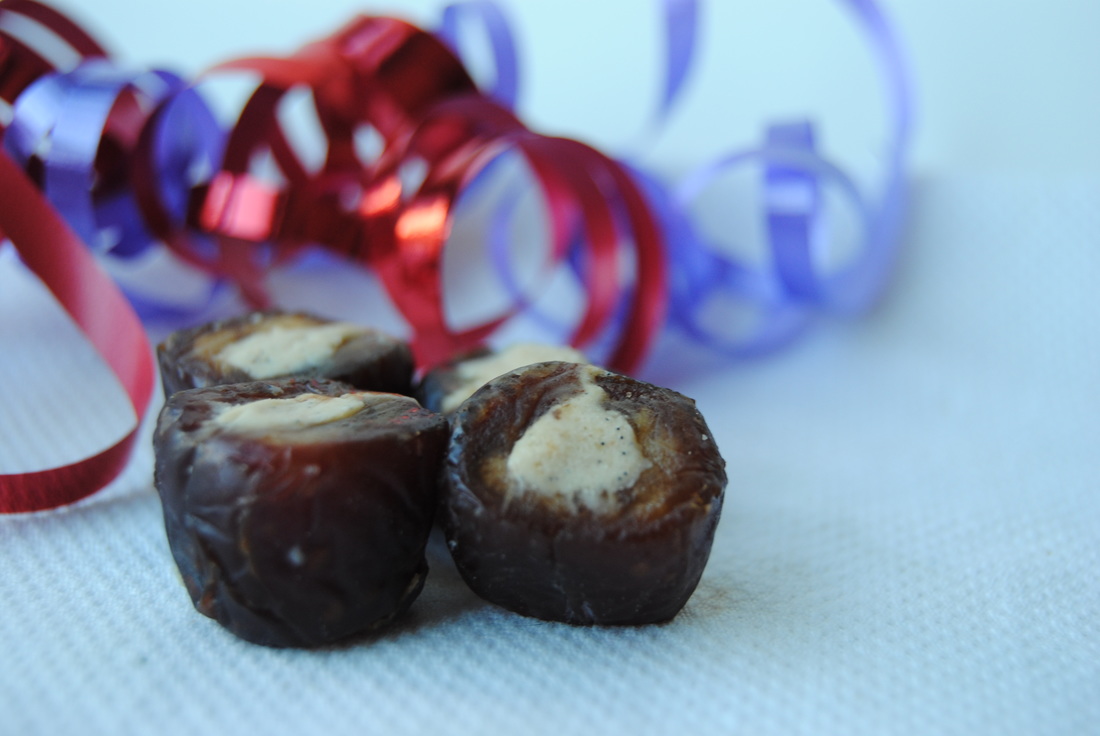 Raw Coconut-Cashew Butter Filled Dates PREP TIME: 5 mins TOTAL TIME: 30 mins (includes chilling time) Servings: 24 candies Ingredients 12 Medjool dates 1/8 cup raw cashew butter 1/8 cup raw coconut butter 1/4 vanilla bean, inside scraped out 1/8 tsp salt, or to taste In a microwave safe bowl, carefully melt cashew butter and coconut butter in 10 second increments making sure to stir frequently to prevent the butters from burning (this should take about 20-30 seconds). Add vanilla bean and salt to the butters, stir mixture thoroughly, then set in the fridge to cool for at least 10 minutes. Remove the pits from 12 dates by slicing open one side with a small, sharp knife but not cutting the dates all the way through. Once filling has completely cooled, add 1 tsp of filling to the center of each date and carefully pinch closed. Repeat until all the dates are filled. Place the filled dates back in the fridge and allow to cool for about 10 minutes. Using a sharp knife, cut the ends off of each date making two flat sides in which you can see the cream filling. Then cut each date in half making 2 candies per date. Repeat until you have made 24 individual candies. Place prepared candies in a candy box or tin or simply wrap each candy in plastic wrap. Keep candies in the fridge for taste and freshness. 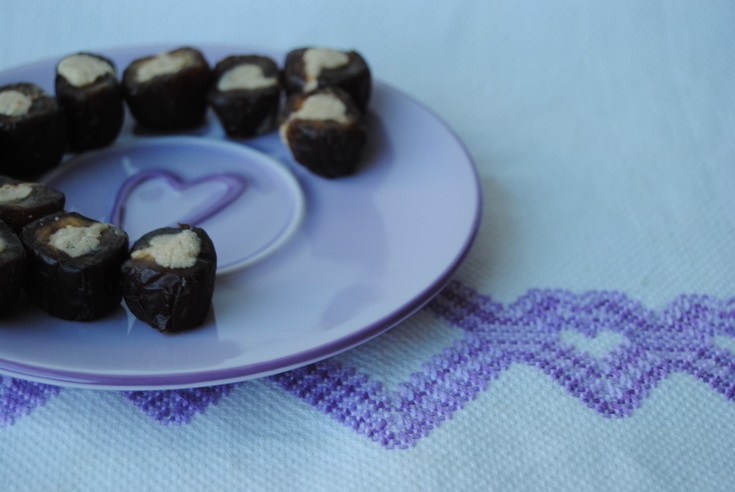 So how's that for satisfying a candy craving the natural way? The dates are gooey and oh so sweet and pair nicely with the rich coconut-cashew filling. This might be just what you need if you may (or may not have) had too many boxed chocolates this past weekend. And don't forget about the wonderful date as a sweet ingredient in your kitchen from now on. Much love, Jess and Cecelia 
0 Comments
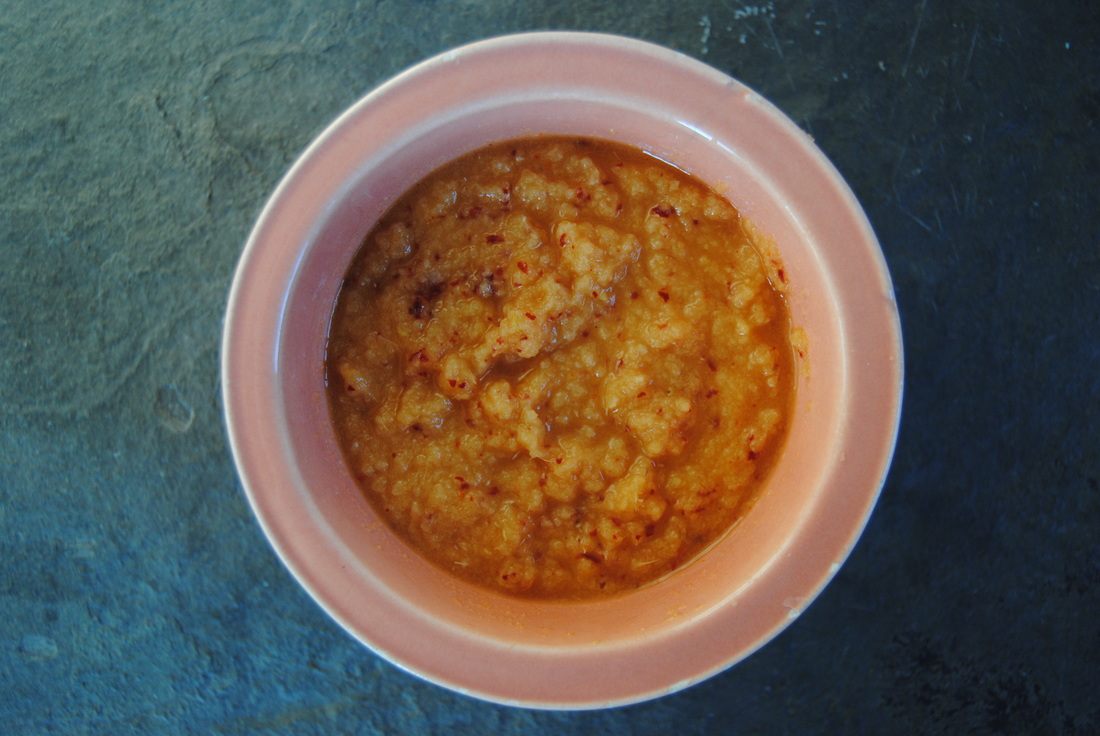
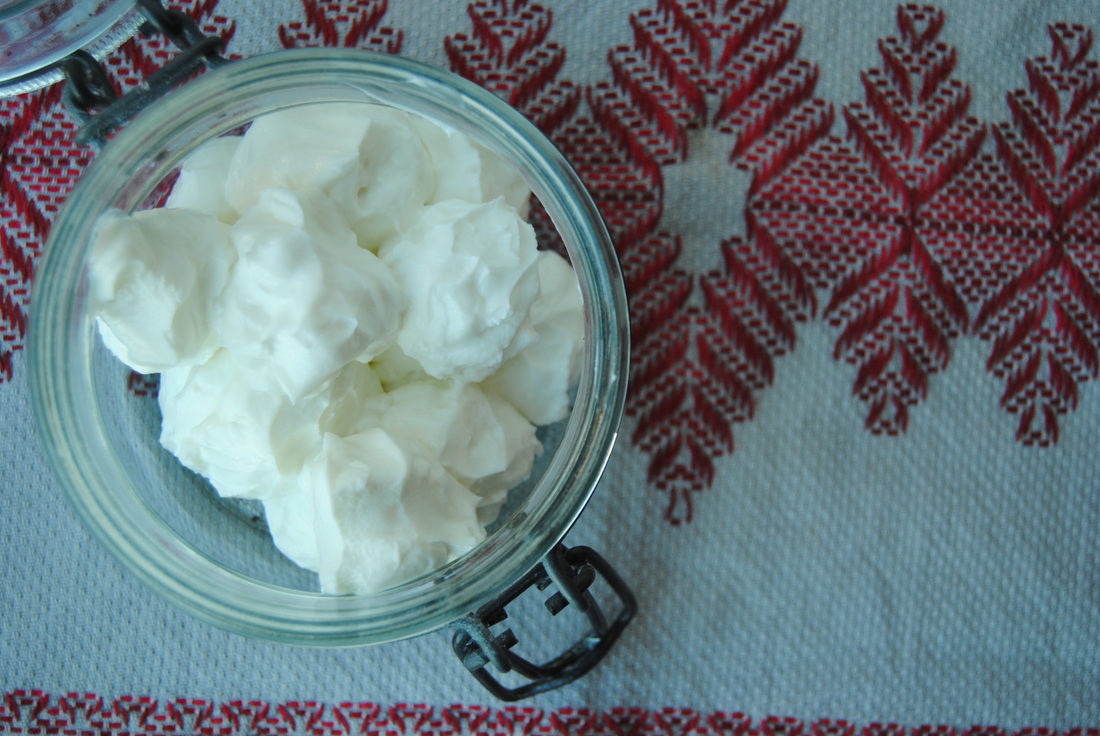
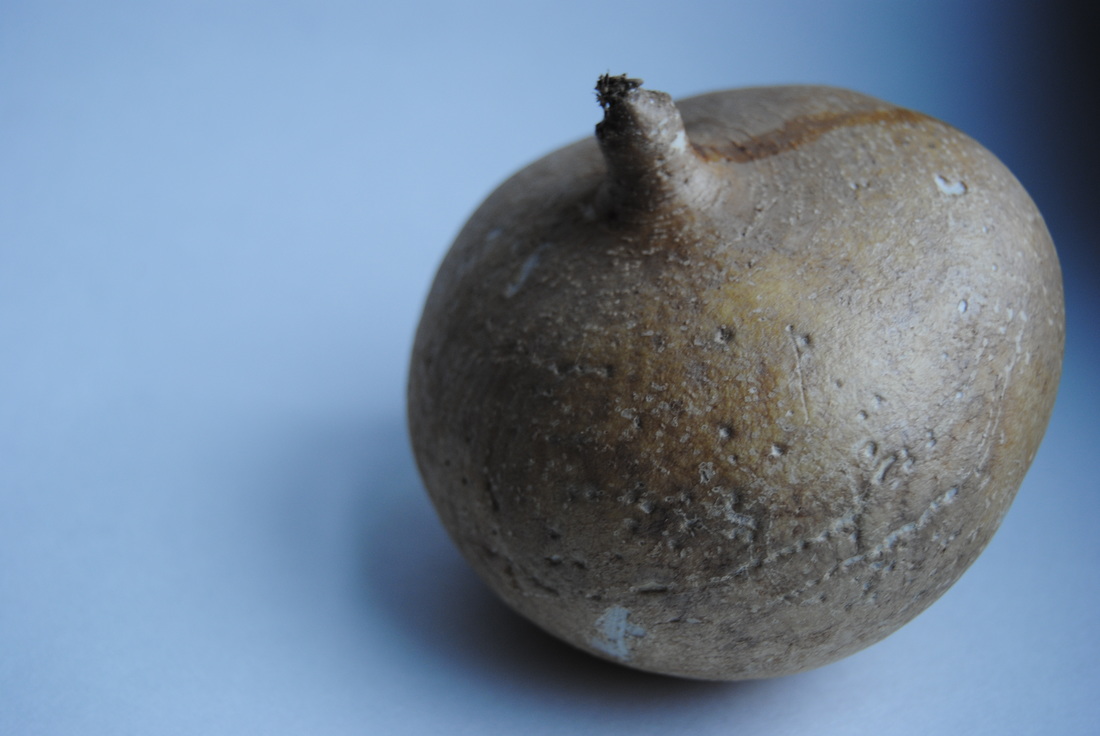
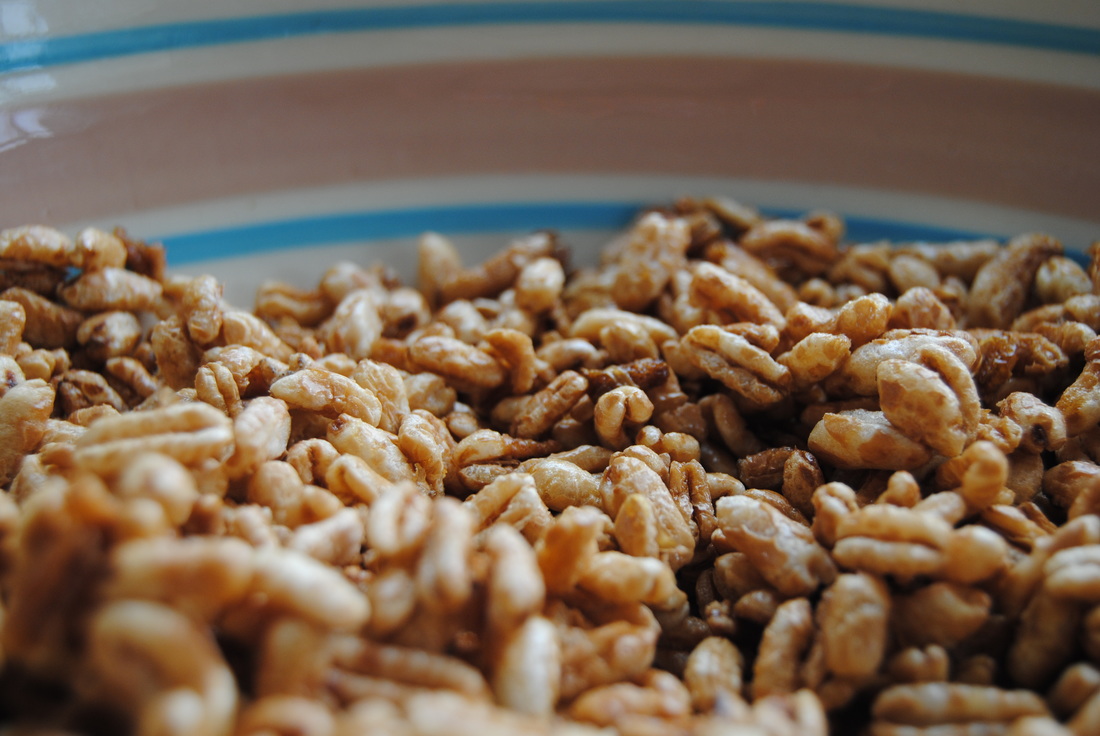
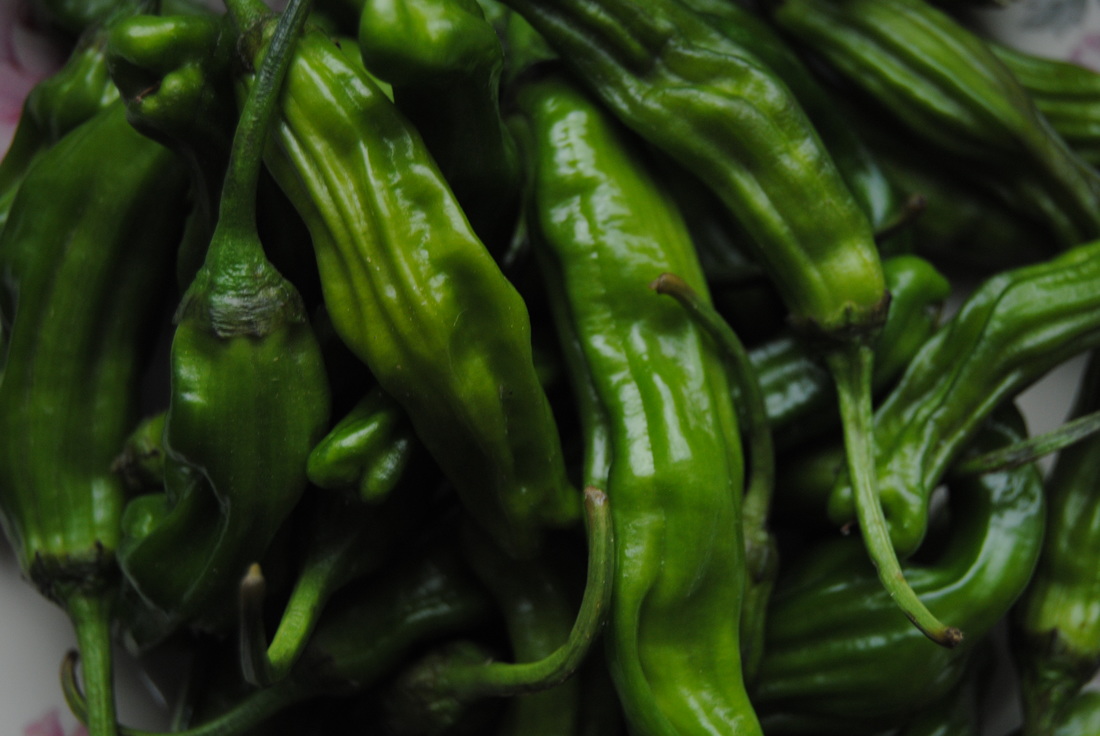
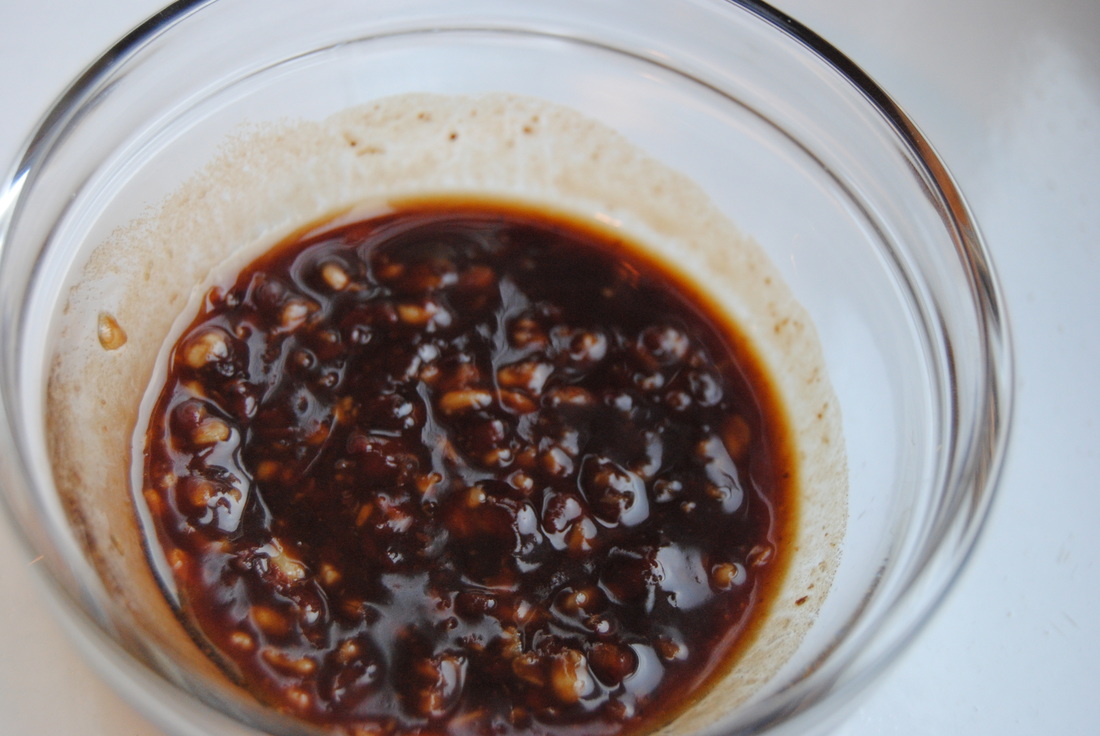
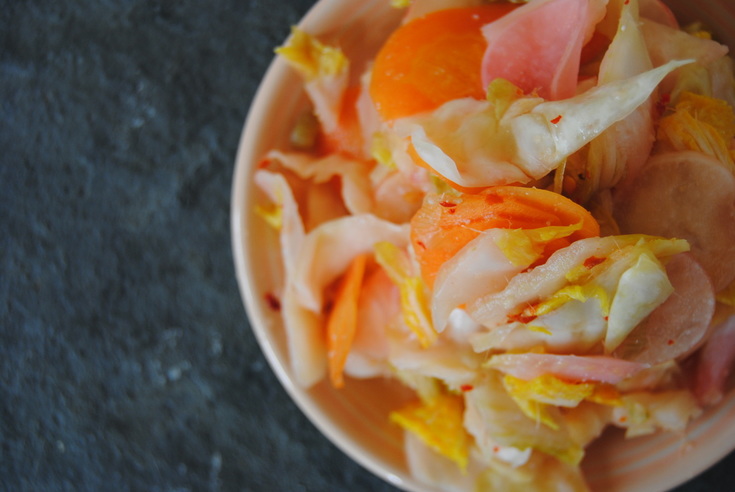 As you can probably tell from following our recipes, we just love beautiful looking and delicious tasting foods. But almost more important than that we just adore foods that keep our gastrointestinal tracts (guts - the internal kind!) happy and healthy. Because good digestion is just one of those things that can really change your life if you've ever struggled with any sort of digestive issues. And it completely makes sense that what we put into our bodies day in and day out will create our internal environment and affect the happiness or unhappiness of our guts and digestion as a whole. With that being said, we have another fermented foods recipe for you this week, kimchi! 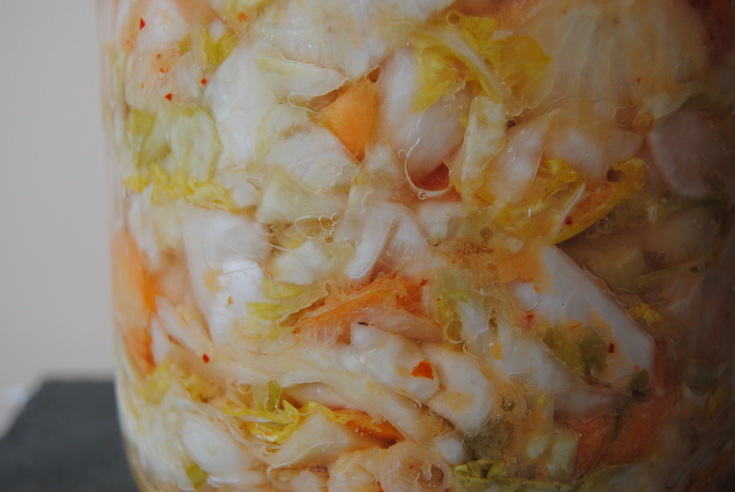 Kimchi is a classic Korean fermented side dish made from vegetables and a combination of spices. Kimchi has long been known as one of the healthiest foods to consume because it is fermented. If you remember from these previous posts (learn more here and here), fermented foods are great for our guts because they contain live, active probiotic cultures, specifically lactobacilli. And even better that kimchi not only contains probiotics (good bacteria) but also contains prebiotics found in the green onion and garlic. Prebiotics are non-digestible carbohydrates found in certain foods and are necessary in the gut to feed the probiotics, which in turn creates that healthy gut environment we've been talking about! So we hope that by this post we've convinced you that fermented foods need to be in your diet ASAP, starting with this recipe... 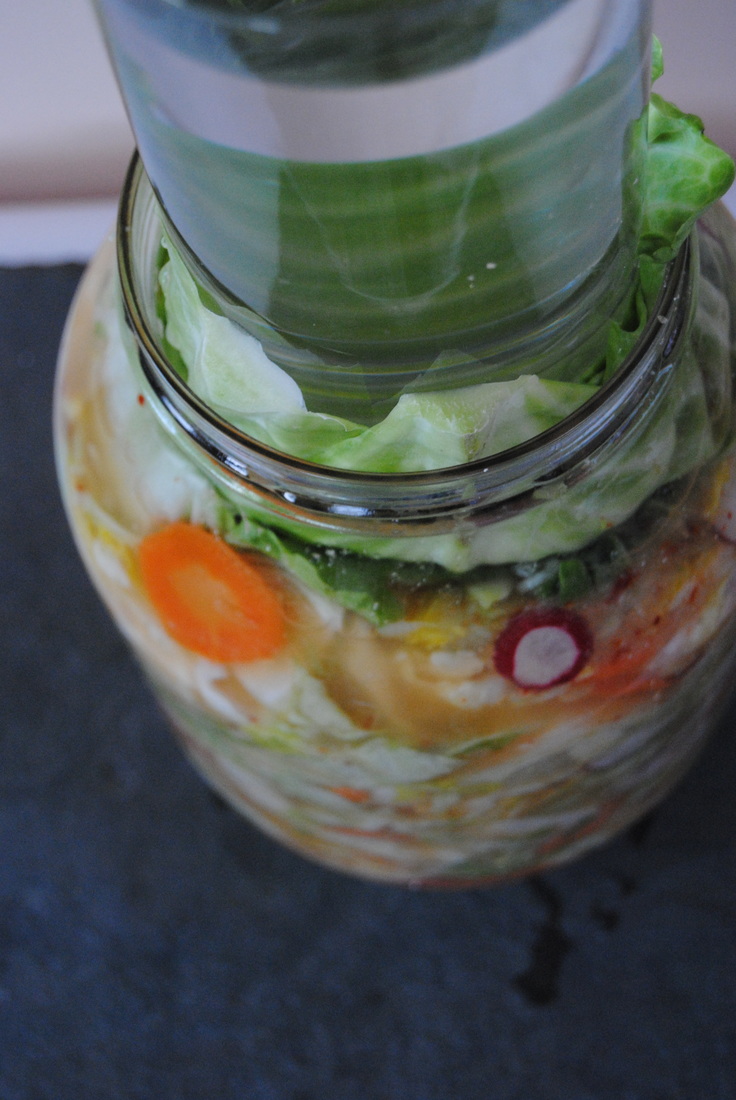 Basic Kimchi PREP TIME: 1.5 hours TOTAL TIME: 1.5 hours (+ 1 week fermentation time) Servings: 1 quart (4 cups) Ingredients 4 Tbsp sea salt dissolved in 4 cups water 1/2 pound Napa cabbage 1/2 pound green cabbage 4-6 red radishes 2 -3 large carrots 3 green onions 3 garlic cloves 4 dried red chili peppers 2 Tbsp fresh ginger root, grated 3 Tbsp rice flour Remove the outer layer of both the Napa and green cabbage and set aside. Roughly chop both cabbages and place in a very large bowl. Using a mandolin, or if you are able to do this by hand, thinly slice the radishes and carrots and place into the same bowl as the cabbage. Chop white and light green parts of the green onion and add to the bowl. Next make a brine using sea salt and warm water. Stir brine until salt has fully dissolved. Pour brine over prepared vegetables. Using your hands, gently massage the vegetable to help draw water out of the vegetables and completely coat in brine. Using a plate that fits nicely inside the bowl, place on top of the massaged vegetables and then add a weight on top of the plate (we used a jar filled with water). You basically want something heavy enough to fully submerge the vegetable under the brine. Allow to sit at room temperature for at least 1 hour. Now begin to make your flavor paste. In a high speed blender or a food processor, combine garlic, ginger, and chili peppers and add just a splash of water to allow mixture to come together in the blender. You should end up with a semi-chunky paste. Add 1 Tbsp rice flour to the paste at a time until a thick mixture has formed. The rice flour helps to thicken the paste so that it adheres to the vegetables. Once vegetables have soaked in the brine for at least 1 hour, taste test for desired level of salt. If you feel the vegetable are too salty, rinse them off. We thought the level of salt was perfect and therefore did not rinse. Drain off brine making sure to save the liquid in a separate bowl. Add drained vegetables to a new, large bowl and gently massage the vegetables with the chili-ginger-garlic paste until vegetables are completely coated. Now gradually add prepared vegetables to a large, sanitized glass jar or a crock. It is important to make sure you pack the vegetables down to allow for a tight "seal" which will prevent your kimchi from molding. Continue this process until all the vegetables are tightly packed into the jar. There should be at least a 4" space from the top of the jar and the vegetables. Pour enough reserved brine over vegetables until the top is fully submerged. Hint- you do not want to add too much brine to the jar because as the vegetables ferment they will release more liquid which could lead to a brine overflow! Place reserved full cabbage leaves over the top of the prepared vegetables pressing the edges tightly down the sides of the jar making a top seal over your vegetables. Place a clean jar filled with water or a fermentation weight on top of the cabbage leaves to apply pressure (pictured above). Remember, it is very important to make sure you have a tight seal to make sure your kimchi ferments properly. Place in a warm spot in your kitchen and let the fermentation begin! After about seven days, taste your kimchi. If desired flavor (tang, spice, and sourness) is to your liking then it's time to chill the kimchi. Remove top cabbage leaves and discard. Tightly pack kimchi and enough brine to submerge vegetables into air tight containers, cover with a lid, and place in the fridge. Note that large mason jars work well for fermentation jars and kimchi storage once fermentation is complete. 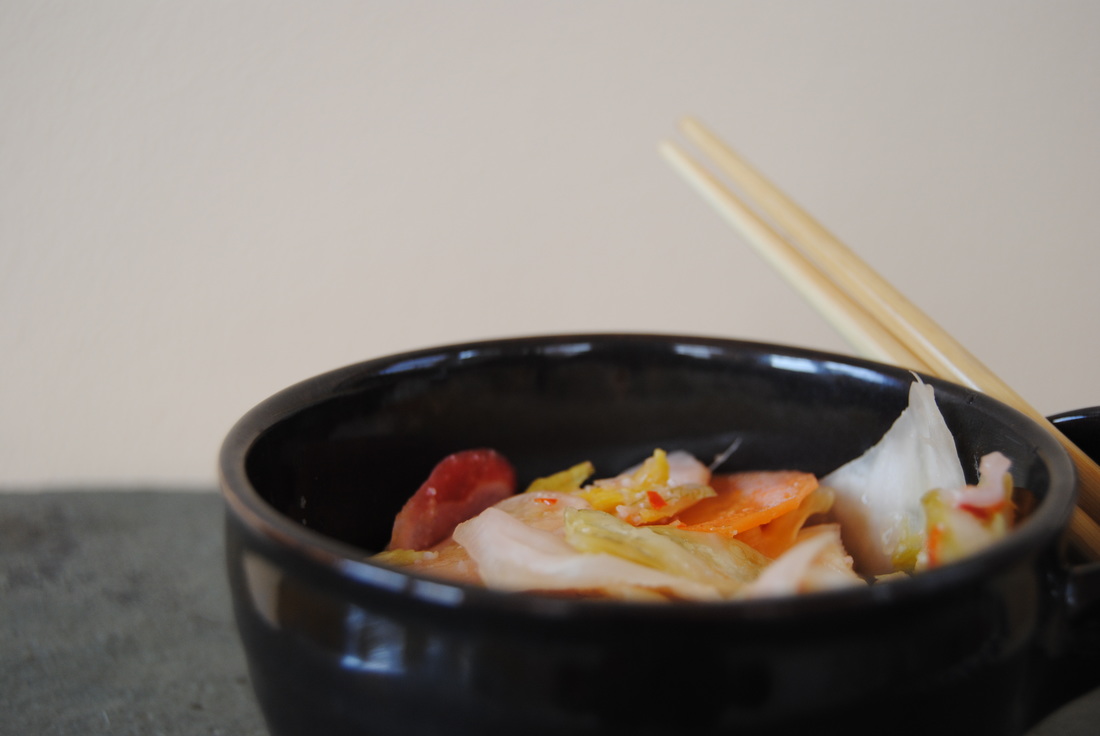 If you've never had kimchi the flavor might surprise you at first - quite salty, tangy, spicy, and sour all at the same time in a special way that just well, works. And we can't say enough about how happy your gut will be if you get this (or other) fermented foods into your diet on a daily basis. We suggest enjoying kimchi over rice, in miso soup, diced up and mixed into cream cheese for toast or bagels, hidden in grilled cheese, or on top of Korean BBQ tofu tacos. Get creative with it and remember to tell us your favorite way to enjoy your kimchi! Stay happy, Jess and Cecelia  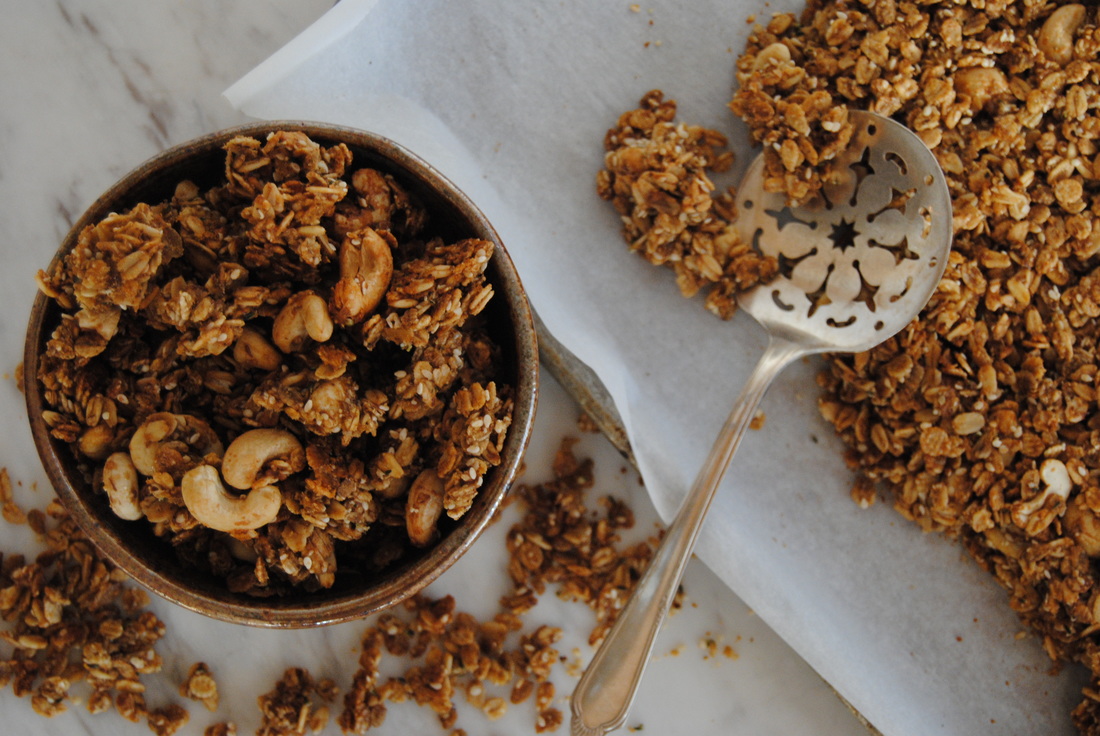 Here at TGBK we just love when foods have almost magical qualities. Of course, all whole foods provide vital nutrients to our bodies but some, more than others, have additional benefits above and beyond what is expected. And maca powder is just one of those super (or magical!) foods for us. Even an ancient civilization utilized maca in a variety of ways. So let's learn why before we get to our magical granola recipe. 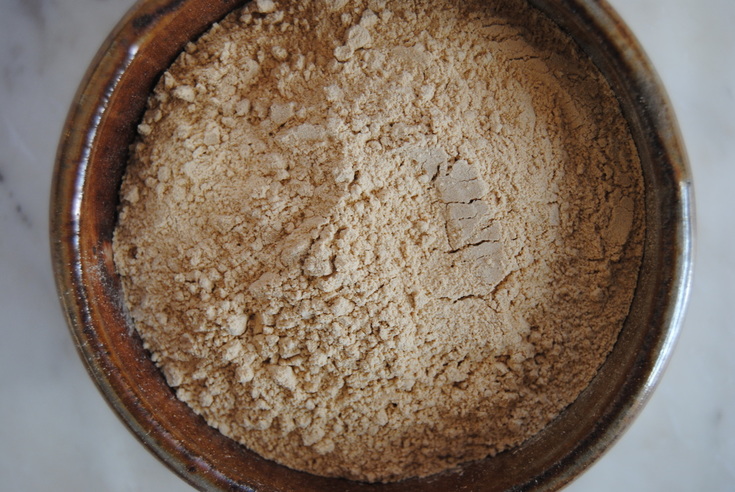 Maca powder comes from a root native to central Peru which grows at a high altitudes in the Andes mountains. Maca has been harvested and consumed for over 3,000 years and was known to be sacred to the Incas as food and medicine. Even to this day, maca is considered a super food for its superior nutritional profile. Maca powder contains primarily fatty acids, amino acids, fiber, electrolytes, and minerals. As mentioned, maca has been used historically for medicinal purposes and continues to be used today in efforts to balance hormones and aid in menstrual problems, symptoms of menopause, and fertility issues. This magical root has also been used to enhance energy and memory (yes please!). But please remember that like any other medicinal herb, maca may help with these problems/symptoms but is not a cure. The most common form of maca powder is ivory in color though it can be found more rarely in a variety of colors including red, purple, and black. In terms of flavor, maca has a slightly sweet and roasted butterscotch flavor and works well in baked goods, smoothies, ice cream, and of course granola! Magical Maca Maple Granola PREP TIME: 15 mins TOTAL TIME: 45 mins Servings: 18-24 quarter cup servings *Note that granola is quite rich and best eaten in small portions or as a crunchy topping Ingredients 2 cups thick rolled oats 1 cup rolled barley 1 cup rolled rye 1/4 cup oat bran 1/4 cup maca powder 1/4 cup ground flax meal 1/2 tsp sea salt 1 1/2 cups raw cashews 1/4 cup hemp hearts 1/8 cup white sesame seed 1/2 cup coconut oil 3/4 cup pure dark maple syrup 1/2 cup coconut sugar 1/4 cup water 1/2 vanilla bean pod (scrape the inside) or 1 tsp pure vanilla extract Preheat the oven to 350°. Line a large baking sheet with parchment paper and set aside. In a large bowl, mix together the oats, barley, rye, oat bran, maca, flax, salt, cashews, hemp, and sesame seeds. In a sauce pan, combine coconut oil, maple syrup, coconut sugar, and vanilla. Turn burner on to medium heat and stir until the oil has melted and sugar has dissolved. Pour warm oil and sugar mixture over dry ingredients and stir until evenly covered. Add 1/4 cup water over the granola and stir to combine. Evenly spread mixture onto parchment lined pan. Bake for 30 minutes or until granola is golden brown. Let sit until cooled. Using a large spoon, break granola into large chunks. Place granola back into the oven and continue cooking for an additional 7-10 minutes. Make sure to stir granola at least once while it is cooking. Again, allow granola to completely cool before storing in air tight container. Adding granola to the container before it has completely cooled will add moisture and soften the granola. *Note that you can use 4 cups of rolled oats and omit rolled barley and rye which may be more difficult to find. Hemp hearts and sesame seeds can also be used interchangeably, just keep the total amount the same (~2/3 cup). 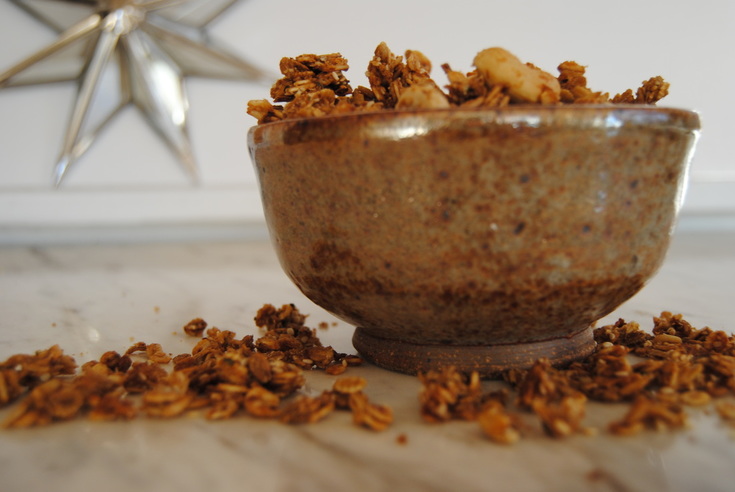 After a snack of this granola we hope you are satisfied, energized, and hormonally balanced. And even if you're not in it for maca's magical qualities, this granola is just plain delicious! So savory, sweet, crunchy, and with a full maca flavor that can't quite be explained - so you'll just have to try it. Enjoy the magic, Jess and Cecelia 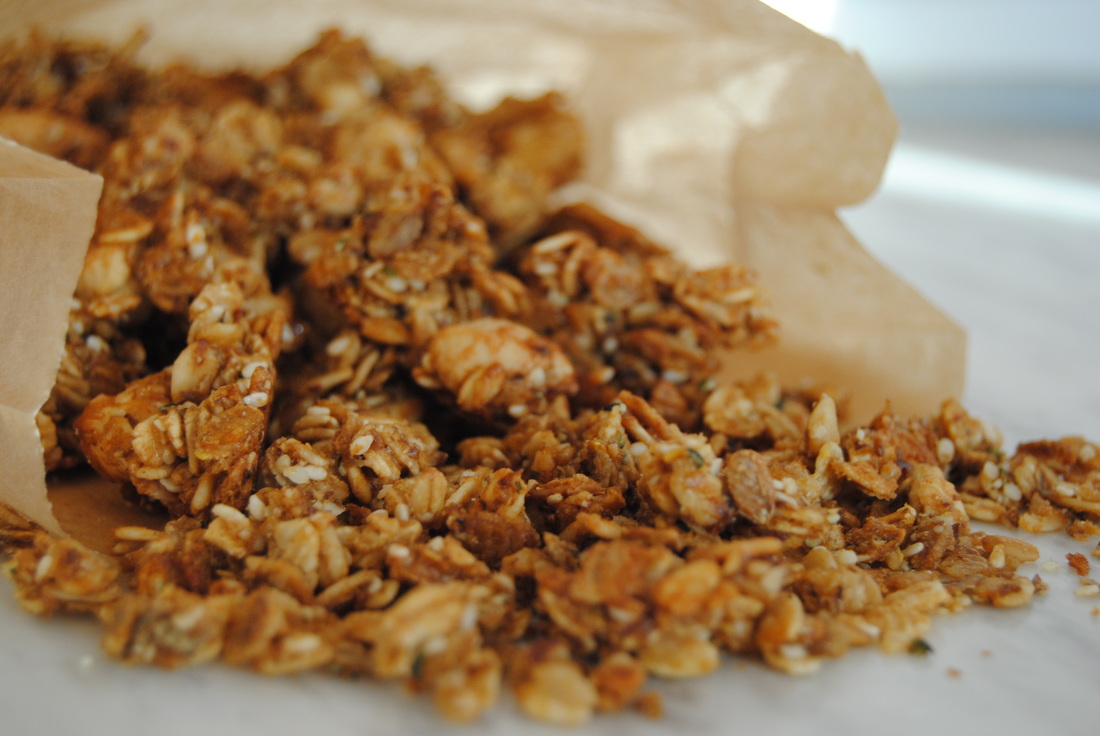 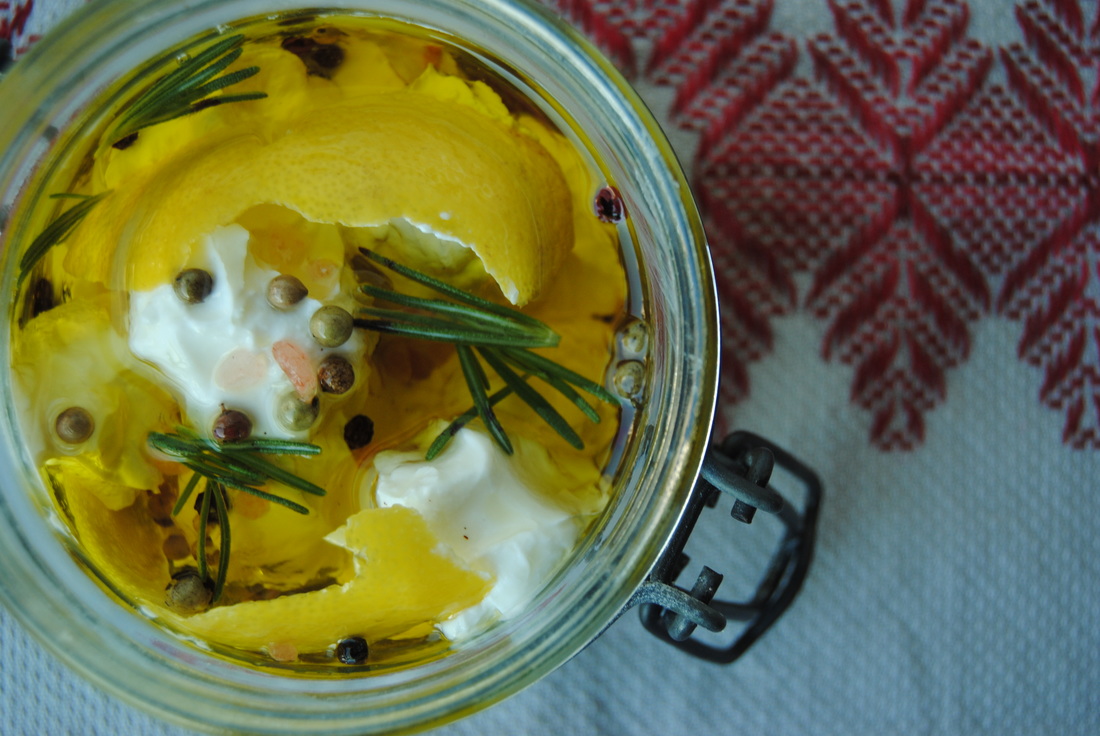 It's that season friends! We are well underway with holiday parties and gatherings with friends and family. And here at TGBK we know what all of these events will have in common, plenty of food! Now of course, not all of this food will align with the way you may try to eat throughout the rest of the year and that's okay. But we're here to remind you that treats and festive foods can still fit your whole foods based and nutrient packed lifestyle. With the right recipes, you can be the one impressing your friends and family with healthy foods that are still delicious and craving worthy! We think that this recipe fits the bill; festive, delicious and still on the lighter side compared to what else you mind find at holiday gatherings. 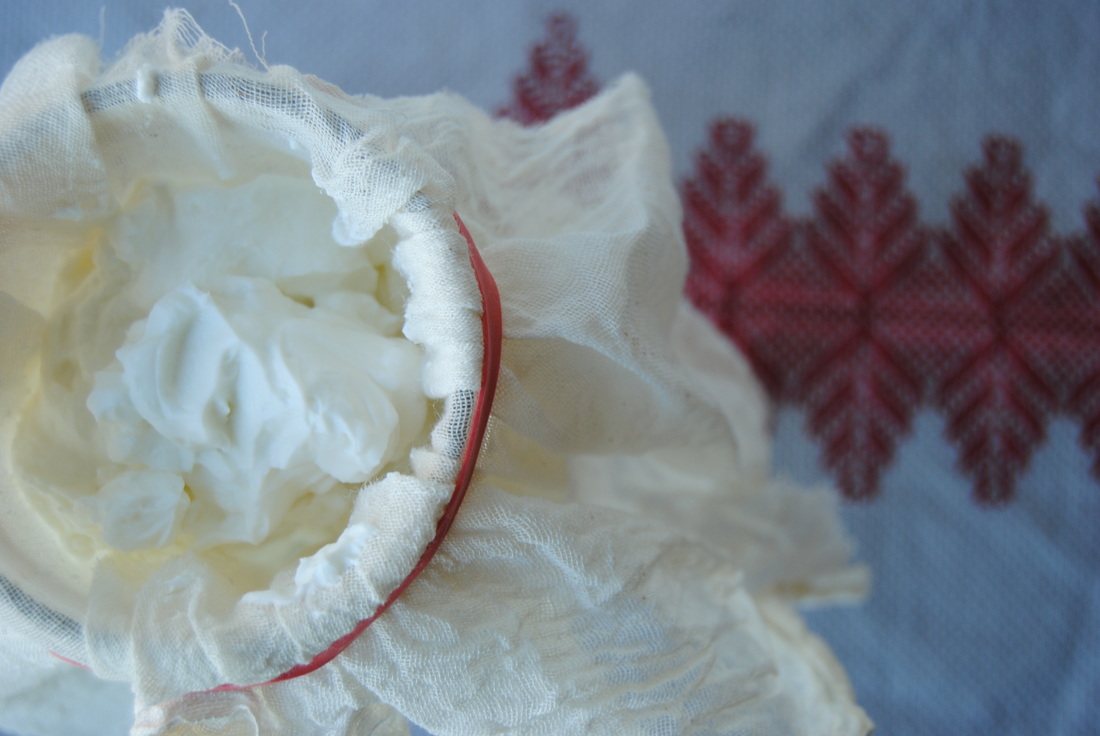 This recipe features skyr which is an Icelandic cultured dairy product (basically a type of yogurt). Even though this term may be new to you, skyr has been around more than 1,100 years! Skyr is traditionally made with raw milk, however, brands found in grocery stores are made with pasteurized milk. Similar to Greek yogurt, skyr is strained which condenses the nutritional value and means more protein in the final product. Skyr has a mild, tangy taste and a thick, creamy texture. Being a fermented food, skyr of course provides a generous serving of those wonderful probiotics that we just can't get enough of. Skyr is nutritionally similar to Greek yogurt but superior to regular yogurt because of the high protein content and large amount of probiotics contained in many brands. Siggis is a brand we absolutely love and can be found readily at many grocery stores. For this recipe, we used strained, fat-free skyr in lieu of cheese for this marinated spread. This substitution maximizes protein and probiotic content while decreasing fat content, which can be a welcomed change at many holiday buffets! Salt Brined Icelandic Yogurt Balls PREP TIME: 5 mins (additional 24 hrs to strain yogurt) TOTAL TIME: 10 mins (additional 24 hrs to strain yogurt + 2 hrs to marinate prior to serving) Servings: 4-6 Ingredients 12 oz fat free, plain Icelandic yogurt or Greek yogurt ~1/2 tsp pink Himalayan sea salt 1 tsp rainbow peppercorns (whole) 2, 2" organic lemon rinds ~1/3 cup extra virgin olive oil Thin, crispy cracker of your choice* (we like Raincoast Crisps brand sold at Whole Foods) Garnish with green herb of your choice (we chose rosemary) Additional items needed 10"x10" cheese cloth Large jar at least 10" tall Rubber band Mix 1/4 tsp ground sea salt into yogurt. Place cheese cloth over the opening of a large jar allowing the cloth to sag a little into the jar. Place rubber band around the top of the jar to tightly hold cloth in place (pictured above). Add salted yogurt to the cloth and allow mixture to strain for ~24 hrs in the fridge. Within a few hours you will notice a cloudy liquid at the bottom of the jar, this is the whey straining off. You want as much liquid to strain off as possible, making a very thick spreadable "cheese like" texture. After 24 hours the yogurt should be ready to shape into balls. Using the palm of your hand, carefully form the strained yogurt into small balls. The less you handle the yogurt balls the better, avoid rolling between your palms. Instead, form into shape with fingertips. If yogurt is very difficult to work with, try placing in the freezer for five minutes .Place formed balls into a serving jar/bowl. Repeat until all the yogurt has been used. Add lemon rind, peppercorns, 1/4 tsp whole sea salt and herb of choice to the jar. Pour enough olive oil over the top until the yogurt balls are fully submerged. Allow yogurt balls to marinate in olive oil mixture for a few hours in the refrigerator. Serve with a thin and crispy cracker. *Look for a cracker made with whole wheat flour and sunflower or olive oil 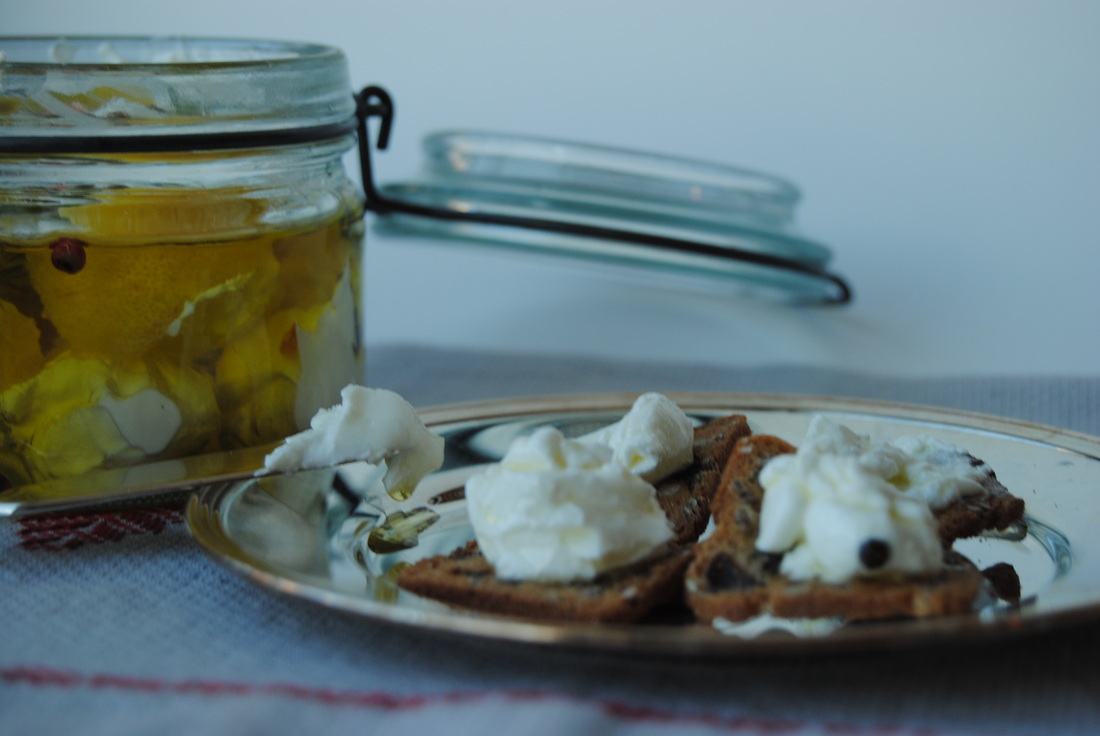 So who's impressed? This spread is so rich, so creamy, and so packed with flavor, that you won't even miss those extra fat calories you left behind with this amazing substitute! Whip this up for any holiday gathering this year and you're sure to be the talk of the party. Just remember to strain your yogurt (skyr) 1-2 days ahead and you'll be ready to shine! Stay festive (and lite!), Jess and Cecelia 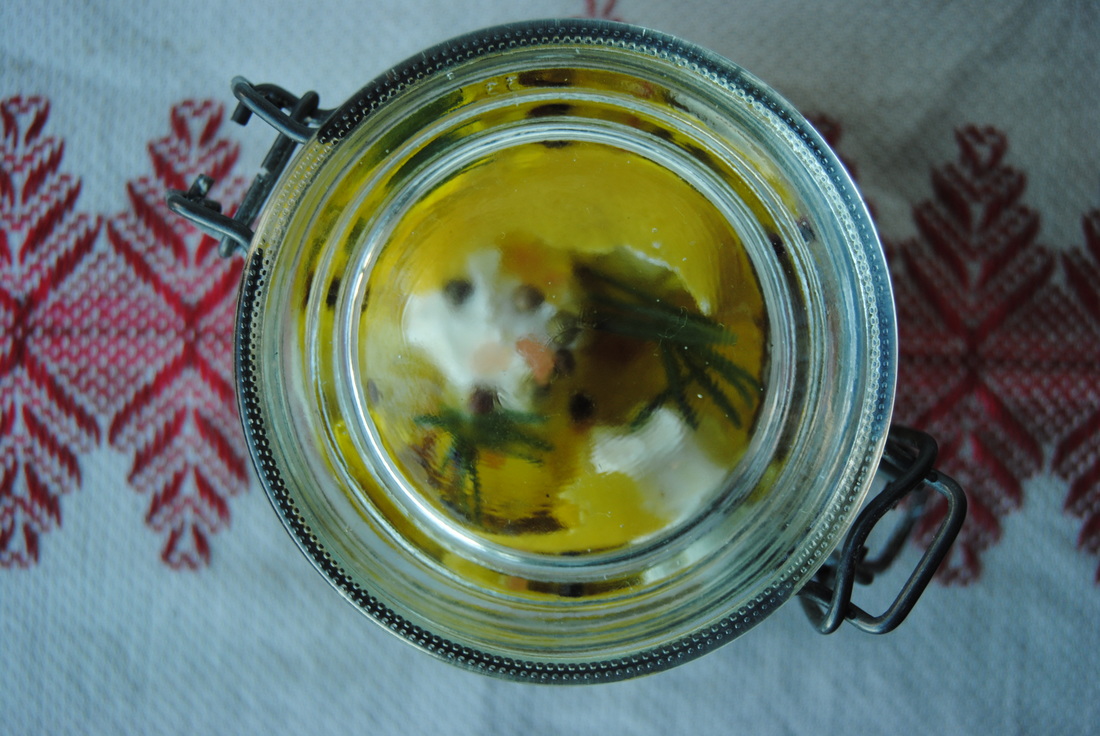  An all time favorite snack food of ours has got to be a big bowl of homemade popcorn. It just fits all the requirements for a good snack; crunchy, salty, savory, finger food, and so much more! A huge reason we love homemade popcorn as a snack food is that it can be flavored in so many different ways, because let's face it, plain popcorn just doesn't satisfy our snacky cravings. So first let's find out why homemade, stove-top popcorn is the ONLY option before we get to our must have recipe. 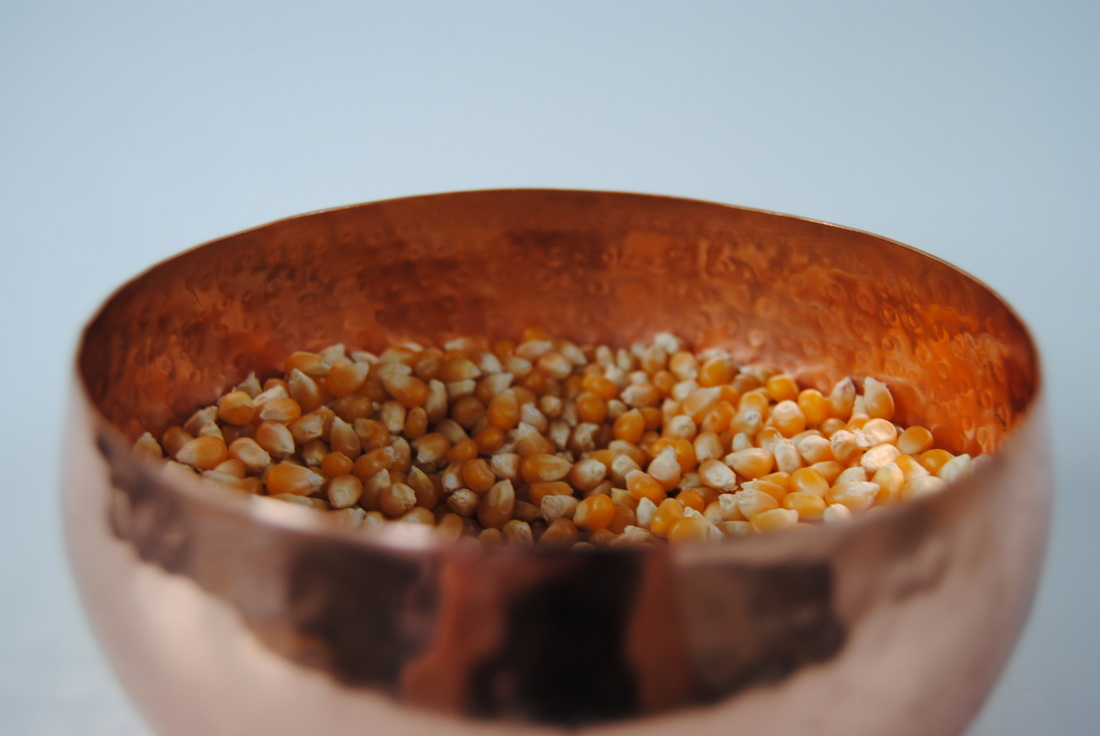 During the age of convenience foods, microwave popcorn became a huge hit. Being that it is fast, easy, and cheap we can definitely see why. BUT since learning more about potential carcinogens in foods we think that microwave popcorn has really lost all of it's appeal. Microwave popcorn is definitely a no-go for us because a majority of popcorn brands in the grocery store contain terribly unhealthy ingredients. Lets start with the bag itself; most microwave popcorn bags are coated with a layer of perfluorooctanoic acid (PFOA) which the Environmental Protection Agency (EPA) has labeled as a carcinogen (gross!). On many microwave popcorn ingredient lists you will find partially hydrogenated oil, pro-inflammatory genetically modified oils, artificial flavoring, and tertiary butylhydroquinone (TBHQ), a food preservative made from butane which is a toxic gas (double gross!). But don't worry! When made at home from whole corn kernels popcorn can be a healthy snack. Popcorn is considered a whole grain and good source of fiber with 3 grams of fiber per 3 cup serving. If air popped and lightly sprinkled with salt, popcorn can be a low calorie snack food. But since we focus more on quality than quantity (of portion sizes or calories) we went for a stove-top, savory flavored version. This recipe will quickly become a crowd favorite so let's get popping! 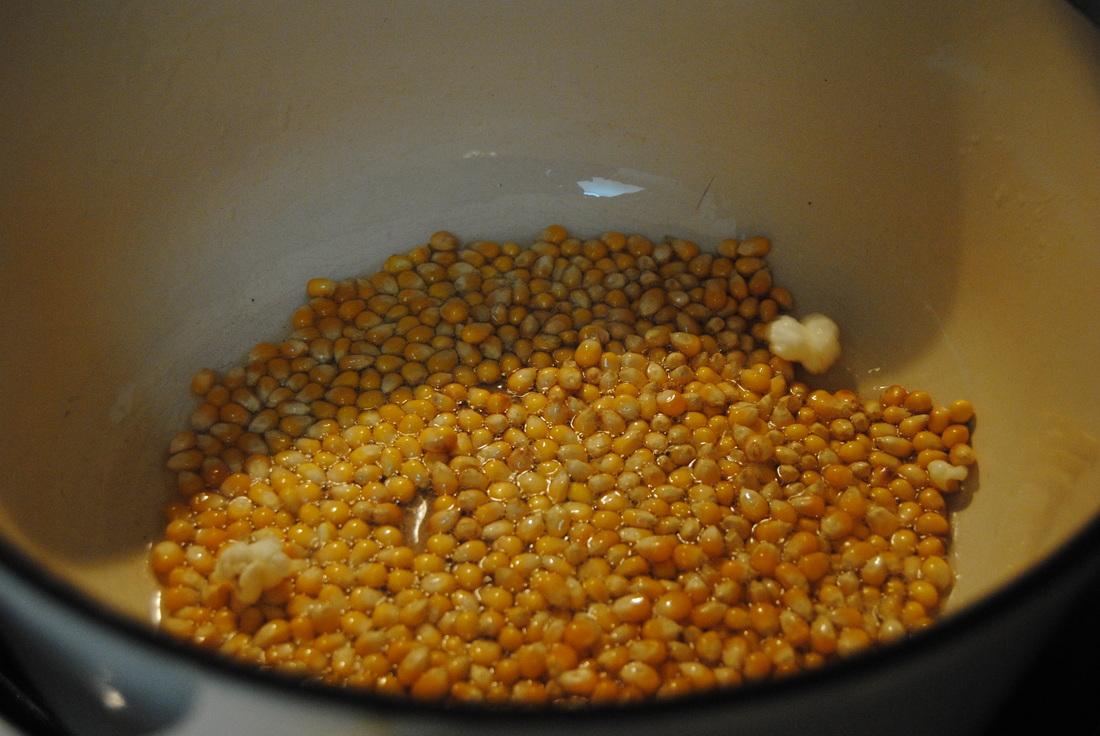 Savory Miso Popcorn PREP TIME: 5 mins TOTAL TIME: 10 mins Servings: 12 Cups Ingredients Popcorn 3 oz organic popcorn kernels (about 1/2 cup) 3 Tbsp grass fed ghee 1/2 tsp sea salt Miso Topping 1 Tbsp raw miso paste (we used chickpea, brand featured here) 2 Tbsp extra virgin olive oil In a small bowl mix miso with olive oil until combined then set aside. In a dutch oven or deep cast iron skillet add 3 Tbsp ghee and sea salt. Turn stove top on to medium-high heat and allow ghee to melt. Add one popcorn kernel to melted oil and wait a few minutes until the kernel pops (this is how you know the oil is ready). Add 3 oz of kernels to the pan and cover with a lid. Bring the temperature down to a medium heat. While wearing oven mits, gently shake the pan back and forth to allow kernels to evenly pop. Continue doing this until you no longer hear popping. You may also lift the lid to take a peak, just be careful! While the popcorn is still hot, pour miso olive oil mixture over the top and stir to combine. We found that using your hands to gently massage the miso mixture into the popcorn worked well. Pour prepared popcorn into a large bowl and start snacking!  Well, how good was that? The miso topping really takes this popcorn to a new level adding a whole other layer of flavor and savoriness that only fermented foods like miso can provide. This popcorn really will be hard to stop eating so we suggest sharing with a friend (or many!) and pairing with a favorite movie. Happy Popping, Jess and Cecelia  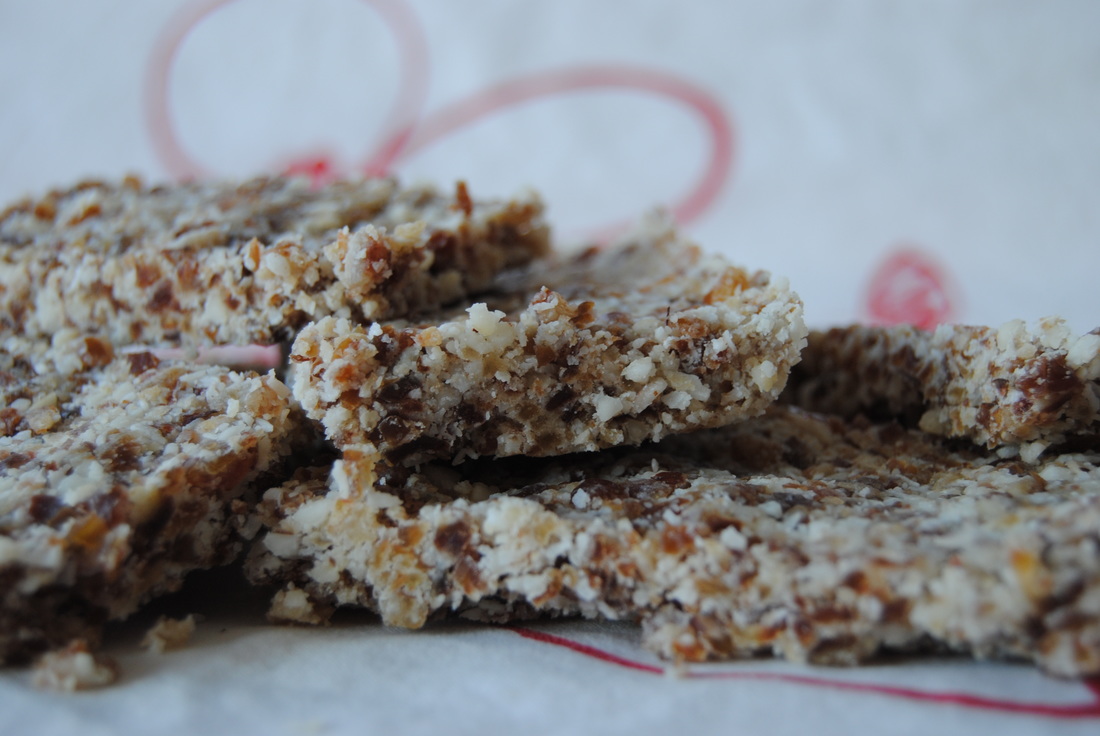 Oh the coconut - an amazing plant with so many culinary uses in so many different forms: coconut sugar, coconut oil, coconut water, coconut milk, coconut meat, coconut flakes, and the list just goes on and on. We just can't pick our favorite but we don't have to! All we have to do is decide which form we want to use in our recipes. For this delectable bar we chose coconut butter or manna that we made right in our kitchen. So let's find out more... 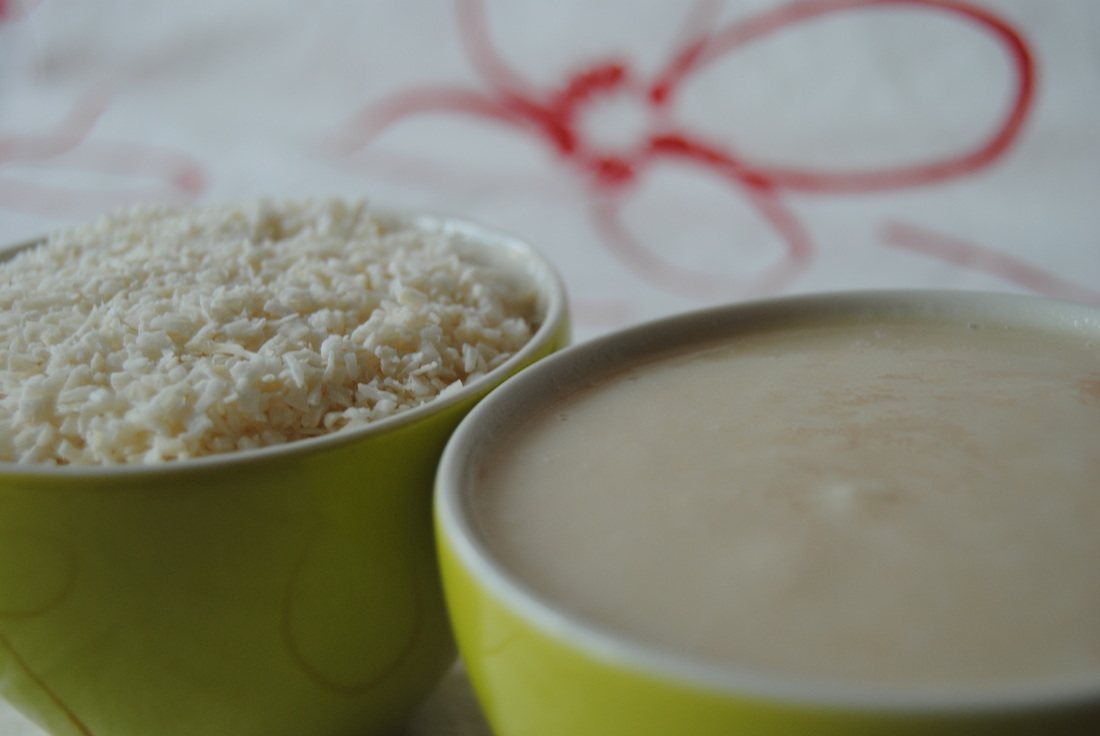 Surely you're wondering what coconut manna is, well it's a fancy name for coconut butter. Coconut manna is coconut meat blended into a smooth "butter". You may be more familiar with coconut oil which is purely fat extracted form coconut meat, whereas, coconut butter is the whole coconut meat which contains about 65% fat but also other key nutrients including fiber. When purchasing coconut manna (most likely labeled as coconut butter), always look for a raw product processed at a delicate temperature of 115 degrees or less to allow the vital nutrients to be preserved. One product that meets our high coconut standards can be checked out here. But if you have a good quality, high speed blender such as a Vitamix or Blendtec you can make your own coconut manna right in your kitchen. There is only one ingredient, coconut meat! We blended raw, unsweetened coconut flakes on high for several minutes and wallah! A creamy, coconut spread worthy of your favorite toast or recipe- just replace for standard butter one to one. Now on to those bars. 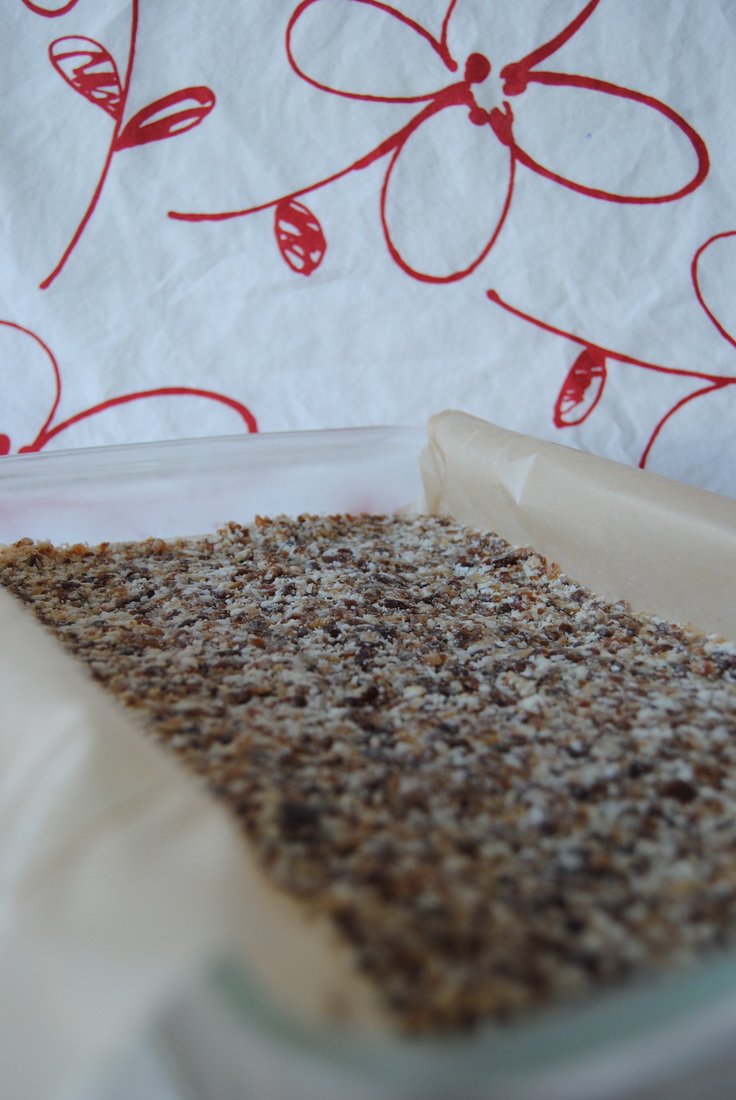 Coco Loco Bars PREP TIME: 5 mins TOTAL TIME: 45 mins (includes 30 mins in the fridge) Servings: 12 bars Ingredients Coconut Butter 7 cups dried, unsweetened coconut flakes Bars 2 1/2 cups pitted dates 1/2 cup dried, unsweetened coconut flakes 1/2 cup raw brazil nuts 3/4 cup coconut butter Sprinkle of sea salt To make the coconut butter, add 7 cups of dried, unsweetened coconut to a good quality, high-speed blender such as a Vitamix or Blendtec and blend on high for 2 to 3 minutes until a smooth butter is formed. Pour butter into a glass jar and store at room temperature. Please note, the butter will harden as it sits on the counter. If you want pour-able butter you will need to heat it prior to using. To make the bars, start by lining a 9 x 12 inch pan with parchment or wax paper. Combine the dates, dried coconut, brazil nuts, coconut butter, and sea salt to a food processor and pulse until a crumbly mixture is formed. Try forming the mixture into a ball and it should hold together. If you notice that the mixture is too crumbly and does not hot it's shape, add one or two more dates to the food processor and pulse again until the mixture will hold together. Pour mixture into prepared pan and spread evenly. Using a piece of wax paper, evenly press the mixture down forming one giant coconut bar. Allow to firm up in the fridge for 30 minutes. Once chilled cut into 12 bars. Wrap each in wax or parchment paper for a quick on the go snack. Store bars in the fridge. Bars can be eaten cold or at room temperature. 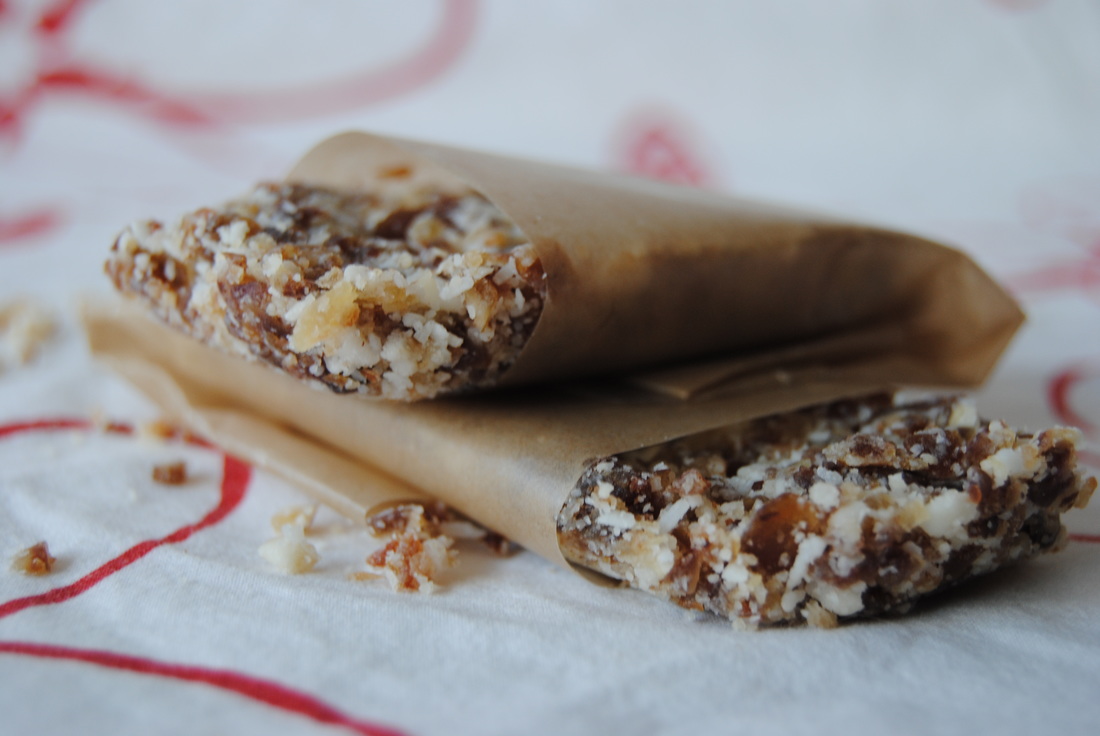 This bar is so full of coconut flavor and such a perfect use for coconut manna. The coconut fats makes this a satisfying snack or mini-meal that will keep you happy until your next food break. Heart, Jess & Cecelia 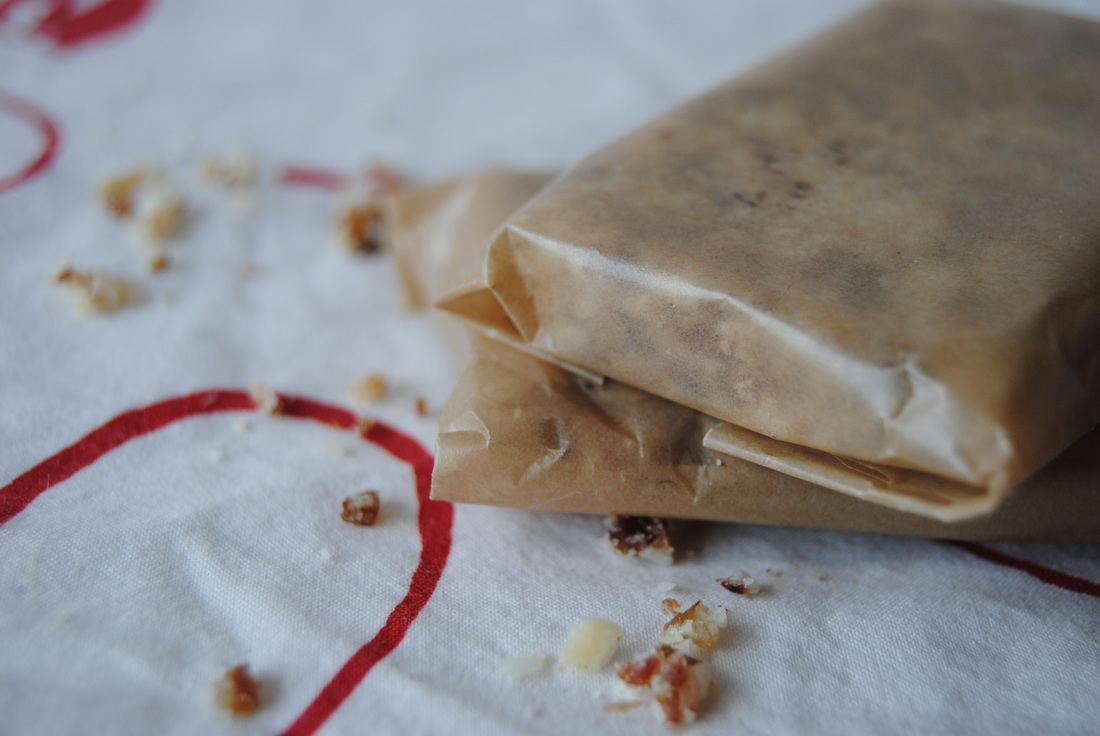 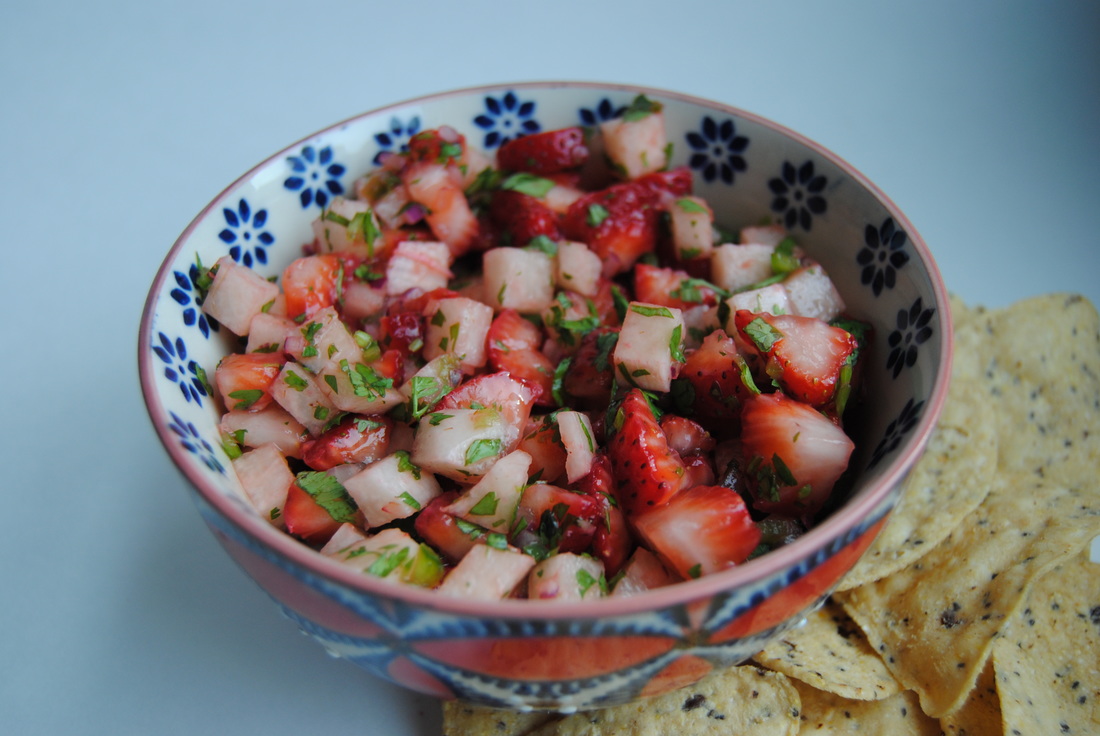 To add to the list of the many things we love about summer - we love fresh, local produce! In locations with four seasons, like Chicago, summer is the best time to find local produce. We love how you can track the time passing with which fruit or vegetable is at the farmers market each week. Speaking of farmers markets we hope you've checked out your local market by now and if not it's time to get there! Berries have been ripe for the picking and that's why we chose a strawberry salsa recipe this week. The reasons we are so excited about local produce are many - the most pronounced being the taste. Local produce is picked when it's the ripest and available for purchase soon after. Unlike during colder months when fruits and vegetables are picked early and then travel hundreds of miles to the local store. You can imagine that this process is not optimal for taste but also affects nutrient quality. Produce that is picked prior to optimal ripeness and likely weeks prior to consumption are more likely to loose valuable nutrients during this time. And if you're being good about eating your fruits and vegetables you should be getting the most benefit possible! For strawberries we recommend looking for organic because strawberries are known to contain high levels of pesticide residue when produced conventionally. The other produce we are using for this salsa, jicama, you likely won't find local as it is native to Central America. We like the uniqueness of this root vegetable - it has a very mild taste and crunchy texture. You may have never noticed it in stores but we find it easily available at local grocery stores. If you can't find it, or want to be 100% local, cucumber would be a great substitute for this recipe. Finally, a hint about our chips. We enjoyed this salsa with tortilla chips from Late July Organic Snacks. Unlike other commercial chip brands that contain GMO corn and unfavorable oil such as canola and soybean, Late July products are organic, non-GMO, and often contain some of our favorite ingredients such as chia seeds, flax seeds and quinoa. 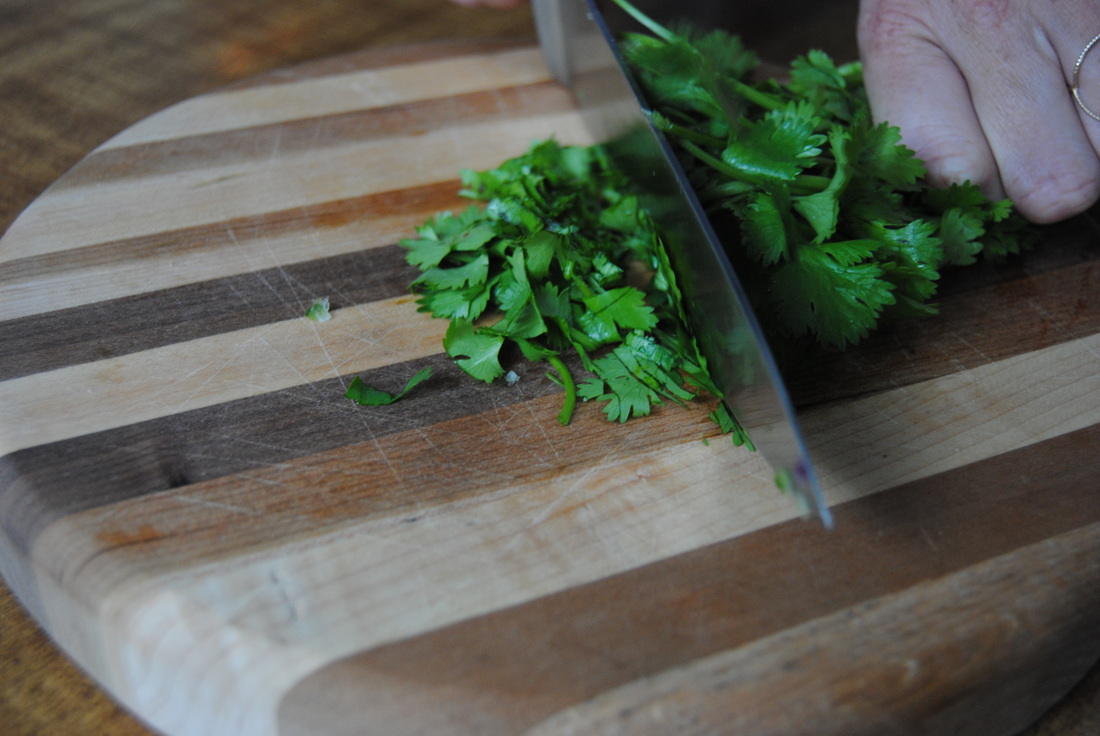 Strawberry Patch Salsa PREP TIME: 15 mins TOTAL TIME: 20 mins Yield: ~4 cups salsa Ingredients 1 pint organic strawberries, chopped 1/2 cup jicama, chopped 1/2 cup cilantro, chopped 2 Tbsp red onion, finely chopped 1 large clove garlic, minced 1 Tbsp jalapeño, finely chopped Juice of 1/2 lime 1/4 tsp salt Wash and rinse strawberries and jicama. Evenly chop strawberries and jicama and place in a mixing bowl. Finely chop red onion, garlic, and jalapeño and combine with strawberries and jicama. After rinsing cilantro, fold a large handful of stems in half and chop starting from the top (as pictured above) - you will chop both leaves and some stem but this is much easier that removing the leaves one by one. Add the juice of 1/2 lime and sea salt. Stir to combine. We thought the flavor of this salsa was perfect after we let it sit for about 15-20 minutes. Dip your favorite chip or use any way that you would standard salsa. 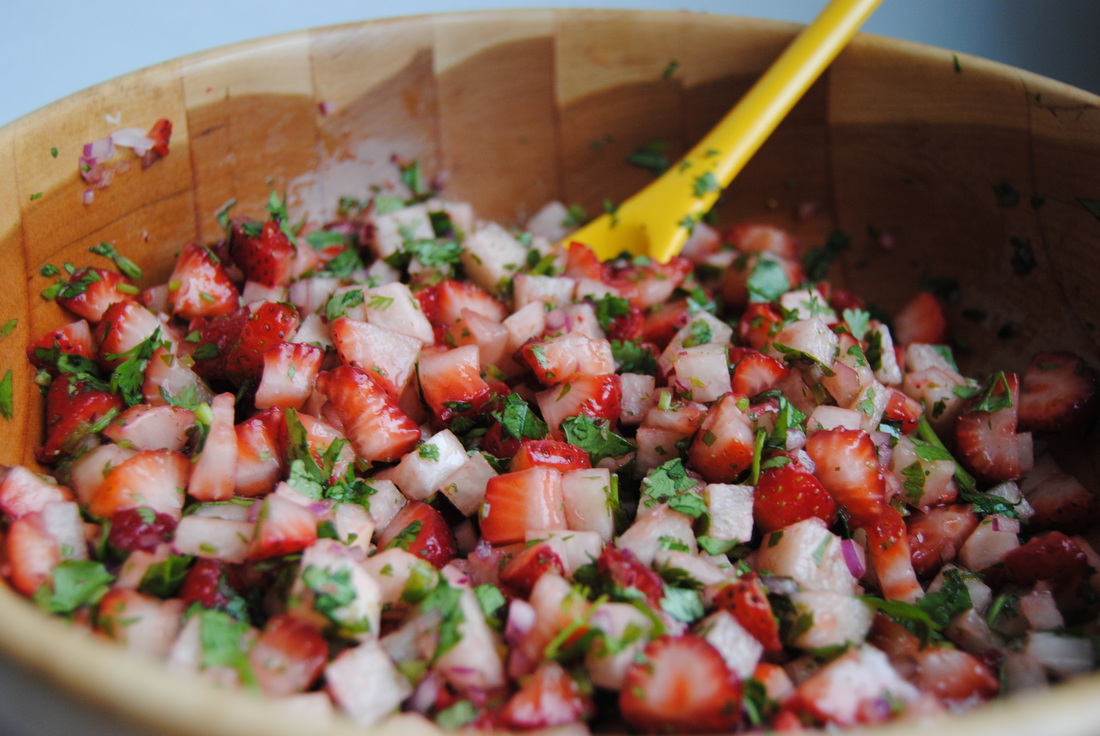 We recommend this salsa during strawberry season so get on this one quick! The weeks fly by quick during the summer and the next time you hit the market something else will probably be in season. Get creative this season buy whichever produce looks the best and have fun creating your own seasonal recipes. Stay local, Jess and Cecelia 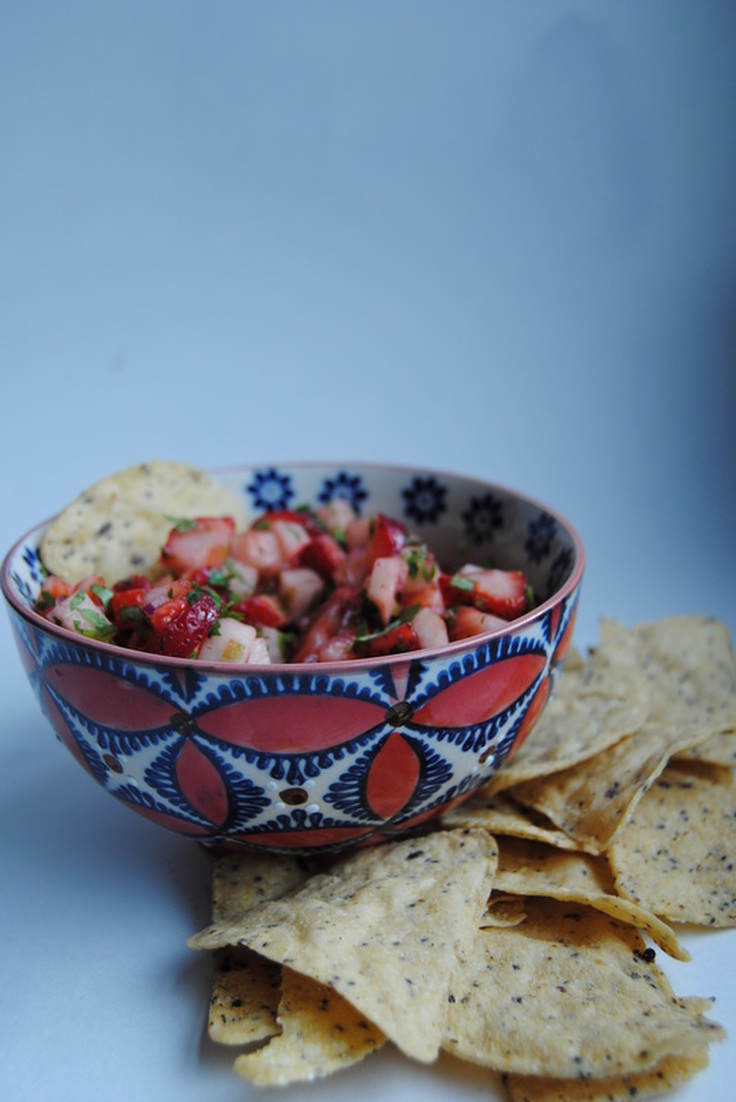 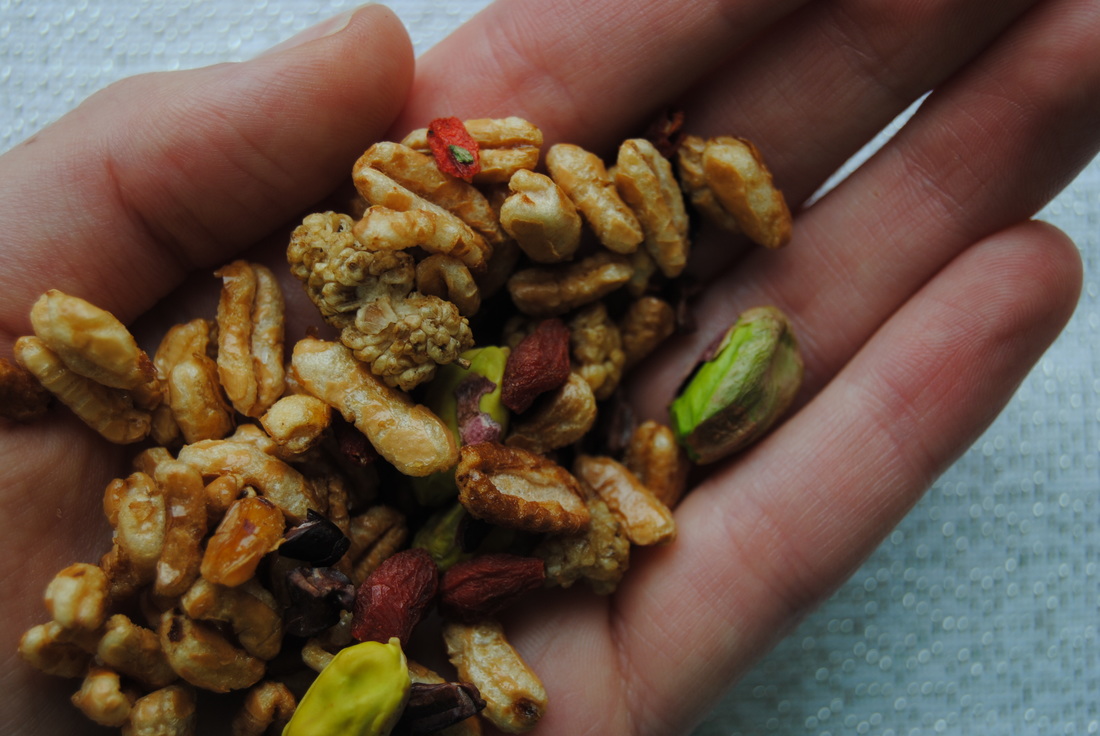 Here at TGBK we love a lot of foods but we have to say that one holds a special place in our hearts, yes you guessed it, chocolate. Now if you're into chocolate as much as we are and don't want to feel guilty about an everyday chocolate fix then this post is for you! And we're here to remind you that certain forms of chocolate are actually superfoods and a great addition to your diet. Now don't get crazy, we aren't suggesting you head down the nearest candy aisle- we are referring to cacao and raw chocolate recipes. Confused? Read on! 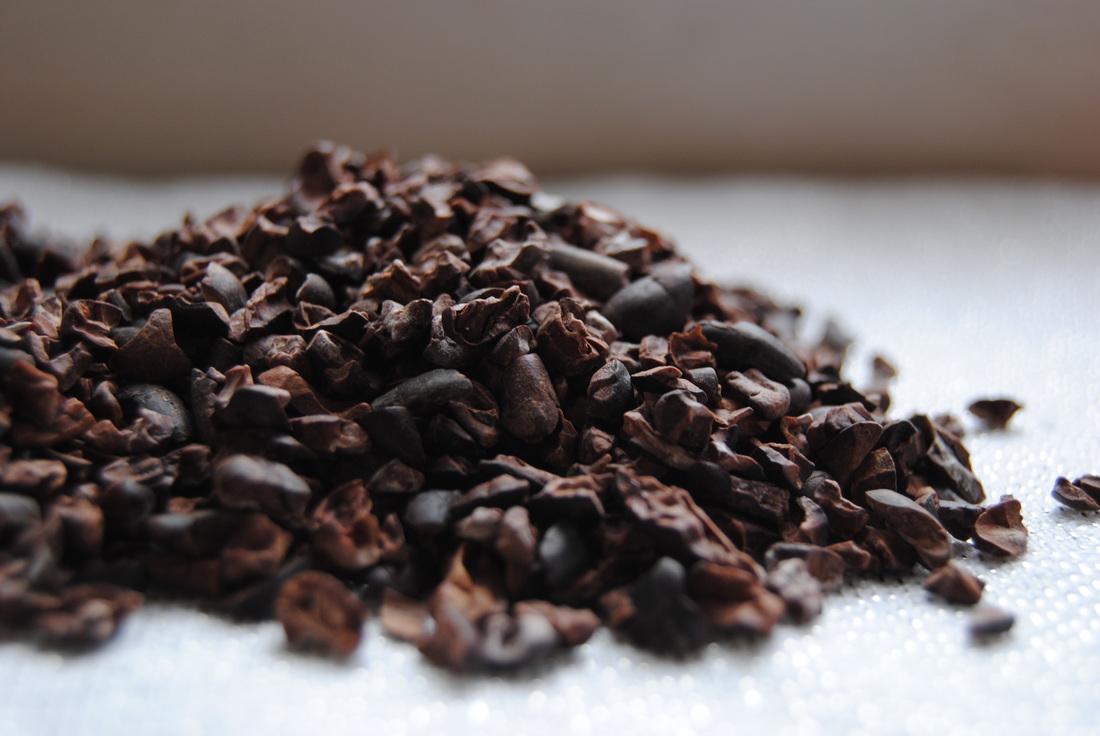 So the wonderful (and to us, holy) cacao bean is what provides the world with chocolate (hallelujah!). Cacao beans are seeds found in the fruit pods of the cacao tree which are harvested and fermented and then processed into the various chocolate products we know and love. However, this processing is what can make all the difference in final product and nutritional benefit. Many beans go through a roasting process to dry the beans and develop flavor and aroma, but this high temperature treatment can destroy the antioxidants that cacao contains which make it a superfood in the first place (refresher about superfoods here). Raw cacao products are alternatively dried at low temperatures to preserve these beneficial nutrients. The low temperature dried cacao beans can then be made into cacao nibs, cacao powder or cacao butter, all raw, antioxidant packed products that we love! This recipe features raw cacao nibs which are essentially crumbled cacao beans. They have a bold chocolate flavor that may be more tangy and bitter than you would initially expect, but remember this is 100% pure cacao with no added sugar or other ingredients. This recipe features not only cacao as a superfood but also mulberry and goji berry which have their own super qualities. Our favorite supplier of these super foods is Navitas Naturals - their website can provide you more superfood information and ways to find their products. You will notice that these products may be pricey but remember that you are paying for a high quality product. If you are budgeting look for these items in bulk bins at local co-op or specialty markets or search for bulk deals online. Once you get your raw cacao get going on this recipe! 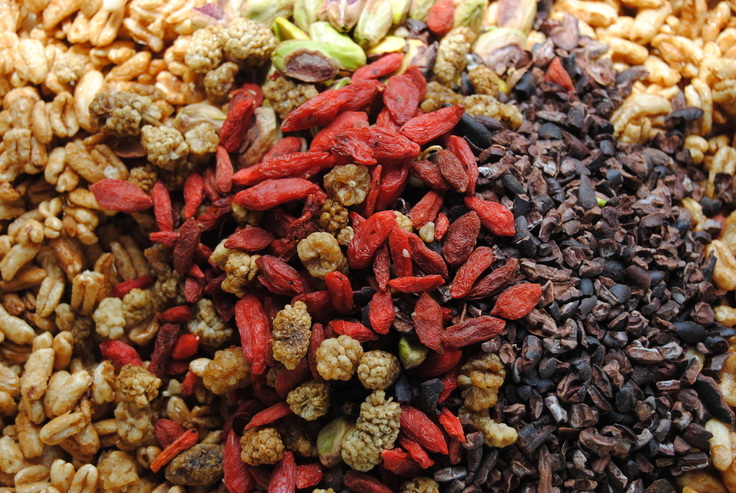 Holy Cacao Superfood Power Mix PREP TIME: 5 mins TOTAL TIME: 15 mins Servings: 7.5 cups Ingredients Toasted Cereal 6 cups unsweetened puffed kamut or puffed wheat 1/3 cup pure maple syrup 1 Tbsp coconut oil, melted 1/8 tsp sea salt Superfood Power Mix 6 cups unsweetened puffed kamut 1/2 cup raw cacao nibs 1/4 cup raw goji berries 1/4 cup raw mulberries 1/2 cup raw pistachios 1/4 tsp sea salt Preheat oven to 350 degrees. Line a large baking sheet with parchment paper and set aside. Measure out 6 cups of puffed kamut and place into a large bowl. Combine 1/3 cup pure maple syrup, 1 Tbsp melted coconut oil, and 1/8 tsp sea salt in a small bowl, stir to combine. Pour liquid mixture over puffed kamut and stir until evenly coated. Spread mixture onto parchment lined baking sheet and toast in the oven for 10 minutes. Remove from oven and allow to cool. Combine all ingredients (cooled kamut, cacao nibs, goji berries, mulberries, pistachios, and sea salt) in a large bowl. Portion out into individual 1/2 cup servings if desired. Store mix in air tight containers, we prefer a small jar we can throw in our purse or backpack for an on-the-go healthy snack! 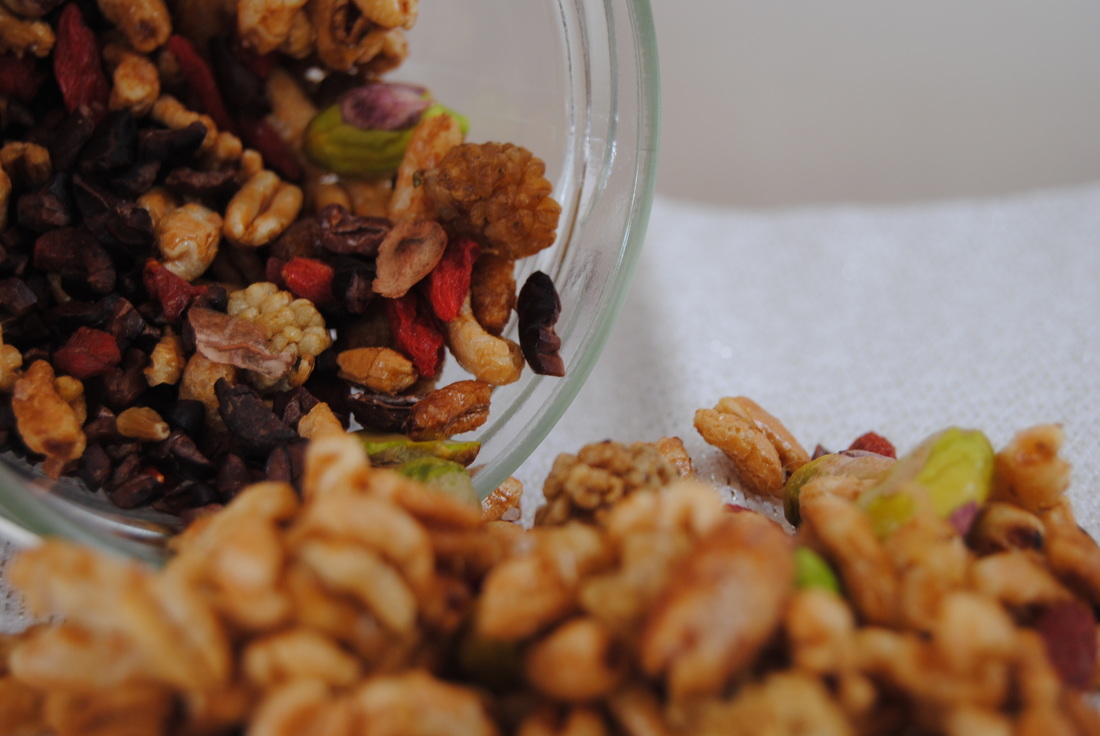 Have your prayers been answered with this power mix? We sure hope so! We love the toasty, sweet cereal mixed with the bold cacao nibs and chewy, slightly sour berries. You can feel good snacking on this anytime of the day or even as a delicious superfood cereal with homemade almond milk. Hey, we could all use a little more raw chocolate in our lives. Have a rawesome week! Jess and Cecelia 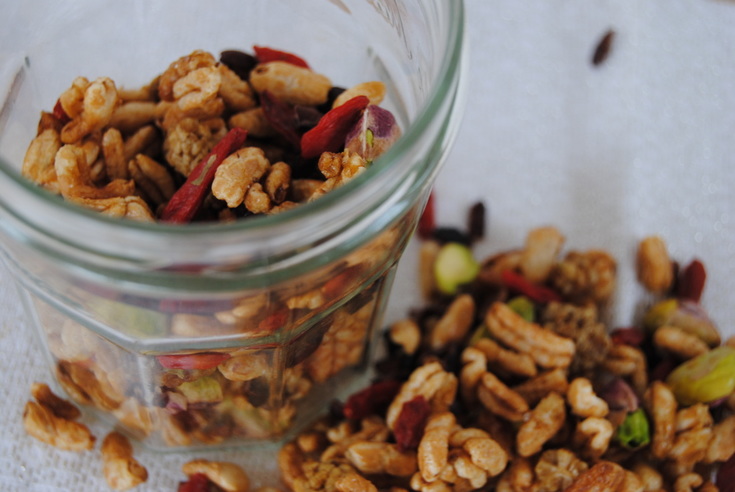  Welcome back, we've missed you! Though we have been quite busy enjoying the wedding bliss. To keep the festivities going we decided to give you a sneak peak into Cecelia's wedding last week and a recipe for our favorite food item from the night. Pictured above is the beautiful venue in upstate New York that we relaxed at last weekend in perfect weather. When discussing the days events afterwards we, not surprisingly, both enjoyed the raspberry brie crostini appetizer the best though there were plenty of food options (vegetarian friendly and otherwise). The wedding was catered by Davino Catering who did a fabulous job so a huge thank you to them for the inspiration for this recipe.  Since this recipe features raspberry spread lets start by discussing the difference between jelly, jam, and preserves; I mean are they really different? Well jelly is a fruit spread made from cooked down fruit juice. It is clear with a smooth texture. Jam is also a fruit spread but it is made from crushed fresh fruit, sugar, and added pectin- a naturally occurring soluble fiber in plants that can be used as a thickening agent. Jams usually do contain seeds, especially berry jams. Preserves is yet another fruit spread made from whole fresh fruit with added sugar. Preserves are created by cooking down fresh fruit until it becomes very soft and the mixture begins to thicken without the need for added pectin, however some companies do still add pectin to their preserves. Preserves usually contain large chunks of fruit and are not smooth in texture. Based on these differences, preserves typically contain the most whole fruit and least additives. Though whichever fruit spread you choose look for short ingredients lists and products that don't contain high fructose corn syrup but you already knew that! A brand of jams/jellies that we like is Bonne Maman because of the simple ingredients and variety. Trader Joe's raspberry preserves is also delicious! So grab your favorite spread and lets get to the appetizer that stole the show (well besides the bride of course!)...  Raspberry Brie Toast PREP TIME: 10 mins TOTAL TIME: 15 mins Servings: 4-6 Ingredients 1 baguette* 4 oz triple cream Brie 1/3 cup olive oil 1/4 cup raspberry preserves 1 pint fresh raspberries Rosemary sprigs if desired Turn oven on to broil setting and begin to warm up. Cut baguette on the bias. Place slices on a cookie sheet and lightly brush 1 teaspoon olive oil on both sides of the bread. Place prepared bread in the oven and lightly toast until golden and crispy ~2-3 minutes, flip slices over and do the same to the other side. Remove from the oven and allow to cool. Thinly slice brie into at least 12 slices. Spread 1 teaspoon raspberry preserves onto one side of each slice of bread. Place 1 slice of brie on top of preserves and add 1 fresh raspberry and optional fresh sprig of rosemary to the top. Pop open a bottle of champagne and toast to the newlywed couple! *Look for whole wheat and simple baguette ingredients, ours contained just flour, water, salt and yeast  This appetizer will surely be a crowd favorite at all the parties you're hosting this spring/summer. The sweet jelly, combined with the savory brie and piney tang of rosemary will make you the host/hostess of the season, we swear! Well we hope you enjoyed this sneak peak into the special day we celebrated last weekend and remember this sweet couple every time you enjoy this recipe. Stay sweet, Jess and Cecelia  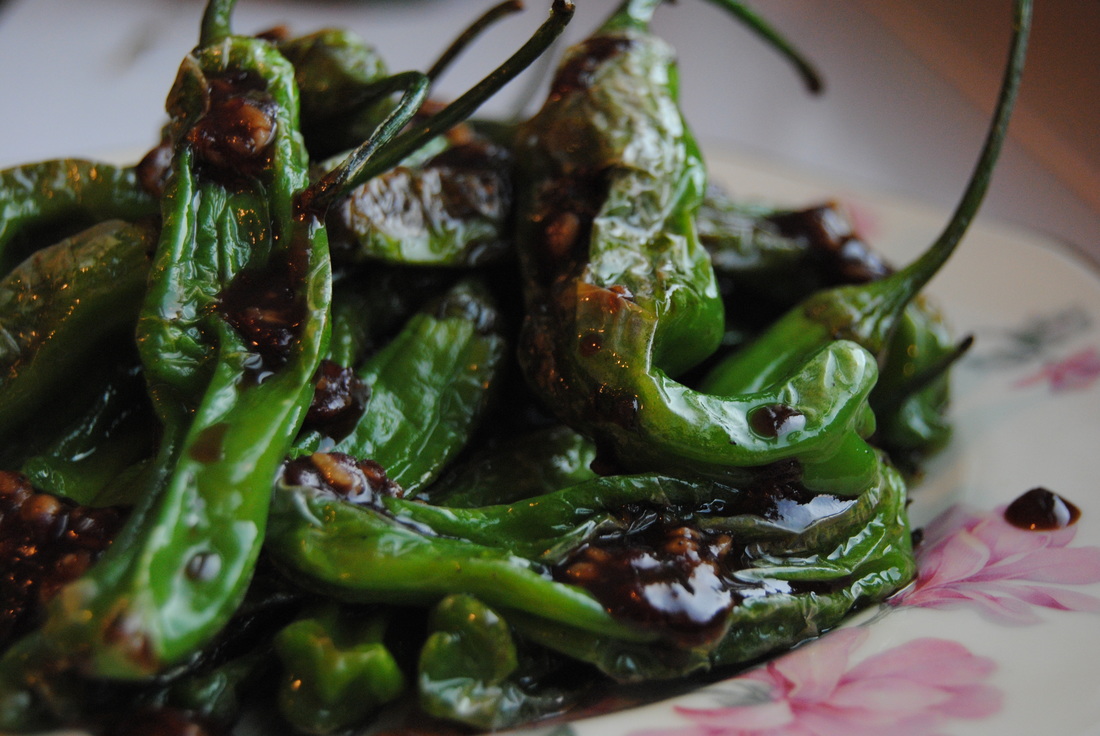 Yes, you read that right, bar food! And we're not talking chicken wings and fries. Though green may not be the most popular color for bar snacks we think it's the best. Our favorite example being these blistered and smothered shishito peppers. Between the slightly spicy and citrus natural flavor of the peppers, richness of the ghee they are cooked in, and the salty sweet tang of the miso and soy sauce, your taste buds won't know what hit them. After this recipe we swear you'll be reaching for vegetables with your next beer. But first let's explain ghee and find out what the heck a shishito is... 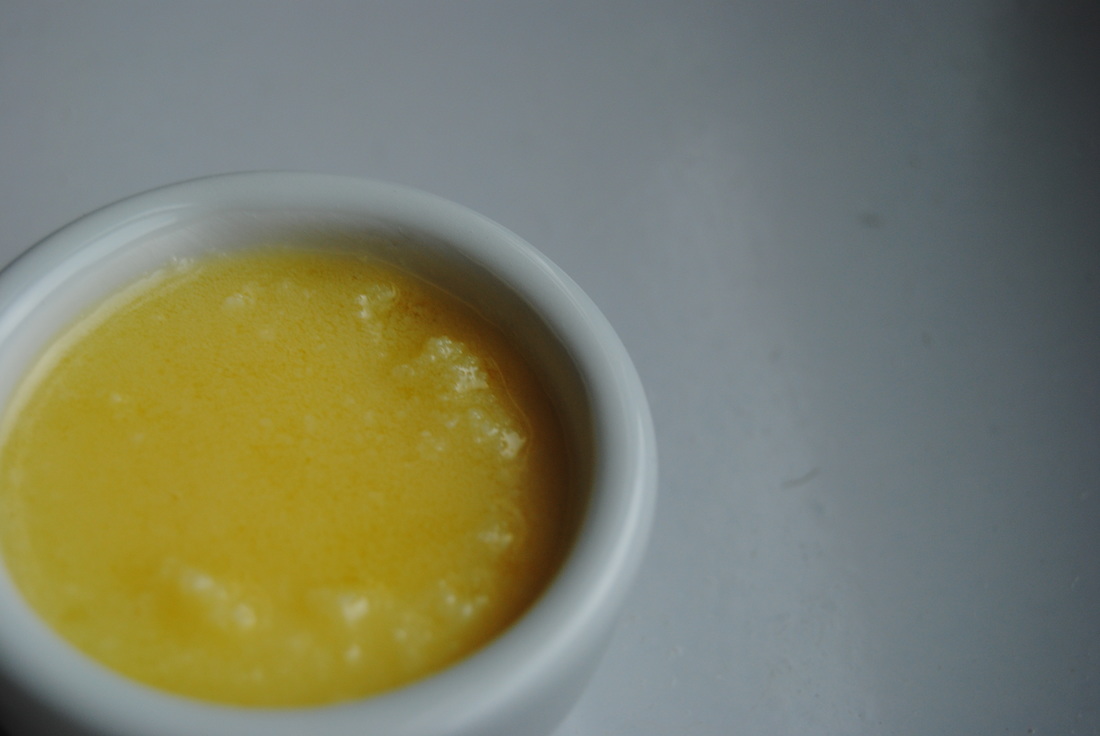 Shishito is a variety of pepper native to Japan and popular as a Japanese appetizer or bar snack. They are small, slender and green with soft skin with little ridges (as you can see pictured below). They have a mild spice and citrus flavor though they do pack a surprise; about one in ten have a spicy heat that may surprise you if you're not expecting it. Shishito peppers are becoming more popular and available so keep an eye out at your local grocer or farmers market this summer. We found ours at Trader Joe's. If you absolutely cannot find them (dang!) other varieties of small peppers can work in the recipe such as mini bell peppers. Now we cooked our shishito peppers in ghee which is a class of clarified butter popular in Indian cooking. Ghee is created by slowly cooking butter over an open flame until the water is evaporated and the fat separates from the milk solids, creating a golden hue (pictured above) and strong buttery flavor. This process removes the milk proteins found in butter, casein and whey. These proteins typically burn at high temperatures, so without them, ghee has a higher smoke point than butter and also olive oil making it superior for cooking at high temperatures. Smoke point is important because it is the temperature at which the fat or oil starts to degrade or breakdown and produce free radicals and chemical compounds This can produce an off taste in the food being cooked, decrease the nutritional quality of the oil, and create substances that are less than ideal for ingesting into your body. On the shelf ghee does not go rancid as quickly as butter and can be kept at room temperature in an air tight container for several months. Ghee is rich in fat soluble vitamin A and also contains vitamin E and K. Also, remember that having a fat source when consuming fat soluble vitamins A, D, E, and K in other foods helps to improve absorption; lucky because like most vegetables shishito peppers contain a small amount of vitamins A and K! You can ghee at specialty grocers, ethnic grocers and possibly in the natural or ethic aisles at your local grocer. We know that all Whole Foods and Trader Joe's carry ghee and/or clarified butter. Sweet and Salty Shishito Bites PREP TIME: 5 mins TOTAL TIME: 15 mins Servings: 1-2, depending on how much you like to share Ingredients 6 oz bag of Shishito peppers (about 30 peppers) 1 Tbsp ghee (organic, grass-fed preferred) or coconut oil Sprinkle of sea salt Dressing 1 Tbsp miso (we used River Valley's adzuki bean miso) 1 Tbsp organic soy sauce 1 1/4 tsp honey Add ghee to a medium wok, turn to high heat and allow ghee to fully melt. Add shishito peppers to pan, sprinkle with sea salt, and cook for 5-7 minutes, stirring peppers until blistered. If your peppers are different sizes and the smaller ones become fully cooked faster, remove them from the wok with tongs while the larger peppers continue to cook. While peppers are cooking, stir together the miso, soy, and honey. Drizzle the dressing over cooked peppers and get snacking using fingers only please! 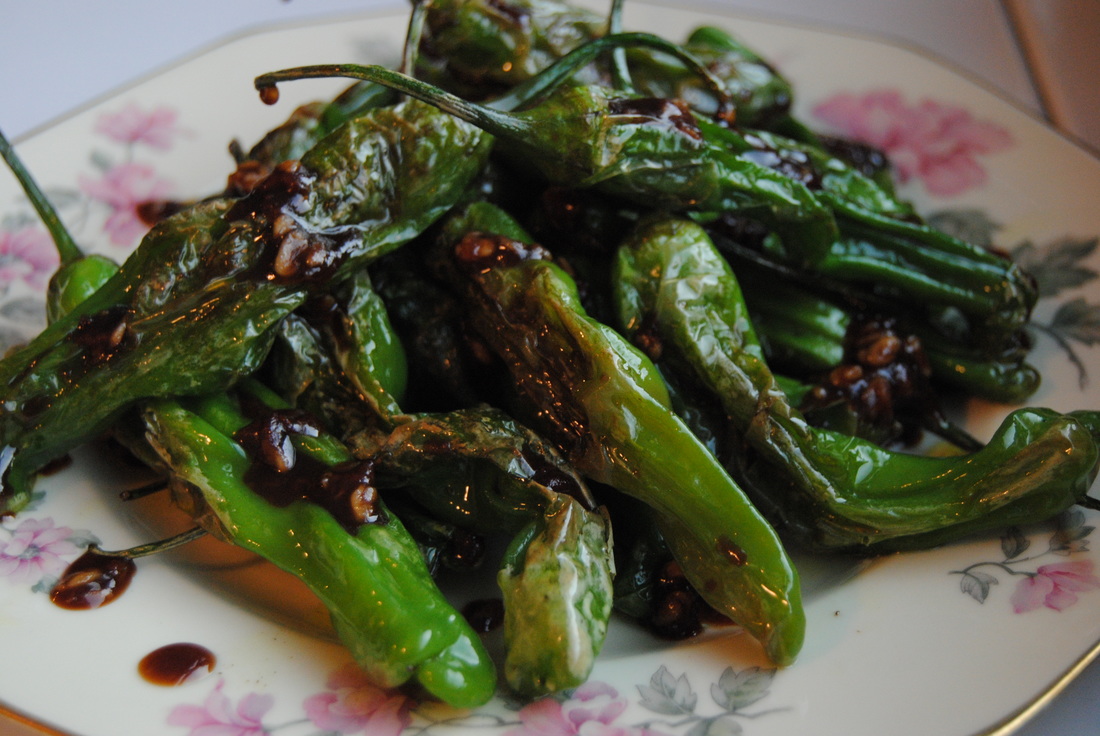 Did you get a hot one? Either way we hope you enjoy this recipe as much as we do. Next time you're perusing a bar menu keep your eye out for these babies (small peppers that is) and think of this recipe as a sure to impress next time you're entertaining. Haven't we all had enough fries? Debatable, but still, it's about time for bar food to go green! Cheers, Jess & Cecelia 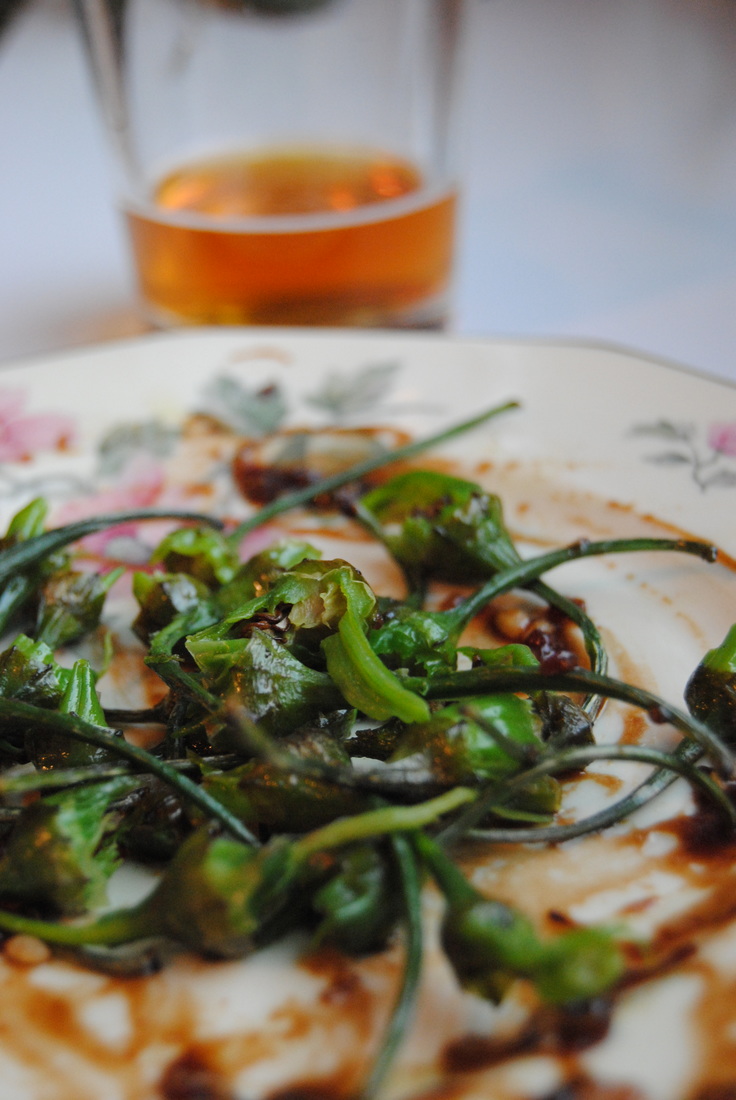 |