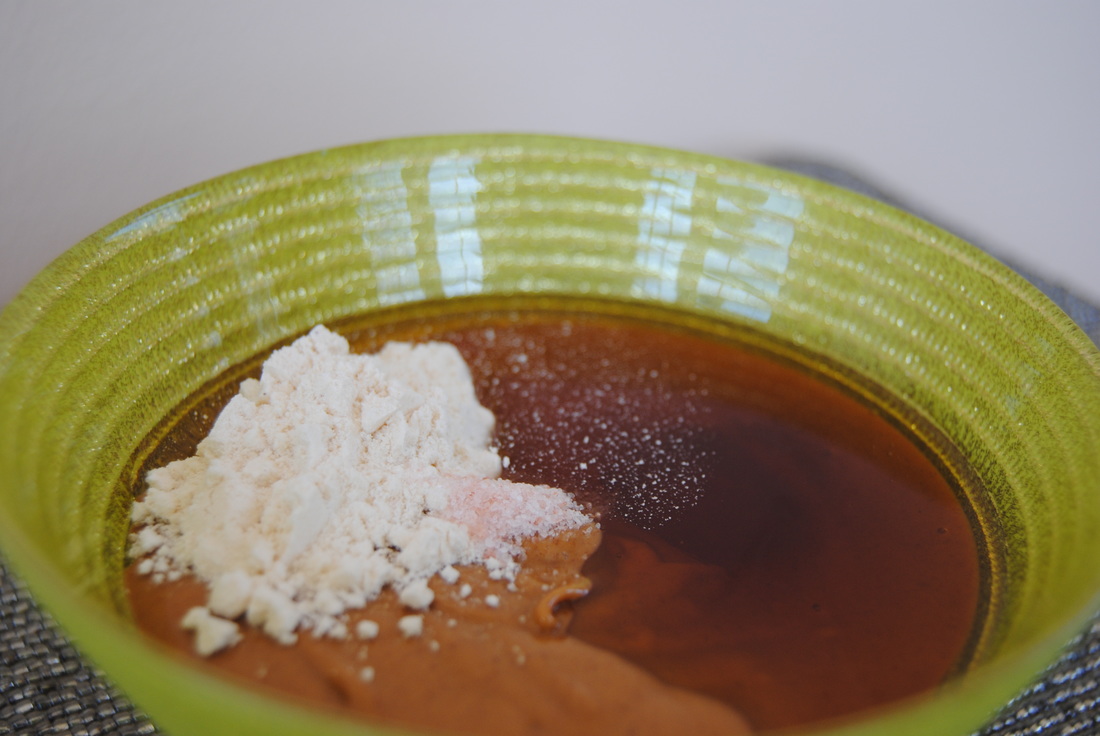
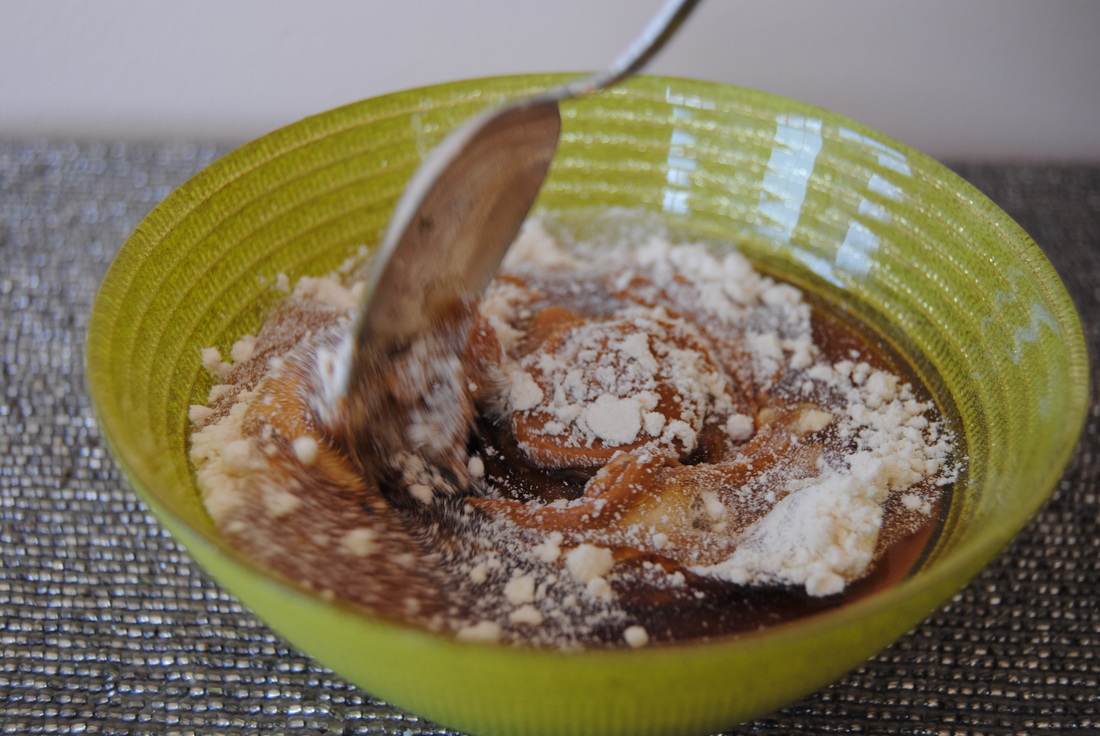
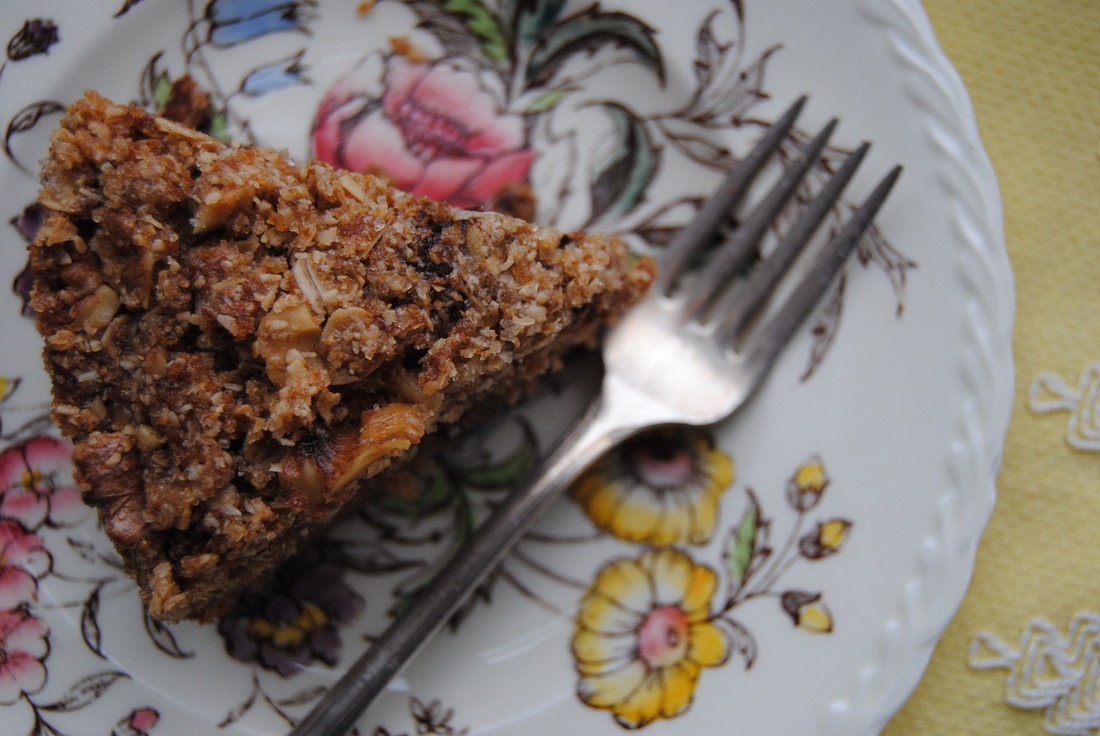
 Oh spring! How we've waited for you! And what a great way to welcome the season this first Spring weekend with Easter celebrations. This cake is just perfect for any gathering you may be attending this (or any!) Spring weekend. It has a delicate blend of sweetness and spice just right for this in between time as the days get longer and warmer. And this cake contains an extra special ingredient adding to it's sweetness, lucuma. Sound interesting? Find out more... 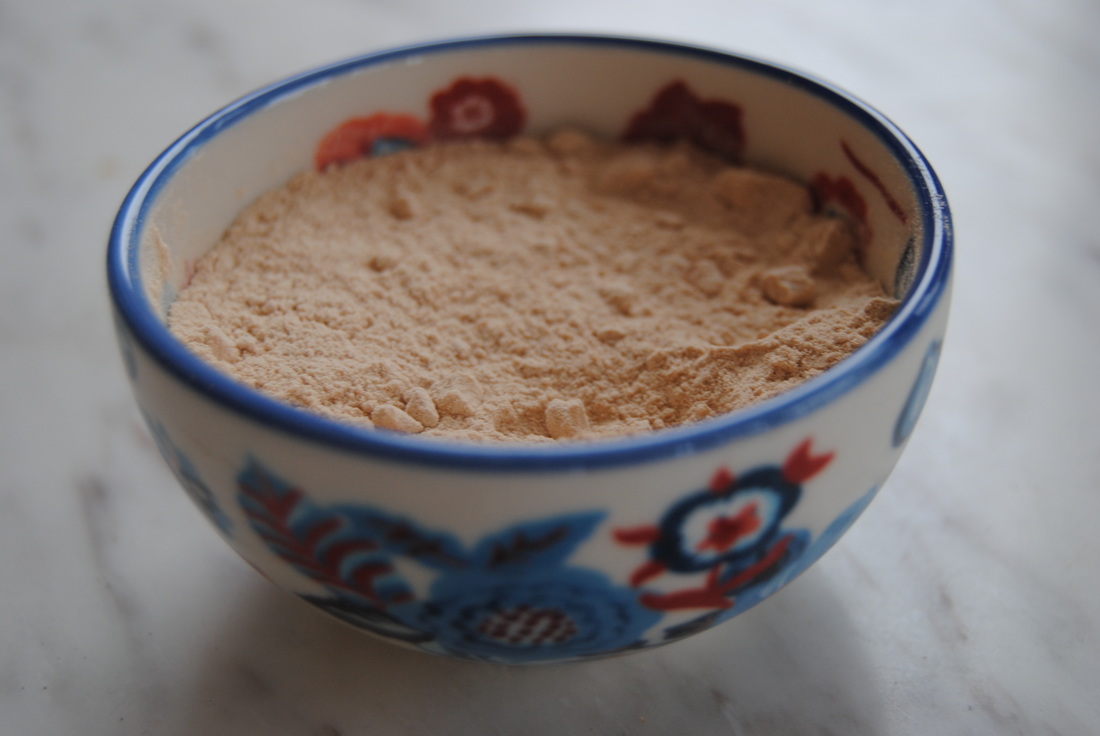 Lucuma is a fruit native to Peru and grown in the Andes. It has a natural sweet maple flavor but a low glycemic index, meaning that it does not cause a dramatic spike in blood sugar levels like other sweet foods can. Lucuma is a good source of vitamins, minerals, antioxidants, and fiber. A two teaspoon serving packs two grams of fiber, which means our crumb cake contains twelve grams of fiber from the lucuma alone! Not surprising, lucuma is a popular ice cream flavor in South America and often favored over chocolate or vanilla. The most common form of lucuma found in North America is a powder made from the dried fruit that can be used in many ways. Some of our favorite uses are adding to hot cereals, smoothies, yogurt, home made baby food, and baked goods such as our crumb cake this week. Remember that along with additional nutrients and fiber lucuma will provide a mild sweetness without spiking blood sugar. Lucuma powder can be found at specialty grocers and healthy food stores or online. A brand that we like is Navitas Naturals and more info can be found on their site. But if you don't have lucuma in your pantry yet don't worry! This cake will work without if you substitute another 1/4 cup flour for the lucuma powder. Just this once though because lucuma is worth a try! 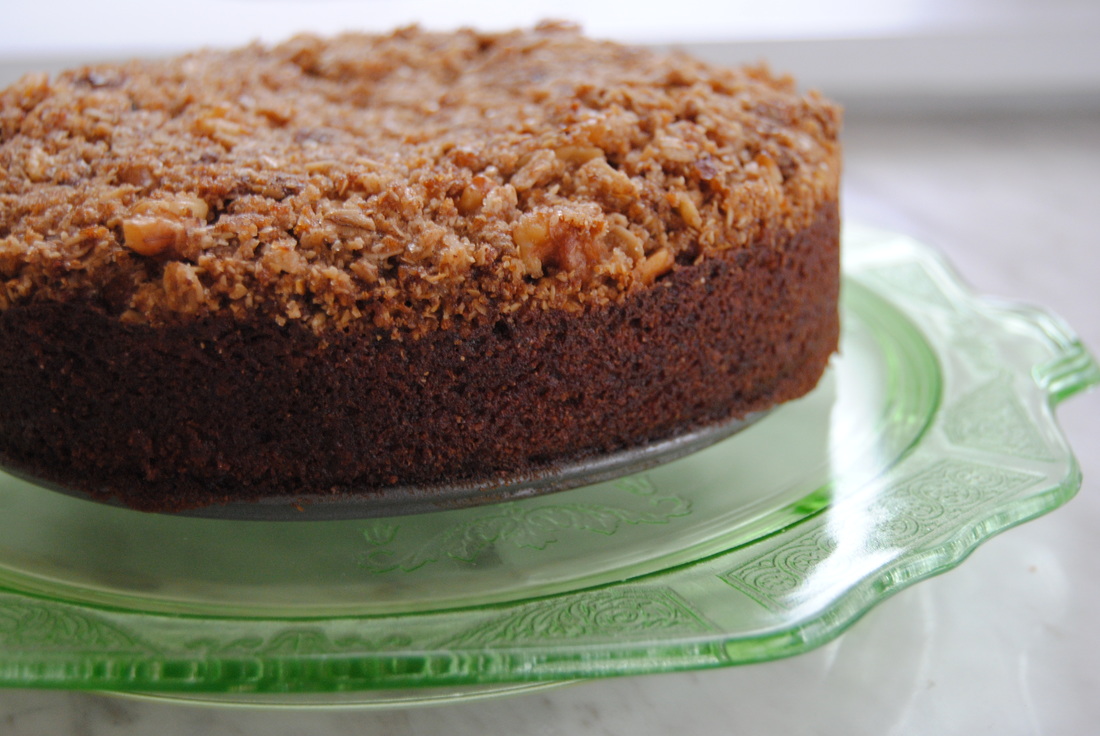 Lucuma Cinnamon Crumb Cake PREP TIME: 20 mins TOTAL TIME: 1 hour, 5 mins (includes baking time) Servings: 8-10 slices Ingredients Crumb Topping 1/4 cup + 3 Tbsp cane sugar 2 Tbsp black strap molasses 4 Tbsp coconut oil, softened but not fully melted 1 tsp ground cinnamon 1/3 cup oats, lightly processed in a food processor 1/3 cup oat bran 1/2 cup walnuts, chopped Cake 6 Tbsp coconut oil, softened but not fully melted 1/2 cup cane sugar 2 Tbsp ground flax + 6 Tbsp warm water 1 tsp pure vanilla extract 2/3 cup plain soy yogurt (or plain yogurt of choice) 1 cup white whole wheat flour 1/4 cup lucuma powder 1 tsp baking powder 1/4 tsp baking soda 1/2 tsp sea salt Middle Swirl 2 tsp ground cinnamon 2 tsp cane sugar In a small bowl, combine the crumb topping ingredients; coconut oil, cane sugar, molasses, oat flour, oat bran, cinnamon, and chopped walnuts. Lightly mix with a fork until a crumbly texture is formed then set aside. Preheat oven to 350 degrees. Lightly oil a 8" spring form pan* with coconut oil and set aside. To prepare the cake ingredients start by combining the ground flax seed and warm water in a small cup. Mix with a fork until gelatinous and set aside. In a large mixing bowl, sift together the whole wheat flour, lucuma, baking powder, baking soda, and sea salt and set aside. In a standing mixer combine the softened coconut oil and cane sugar and beat on high until light and fluffy. Add the flax/water mixture, vanilla, and yogurt and continue to mix until fully combined. Make sure to scrape down the sides of the bowl as you mix. Slowly add the dry ingredients to the mixer and beat until just combined. Make sure to avoid over mixing. Combine 2 tsp of cinnamon with 2 tsp of cane sugar in a small cup for the middle of the cake. Spread half of the cake batter in the prepared pan using a spatula - this may take some patience as the batter is sticky. Sprinkle the cinnamon sugar mixture evenly over the first layer of batter and then evenly spread the remaining batter over the top. Generously crumble the topping evenly over the cake. Bake in a preheated oven for 45-50 minutes or until a toothpick comes out clean. Allow cake to slightly cool then run a butter knife around the sides of the pan to loosen before releasing the spring form side. Serve with a cup of tea or coffee and enjoy with loved ones! *A regular cake pan will work but make sure it is well greased with coconut oil. 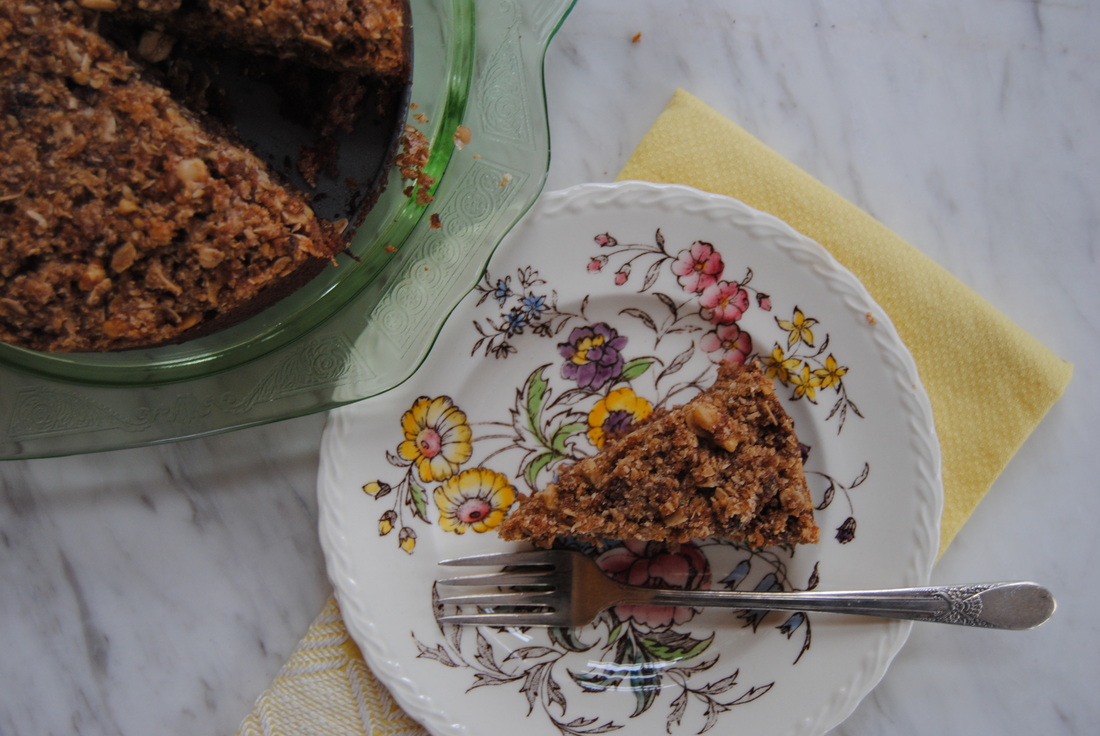 Cinnamon. Sweet. Heaven. Basically the only way to describe this cake. This one will go fast so feel free to make an extra, one for your gathering and one all for you! Did we really just say that? You'll get it once you've given it a try... Happy Easter, Jess and Cecelia 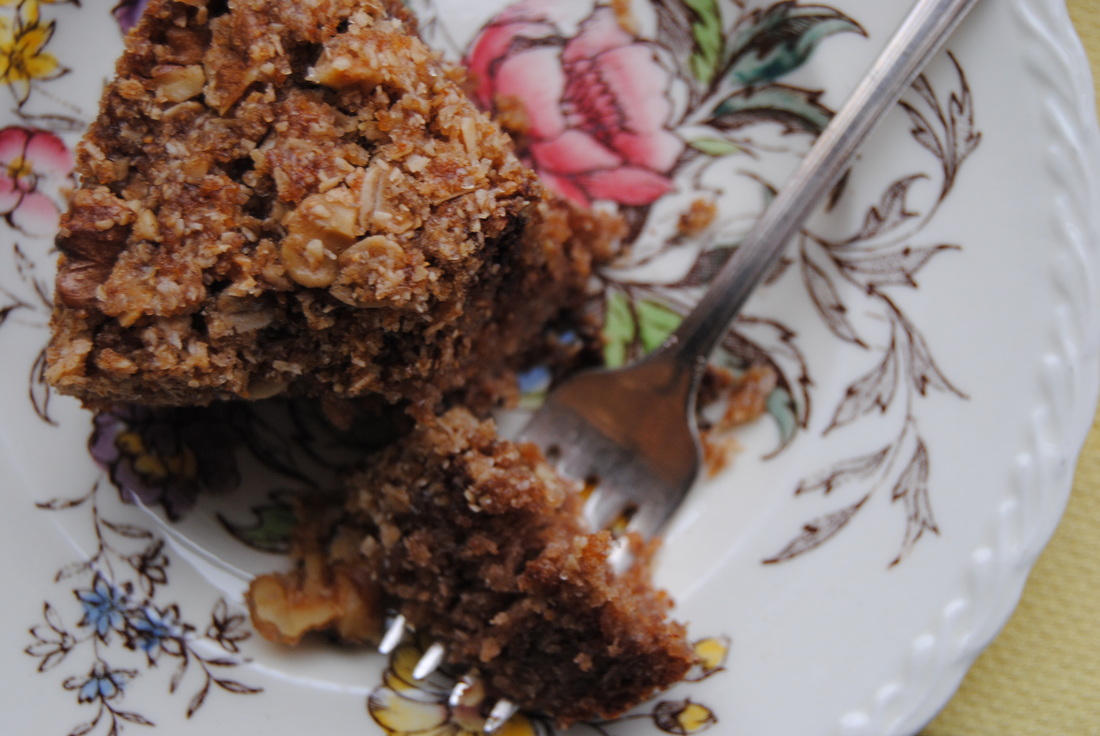
2 Comments
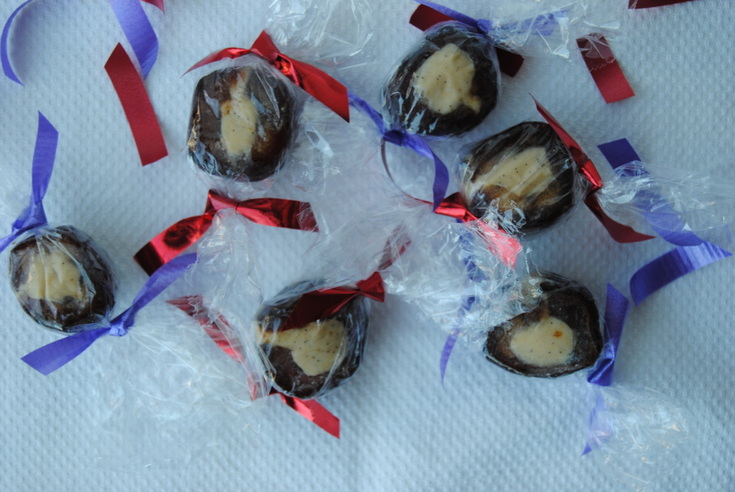 The sweet celebration of Valentine's Day this past weekend got us thinking about candy - big surprise! And though chocolates are the traditional sweet during this time, we were thinking a little differently. We wanted to try to make a candy with no added sugar, sounds crazy right?! Well not if you utilize nature's candy, a little piece of food perfection called the date. 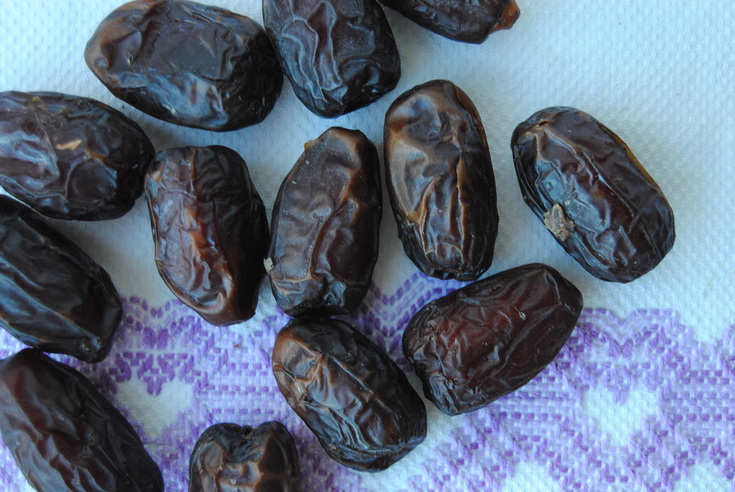 Dates are a flowering edible plant from the palm family that grow in hot climates. They grow in clusters on a species of palm tree well named "date palms" and are most commonly eaten once dried. A date palm can take up to 7-10 years to mature and once mature may produce a crop of up to 300 lb per harvest season. Our favorite variety of date is the Medjool date native to the Middle East and North Africa but also grown in other desert like regions across the globe. In our opinion, Medjool dates are superior to all other dates because they are the largest in size, have the softest texture, and the sweetest taste.....AKA nature's candy! Dates can be enjoyed on their own as a sweet snack, blended into beverages to add a little sweetness, or chopped up and added to baked or raw recipes. They are also great stuffed in savory or sweet recipes similar to our post this week. They provide, of course, sweetness but also a caramel reminiscent flavor and a chewy and slightly sticky texture. If blended, this sticky texture can even be used as a binder in raw granola bar recipes. But we will save that for another post. Today, no-added sugar candies! 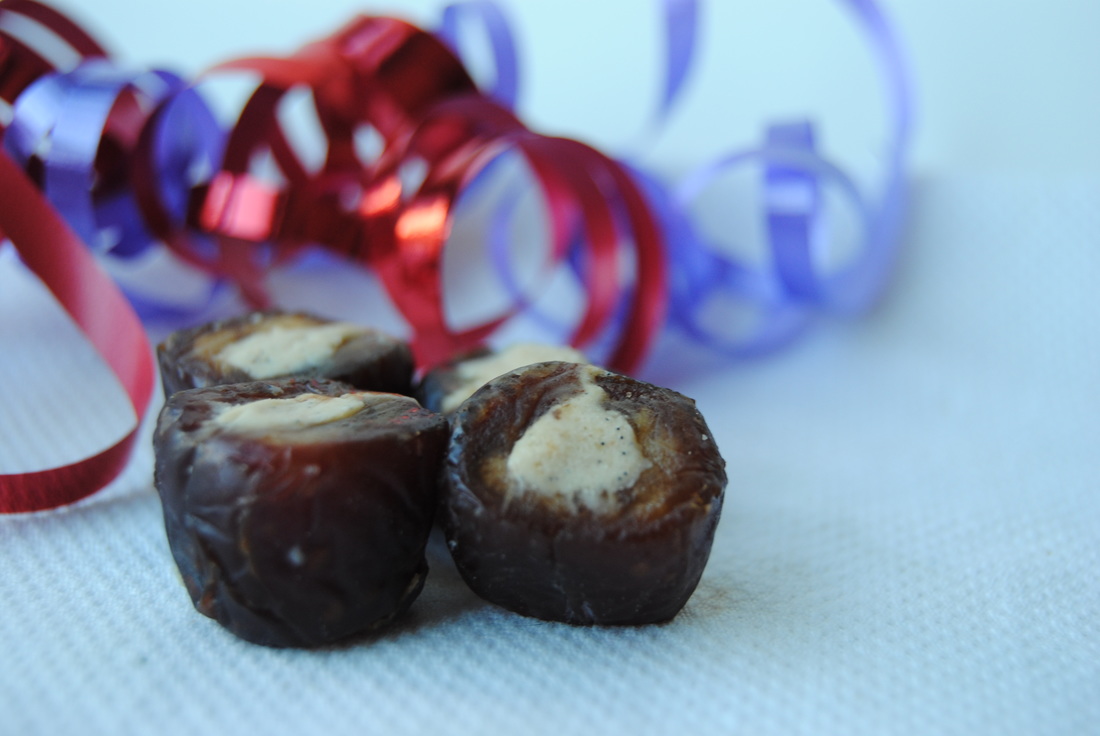 Raw Coconut-Cashew Butter Filled Dates PREP TIME: 5 mins TOTAL TIME: 30 mins (includes chilling time) Servings: 24 candies Ingredients 12 Medjool dates 1/8 cup raw cashew butter 1/8 cup raw coconut butter 1/4 vanilla bean, inside scraped out 1/8 tsp salt, or to taste In a microwave safe bowl, carefully melt cashew butter and coconut butter in 10 second increments making sure to stir frequently to prevent the butters from burning (this should take about 20-30 seconds). Add vanilla bean and salt to the butters, stir mixture thoroughly, then set in the fridge to cool for at least 10 minutes. Remove the pits from 12 dates by slicing open one side with a small, sharp knife but not cutting the dates all the way through. Once filling has completely cooled, add 1 tsp of filling to the center of each date and carefully pinch closed. Repeat until all the dates are filled. Place the filled dates back in the fridge and allow to cool for about 10 minutes. Using a sharp knife, cut the ends off of each date making two flat sides in which you can see the cream filling. Then cut each date in half making 2 candies per date. Repeat until you have made 24 individual candies. Place prepared candies in a candy box or tin or simply wrap each candy in plastic wrap. Keep candies in the fridge for taste and freshness. 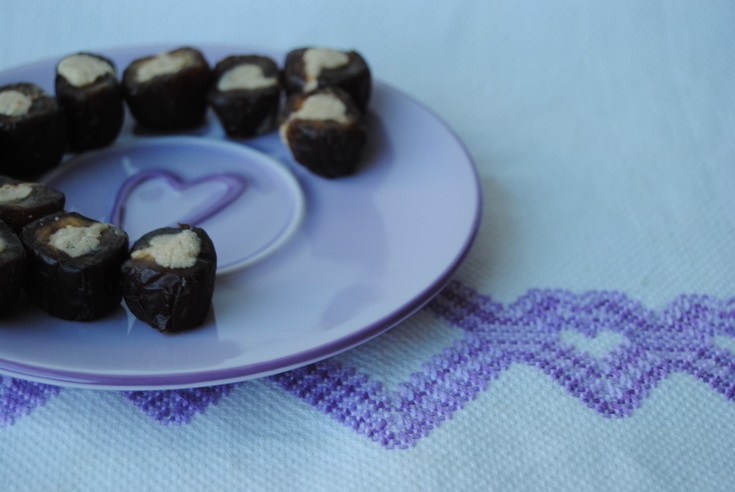 So how's that for satisfying a candy craving the natural way? The dates are gooey and oh so sweet and pair nicely with the rich coconut-cashew filling. This might be just what you need if you may (or may not have) had too many boxed chocolates this past weekend. And don't forget about the wonderful date as a sweet ingredient in your kitchen from now on. Much love, Jess and Cecelia 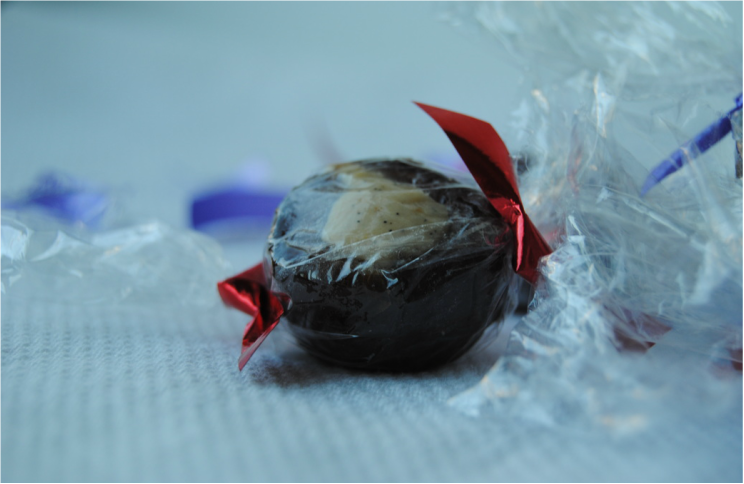 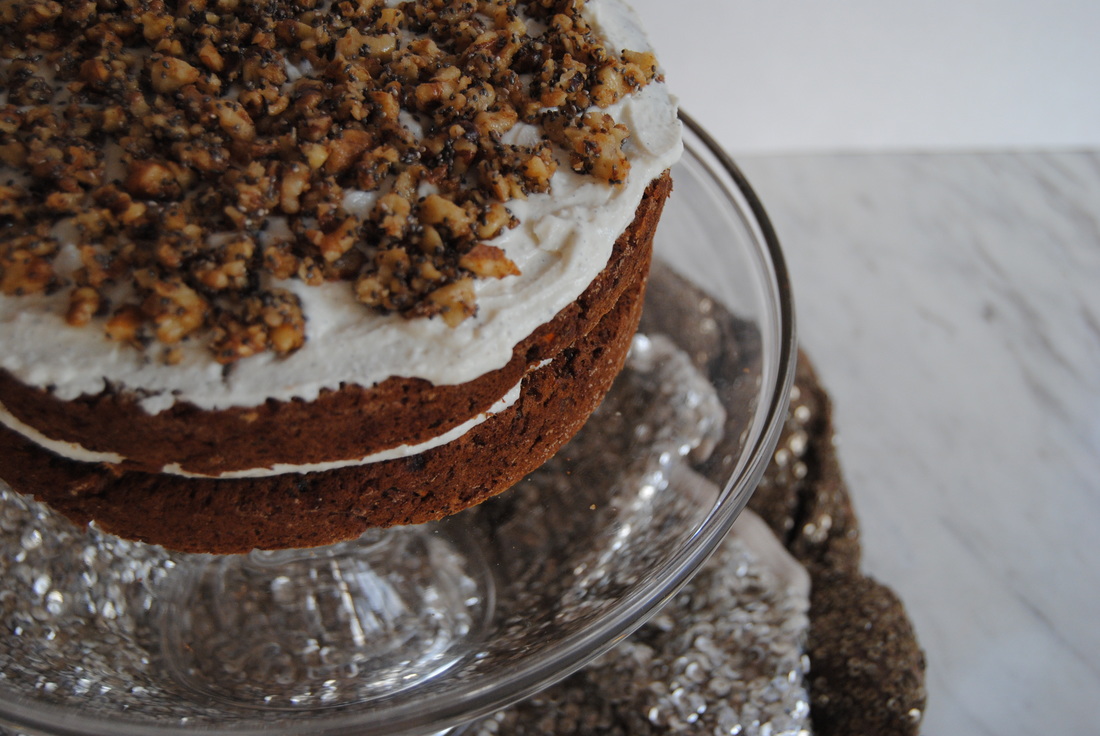
Can you believe it's been a whole year already!? And what a year it's been. Creating and sharing recipes these past twelve months has honestly been a dream come true for us. We are so appreciative of our amazing family, friends, and loyal blog followers for all of your love and support. So this post is truly for all of you as a celebration of an amazing year. We hope that you love this cake as much as we do and enjoy it while celebrating something really, really special. We sure did.
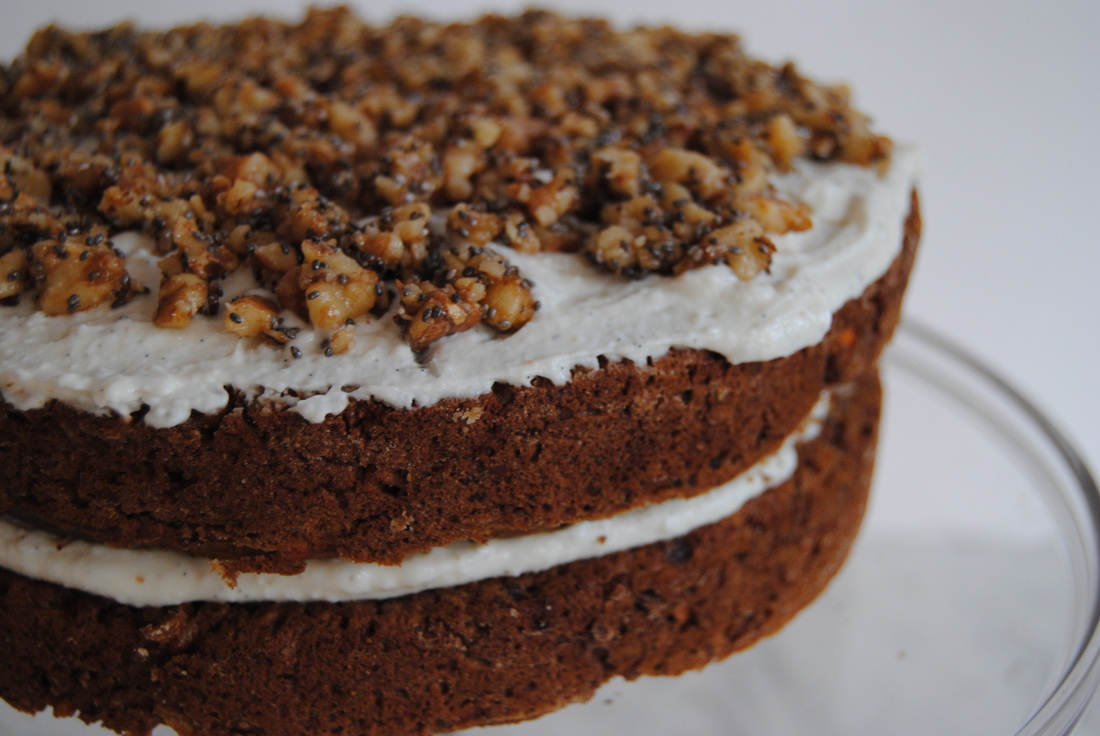
This cake is special for many reasons; it is 100% homemade, a delicious use of vegetables, and is finished with a mouthwatering, unique, and protein packed frosting. But that's not all! It also contains a nice dose of omega-3 fatty acids (or omega 3s). This is special because omega-3s are nutritionally wonderful. Omega-3 fats come in three different forms. The first is ALA (alphalinolenic acid) and is most commonly found in flax seeds. ALA is an essential fatty acid, meaning our body does not make it and is therefore crucial to get from food. There are two other omega-3s, DHA (decosahexaenoic acid) and EPA (eicosapentaenoic acid). These two omegas are commonly found in wild caught salmon. Omega-3s have anti-iflammatory properties, may support circulation by transporting oxygen from red blood cells to the tissues, can act similar to blood thinners when taken in the right doses, and DHA found in wild salmon plays a large role in the developing brain of a human fetus. We used plant based forms of omega-3s in this recipe including walnuts, chia and flax seed. Ground flax seed specifically contains a great deal of ALA and is also considered a good source of dietary fiber, with a 4 Tbsp serving of ground flax seed providing 8 grams! So now that you know a little more about omega-3s, let's get on to making this carrot omega cake!!
Rainbow Carrot Omega Cake with Goat Cheese Frosting
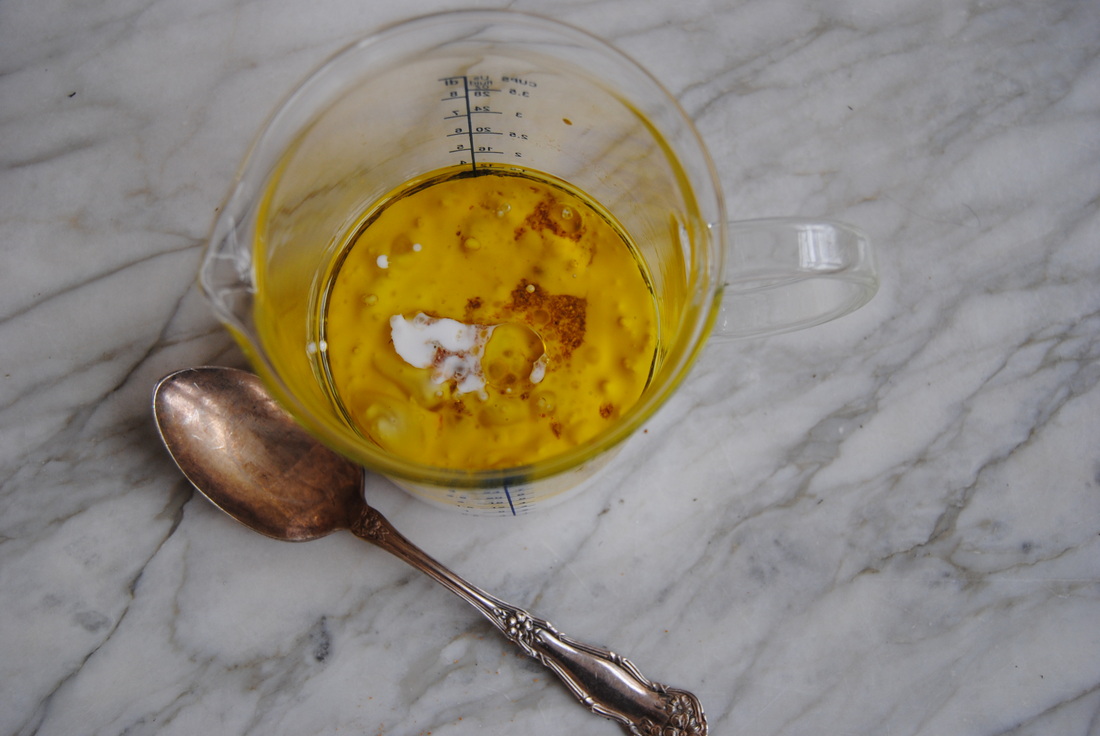
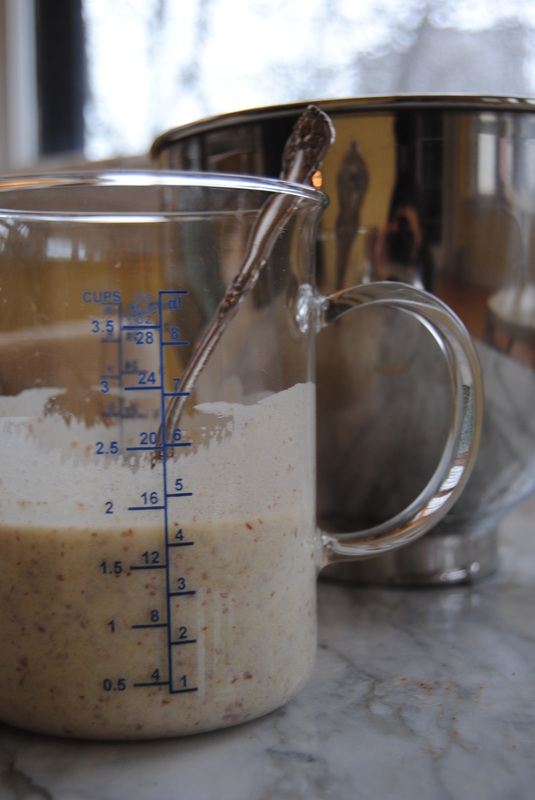
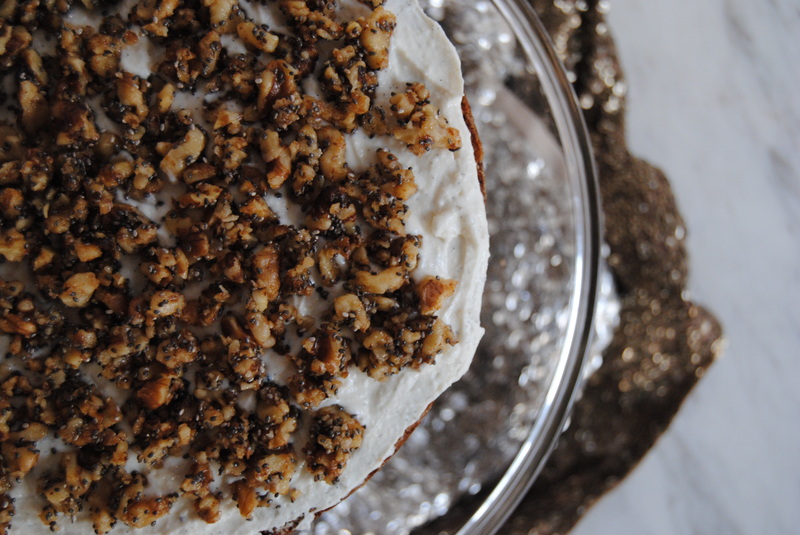
PREP TIME: 20 mins TOTAL TIME: 60 mins Servings: 8-10 Ingredients: Cake 1 1/2 cup white whole wheat flour 1/4 cup coconut flour 2 tsp baking soda 1 tsp cinnamon 1/2 tsp allspice 4 Tbsp ground flax seed + 1 Tbsp reserved for middle frosting layer 12 Tbsp warm water 1/2 cup honey 1/4 cup + 2 Tbsp pure maple syrup 2 Tbsp molasses 1/2 cup melted coconut oil 3 cups carrot shavings (we used rainbow carrots-purple, yellow, & orange) Frosting 3/4 cup thick vanilla Greek yogurt (we used Siggi's 4% fat) 3/4 cup soft goat cheese 3 Tbsp honey 2 Tbsp coconut butter, melted 1/2 vanilla bean, inside scraped out Candied Nut/Seeds 1/2 cup walnuts 1/8 cup chia seeds 1 Tbsp honey Sprinkle of sea salt Preheat over to 375 degrees. Prepare 2, 9" round cake pans with a parchment lined bottom and make sure to oil the sides of both pans. Using a food processor, or this can be done by hand using a large grater, process or shave carrots until you have ~3 cups of shavings. In a large bowl, sift white whole wheat flour, coconut flour, baking soda, cinnamon, and allspice and set aside. Combine ground flax seed and warm water and whisk until fully combined. Allow flax and water mixture to sit for a few minutes to thicken. In a separate bowl, combine honey, maple syrup, molasses, coconut oil, and thickened flax mixture. Add liquid ingredients to dry ingredients and stir until just combined. Add carrot shavings to the bowl and again mix until just combined. Avoid over mixing the batter. Pour batter into prepared pans and place on middle rack of the preheated oven. Bake for ~40 minutes or until a toothpick comes out clean. Allow cake to fully cool before removing from the pans. In a small sauce pan on medium heat, combine walnuts, chia seeds, honey, and sea salt. Stir mixture until lightly toasted, take off the heat and set aside. To make the frosting, using a standing mixer or hand held mixer, combine yogurt, goat cheese, honey, coconut butter, and vanilla bean. Mix on high until light and fluffy and set aside. To assemble the cake, carefully invert one cooled cake onto cake stand. Spread half of the frosting on top of the cake then sprinkle with 1 Tbsp ground flax seed. Carefully invert second cake on top of the first cake, then finish frosting the top of the second cake. Sprinkle with cooled candied nut/seed mixture, serve, and enjoy! 
One bite and we swear you will be hooked. The cake itself is just delicious and has the perfect amount of sweet carrot flavor, but the frosting is a whole other level! Creamy, sweet, salty, and tangy all in one and definitely something to celebrate. We would like to send a special thank you to Jess's brother Max for this delicious cake inspiration! And as we enjoy this recipe we are looking forward to another year of amazing food. So stay with us here at TGBK, there is so much more to come!
Happy birthday blossom, Jess and Cecelia 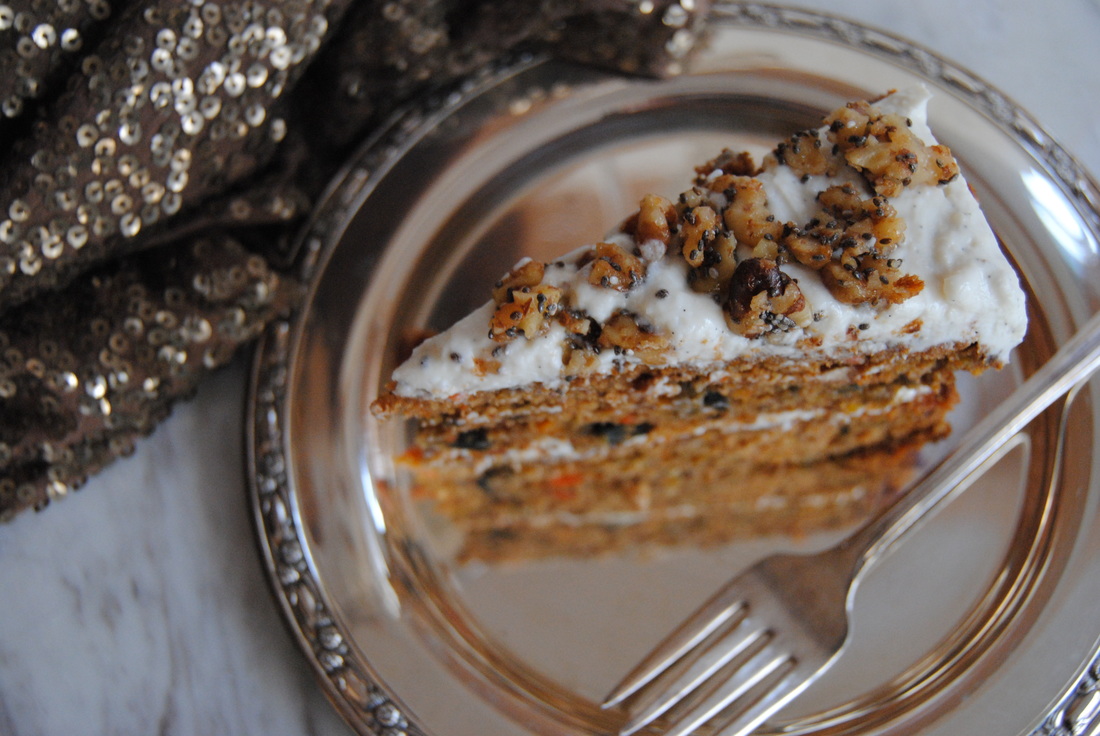
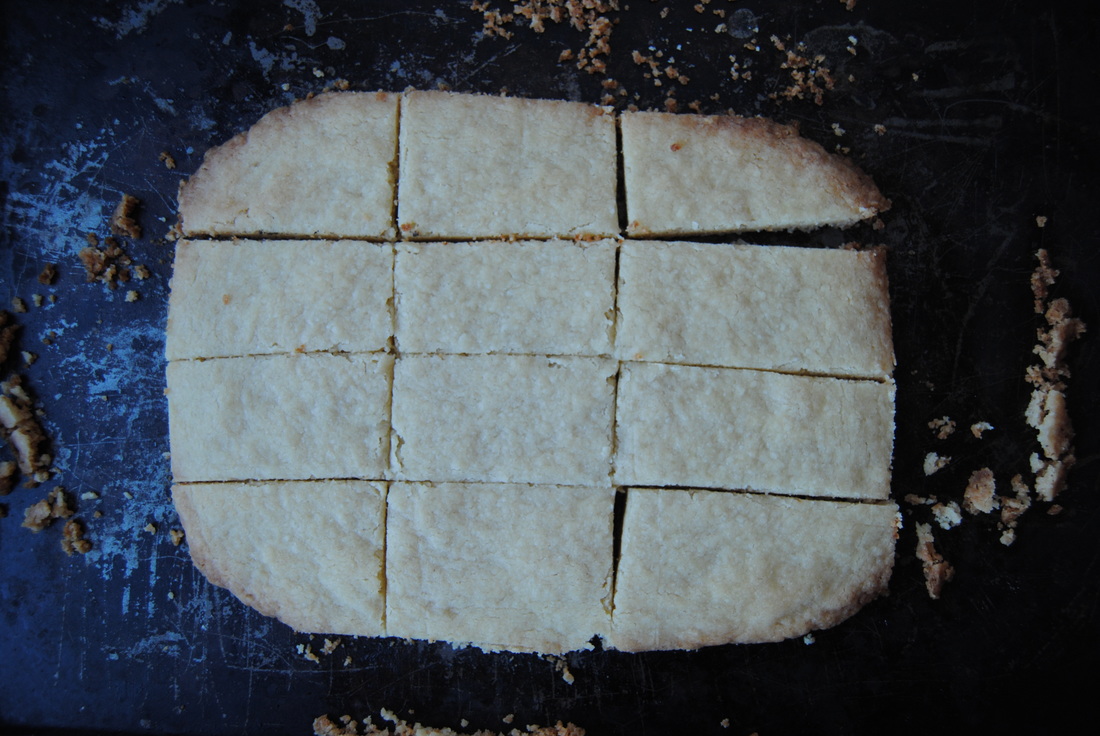
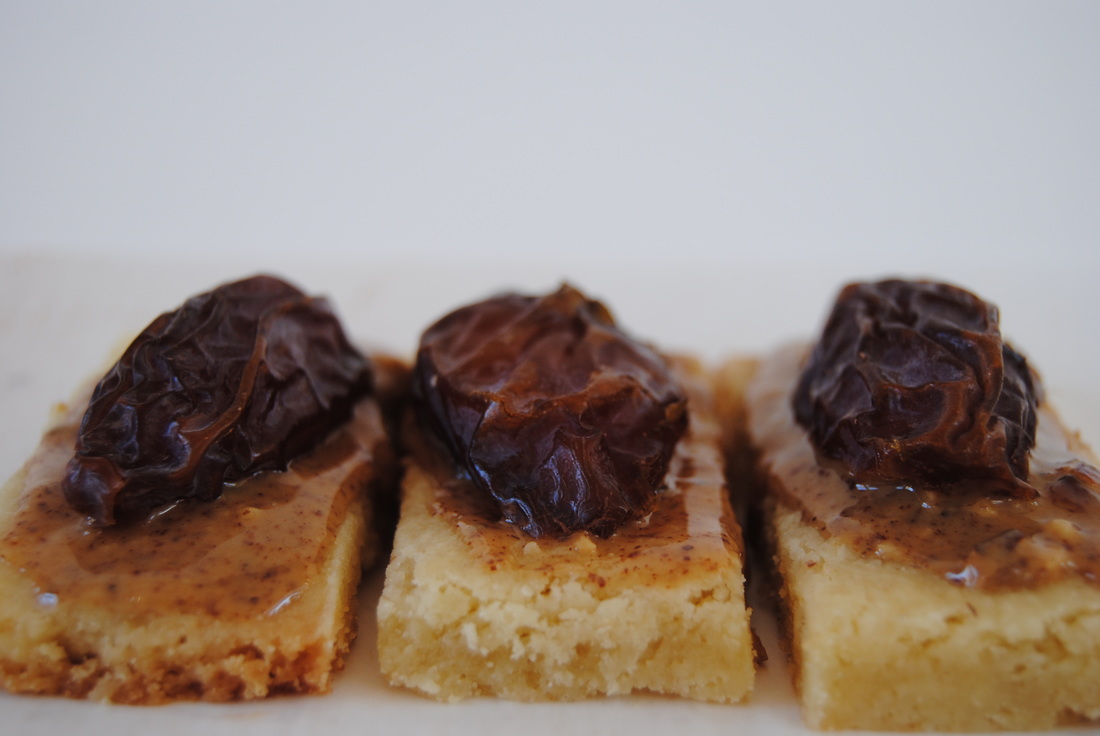
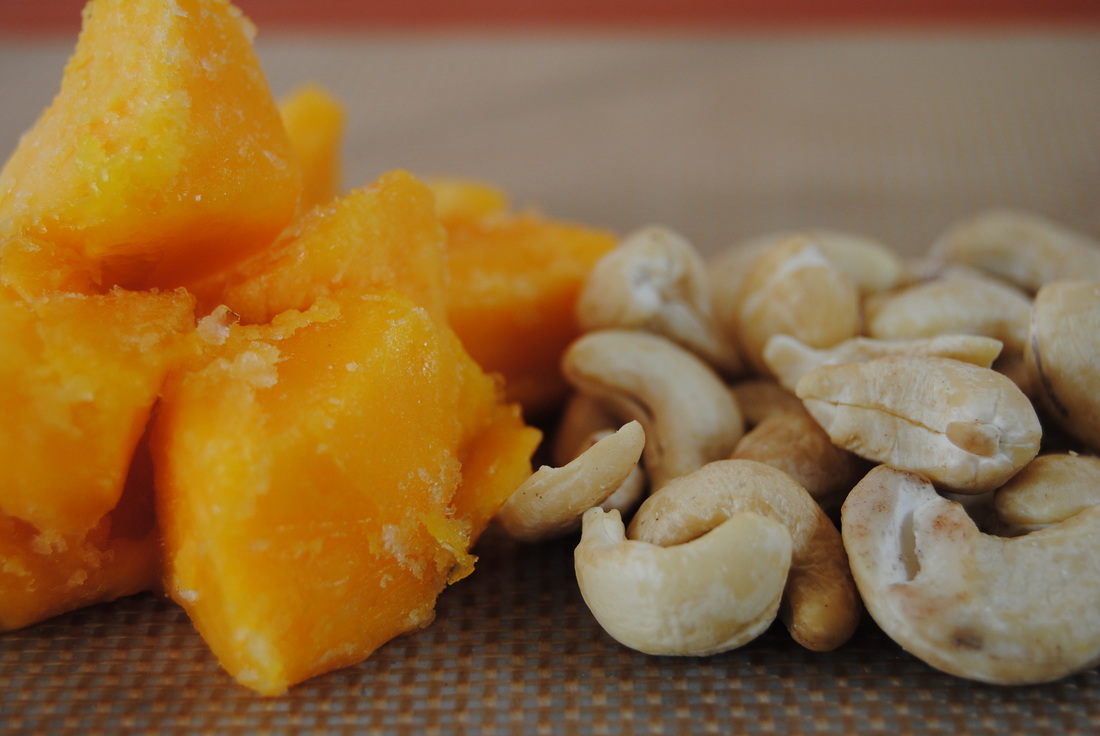
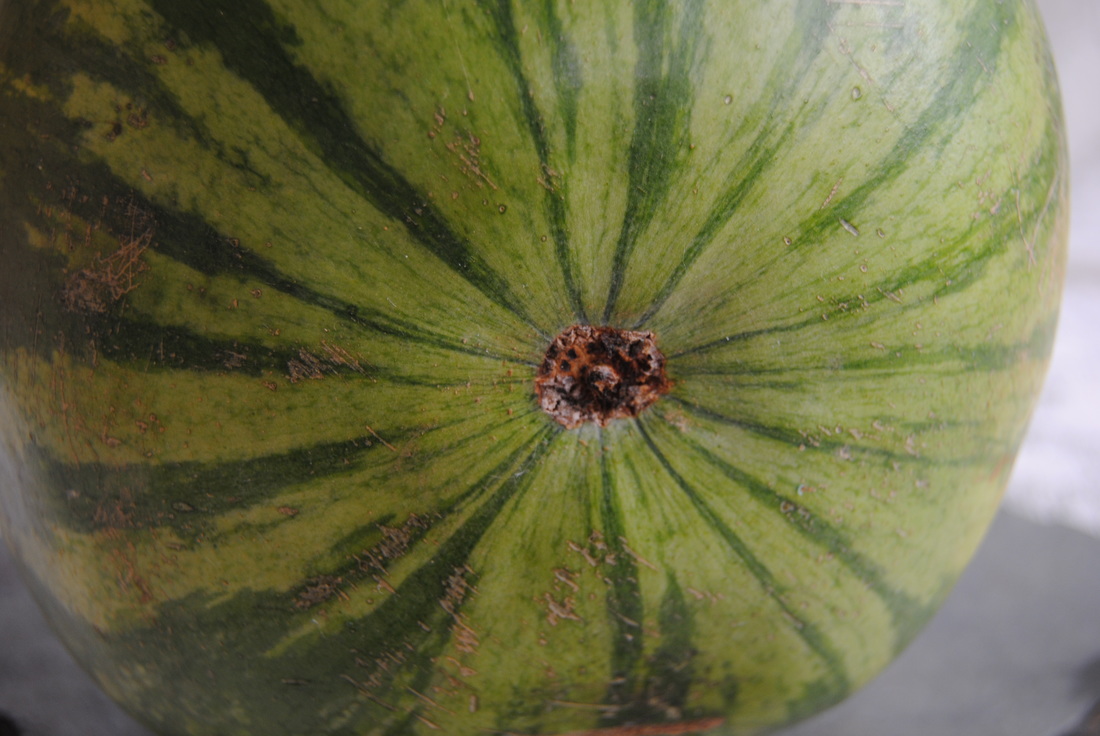
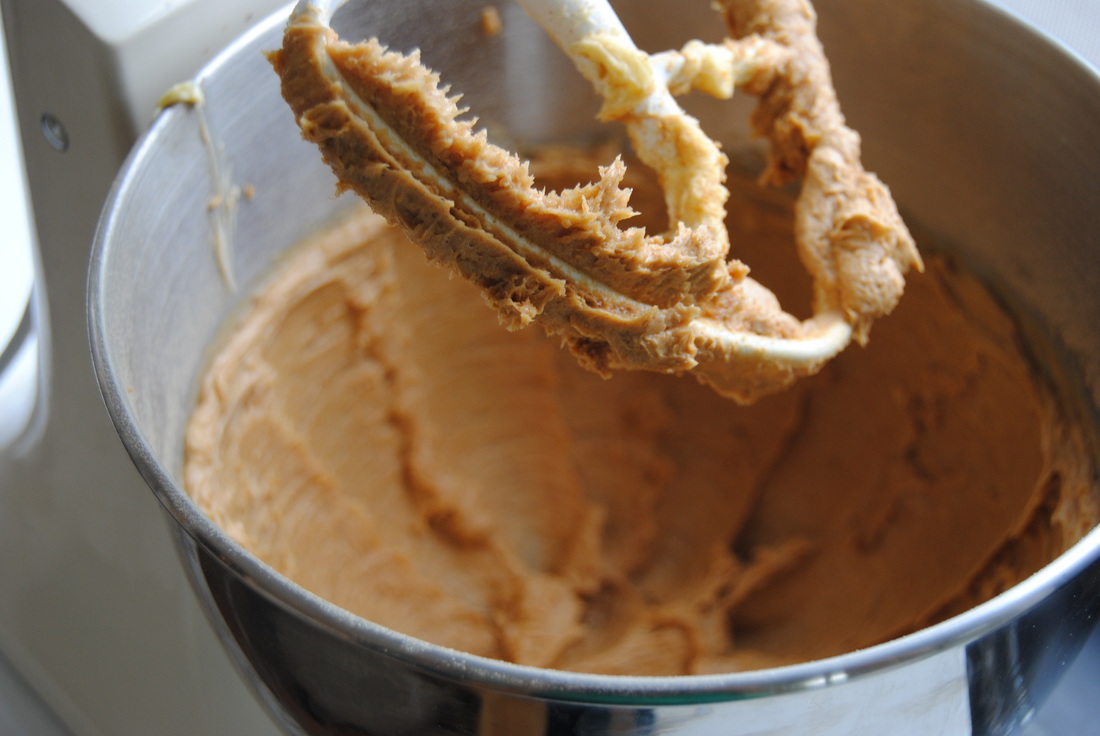
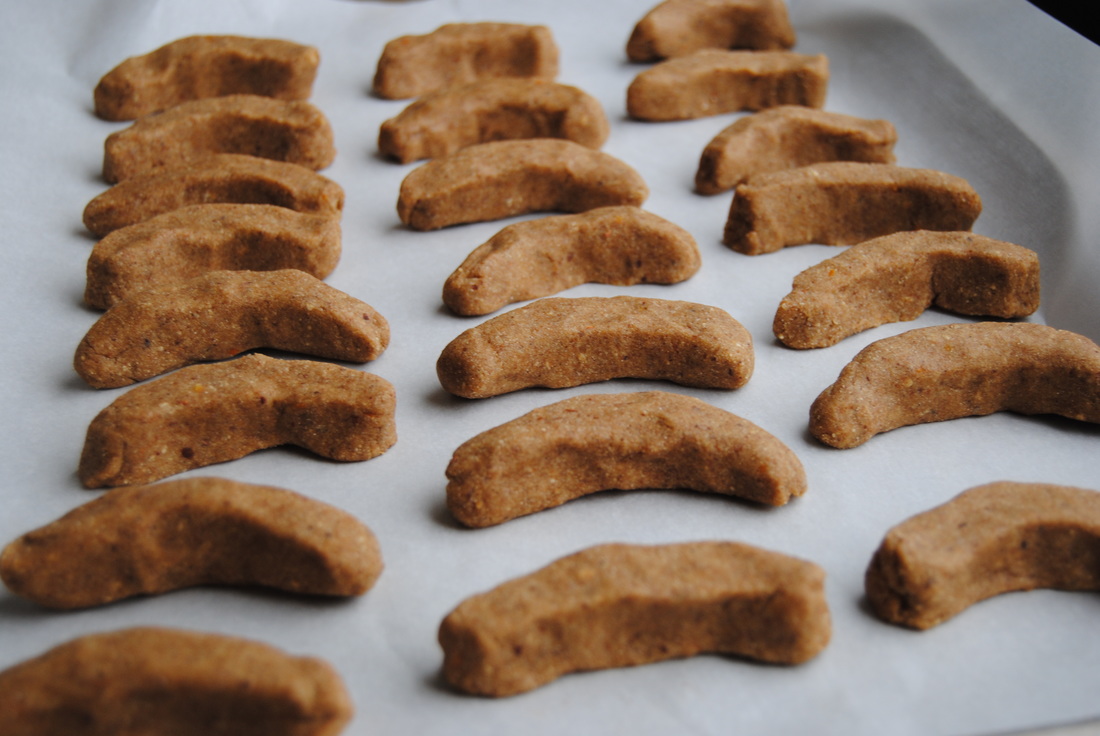
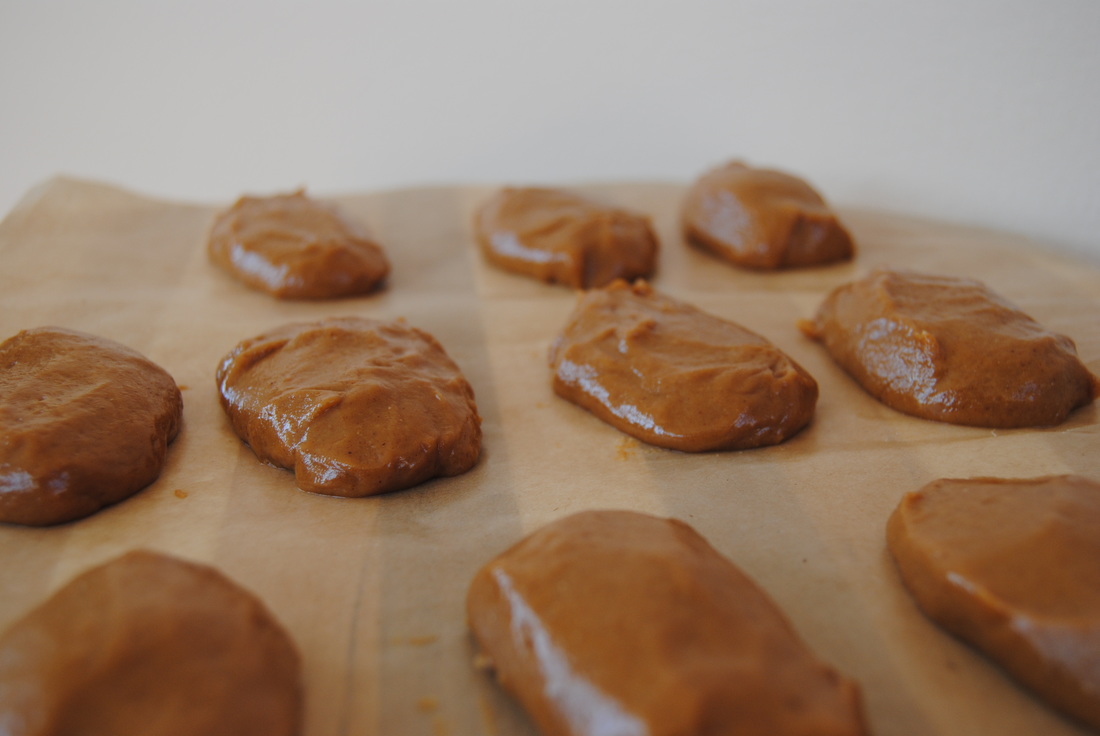
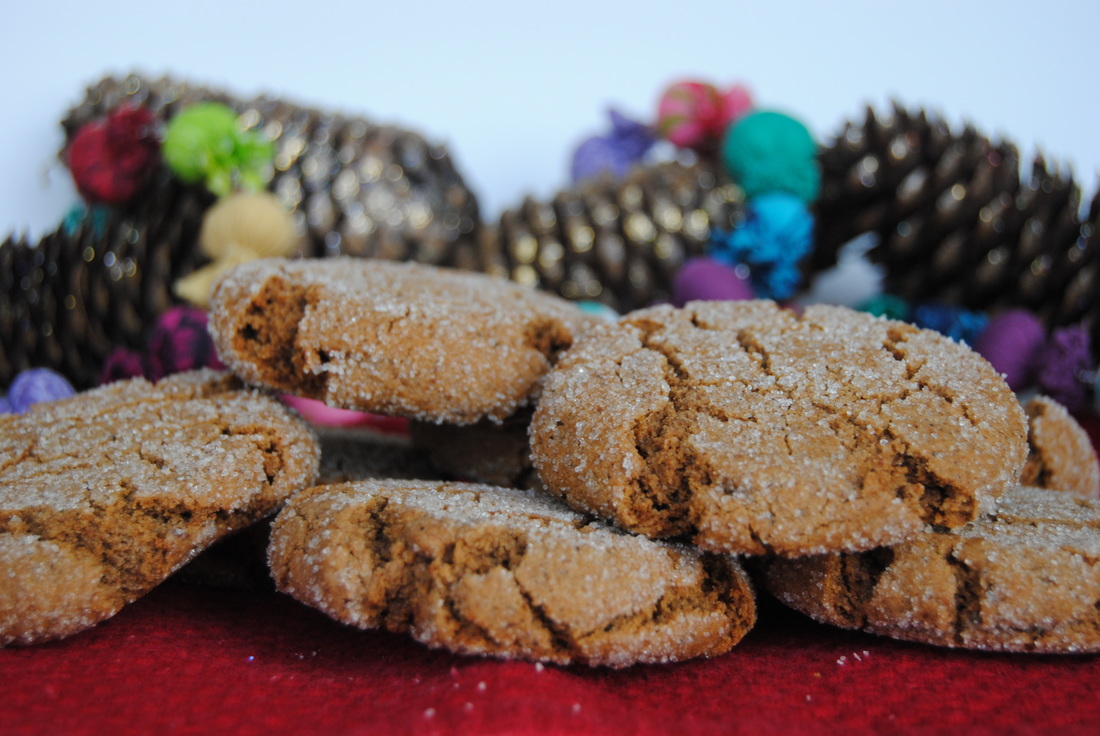 We are going to take a bet that you've all been nice this year TGBK friends! And with Christmas quickly approaching that means that you deserve a special gift from us. This cookie recipe is just the thing - it's a special recipe that Jess once received as a gift and has been perfecting over the years. And oh how perfect it now is! We even made this recipe vegan for those of you who prefer your diet that way - but of course you can't go wrong with butter as a substitute. Let's first learn more about the spice in these spice cookies before we get to baking. 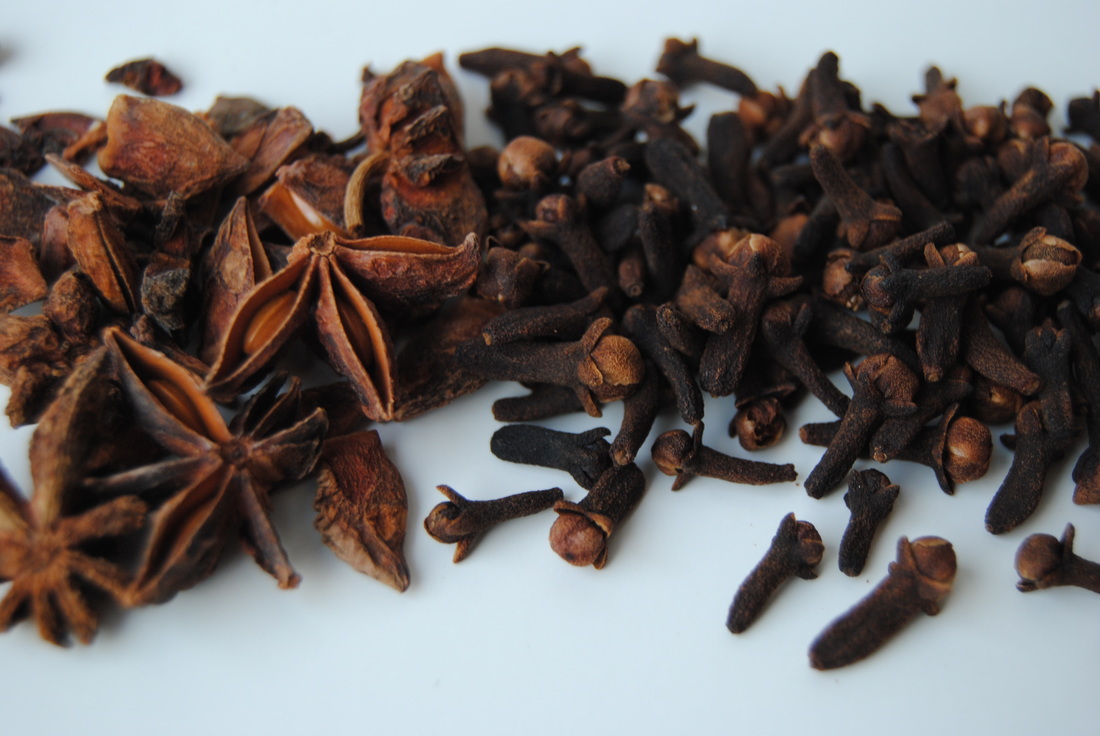 As you may have guessed, the star of these cookies is truly the spice - one of those spices being star anise. Star anise has a strong licorice flavor that is complimented by clove, which can also have a sweet licorice taste. Clove is actually the dried, unopened flower bud from a tree primarily found in Indonesia. One interesting fact about clove is it's use as an antiseptic. Clove contains eugenol, an active component known to kill bacteria and viruses helping to keep food fresh longer. And we can't forget about the cinnamon in these cookies which provides a warm and subtle sweetness. What we also want to highlight is how exceptional a flavor profile you can produce when these spices are ground from whole dried products, specifically clove and star anise. Each spice truly shines and can be distinguished, unlike when compared to using pre-combined spice blends. An electric spice grinder works best for this use. If after grinding you still notice large pieces of spice we suggest straining through a small metal strainer to avoid tough, large pieces of spice in your final product. Okay, so it's time to grind your spices and get to the recipe! 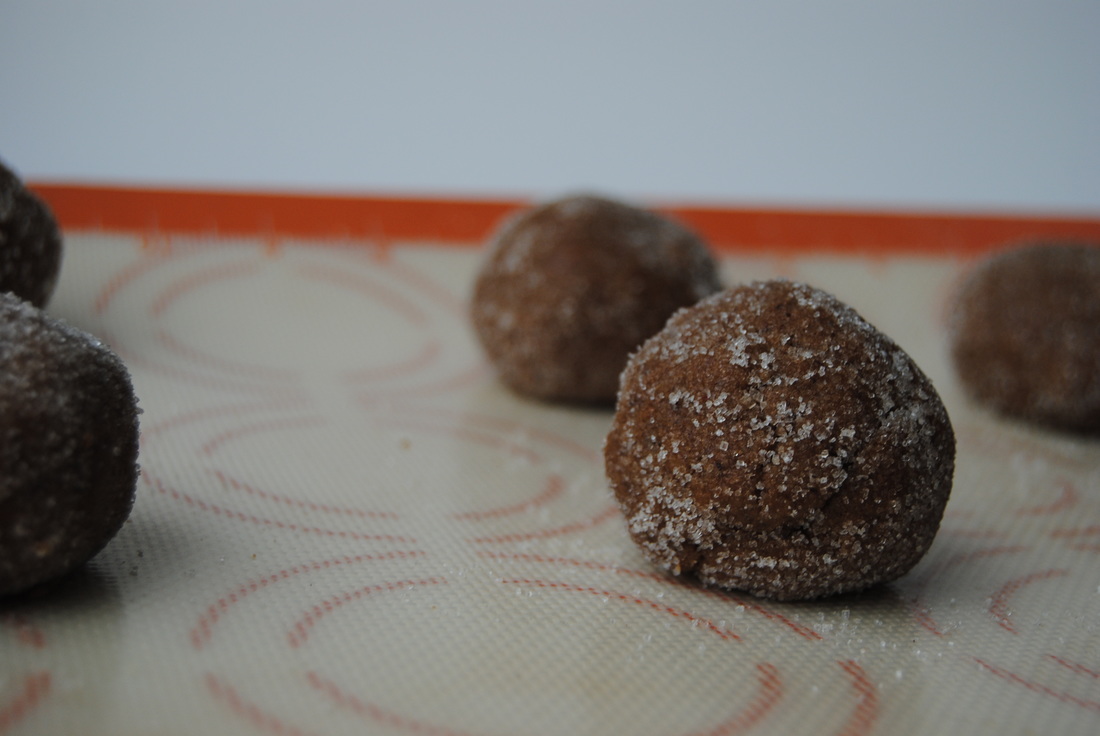 Giant Spice Cookies PREP TIME: 20 mins TOTAL TIME: 33-35 mins Servings: ~24 large cookies Ingredients 4 ½ cup flour (4 Cups white whole wheat flour* & 1/2 Cup buckwheat flour) 2 Tbsp fresh ginger juice OR 1 ½ Tbsp ground ginger 2 tsp baking soda 1 tsp ground clove 1 tsp ground star anise 2 Tbsp ground cinnamon ½ tsp salt 3/4 Cup melted coconut butter 3/4 Cup room temperature coconut oil (soft but not melted) 1 1/2 Cups coconut sugar 1/2 Cup pure maple syrup ½ cup raw sugar (reserved to roll the dough in) 2 Tbsp ground flax mixed into 6 Tbsp liquid (if using fresh ginger juice mix 2 Tbsp ginger juice with 4 Tbsp water) ½ cup dark molasses Preheat oven to 350°. In a large bowl mix together flour, spices, salt, and baking soda, then set aside. In a small bowl, combine the ground flax seed, ginger juice and water. Let sit until gelatinous, about 3-5 mins. In a bowl of electric mixer fitted with a paddle attachment, mix the melted coconut butter and coconut oil on high until smooth—about 2 mins. Add coconut sugar and maple syrup to the bowl and mix on high until light and fluffy. Add in flax seed mixture and molasses and continue to mix, scraping down the sides of the bowl as needed. Slowly add the flour/spice mixture into the bowl of the electric mixer. Continue to add flour mixture until fully combined making sure to not over mix the dough. Roll dough into golf ball size balls, then roll in raw sugar. Place cookies on parchment lined baking sheet and cook at 350°for 13 mins. If needed, mid-way through cooking lightly press dough down with a flat bottomed glass. Allow to cool then store in an air tight container for 3-5 days if there is still any left! *We used King Arthur brand (info here), but if you can't find white whole wheat flour then substitute with white, whole wheat, or a mixture of both.  These cookies represent everything nice about the holidays; delicious treats, simple pleasures, and sharing love and time with friends and family. The balance of sweet and spice and cakey texture make these cookies a yearly favorite. Once you try them we can bet you won't let a Christmas go by without them. We know we sure don't. Stay nice, Jess and Cecelia 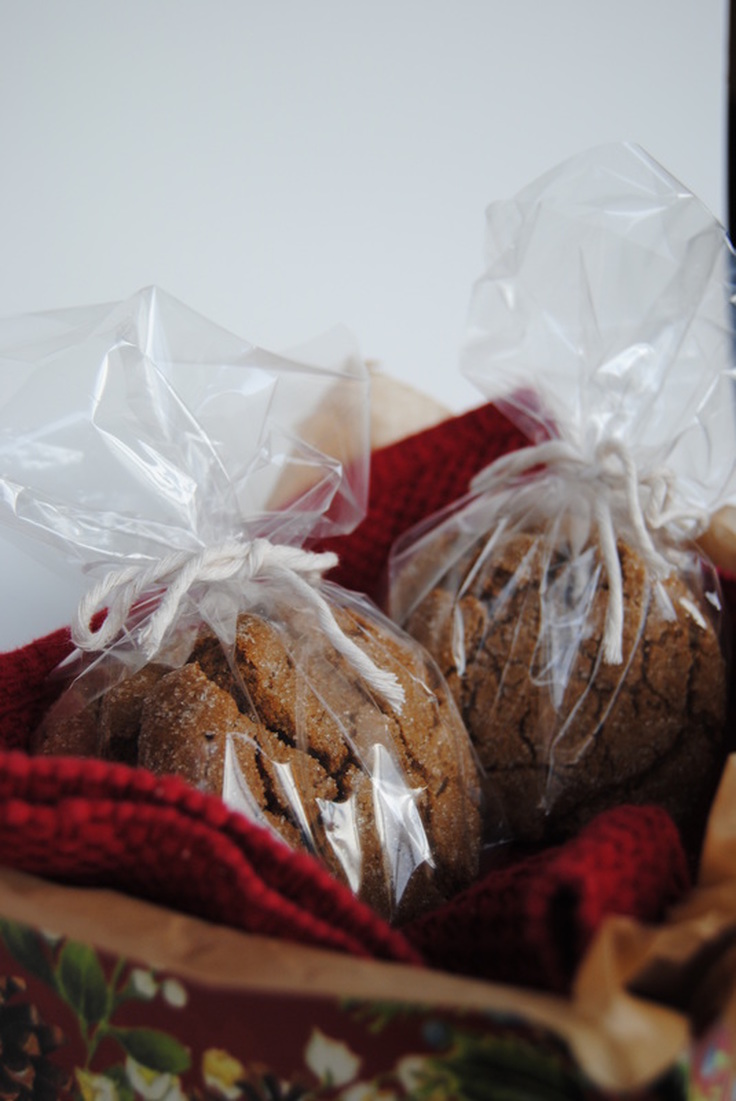 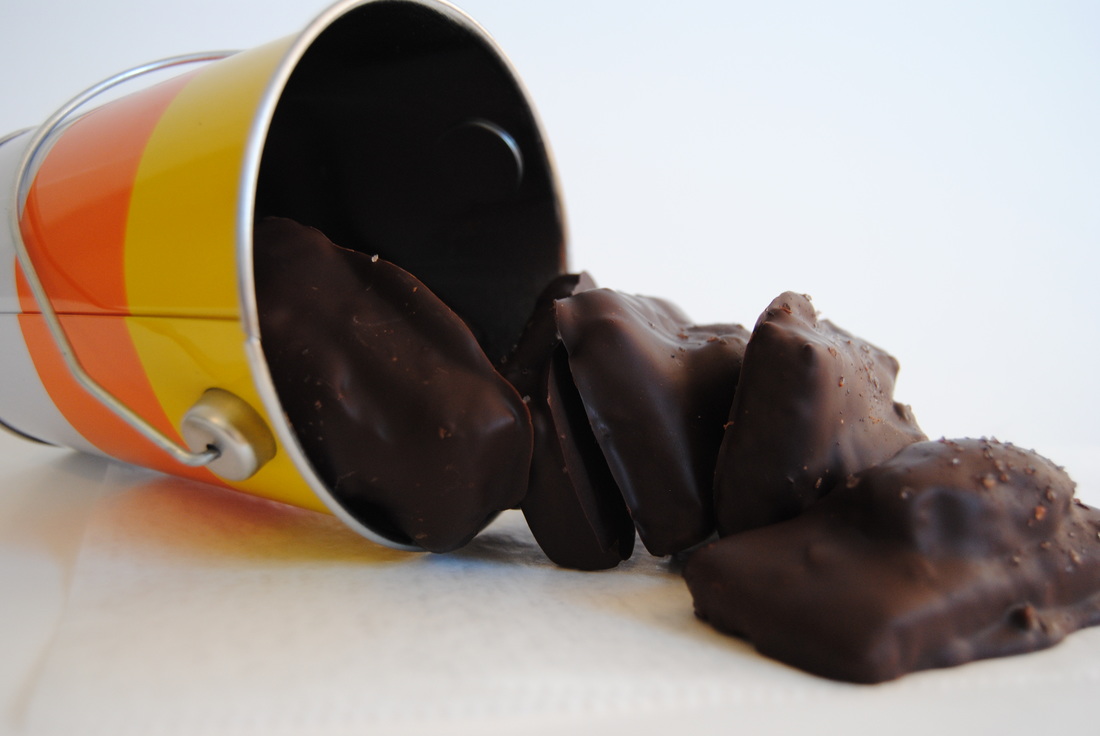 With October being the start of a long season of treats, we thought it would be fitting to give you an amazing homemade candy recipe. Because let's face it, even though homemade candy is more work, the quality and flavor profile just can't be beat. Our favorite way to make homemade candy is to pick a standard store bought classic and recreate it with awesome (and better!) ingredients. So go ahead and try to guess our candy inspiration for this post and we'll give you a hint at the end just in case! 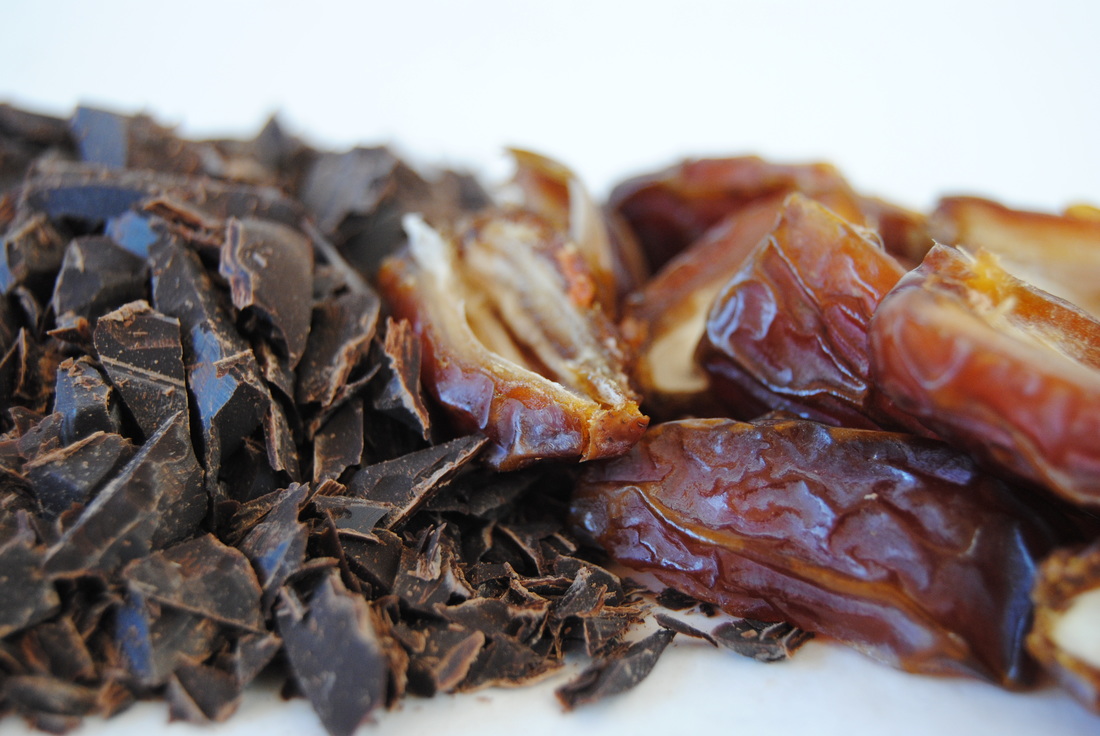 Since this post is close to a holiday (Halloween!), we are going to take a break from trying to bombard you with fabulous nutrition information. Instead, you can refer back to this post if you are wondering why homemade candy is so nutritionally superior. But let's face it, we think those nutrition labels do all the talking... Shortbread Candy Bars PREP TIME: 25 mins TOTAL TIME: 60 mins Servings: 12 candies Ingredients 1 stick butter, room temperature 1/4 cup sugar 1/2 tsp vanilla extract 1/8 tsp salt 1 cup flour 6 Medjool dates, pitted and cut in half 1-2 Tbsps almond butter 8 oz dark chocolate, finely chopped 1 tsp coconut oil sprinkle of sea salt Preheat oven to 375. In a large bowl combine butter, sugar, vanilla and salt and mix with a fork until well combined. Sift flour over butter mixture and blend with a fork until a soft dough forms. Transfer dough to an ungreased baking sheet and press into a 8" x 5" rectangle with your fingertips. Score the dough with a knife two times widthwise and four times lengthwise creating 12 small rectangles. Bake until the edges are golden brown, about 15 minutes. Let pan cool for ten minutes and then cut dough into 12 individual cookies while still warm. Uneven and crispy edges can also be cut off (as pictured above). Once shortbread cookies are cool cut dates in half and remove pits. Carefully spread an even layer of almond butter on top of each cookie and place half a date on top of almond butter, pit side down. Once complete, place cookies in the freezer for 10-15 minutes until almond butter is firm. Meanwhile, chop chocolate and add to a double boiler. Add coconut oil and allow mixture to fully melt stirring frequently. Once chocolate is melted, remove cookies from the freezer. Using a wide bottom fork, carefully dip cold cookies one at a time into the melted chocolate and use a spoon to completely cover with chocolate. Allow excess chocolate to drip from the bottom of the fork for a few seconds before placing the complete bars on wax paper to cool. Before the chocolate is fully cooled, sprinkle the top with sea salt. Store in an air right container in the fridge for 5-7 days.....if they last that long! Allow bars to warm to room temperature before eating if they have been chilled. *Cookie recipe adapted from The Gourmet Cookbook Shortbread recipe 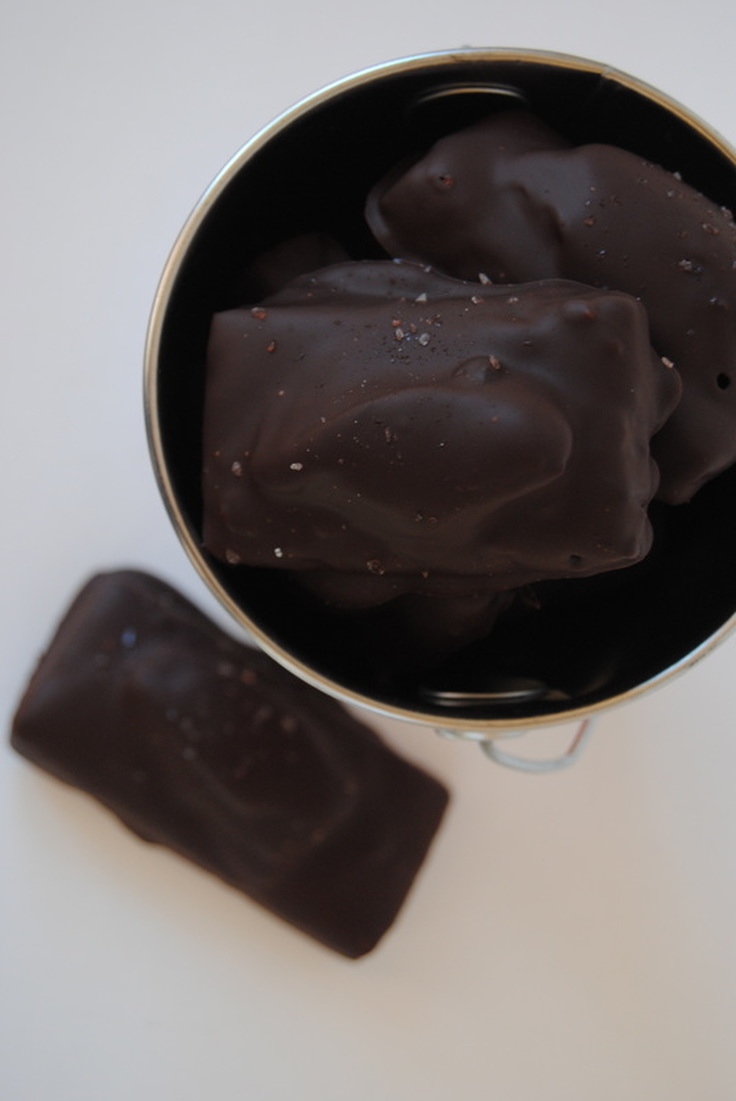 These candy bars are a perfect addition to your Halloween treats this year, you can make now or save this recipe until next week. And the fun you will have making them can become another holiday tradition. If you haven't figured out the classic favorite we are replicating let's just say that this candy's name rhymes with tricks (as in trick or treat) and you can share one with a friend and pick a side. If you're still stumped leave a comment and we'll help you out! Trick or treat (we pick treat!), Jess and Cecelia 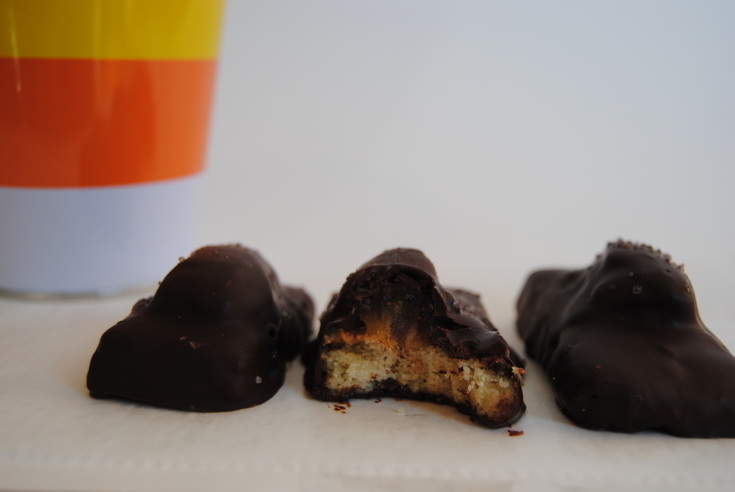 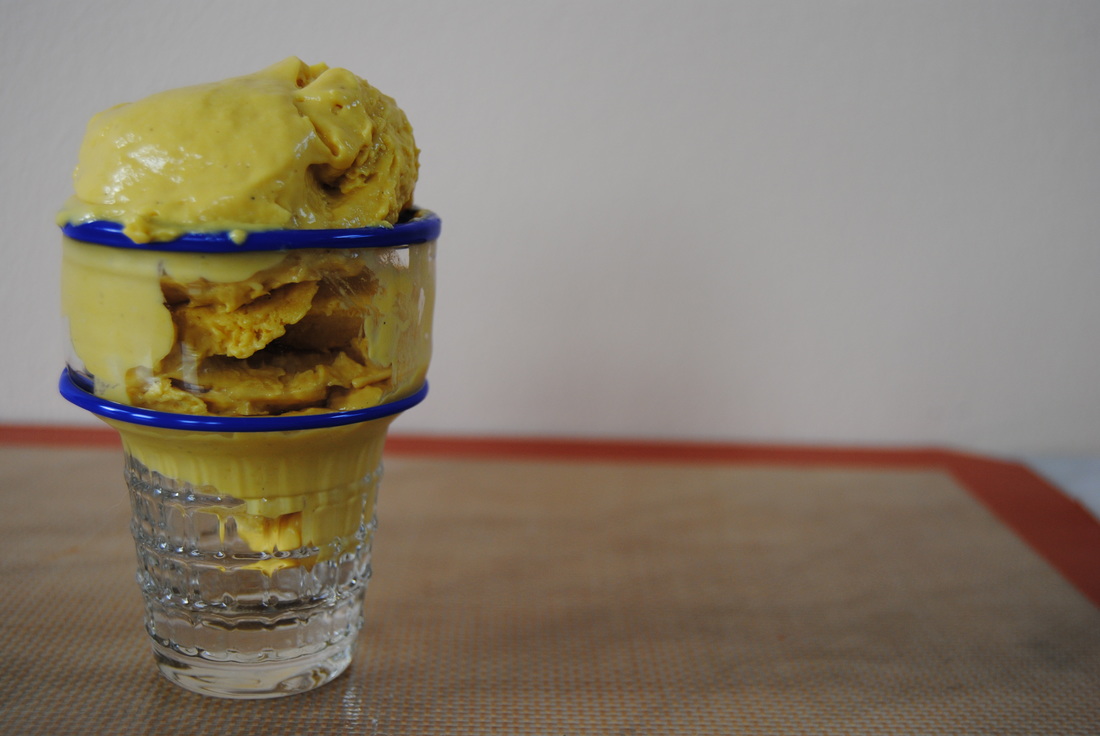 Ok, we know - the saying is "cool as a cucumber" but we think cashews are pretty cool too. Especially in the form of raw, dairy free cashew ice cream. What better way to stay cool on these hot days and feel okay about an everyday ice cream fix. But let's first explore how cashews can do so much more in the kitchen then you ever thought! 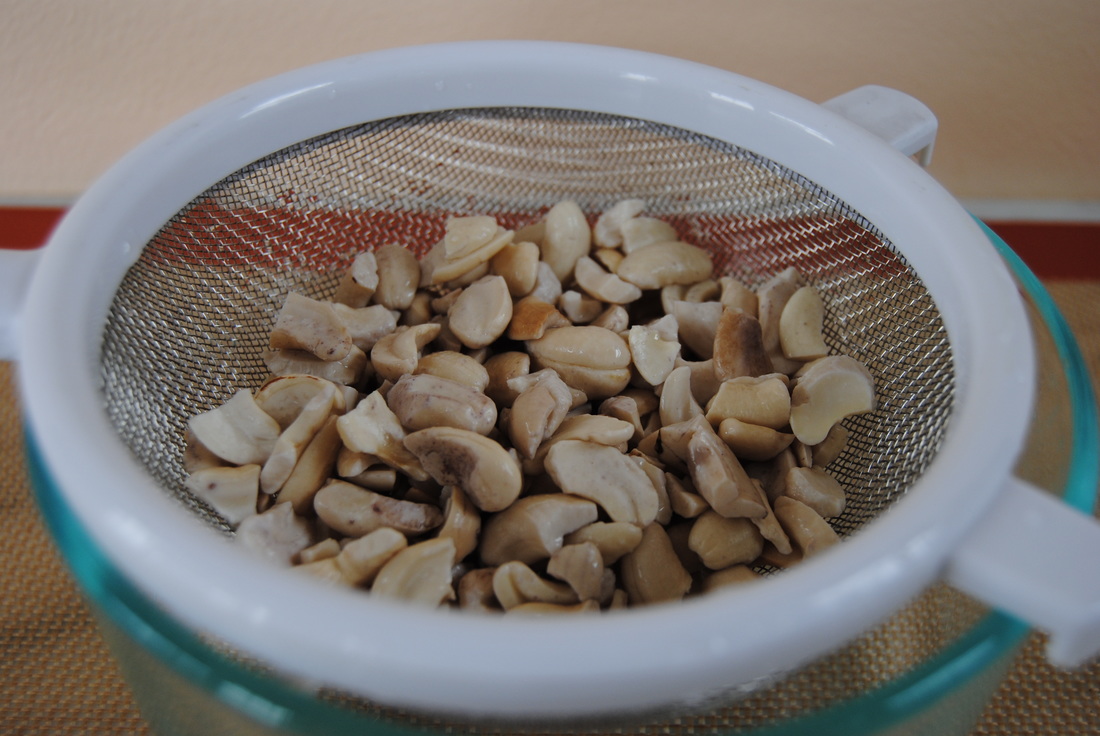 So what we are using for this fabulous ice cream is known as cashew cream - basically a vegan, dairy free alternative to heavy cream that can be used in very similar ways. Like heavy cream, cashew cream has a mild taste and high fat content perfect for creamy soups, alternative cheese spreads/fillings/sauces, and of course ice cream. You just need to remember to give yourself adequate soaking time for the cashews, so a little planning ahead, and a good high speed blender for best results. Cashew cream can be stored in the fridge in an airtight container and is best used within 3-5 days. Even if you are a little skeptical about the idea of a nut replacing your heavy cream, cashew cream is at least worth a try - it's only two ingredients and very simple to prepare. Also, since we are using raw cashews and fruit for this ice cream this is another raw post! Once you taste it we swear you won't know that this ice cream is dairy free, vegan and raw! Mango Tango Raw Cashew Ice Cream PREP TIME: 5 mins (plus 8 hour or overnight soak) TOTAL TIME: 10 mins (plus 30 min-3 hour freeze) Servings: ~ 1 pint Ingredients 2 Cups frozen mango 1 Cup raw, unsalted cashews 1/4 Cup fresh orange juice 2 Tbsp pure, dark maple syrup 1/2 vanilla bean, inside scraped out or 1/2 tsp pure vanilla extract Optional topping: chili lime salt for a kick! (we used Tajin brand) Place 1 cup cashews in a bowl and cover with room temperature water. Allow cashews to sit for at least 8 hours or overnight to soften up. Drain and rinse soaked cashews and set aside. We prefer to use a good quality, high speed blender such as Vitamix or Blendtec to achieve the perfect texture for this ice cream. Add frozen mango, soaked cashews, orange juice, maple syrup, and vanilla bean to the blender and blend on high for 3 minutes or until a thick, creamy mixture forms. Store mixture in an air tight container in the freezer for a minimum of 30 minutes for soft serve like texture or 3 hours for a firmer, scoopable ice cream. If storing in the freezer for a later date, allow ice cream to thaw out a bit prior to serving, about 15-30 minutes on the counter. Cashew Cream PREP TIME: 2 mins (plus 8 hour or overnight soak) TOTAL TIME: 5 mins Servings: ~1 cup Ingredients 1 cup raw, unsalted cashews Water Place cashews in a bowl, submerge with water, cover with a lid and let sit on the counter for at least 8 hours or overnight. Drain and rinse cashews and add to a high speed blender with 1/2-3/4 cup filtered water. Blend on high for 3 minutes or until a smooth, luscious texture is formed. Vary the amount of water added to the blender based on the consistency of cream you like. Flavor sweet or savory or leave as is. 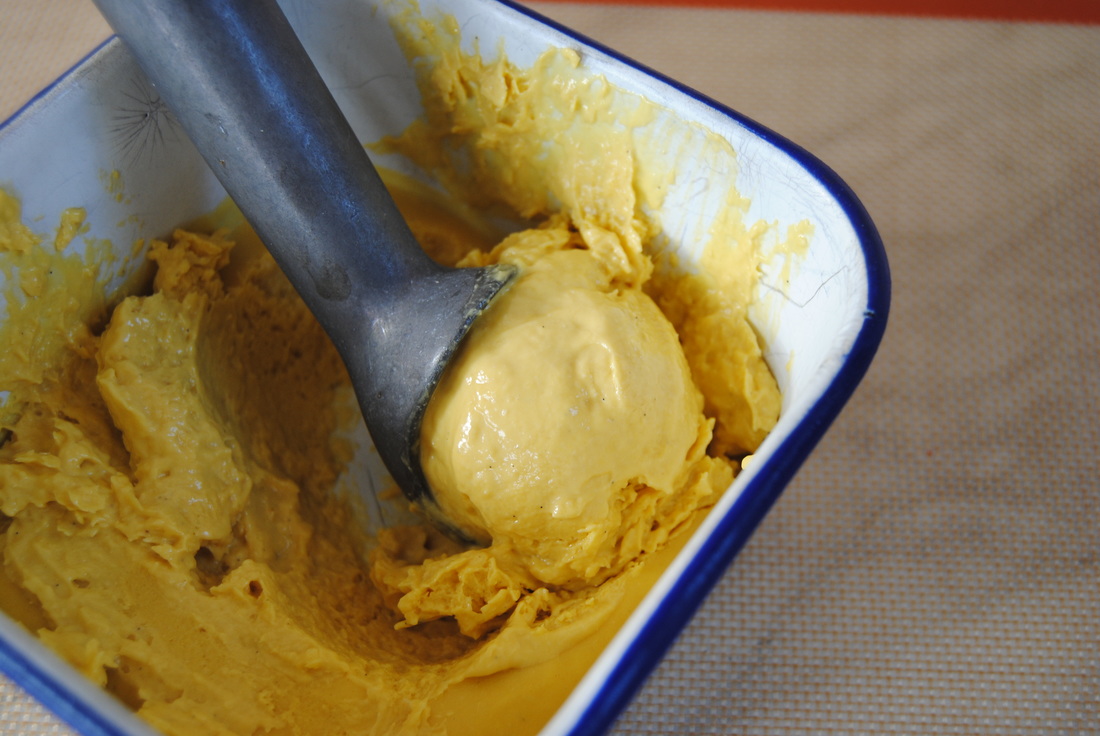 Now isn't cashew just so cool!? Save this recipe for cashew cream and start testing it out in the kitchen. Though ice cream is an August favorite we bet you will find many more uses for cashew cream throughout the year. You can bet we will be using it in recipes to come. Stay cool, Jess and Cecelia 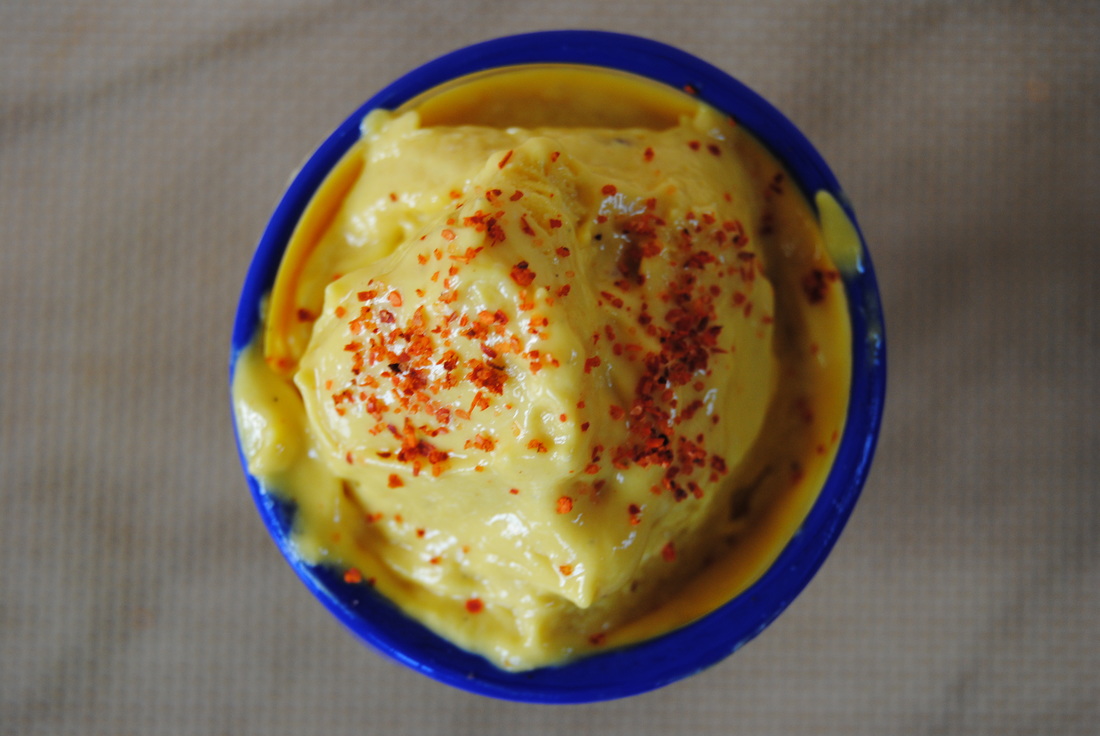 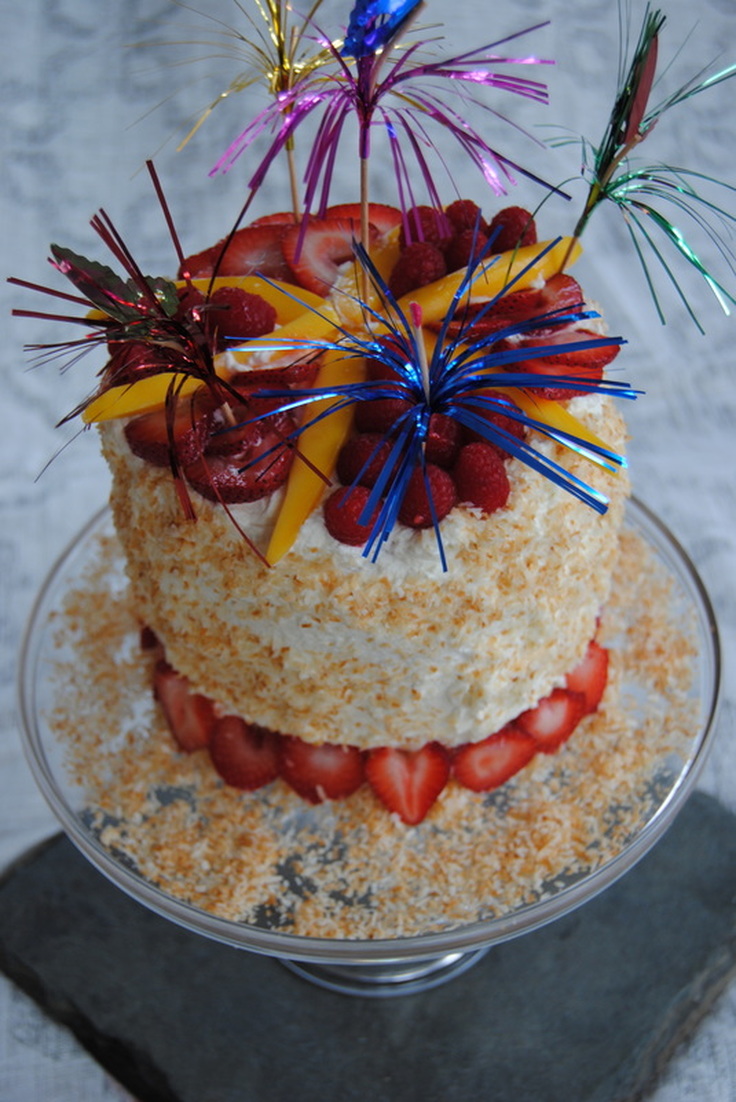 More fun things happening at TGBK friends, and this time we are celebrating Jess's birthday! You know we love a reason to celebrate because that means more treats. When discussing what to make for the big day it came out that Jess's favorite birthday treat growing up was a cake shaped slice of watermelon with birthday candles (i mean dietitian in the making right!). So of course we had to take it to the next level this year- a gourmet, gorgeous watermelon cake. Though the watermelon is one of the stars here, our homemade whipped cream is some close competition and the two pair perfectly. So lets discuss whipped cream first and then we'll get to celebrating! 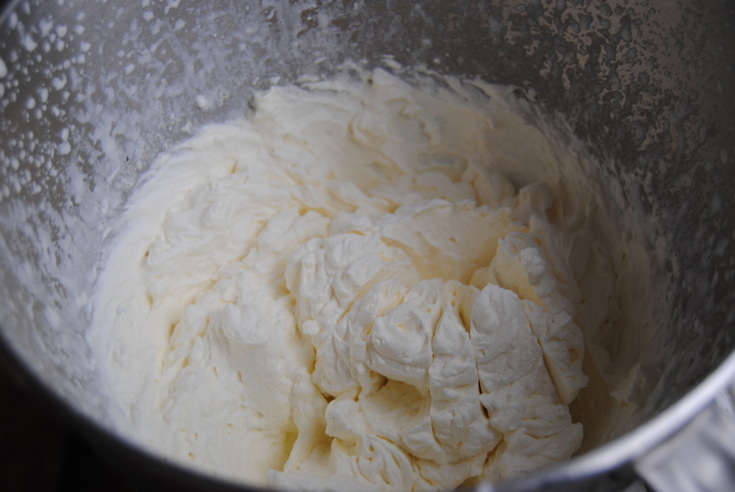 We LOVE homemade whipped cream and know you will too. The taste and texture are superior to anything you will find pre-made and the ingredients just can't compare. Imitation whipped cream contains no heavy cream at all! Instead you will find hydrogenated vegetable oil, high fructose corn syrup, skimmed milk, light cream, artificial favors, xanthan and guar gum. We much prefer our rich, delicious, pure whipped cream made from the simplest ingredients: organic heavy cream, cane sugar, and vanilla bean. The process of creating whipped cream is interesting too (for food nerds like us of course). During the whipping process millions of air bubbles are getting whisked into a liquid; at the same time the whisking is emulsifying fat globules allowing them to join together and form a protective shield keeping the air suspended in the liquid creating your light, airy whipped cream. Because of this delicate science only certain types of liquid can be successfully whipped. Heavy whipping cream is ideal because of its high fat and minimal water content. Full fat coconut milk can also be whipped once most of the water is removed. To do this put your can in the fridge overnight - this should separate the coconut fat solids from the water. Once opened skim the water off and use just the creamy solids for whipping. Also cold equipment will help the whipping process so stick your bowls and whisks in the freezer before you get started. But remember with every science experiment your results may vary, but don't get frustrated, it will always be delicious! Jess's Watermelon Birthday Cake PREP TIME: 20 mins TOTAL TIME: 30 mins Servings: 8 slices Ingredients Cake 1 seedless watermelon Whipped Cream 16 oz organic heavy whipping cream 2 Tbsp cane sugar 1/2 vanilla bean pod, seeds scraped out Toppings 1 champagne (yellow) mango, sliced 1/4 cup raspberries 1/4 cup strawberries, sliced 1/2 cup toasted coconut Place bowl and whisk of an electric mixer in the freezer for at least 10 minutes to chill (a cold bowl and whisk will whip the cream faster). Pour 16 oz of heavy whipping cream into the cold mixer. Turn on high and whisk for 5 minutes until soft peaks form. Add sugar and vanilla and whisk again on high until stiff peaks form. Cut off the top and bottom of the watermelon so it can sit flat on the cutting board. Slice the rind off the middle and cut into a cake like shape (as shown in the picture below). Place the watermelon on a serving stand or a platter and evenly spread a layer of whip cream on the top and sides of the cake. Organically toss the toasted coconut on all sides of the cake. We found that using a large spoon to sprinkle the coconut from top to bottom of the cake worked well. Arrange the sliced fruit on top of the cake. We choose mango, raspberries, and strawberries but feel free to top with your favorite fruit! Slice cake in 8 equal pieces. Serve and enjoy! 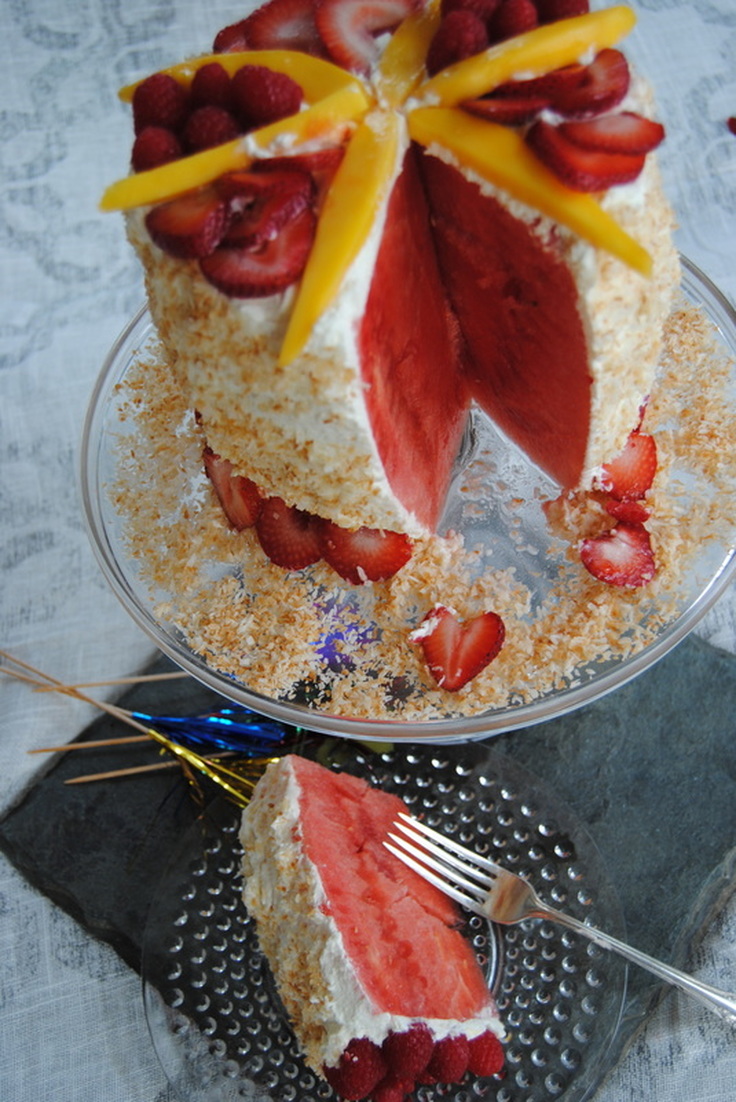 This cake is Jess approved, she agrees that this beats a slice of watermelon with candles! The rich homemade whip compliments the sweet juicy watermelon to create the perfect light dessert for a hot summer day. We hope you love this one and are enjoying the holiday weekend. There is much to be celebrating! Party on, Jess and Cecelia 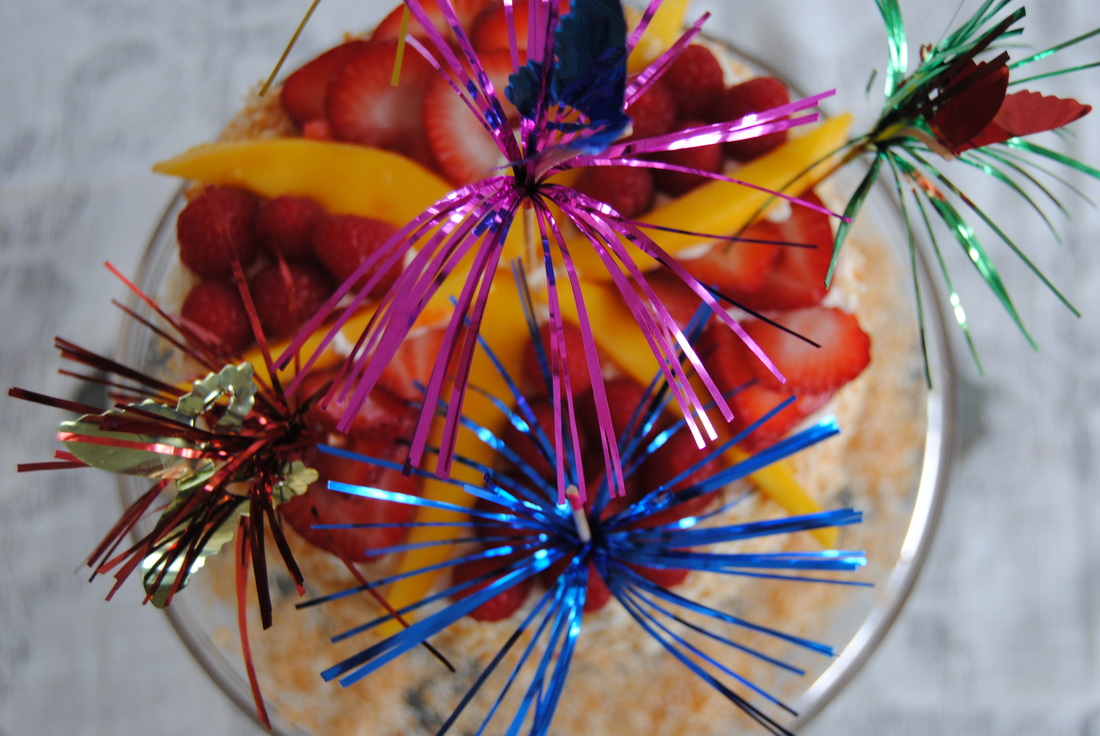 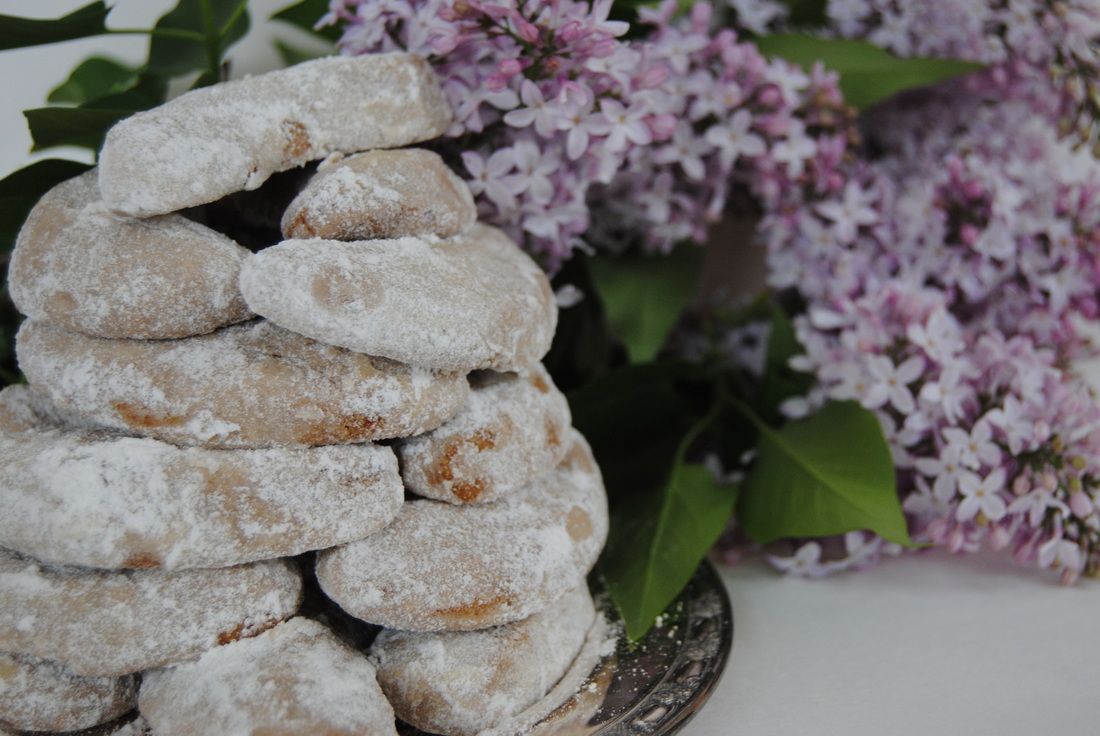 Guess who's getting married at The Green Blossom Kitchen, Cecelia! She is marrying her high-school sweetheart, Travis, next weekend so of course we had to celebrate with Italian wedding cookies and her favorite flower, lilacs. As usual we gave the standard recipe a little make-over which includes the use of alternative flours. Remember the almond flour you saved from our matcha latte and homemade almond milk post a few months ago? Oh yeah! Get that out and let's get started! 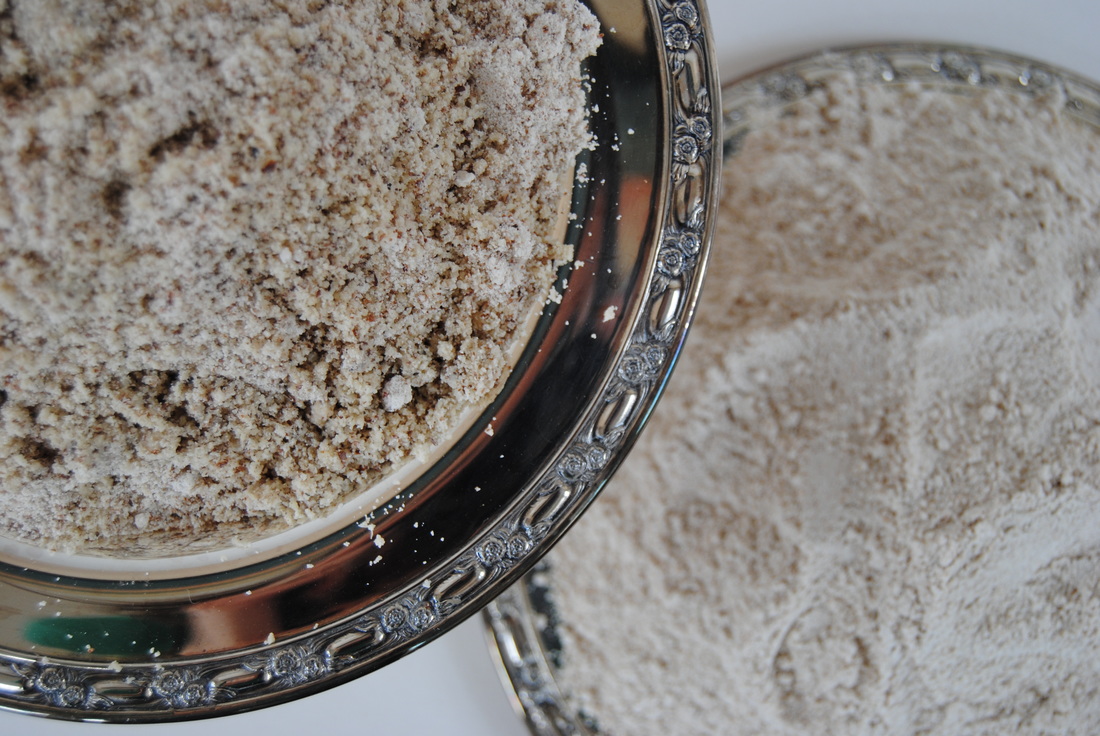 We love using alternative flours in baking, not only for the nutritional benefit but also for the varying depth of flavor they can provide to baked goods. We chose sprouted spelt flour and almond flour for this recipe. Spelt is considered an ancient grain dating back over 9,000 years. It is more water soluble than wheat making the key nutrients in spelt easier for the body to digest, and even more so in the sprouted version we chose. Whole grains are actually dormant seeds which can be sprouted by soaking the seeds in water. Once soaked you could say that the grain "wakes up" and creates a small sprout or living plant. The sprouted grain is then dried (using low heat methods to avoid killing the live nutrients) and ground to create the various sprouted flours. This process makes the grains slightly higher in nutrients and makes the nutrients more available to your body because they are easier to digest. Sounds pretty good right? Spelt flour has a slightly nutty flavor and can easily replace whole wheat flour in most recipes. The other flour we used in this recipe is almond flour which is made from ground almonds and is a byproduct of almond milk, homemade or otherwise. Almond flour is naturally gluten free and has a richness that you will not find in grain flours because of the healthy fat content of almonds. We suggest replacing 1/4 cup of flour in a recipe with almond flour, any more may create a crumbly finished product due to the lack of gluten which acts as a binder in recipes, especially ones that are egg-free. Alternative flours are readily available at specialty grocers though are becoming more available at many grocery stores. So keep your eye out in the baking aisle for a grain other than your standard whole wheat (no offense!). If you find something sprouted, even better! One brand that we like for alternative flours is Rob's Red Mill though we are not aware of any sprouted options currently. So who's ready to get floured? 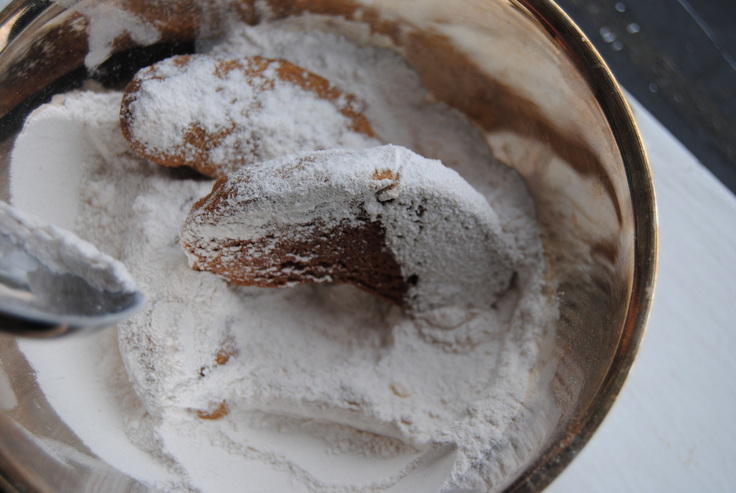 Cecelia's Wedding Cookies PREP TIME: 20 mins (+ 1 hr to chill dough) TOTAL TIME: 40 mins Servings: ~24-30 cookies Ingredients 2 cups sprouted spelt flour 1 cup almond flour (store bought or saved from our almond milk recipe) 1 cup organic, grass fed butter (room temp) 3/4 cup powdered coconut sugar 1 1/2 tsp powdered star anise 1/2 vanilla bean 1/2 cup powdered cane sugar (reserved for tossing warm cookies in) You likely will not be able to find powdered coconut sugar but can create your own as we did if you have a high speed blender such as a vitamix (dry blade). Add granulated coconut sugar to dry blade blender and blend on high for 3-5 mins until sugar becomes a powder. If you do not have a high speed dry blender then look for vegan and/or organic powdered sugar to purchase. The same goes for the powdered sugar coating, this can be made from cane sugar in your dry blender or purchased. In an electric mixer, cream the butter and powdered coconut sugar on medium high speed until light and fluffy. Scrape out the inside of 1/2 vanilla bean and add to the mixer along with the powdered star anise. Add 1 cup almond flour, and slowly add 1/2 cup of spelt flour at a time to mixer until full 2 cups have been added. Wrap finished dough in plastic wrap and store in the fridge until completely chilled ~1 hour. Once dough is chilled turn oven on to 350 degrees, prepare a baking pan with a fitted sheet of parchment paper, and begin shaping your cookies. These cookies can be shaped as crescents (shown in the picture above) or simply roll them into a small ball. Bake cookies on parchment lined baking sheet for 16-18 mins or until golden brown around the edges. Take the cookies out if the oven, allow to slightly cool for ~5 minutes and toss in powdered cane sugar until completely coated with sweetness! 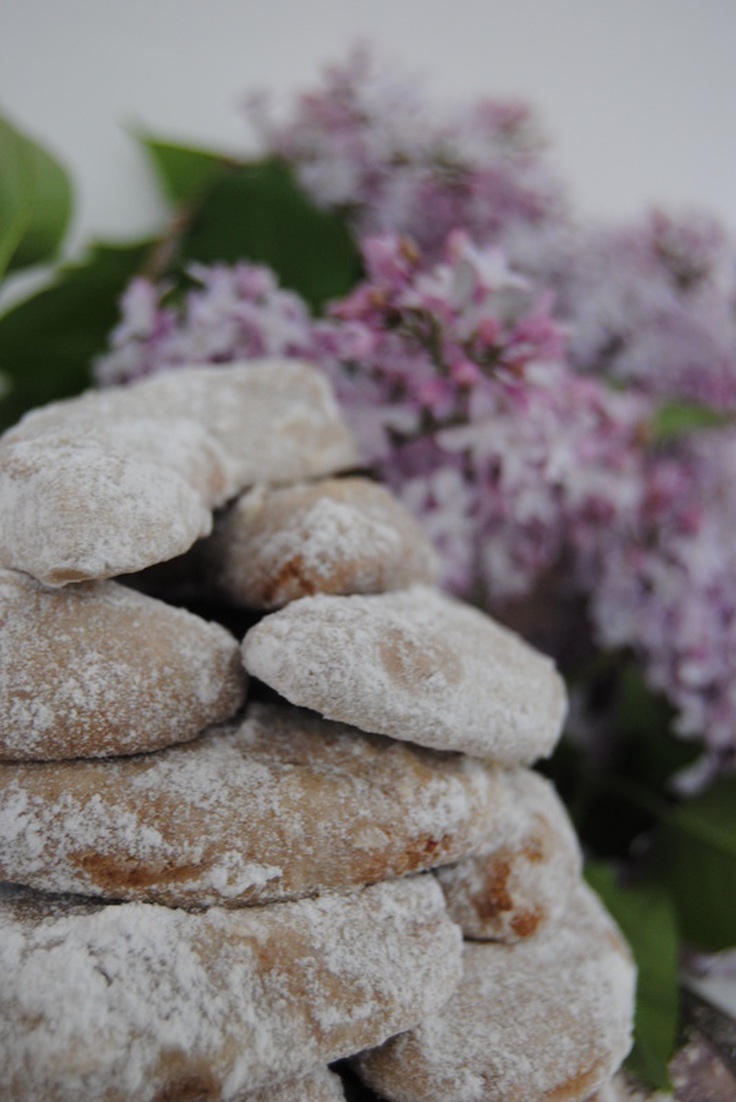 Yummmmmmm. We hope you like the flavor of star anise as much as we do because it really shines in this recipe highlighted by the richness of the butter and powdered coconut sugar. Though Cecelia is 50% Italian and what would an Italian wedding cookie really be without it? Enjoy these with a cup of your favorite tea and send some well wishes our way. Since Jess will be traveling to attend the wedding and Cecelia will be busy (saying I do!) we will not be posting a recipe next week (gasp!). Maybe take this opportunity to look back a try something you may have missed over the last several months. We will be back soon! Much love, Jess and Cecelia  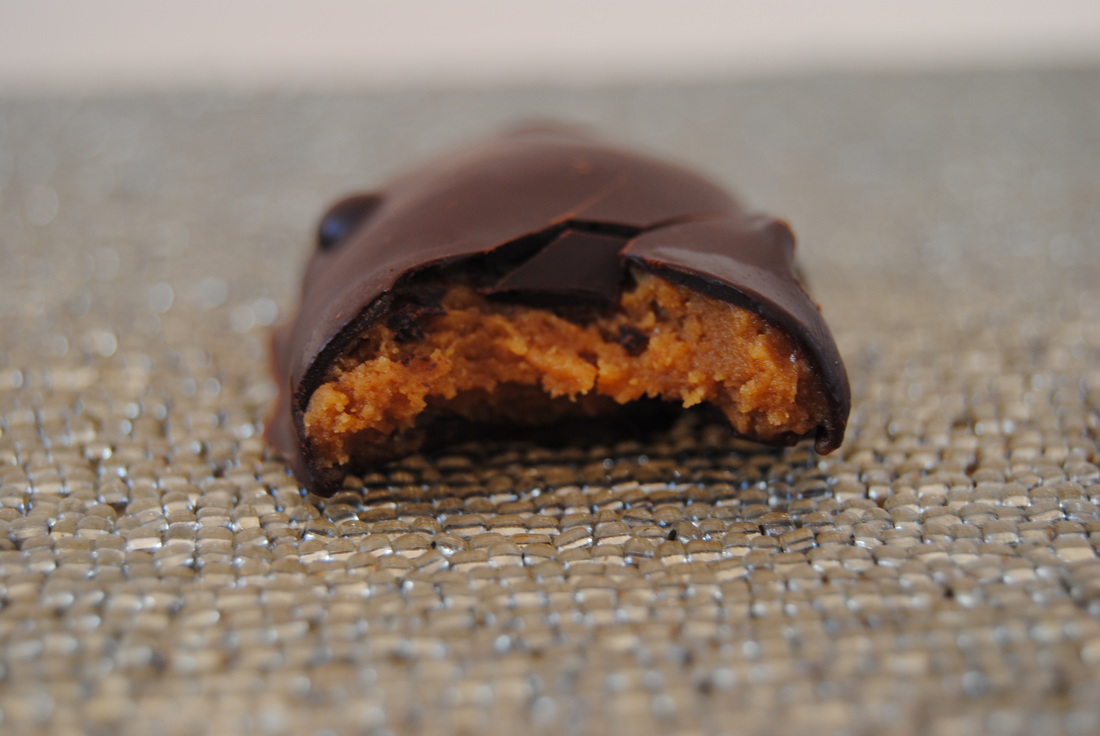 The temperatures are finally bearable in Chicago and a holiday weekend is upon us! Though while you're busy hiding Easter baskets this year maybe take a second to think about what might be hiding in those Easter candies. We know, we know - those treats are only (mostly) for special occasions but that doesn't mean they can't be nutritious and contain good ingredients now does it? We swear these peanut butter eggs are better than anything you'll find in a package and only contain five simple ingredients. Maybe buy some yellow paper to wrap them in and no one will ever know the difference! What the heck is in the classic peanut butter egg anyway and have you ever even looked at the ingredients list? It starts decent with milk chocolate, peanuts, sugar, corn syrup and cornstarch, all pretty familiar. However, there are a few unsettling ingredients hidden in those eggs we just had to tell you about. PGPR is the first; used as an emulsifer and short for ployglycerol polyricinoleate, it is a yellowish, viscous liquid (ew!) composed of ingredients commonly found in caster oil. PGPR is used in a few big name candy companies in place of cocoa butter due to the lower cost. The next is partially hydrogenated vegetable oil (palm kernel and palm oil), aka trans fat. Trans fat is a man made fat that goes through processing to change the chemical structure causing the oil to unnaturally become solid at room temperature. Partially hydrogenated oil has a long shelf life which is why you see it in many processed foods. So what's wrong with that? Trans fat is like a "rotten egg" for your heart; it increases your LDL (bad cholesterol) and deceases your HDL (good cholesterol). For this reason trans fat, in our opinion, is one of the worst "foods" to ingest. Please do your body a favor and avoid any food containing partially hydrogenated oils! So now let's compare these ingredients to our five wholesome ingredient recipe and let your taste buds decide. Dark Chocolate Peanut Butter Eggs PREP TIME: 5 mins TOTAL TIME: 40-50 mins (includes chilling) Servings: 8-10 peanut butter eggs Ingredients Filling 1/2 cup natural peanut butter 1/4 cup pure maple syrup 2 tsp coconut flour 1/8 tsp sea salt Chocolate Coating 6 oz dark chocolate (we prefer 72% or greater) 1 tsp coconut oil Combine the filling ingredients-peanut butter, maple syrup, coconut flour, and sea salt in a bowl. Stir until all ingredients are fully incorporated. Place mixture in the freezer to chill for 10 minutes. Once chilled, measure out 1 Tbsp peanut butter mixture and organically form into an egg shape, rolling lightly between your palms. Repeat with all peanut butter mixture. Place the "naked" peanut butter eggs onto wax paper and place back into the freezer for 20-30 minutes to set while you prepare the chocolate coating. Finely chop dark chocolate and melt with coconut oil in a double boiler stirring frequently. Once fully melted remove chocolate from heat. Remove eggs from freezer, making sure they are firm enough to hold their shape when handled. Using a large fork dip "naked" peanut butter eggs into chocolate (working rather fast as to not melt your filling into the warm chocolate), and use a spoon to completely cover eggs with chocolate. Allow excess chocolate to drip off the fork before placing coated eggs onto wax paper. Place eggs in the fridge to allow the chocolate to set. Once chocolate coating is set you can wrap your candies in beautifully colored foil wrappers as we did. Store in the fridge for up to five days. Not only will you feel guilt free while eating a homemade dark chocolate peanut butter egg, but your friends and family will be begging you for the recipe of this classic favorite! 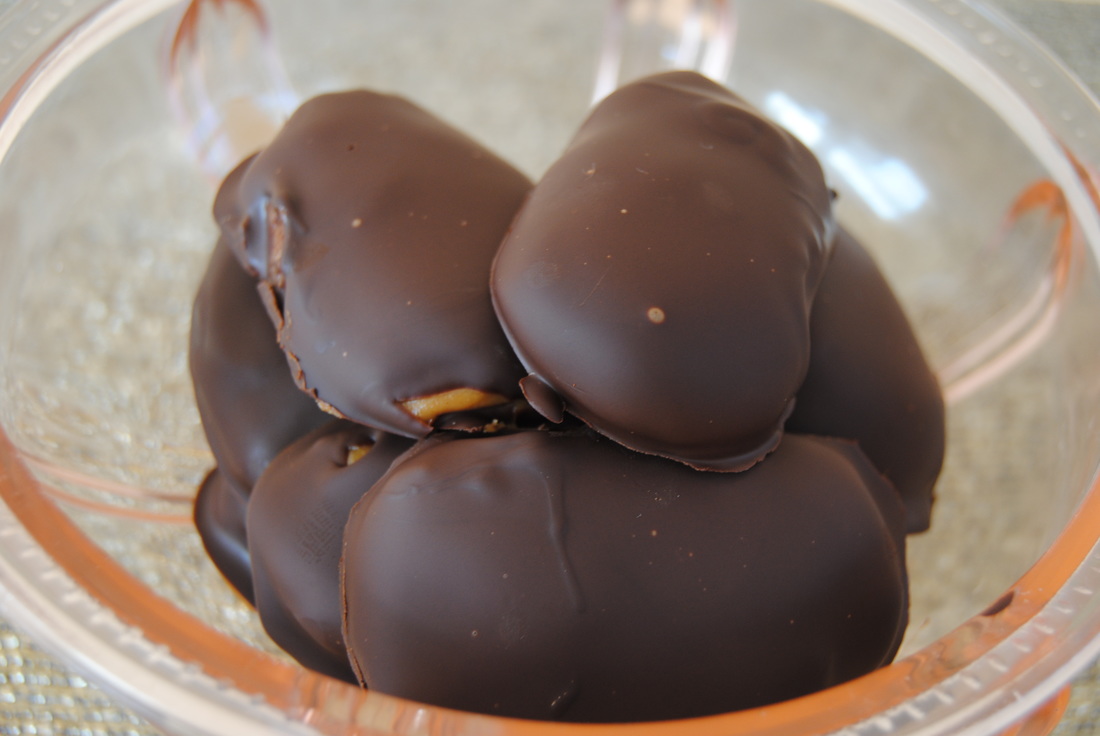 We hope we've convinced you to replace that classic favorite this holiday. And maybe start a new tradition of making these homemade candies together as a family. Looks like you're the lucky one finding this recipe, aka the golden egg. Enjoy it, treasure it, and share it for generations to come. Hoppy Easter, Jess and Cecelia  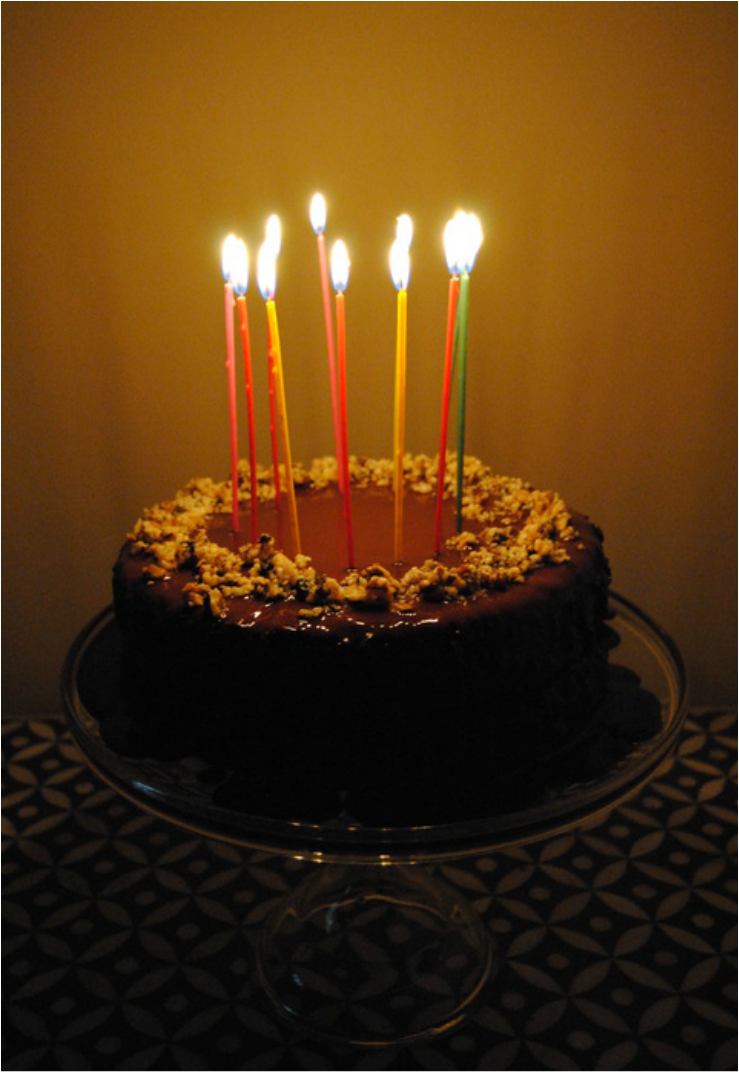 To celebrate both Cecelia's birthday (we won't discuss ages here) and the birth of our blog, we decided that our Olive Oil Blackout Cake would be the perfect first bloom. This cake is everything a good birthday cake should be and more; we've carefully crafted this recipe to provide the most taste with the best ingredients for a final product that will be the best birthday gift you'll ever get (or at least we think so)! You may be looking at the ingredients and making a very long shopping list...but don't worry we've given you substitutes for some products and it's okay to use them. An exception is the coconut sugar because it's a huge part of this recipe and post. With birthdays and sugar-highs on the mind we wanted to give you a quick run down on the nutritional benefits and reasons we love this natural sweetener. 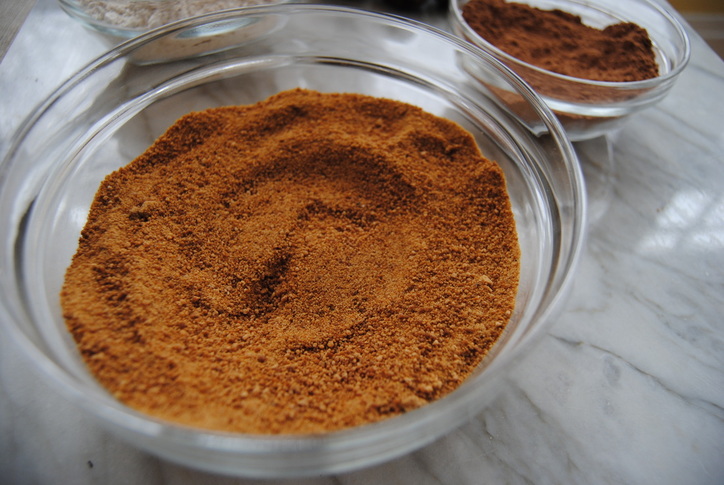
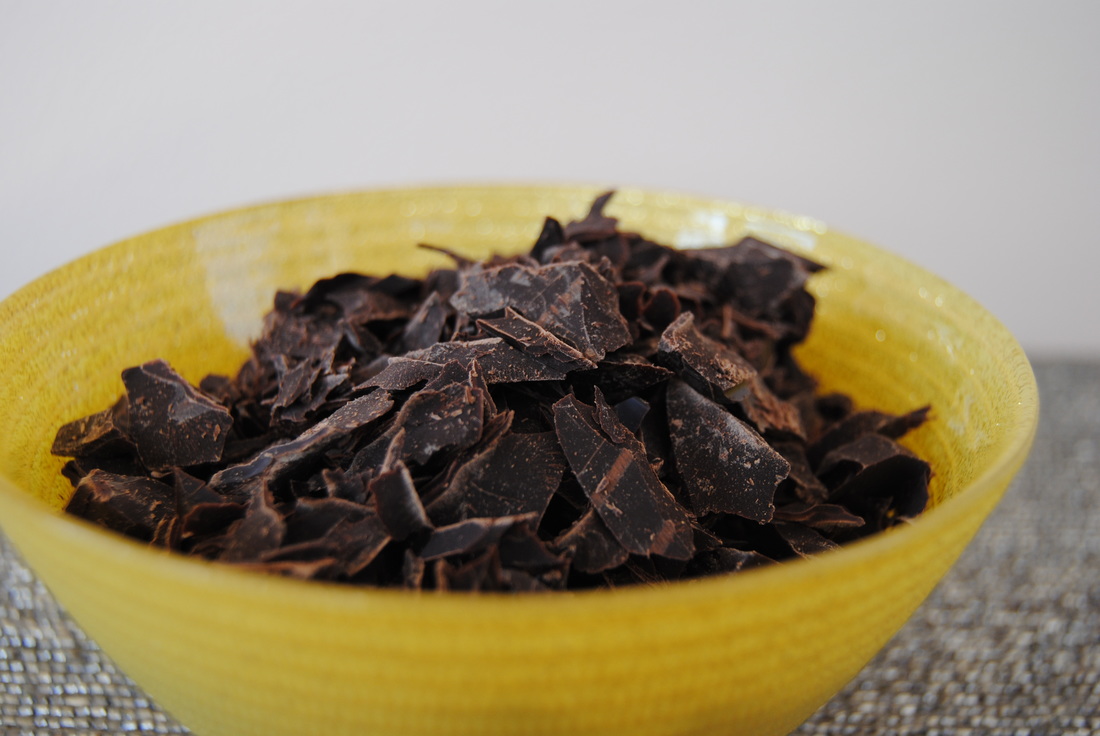
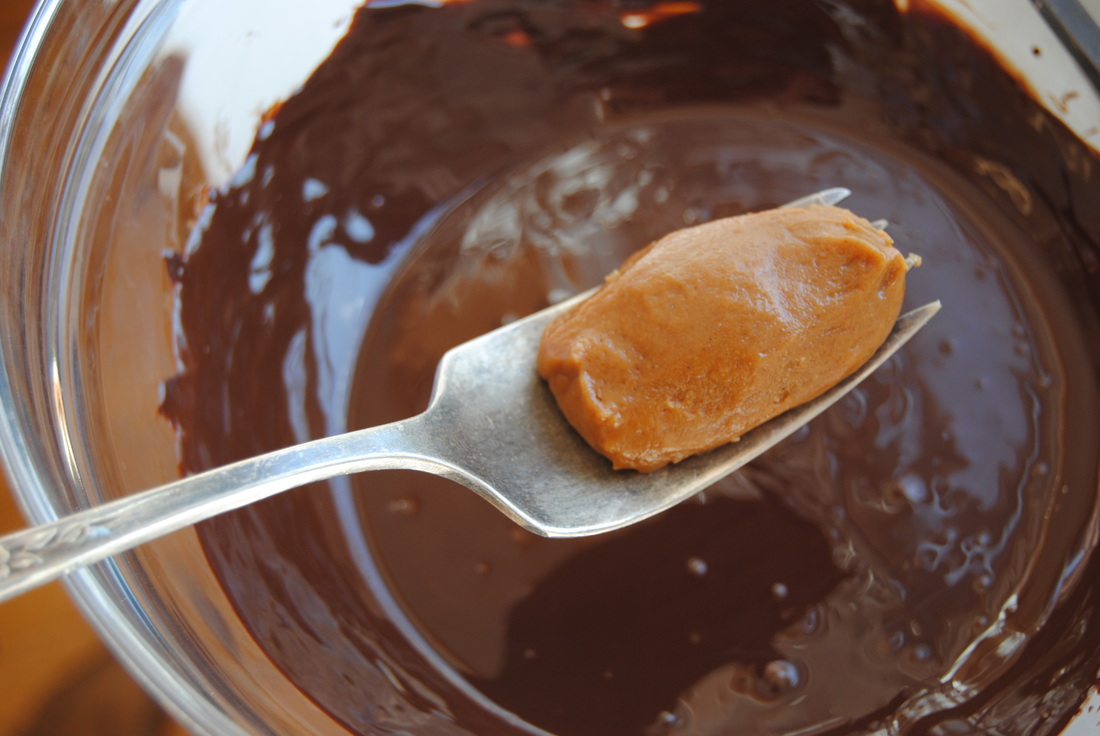
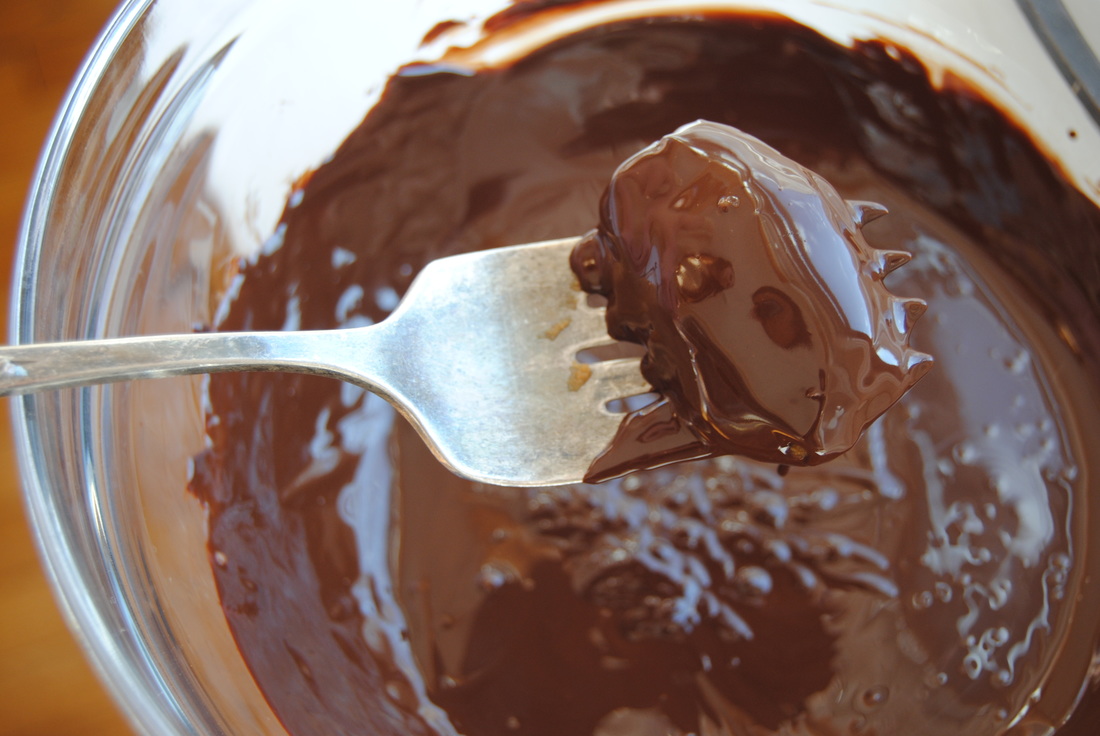
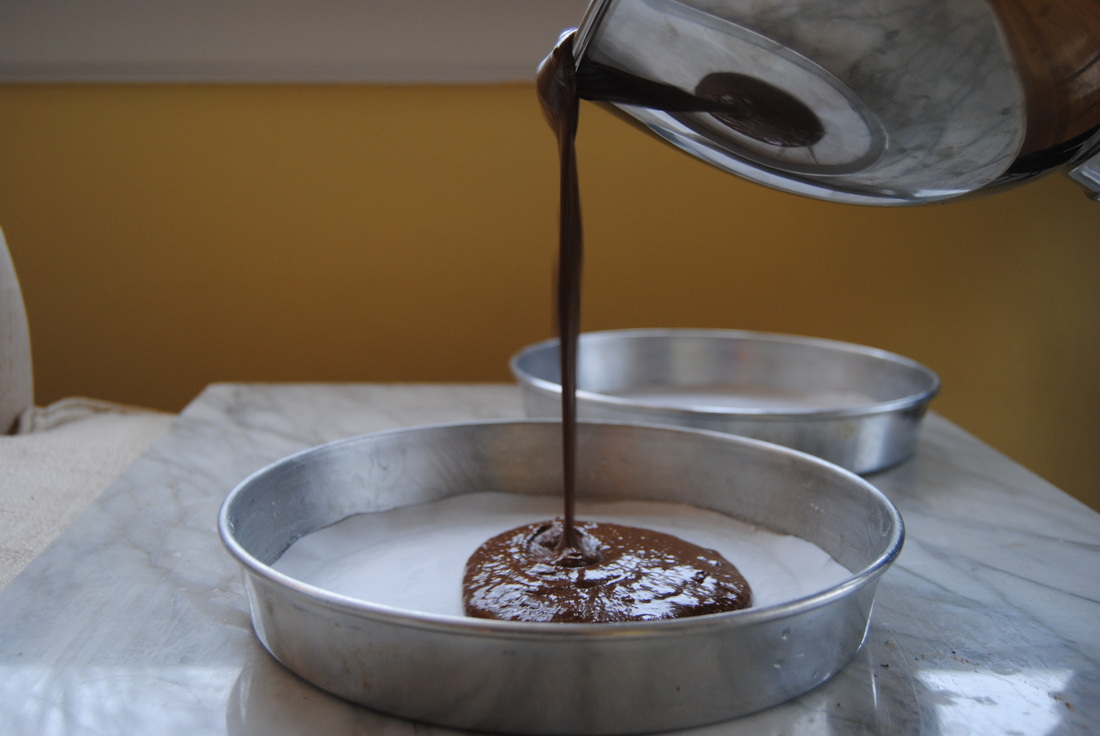
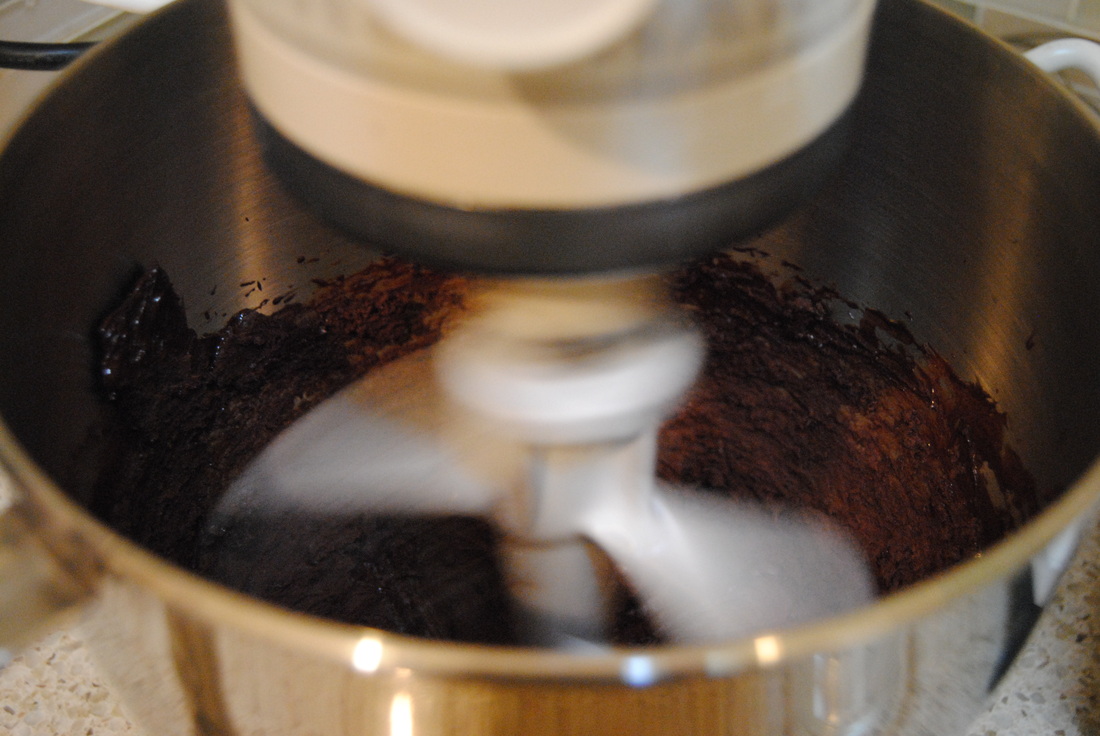
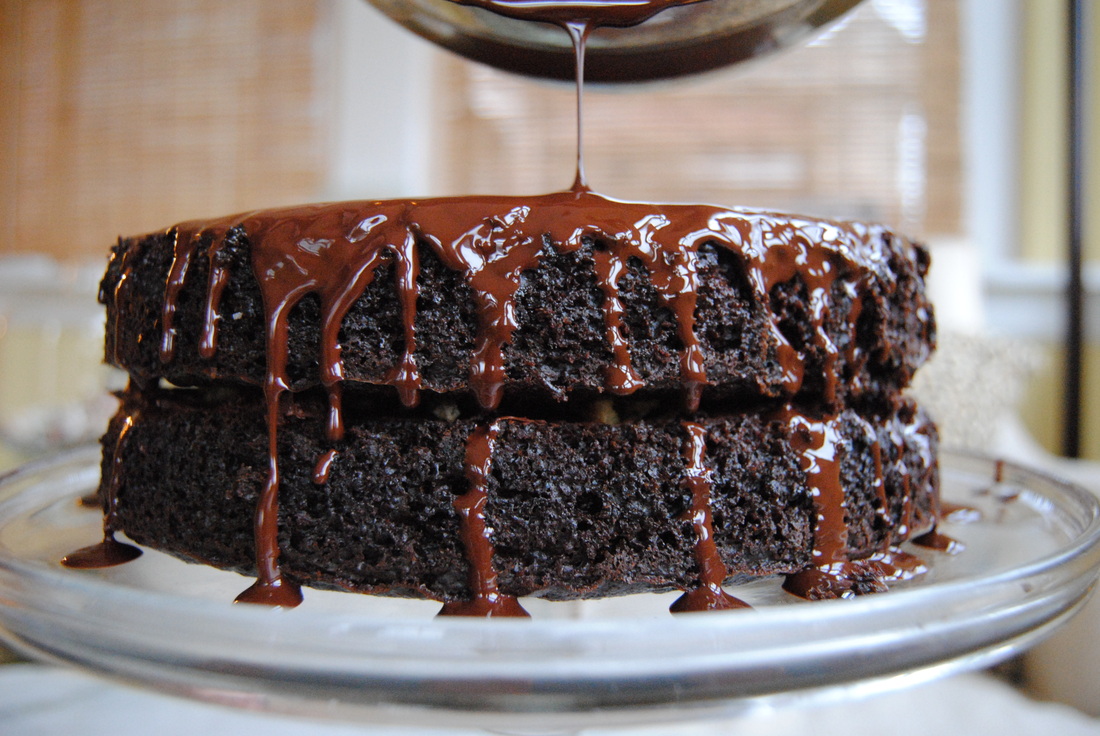
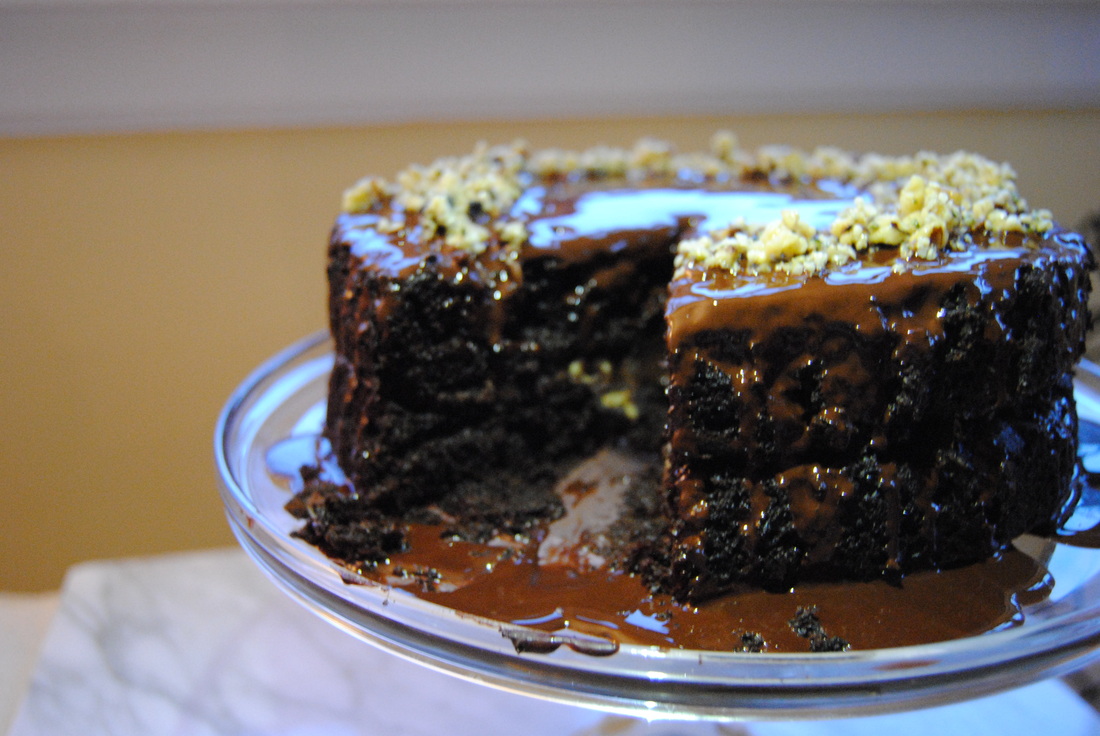
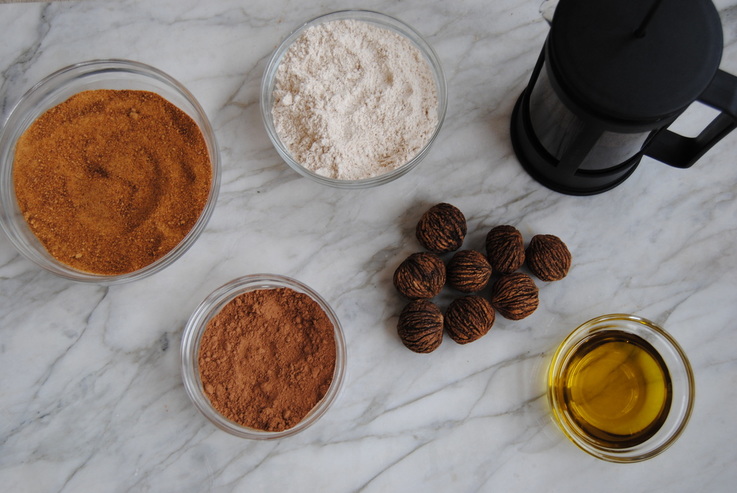 The Olive Oil BlackOut Cake PREP TIME: 40 mins TOTAL TIME: 1 hour 30 mins Servings: 8-12 Ingredients Cake 1 3/4 cup spelt flour (or whole wheat) 2 cups coconut sugar 3/4 cup cacao powder or cocoa powder 2 tsp baking soda 1 tsp baking powder 1 tsp sea salt (we used pink Himalayan) 1 cup "buttermilk" (1 cup coconut milk + 1 Tbsp apple cider vinegar, let sit for 10 minutes to curdle) 1/2 cup extra virgin olive oil 2 Tbsp ground flax seeds + 6 Tbsp room temperature water (let sit for 5 minutes until gelatinous) 1 tsp pure vanilla extract 1 cup freshly brewed hot coffee (we used a French press but any method is fine) Candied Nut/Seeds 1 cup chopped walnuts (would also be great with pecans, almonds, pistachios) 1/2 cup shelled hemp seeds (optional) 2 Tbsp honey 1/3 tsp sea salt Ganache Topping and Frosting 12 ounce dark chocolate (72% cocao or higher), finely chopped 3 heaping Tbsp coconut oil 2 tsp coconut oil reserved for middle frosting layer Preheat your oven to 350 degrees. Lightly coat two, eight inch round cake pans with coconut oil and line bottoms with parchment paper, cut to size, to prevent cake from sticking to the pans. Sift the dry ingredients together - spelt flour, coconut sugar, cacao, baking soda, baking powder and salt - into a large bowl. In a seperate bowl, combine the wet ingredients - "buttermilk", olive oil, ground flax with water, and vanilla - and add the dry ingredients to a standing mixer, fitted with a paddle attachment. With the mixer on low speed, slowly add the wet ingredients to the dry. With the mixer still on low, add the coffee and mix just to combine, making sure to scrape the bottom of the bowl with a rubber spatula. The batter will be pretty thin but don't worry, this is what you want. Pour the batter into the prepared pans and bake for 35-40 minutes until a toothpick comes out clean. Cool in the pans for at least 30 minutes. Meanwhile, begin candied nut/seed mixture. Roughly chop walnuts and add to saute pan. Add the remaining ingredients - hemp seeds, salt, and honey - to the pan. With the pan on medium heat, carefully stir mixture for 2-3 minutes until nuts are lightly toasted. Turn heat off and allow to cool. Begin preparing the ganache. Place chopped chocolate in a double boiler and add 3 heaping Tbsp coconut oil. Allow chocolate and oil to fully melt, stirring often. Once fully melted, pour 1/2 of the chocolate mixture into a separate bowl and place in the fridge to completely cool, this will be use to create the frosting for the middle layer of the cake. Keep the remaining chocolate in the double boiler with the heat off to keep chocolate warm while you work on the frosting, this will be used later for the ganache topping. Once the chocolate in the fridge is cooled, scrape into a standing mixer with paddle attachment and add 2 tsp coconut oil. Whip on high for 3-5 minutes until a spreadable frosting forms, making sure to scrape the bottom of the bowl with a spatula. If your texture is not spreadable continue to whip and possibly add 1-2 additional tsp coconut oil. Carefully place one cake onto a cake plate of your choice. With a butter knife or offset spatula, evenly spread chocolate frosting on bottom cake layer (this may get a little sticky and crumbly but keep at it!). Sprinkle 1/2 of the candied walnut and hemp seeds over the top of the frosting, then carefully place second cake onto the bottom layer. Slowly pour the remaining ganache topping (still warm from the stove) over the top cake layer, allow to drip down the sides. Sprinke the remaining candied walnut and hemp seeds over the top of the cake. Allow the cake to cool/set 30 minutes before slicing......if you can resist the wait! 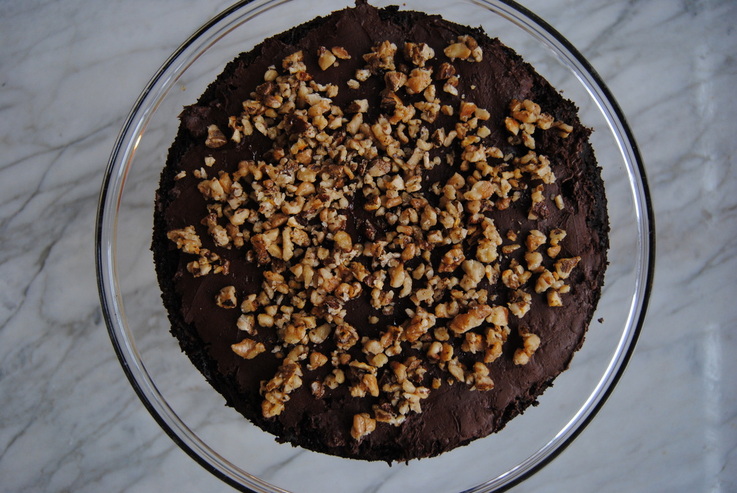 By now you've probably enticed all of your family, friends and neighboors with the rich, chocolately smell wafting from your kitchen. And by taste you would never know that this cake is 100% vegan (yes it's safe to lick spatula/bowls/spoons etc. as you work) and made with ingredients that not only taste good but provide nutritional benefit. So here's to a happy, healthy 29th year to Cecelia and a delicious start to our new endevour, The Green Blossom Kitchen. Please continue this journey with us! Love, Jess and Cecelia  |