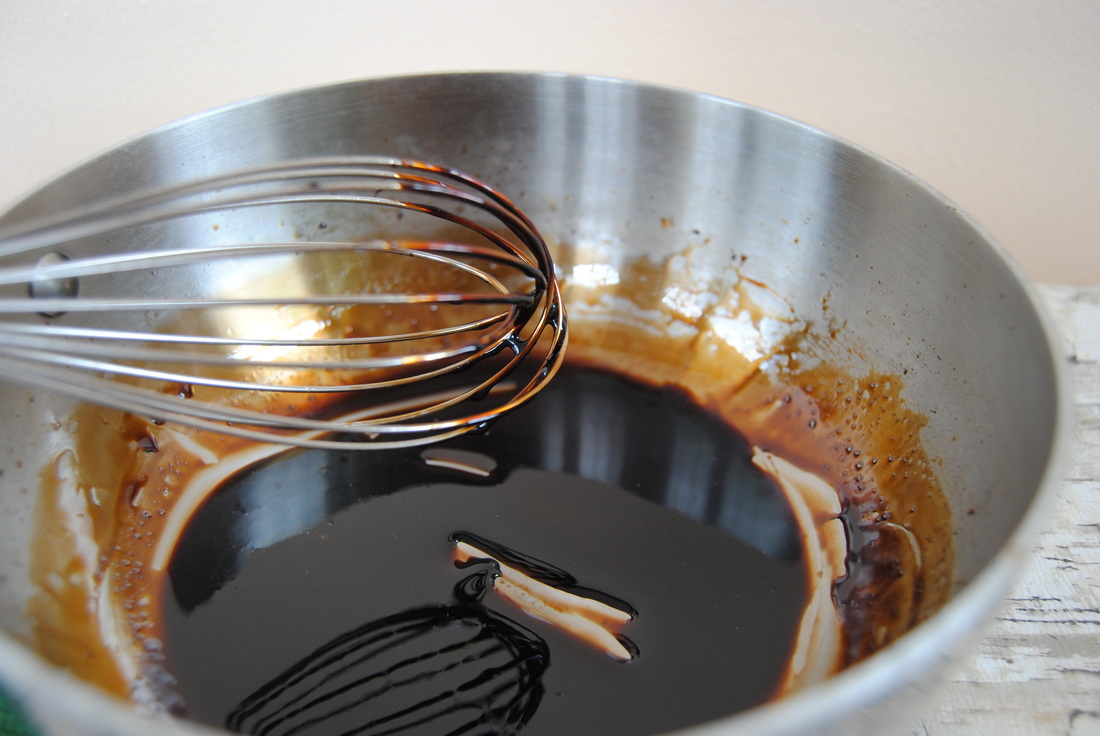
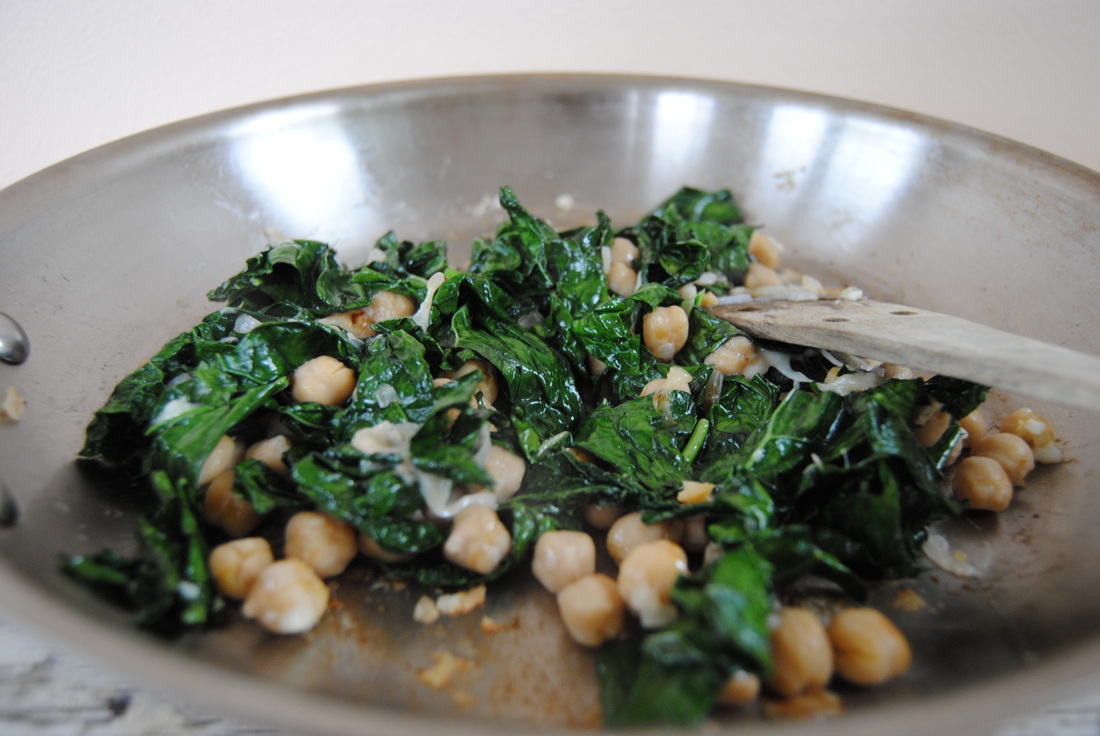
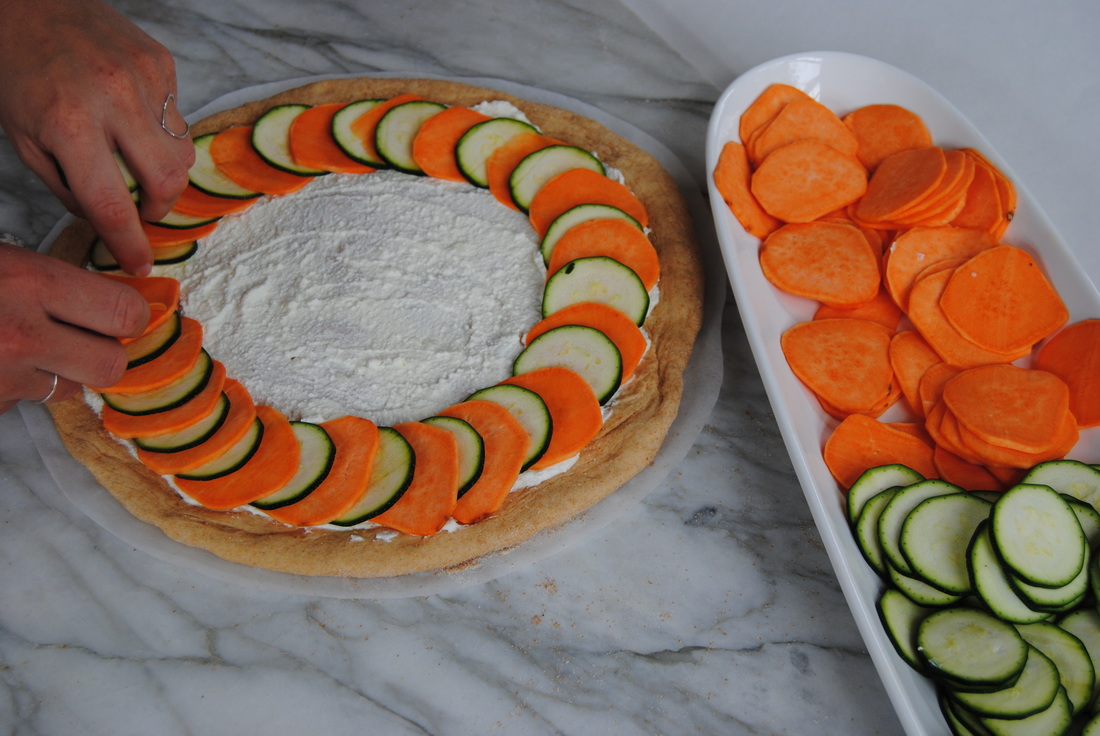
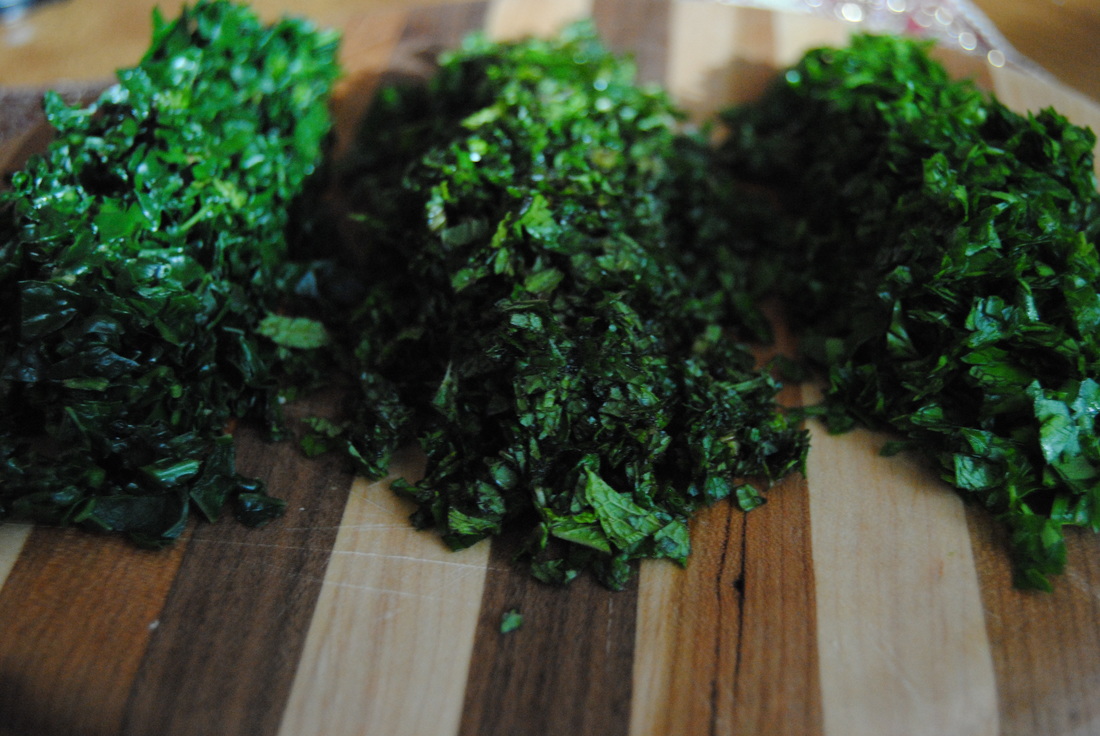
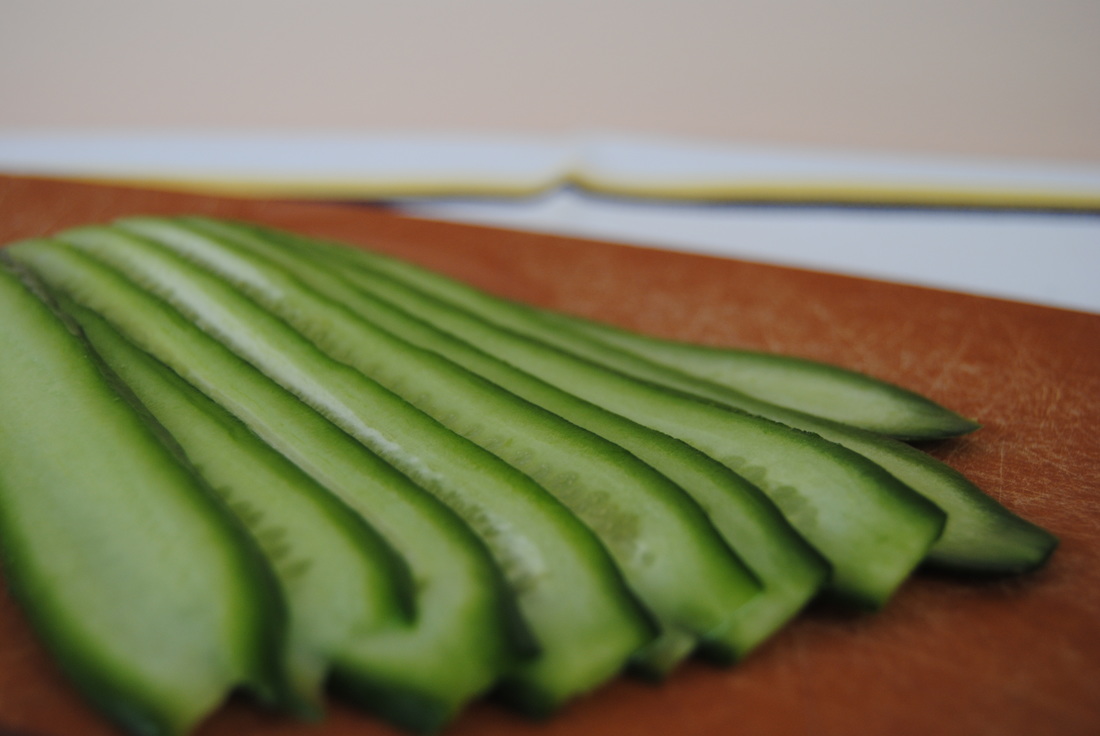
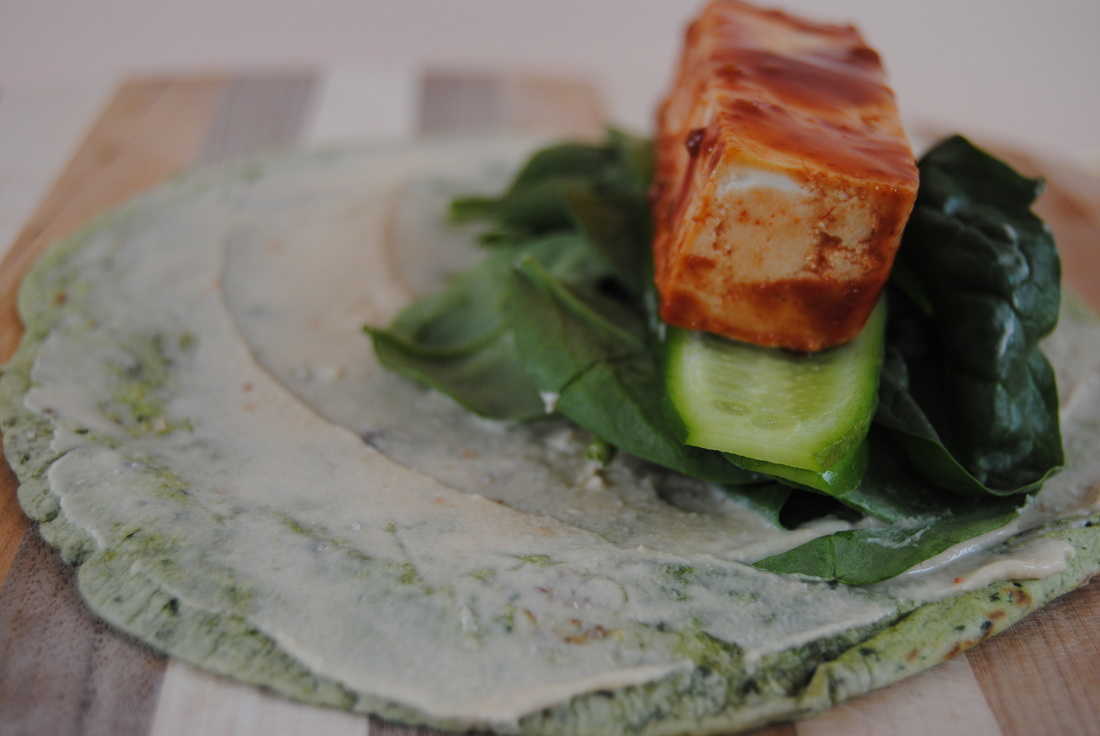
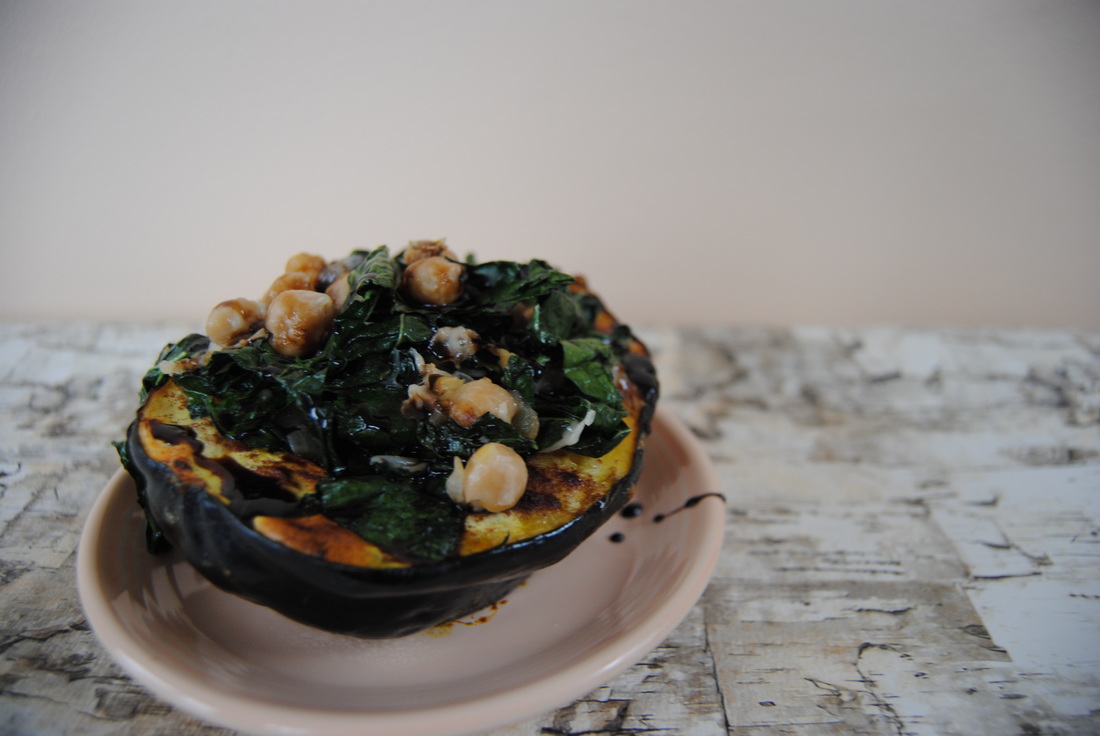
 Okay, so we've accepted that summer is gone in Chicago and have decided to embrace the cooler seasons by celebrating winter squash! No we are not in a rush...it's not winter yet..but it's definitely squash season. To us, no other fall foods can really compete with the versatile squash. With so many varieties and preparations it's almost hard to find time for them all in one season! Say tuned because we have several squash recipes coming this fall including this week's, but let's learn more about squash first. 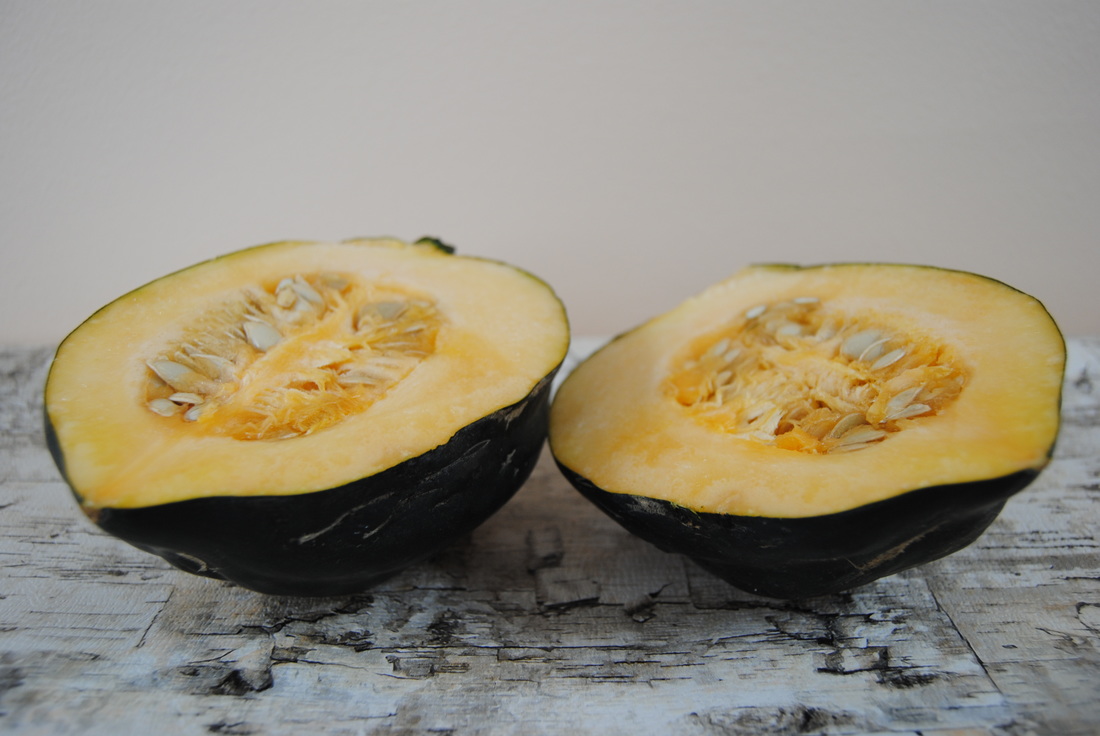 Squash can be categorized in two simple ways, summer squash and winter squash. When it comes to winter squash, the most commonly cooked include butternut, spaghetti, and acorn. Nutritionally, winter squash has more carbohydrates than summer squash but in our opinion remains a deliciously healthy comfort food while still being lower in calories. Now we bet you're thinking how can a food described as "comfort " be low in calories? Well let's compare - one cup of cooked acorn squash contains ~115 calories and 9 g of fiber where one cup of sweet potato contains ~185 calories and 4 grams of fiber. Once baked, acorn squash gives you that same warm, rich taste as other comfort foods but with a different nutrient profile. Not only is acorn squash lower in calories and higher in fiber than other comfort foods, but it also contains ~900 mg of heart healthy potassium and 2 mg of iron per cup. As if you weren't sold already on squash being totally amazing, we still have a delicious recipe to get to! Overloaded Acorn Squash PREP TIME: 25 mins TOTAL TIME: 1 hour 15 mins (includes baking of squash) Servings: 4 (2 servings per acorn squash) Ingredients Squash and Filling 2 acorn squash 1 bunch kale, stems removed and chopped into 2 inch pieces (~2 cups prepared) 2 cups cooked garbanzo beans (prepared from dry using this recipe or 1 can) 1/2 yellow onion, finely chopped 1/2 cup shredded Parmesan cheese 1 Tbsp butter 1 tsp coconut oil Drizzle of honey Sprinkle of nutmeg Sea salt to taste Balsamic Glaze 1/2 cup balsamic vinegar 1 tsp pure maple syrup Preheat oven to 425 degrees. Carefully slice acorn squash in half from stem to tip using a sharp knife. Remove seeds and stringy flesh until the insides are smooth and place on a baking sheet. Spread butter evenly over all four squash halves, drizzle with honey, and sprinkle with nutmeg and sea salt. Bake, cut side up for ~45-60 minutes until the squash flesh is very soft and a knife will easily pass through the flesh and into the skin. To prepare the glaze, add balsamic vinegar and maple syrup to a small saute pan and heat over medium heat until mixtures begins to simmer. Continue to simmer over medium-low heat stirring frequently. After ~10-15 minutes you should notice the mixture thickening and starting to stick to the sides of the pan. The glaze is done when it will stick to the back of a metal spoon without dripping. Once done, pour glaze into a glass bowl and set aside. Note the glaze will harden as it cools and can be warmed for 10 seconds in the microwave to soften. Begin the filling by chopping onion and kale and shredding Parmesan cheese (if your Parmesan is purchased prepared make sure it is shredded and not grated). Heat coconut oil in a saute pan over medium heat, add the onion and a sprinkle of sea salt and saute for ~3 minutes until edges begin to brown. Add kale and garbanzo beans to the pan and continue to saute for another 3-5 minutes until kale becomes soft and turns a bright shade of green. Sprinkle Parmesan cheese over kale and bean mixture and continue cooking until cheese starts to melt (~2-3 minutes) folding mixture with a wooden spoon to evenly coat kale and beans with melted cheese. Once the cheese is fully melted remove from heat. Once the squash is done cooking, let cool for 5 minutes and then fill each halve with 1/4 of the kale, bean and cheese mixture, scraping any crispy Parmesan cheese from the bottom of the saute pan for an extra crunch. Drizzle balsamic glaze over the top and enjoy! 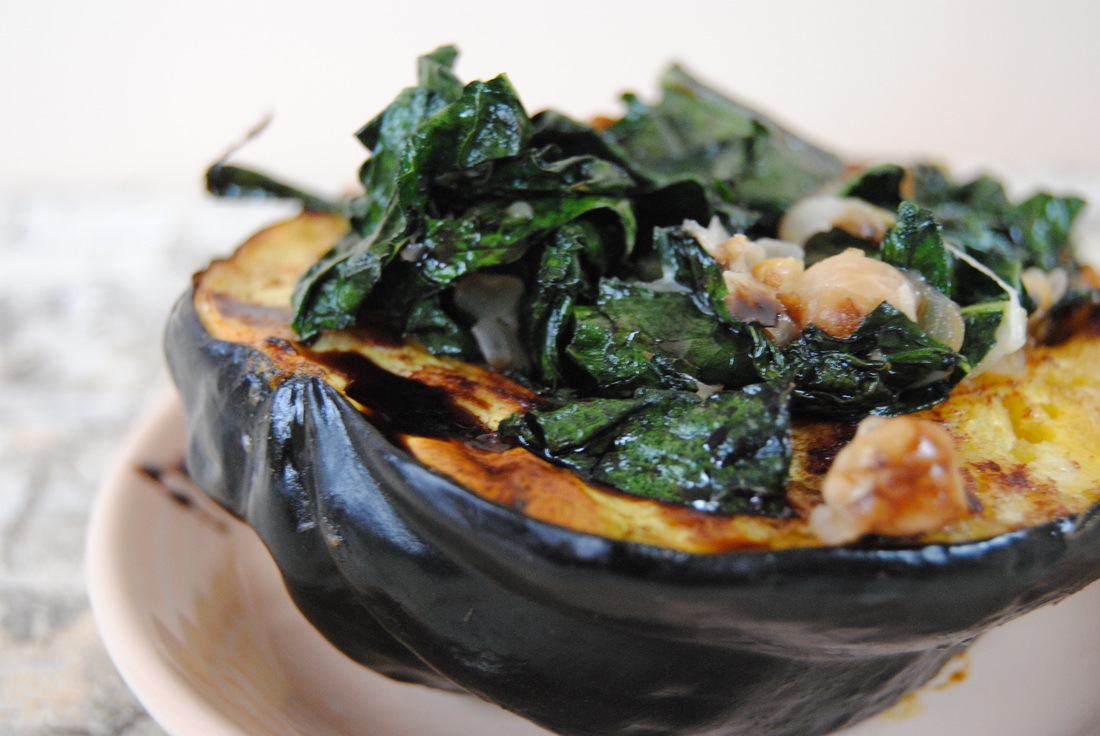 This overloaded acorn squash will be everything you're wanting on these cooler fall nights. With such a perfect combination of flavors we can bet you'll be making this recipe again and again. And we hope you agree that this one is a win for the wonderful winter squash. Happy Fall, Jess and Cecelia 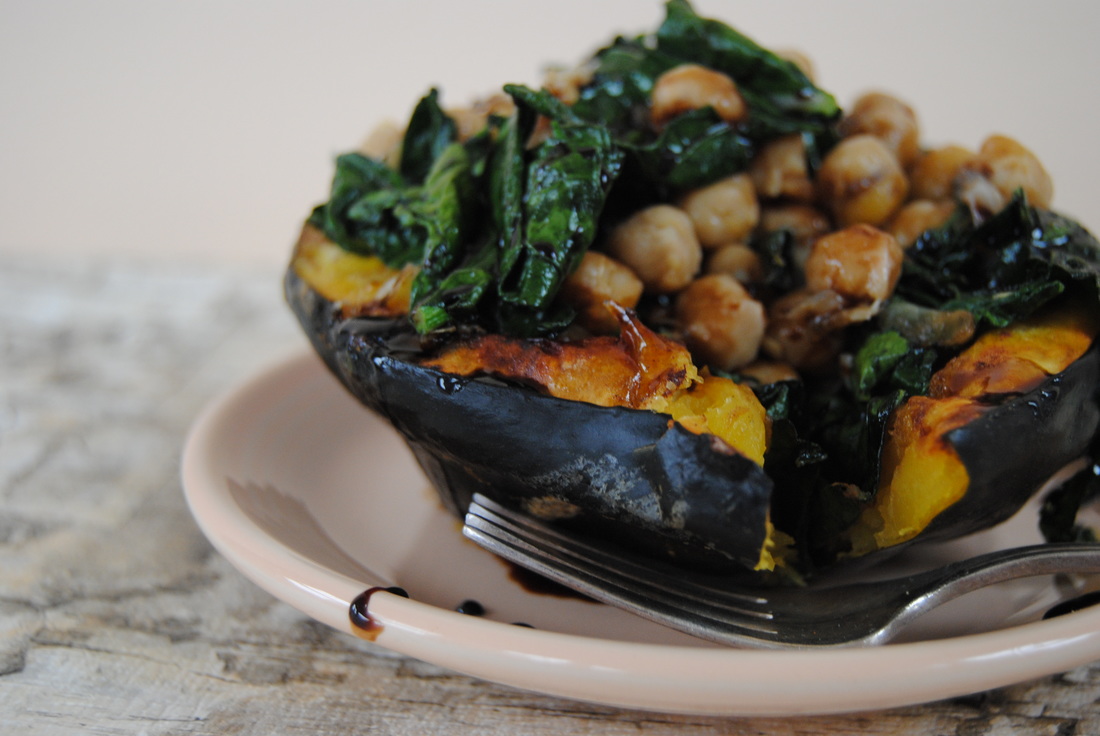
6 Comments
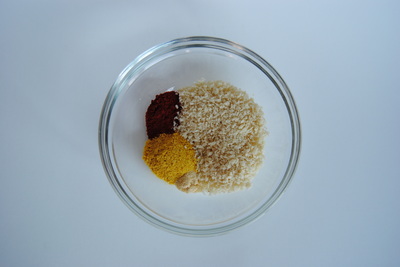
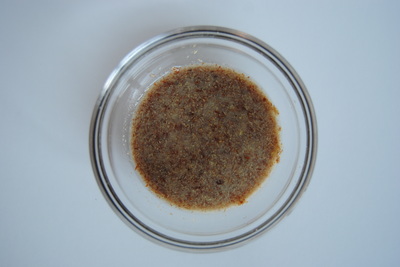
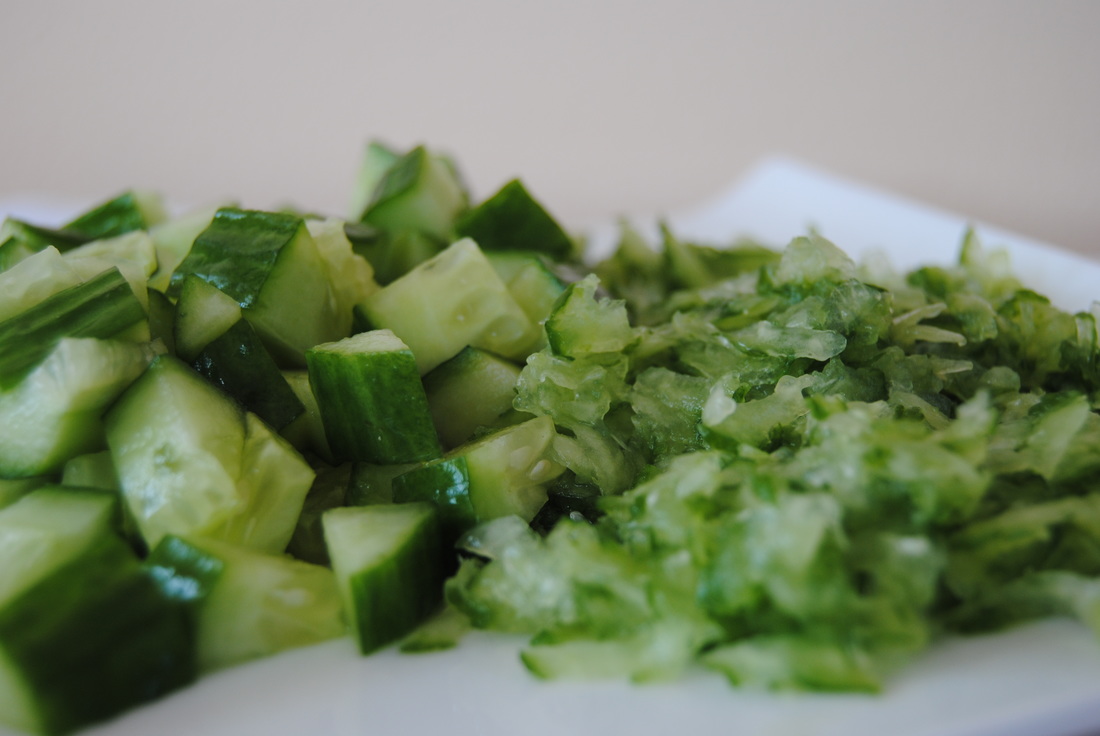
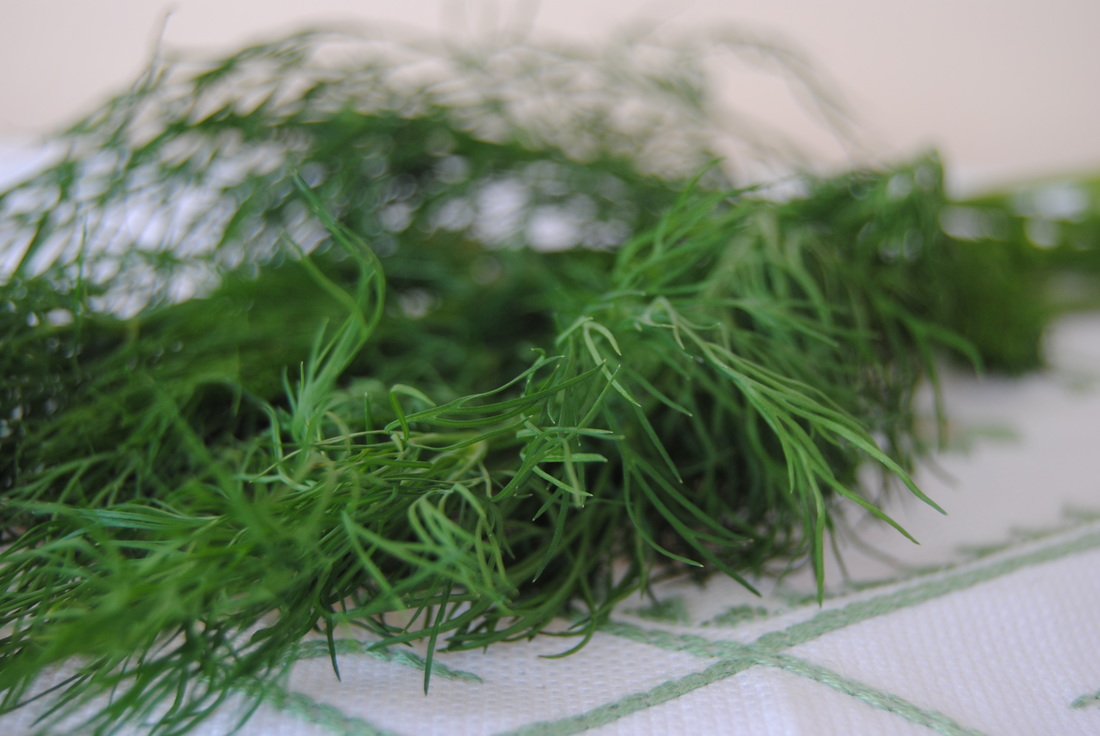
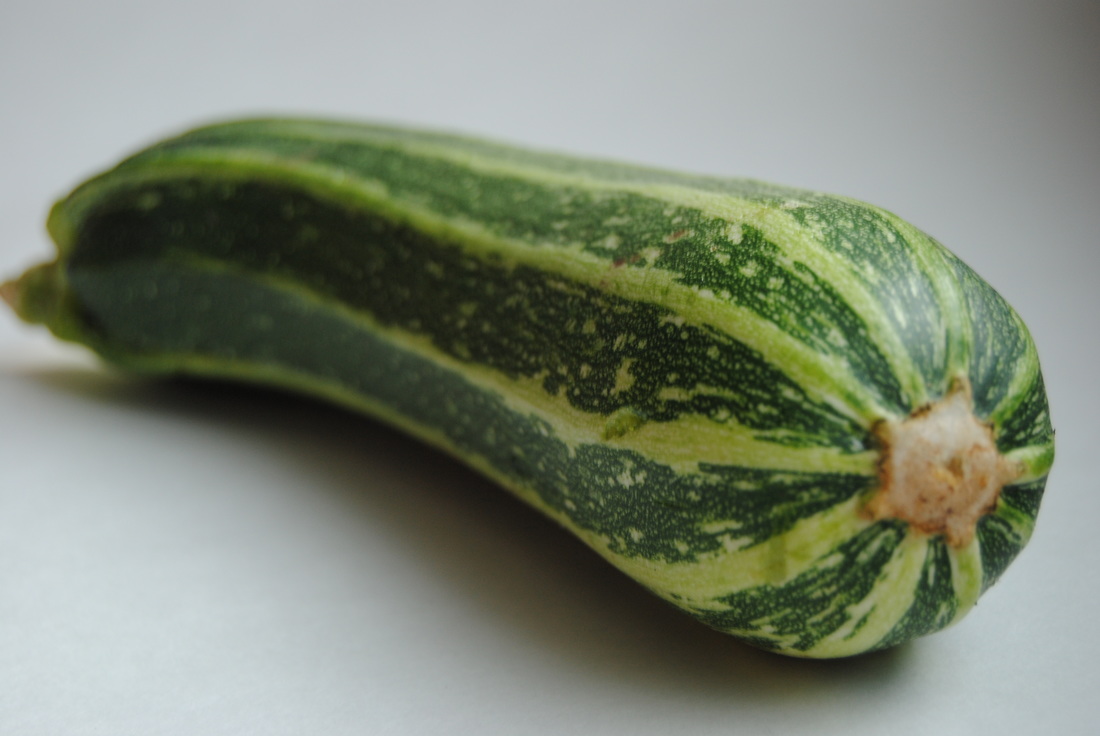
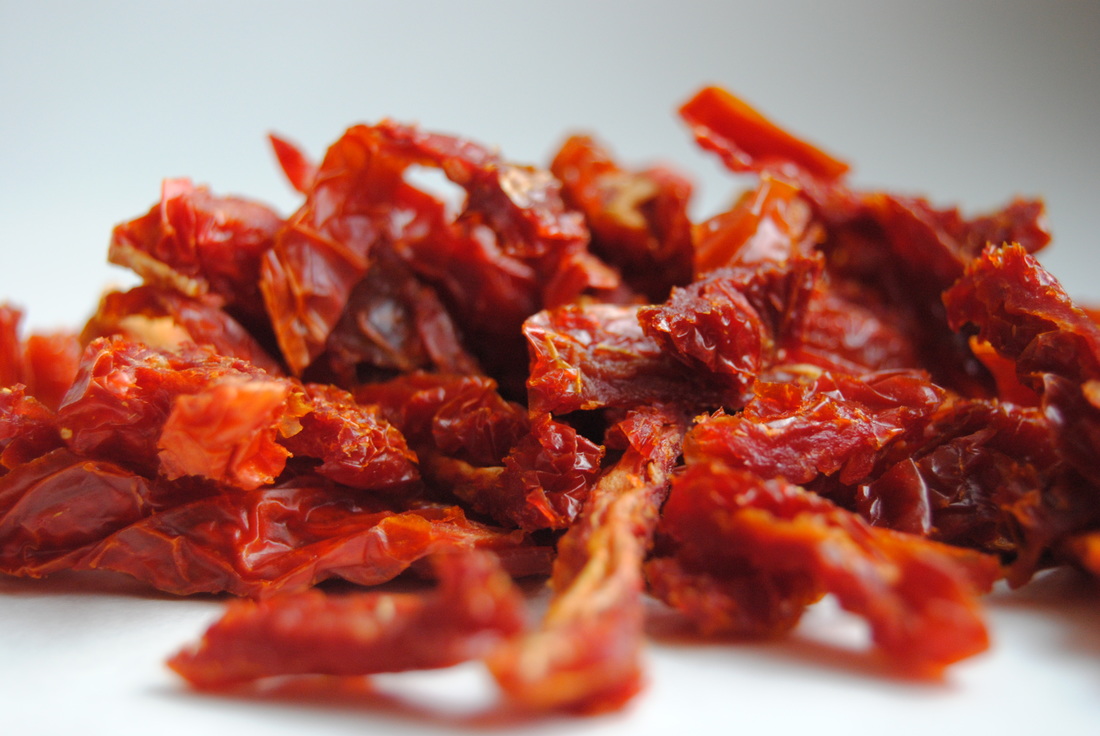
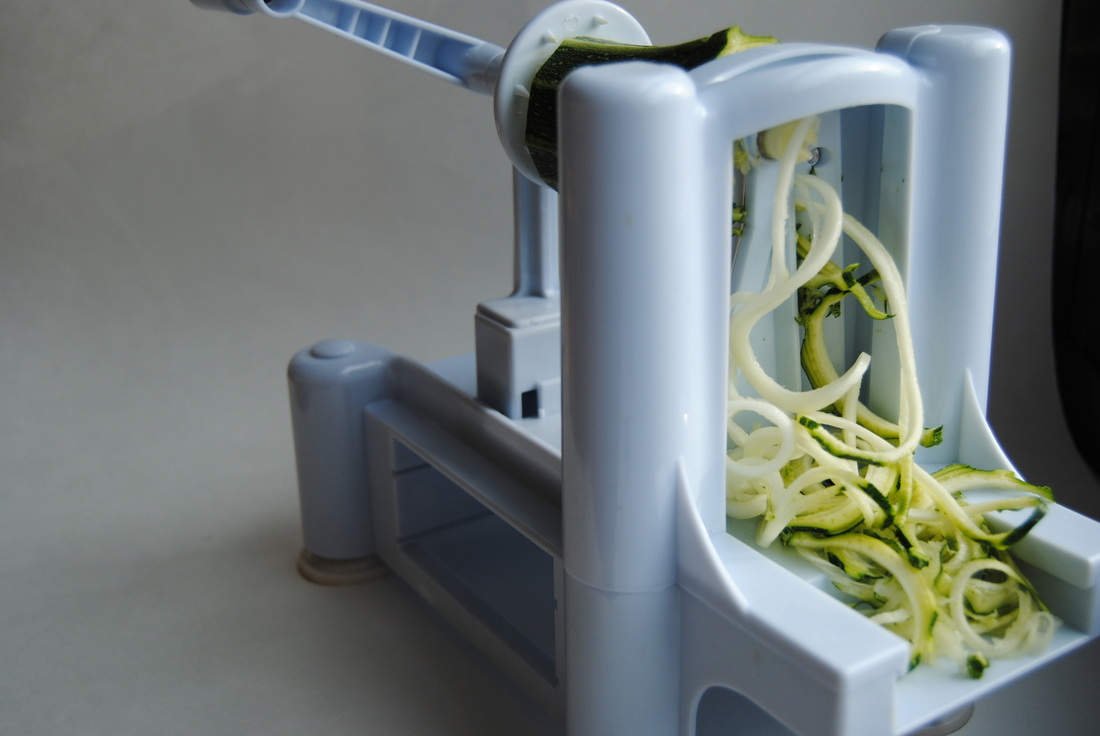
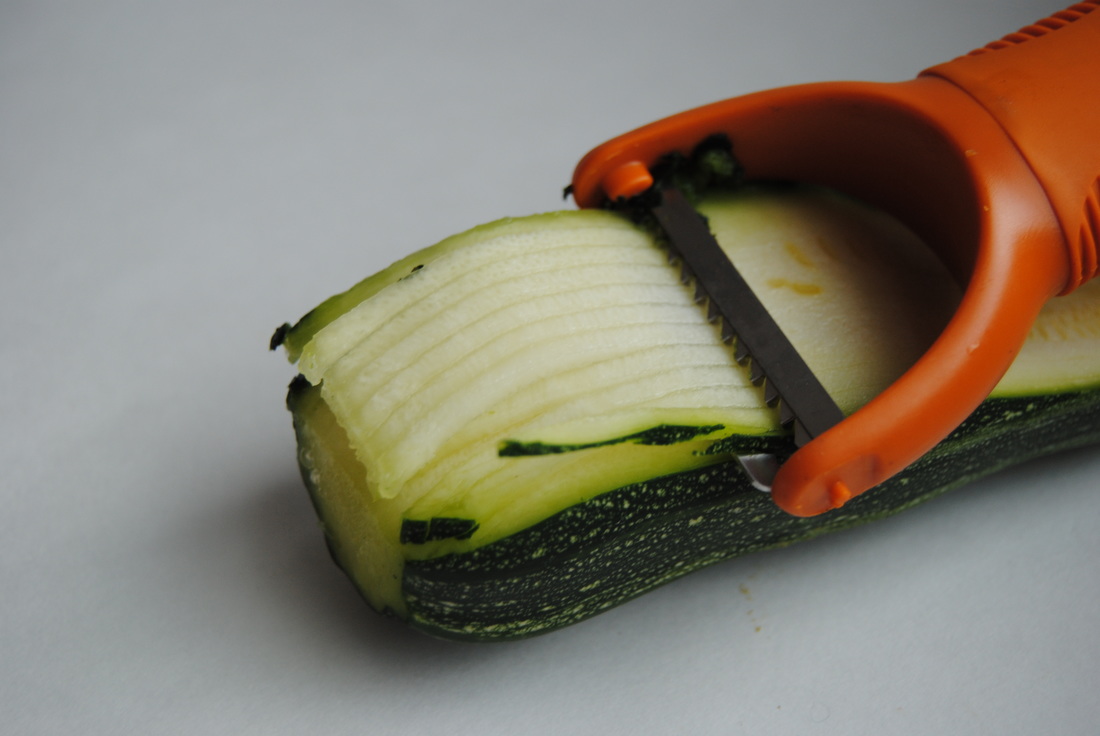
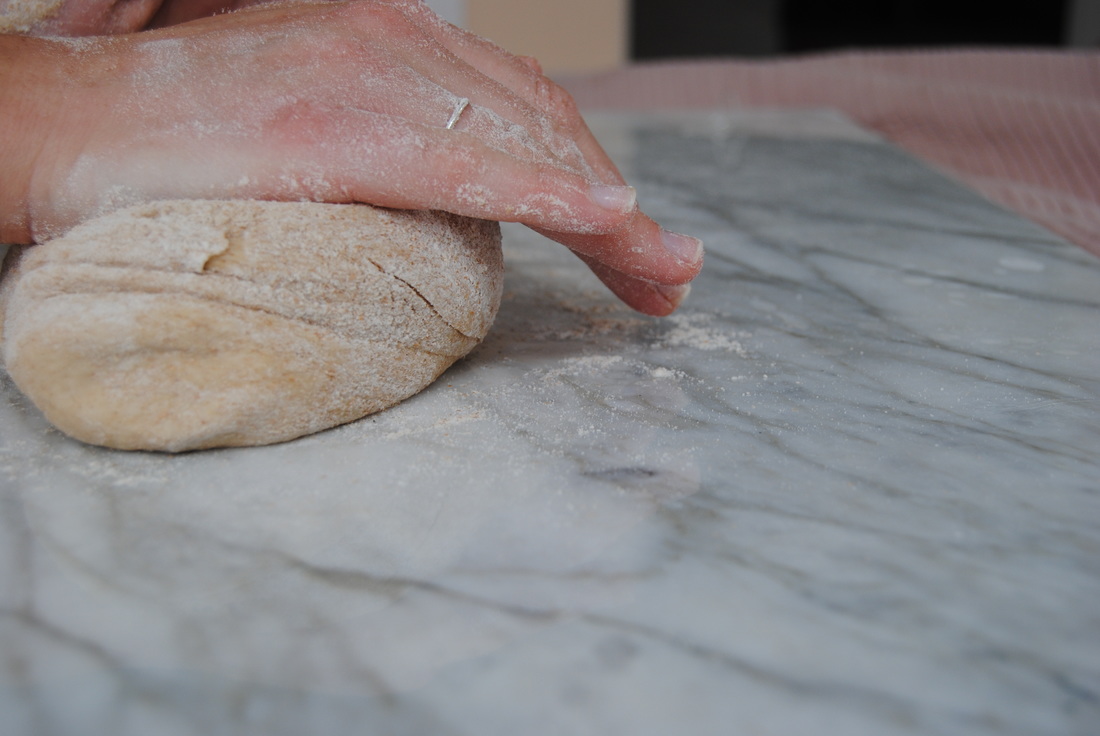
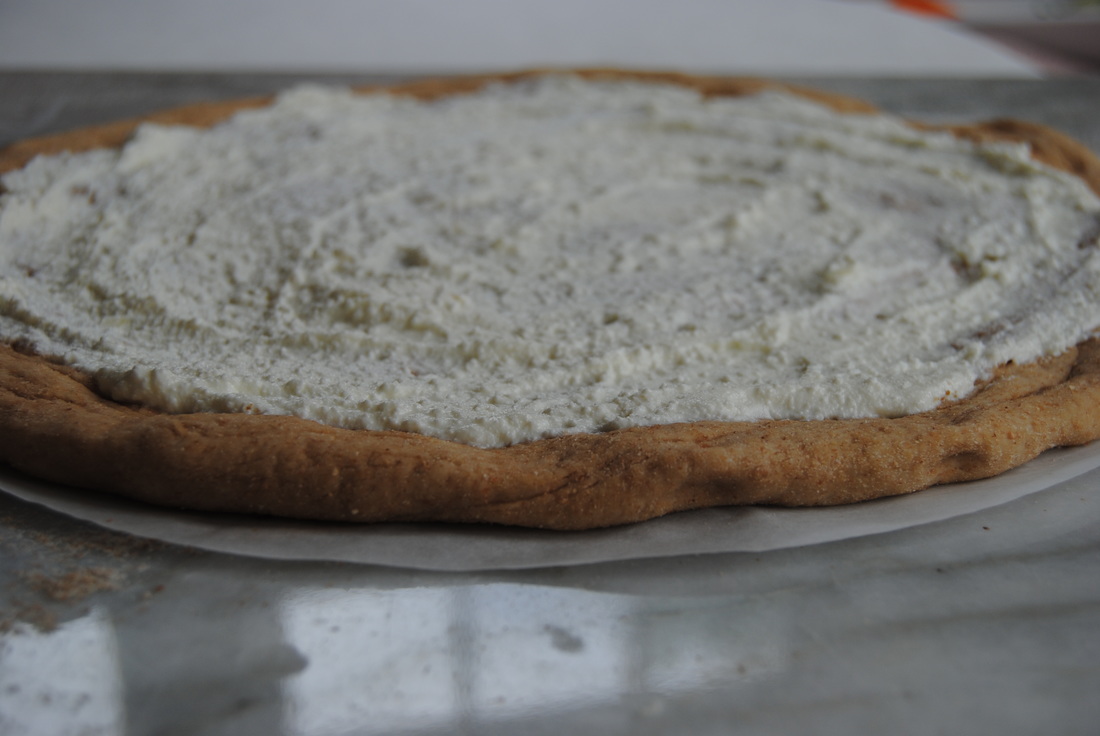
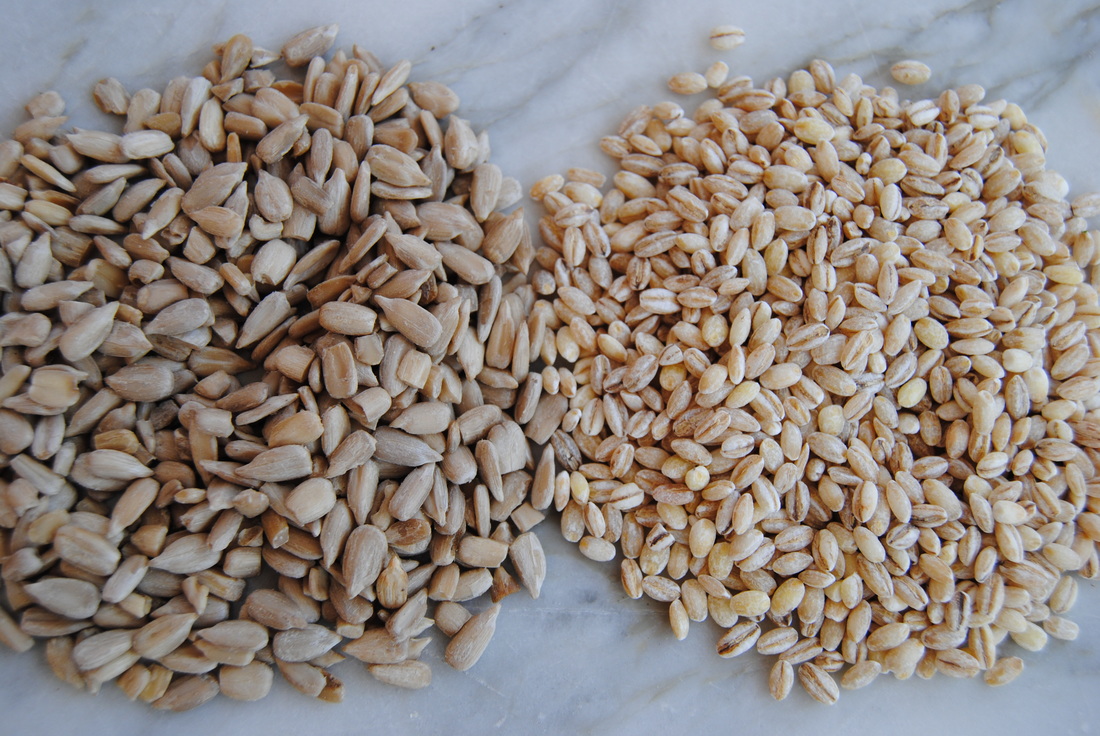
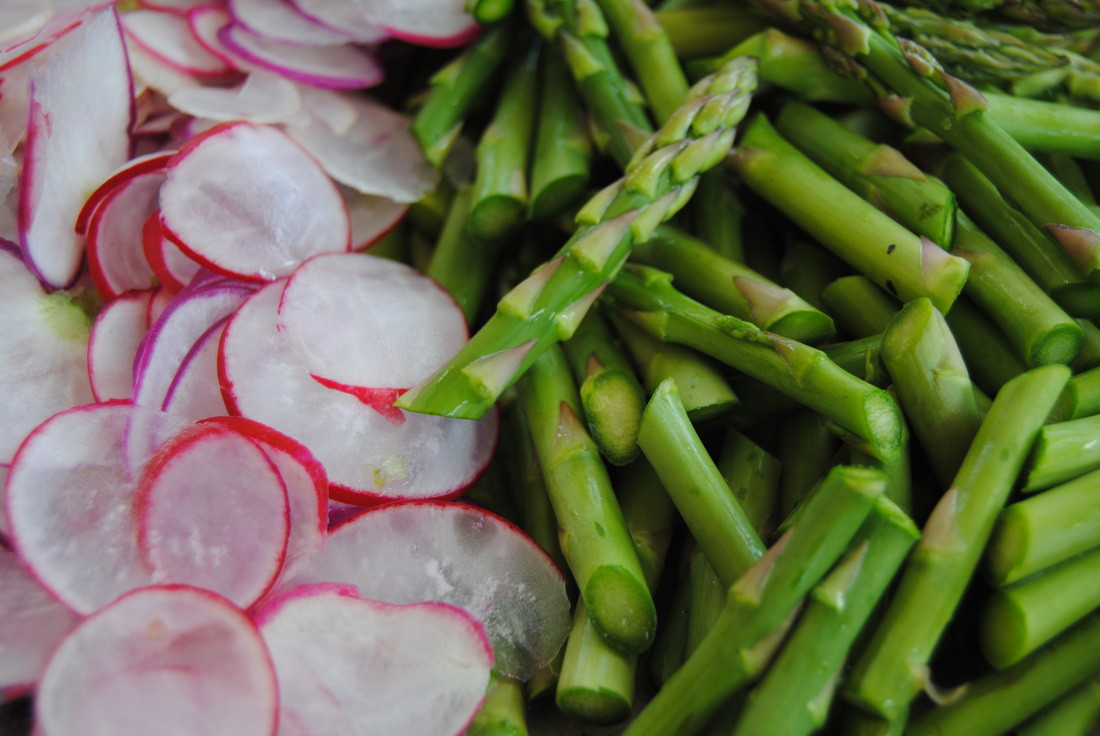
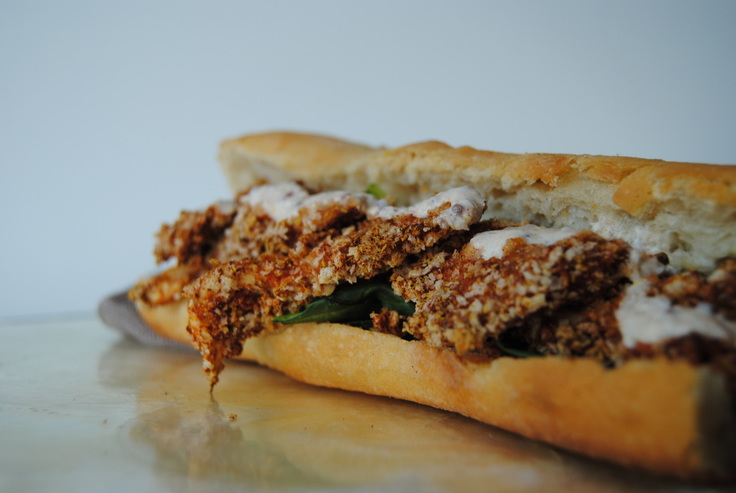 Hi there TGBK friends! The month of September sure did fly by for us and we just can't believe that fall is already here. Since September is National Mushroom Month (true fact!) we wanted to celebrate with a mushroom post. As we said....September has been very busy....but better late than never! Now you can reminisce about the late summer September days while you enjoy this recipe and learn more about why mushrooms are so amazing (they even have their own month!). 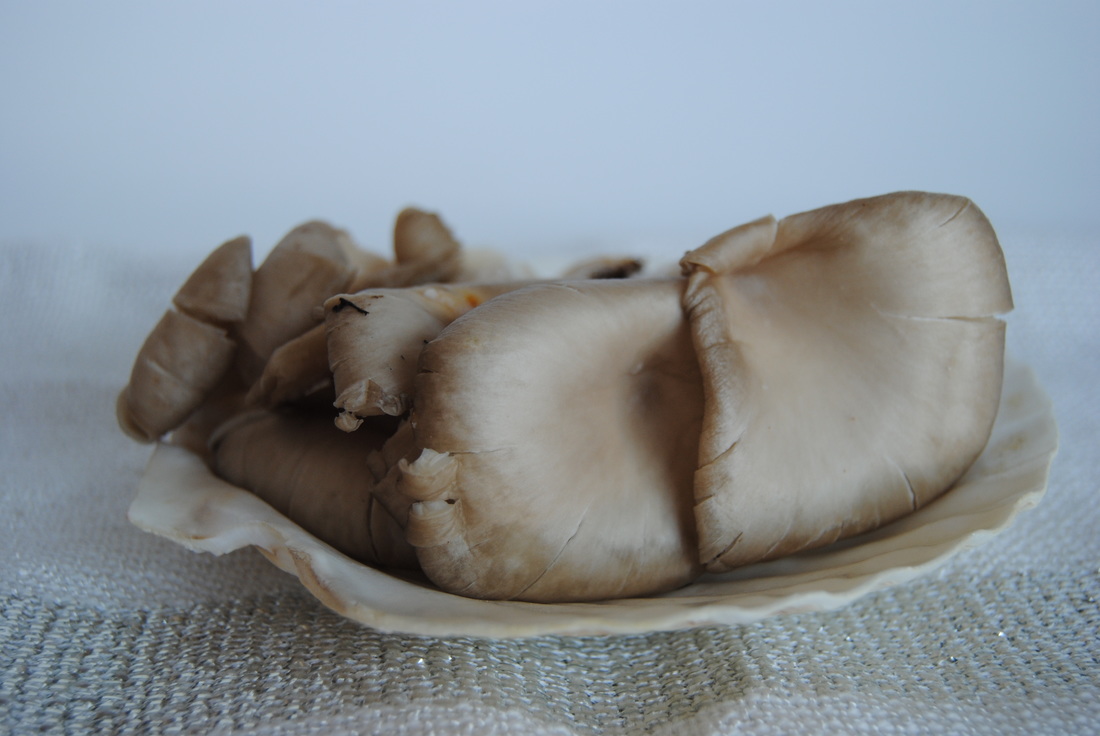 Vitamin D is one of those nutrition "hot topics" recently because 1. it is important to our bodies, 2. many people are deficient in vitamin D, and 3. there are very limited food sources of this vitamin. Vitamin D is found naturally in fatty fish (ex: tuna, salmon and mackerel) and in very small amounts in beef liver, cheese and egg yolk. There are many more fortified foods including milk and diary products, breakfast cereals, some orange juice, and multiple other food products. But if you're like us and like to keep your diet natural and lower in animal products then we need some other options! Other than the sun of course because our amazing bodies can produce vitamin D with skin exposure to sunlight. This option is also limited however by weather, seasonal changes, and the importance of skin protection to limit sun damage and risks that come along with it. We think that a balance of a little of both may be your best bet and mushrooms are here to help. Just like the human body, mushrooms when exposed to sun light increase in the level of vitamin D they contain (amazing!). About three ounces of mushrooms (levels vary based on the type) contain between 100-300 international units of vitamin D2 which is about 16%-50% of the daily recommended intake! Whenever possible, especially if you live in he Midwest during the fall and winter months, remember to incorporate sun exposed mushrooms to your diet to increase your vitamin D intake. And now you can add this mushroom recipe to your repertoire. 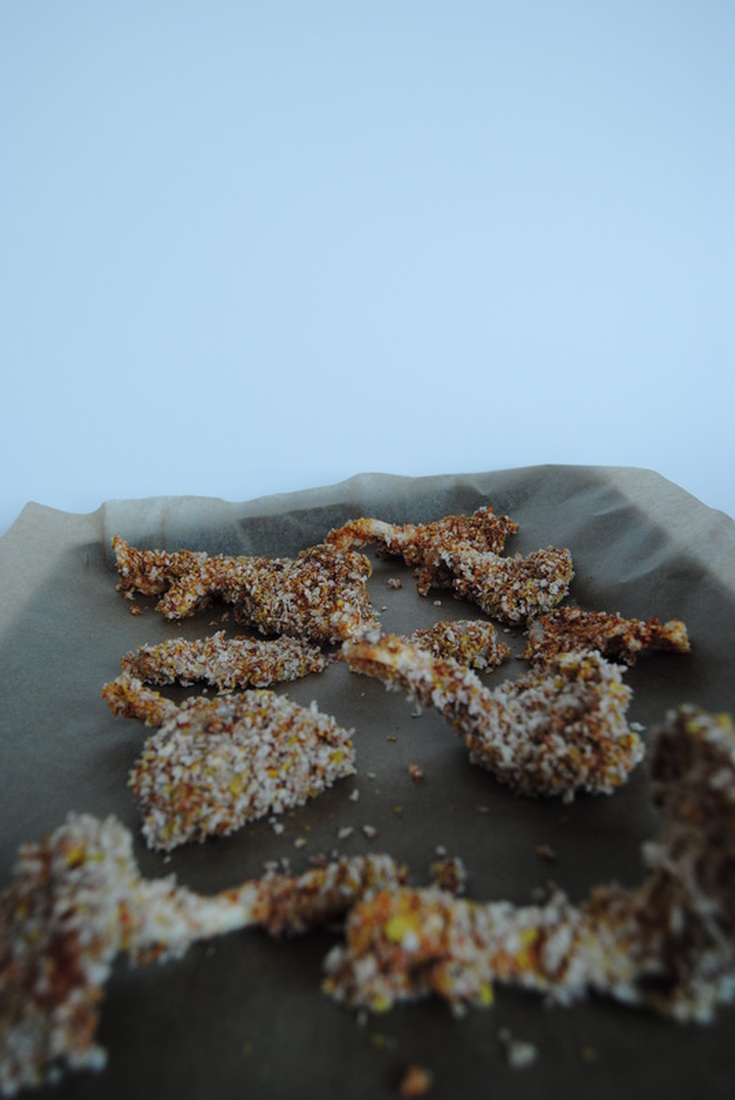 Mushroom Po' Boy PREP TIME: 15 mins TOTAL TIME: 30 mins Servings: 2 Ingredients Sandwich 2, 4-6" sub rolls (we used French baguette*) 5 oz raw oyster mushrooms 1 tsp extra-virgin olive oil Juice of 1/2 lemon 1/8 tsp sea salt 9 Tbsp water 3 Tbsp ground flax seed 1/2 cup bread crumbs (store bought* or homemade) 1 Tbsp nutritional yeast 1 tsp paprika 1/4 tsp onion powder 1/8 tsp sea salt 1/4 cup fresh spinach, chopped Remoulade Inspired Sauce 2 Tbsp plain organic yogurt 1/2 tsp stone ground mustard 1/4 tsp horseradish 1/4 tsp raw apple cider vinegar 1/8 tsp crushed or minced garlic Sprinkle of sea salt Dash of paprika Heat oven to 425°. Line a large baking sheet with parchment paper. Separate mushrooms into individual pieces. Using a clean damp cloth, carefully clean mushrooms. In a bowl combine olive oil, lemon juice, and 1/8 tsp sea salt. Add mushrooms to the bowl and allow to marinate while you prepare the rest of the breading. In a small bowl combine ground flax seed and water. Using a fork, carefully mix until thoroughly combined. In a shallow dish combine bread crumbs, nutritional yeast, paprika, onion powder, and sea salt and set aside. Working carefully, dip each mushroom in the flax seed mixture then cover with breadcrumb mixture and place on lined baking sheet. Repeat process until all mushrooms are breaded. Bake for 10 minutes, flip mushrooms over, and continue baking for an additional 5 minutes or until golden brown. While the mushroom are baking, begin making the sauce. Add all sauce ingredients to a bowl and mix until combined. Now it's time to assemble the sandwich. Cut baguette into 4-6" pieces and slice open making sure to not cut all the way through so that your ingredients are snug and will not fall out. Add chopped spinach and half of the mushrooms to each sandwich.Generously drizzle remoulade sauce on top and enjoy!! *Remember to look for bread and breadcrumbs with minimal ingredients- primarily flour, water, yeast, salt and little else! 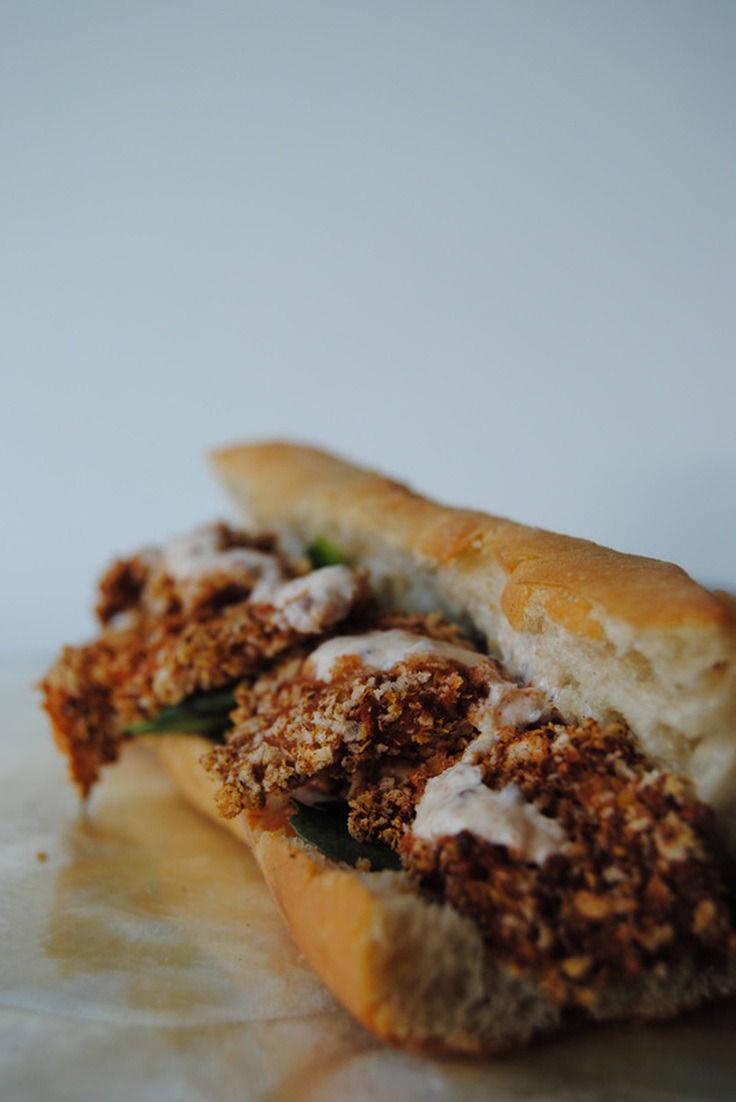 This sandwich is so right is so many ways. The crispy, breaded mushrooms and fresh spinach pair perfectly with the tangy, fiery sauce and soft bread. Such a different way to enjoy mushrooms and another way to get your vitamin D now that summer is long gone. But don't fret, we have a ton of amazing fall recipes on the way! See you soon, Jess and Cecelia 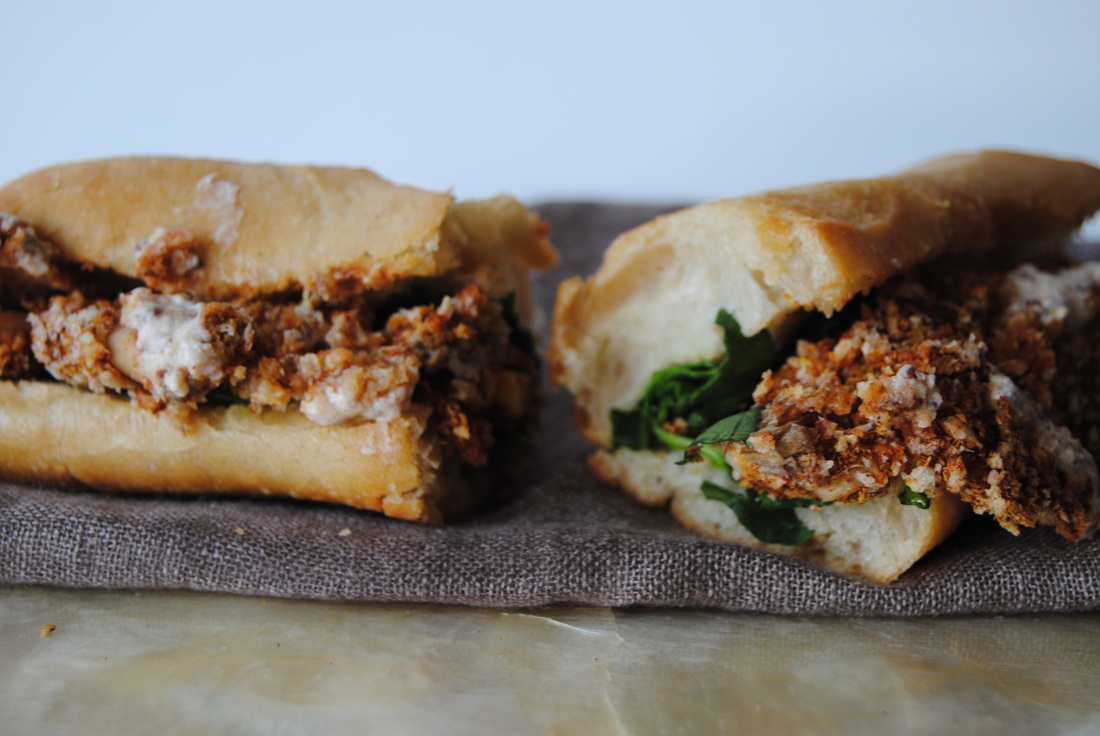 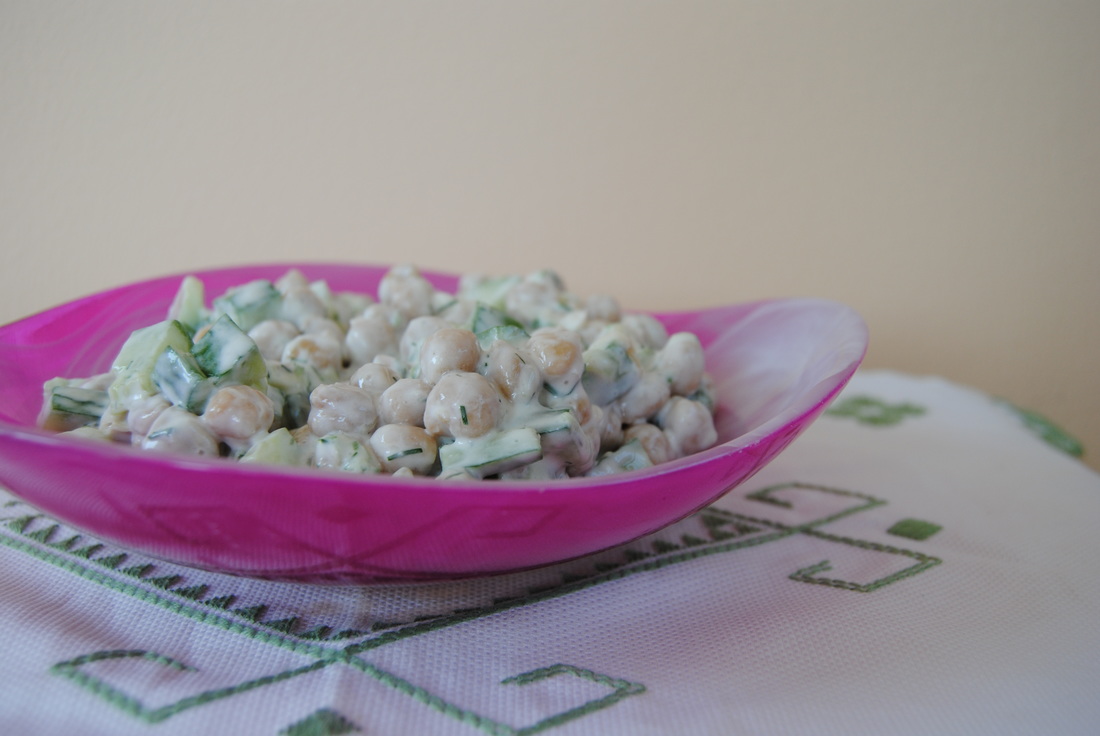 From The Green Blossom Kitchen we really hope that you're making the most of this beautiful summer. But as you're soaking in the pool this August remember that there may be something else that needs a little soaking. Your dried beans are also begging to be soaked! Now we're not here to hate on the convenience of canned beans, but to remind you that when possible cooking from dried beans is more economical, fresher and can increase the variety of beans you have to choose from. Though if you are going to cook your beans at home let's first find out why a pre-soak is a must! 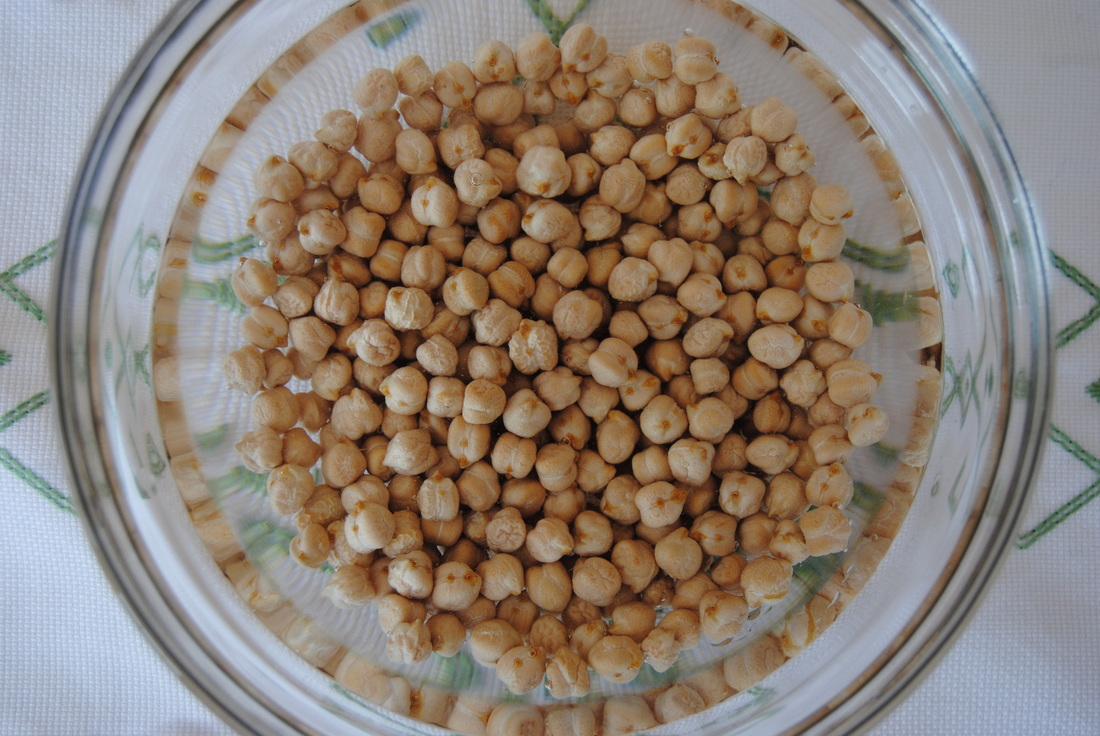 The major reason why soaking your beans is a must is for better absorption of nutrients, which is pretty important to us as foodies/dietitians. Dried beans are one of many plant foods which contain phytic acid, the primary storage form of phosphorus in plant seeds. Though it sounds harmless, phytic acid actually blocks our bodies ability to properly absorb minerals (calcium, magnesium, iron and zinc) within certain plant foods. By soaking beans in warm water (~140 degrees) for at least 12 hours prior to preparing, you are able to greatly reduce the amount of phytic acid within the bean meaning more nutrients for you! Pre-soaking can also reduce cooking time making preparation easier. For this recipe we chose to use chickpeas (of course soaked overnight!). Chickpeas are a vegan source of protein and full of fiber - one cup of cooked chickpeas contains a whopping 15 grams with 65-75% of the fiber being insoluble. So throw some chickpeas in water for a little dip while you explore this recipe further... 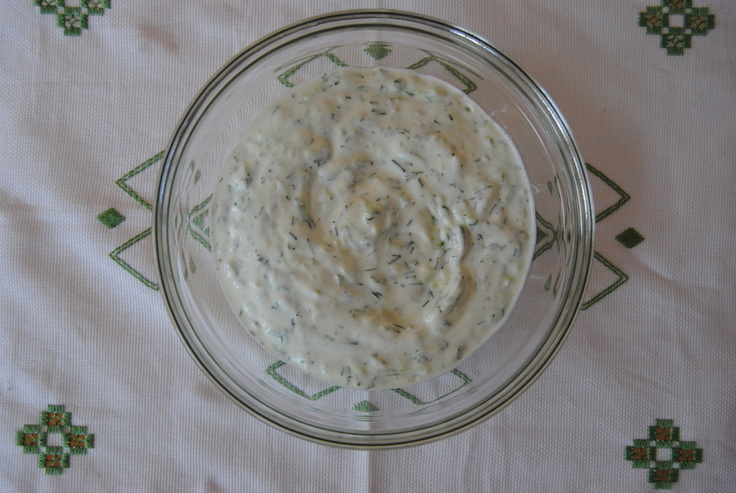 Tzatziki Chickpea Cucumber Salad PREP TIME: 10 mins (plus 12 hour soaking and 1 hour cooking) TOTAL TIME: 15 mins Servings: 4 Ingredients Salad 1 large English cucumber, or 3 small English cucmbers 1 cup dried chickpeas, soaked over night for at least 12 hrs (makes about three cups once cooked) Tzatziki Sauce 1 cup full fat plain Greek yogurt 1 Tbsp chopped fresh dill 1 large or 2 small cloves garlic, minced 1/2 Tbsp lemon juice 1 tsp honey (we used a light clover honey) 1/4 tsp sea salt + additional to taste Sprinkle of pepper to taste Once beans are done soaking, drain, rinse, and add to a pot. Cover with twice the amount of water and bring chickpeas to a boil. Once at a rapid boil cover with a lid, lower the heat, and simmer for about one hour. After an hour of cooking feel free to do a taste test; if the chickpeas are too firm continue cooking until soft and to your liking. Once chickpeas are fully cooked, drain, rinse, and set in the fridge to cool. Chop cucumber into bite sized pieces (about the same size as the cooked chickpeas) and add to the bowl with the cooled chickpeas. To make the sauce, finely chop the dill and mince the garlic. Add the Greek yourt, chopped dill, garlic, lemon juice, honey, salt, and pepper to a mixing bowl. Stir until all ingredients are fully combined. It's now time to mix up your salad! If you plan to eat all of this salad right away add all of the tzatziki sauce to the bowl and mix until fully combined. Sprinkle with additional sea salt to taste. Serve and enjoy! *TIP: If you do not plan to eat all of this salad right away we suggest adding the tzatziki sauce and additional salt just before eating. We found that the longer it sits on the salad the more water is drawn out from the cucumbers being exposed to salt creating a more "soupy" final salad than we would like. 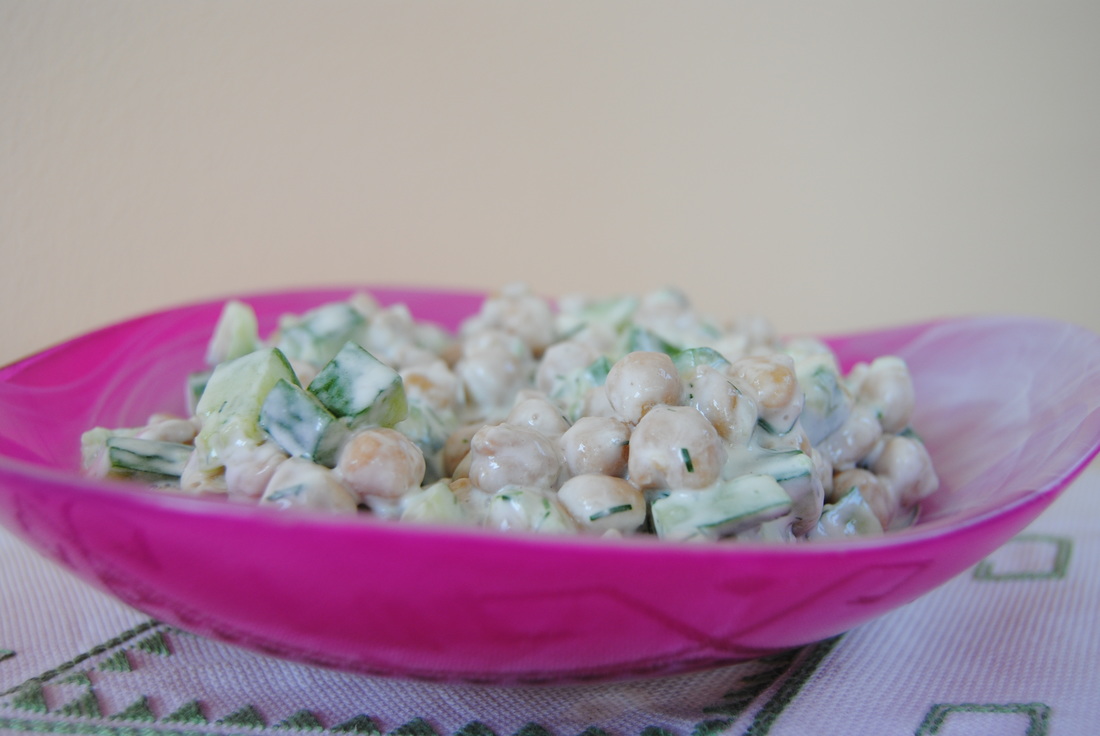 We hope you love the freshness of this salad and find a use for all those garden cucumbers lying around this time of year. We think that this one is great on it's own, a perfect topping for a spinach salad, or yummily (yes yummily) paired with warm pita. Though you may find another use so please share! Also that tzatziki sauce, you're going to want to use it on everything so go ahead! Just remember to soak your beans, they deserve a dip too. Okay, now it's time get back to the pool! Soak it up, Jess & Cecelia 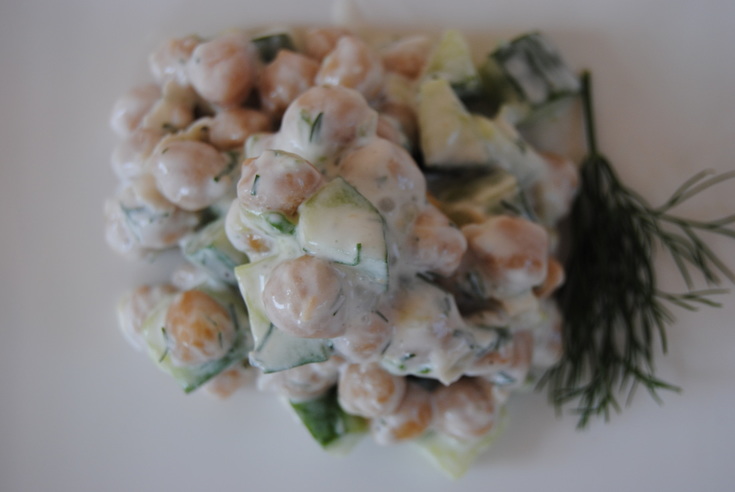 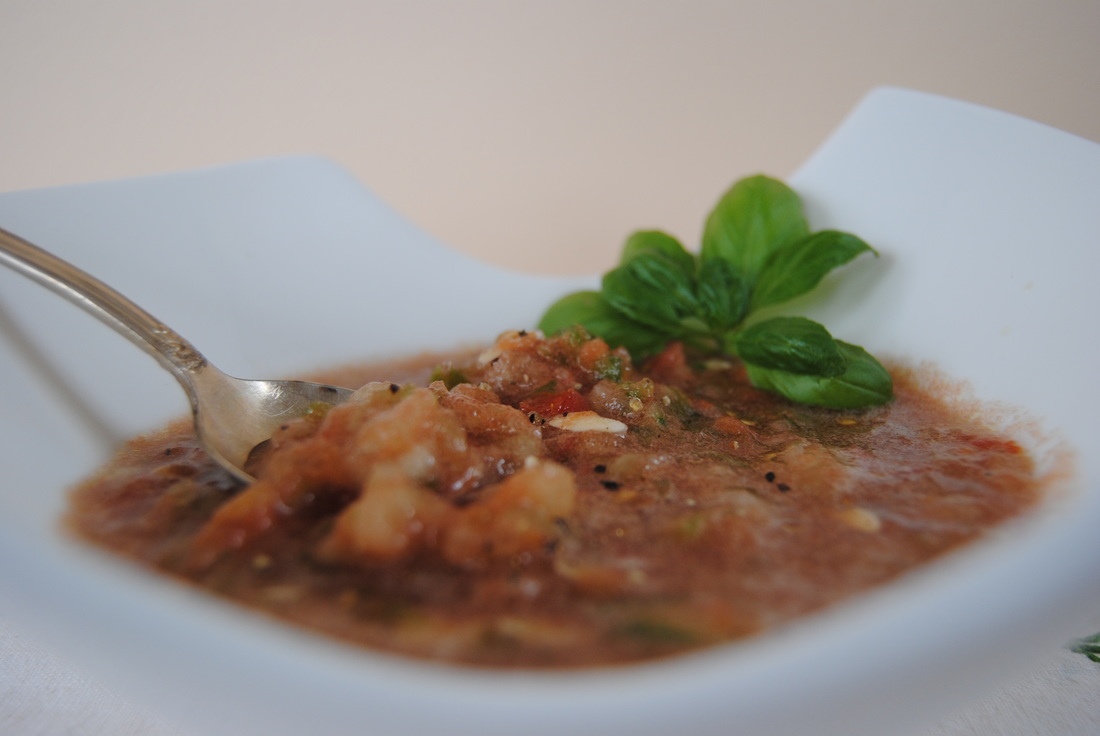 If we had to choose our favorite thing about August (believe us it's a long list) we would have to choose a fresh picked, vine ripe tomato. There really is nothing like the taste of a perfectly ripe, just picked tomato - it must be the closest one can come to actually tasting sunlight (haha!). If you've been hitting the local farmers markets this month you've probably noticed an abundance of beautiful tomatoes waiting to be used in the kitchen. And when a tomato tastes this good we think it's best prepared simply and consumed raw to really appreciate the flavor. Our recipe this week does just that, but first more on tomatoes! 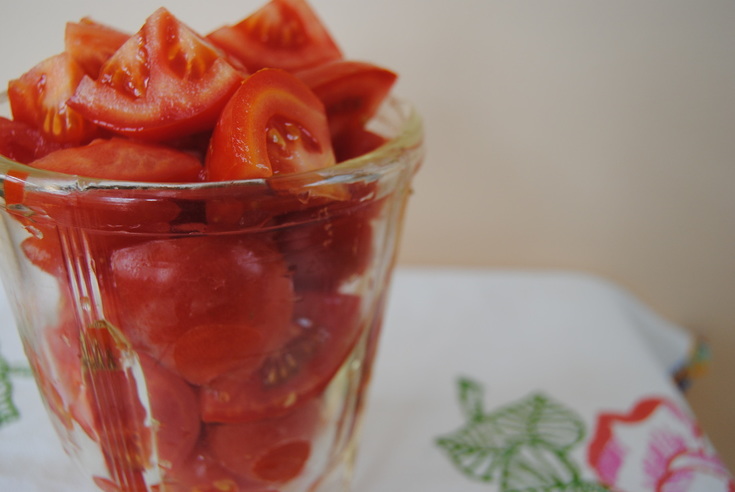 Since we love tomatoes so much we had to take this opportunity to discuss them further. So first, is a tomato a fruit or a vegetable? Now that is a great question! Botanically speaking tomatoes are the fruit of the vine of the tomato plant - a flower blooms and then turns into a beautiful tomato. Though for culinary uses we tend to treat tomatoes as vegetables. There are many varieties of tomatoes that can be used in many different ways in the kitchen. Heirloom tomatoes are popping up everywhere this time of the summer and can be found in a wide variety of colors, shapes, and flavors making tomato shopping very exciting indeed! Heirloom tomatoes are generally grown from seeds that have been around for more than 50 years or passed down through generations of a family. With such a wide variety of heirloom tomatoes to choose from we think you are missing out if you always go for only the varieties you typically find in stores. A few of our favorite heirloom tomatoes are green zebra, mortgage lifter, black krim, big rainbow, and chocolate cherry tomatoes (such cute names!) so keep your eye out for any of these or ones that look good to you. Keep in mind that if you are not growing your tomatoes or harvesting from a friend or family member, buying organic is always preferred. Also, try to store your tomatoes at room temperature and eat within a few days because storing in the fridge can cause flavor loss (oh no!). If you must refrigerate to prevent spoiling let tomatoes warm to room temperature prior to eating. Okay so who's ready to eat some tomatoes already!? 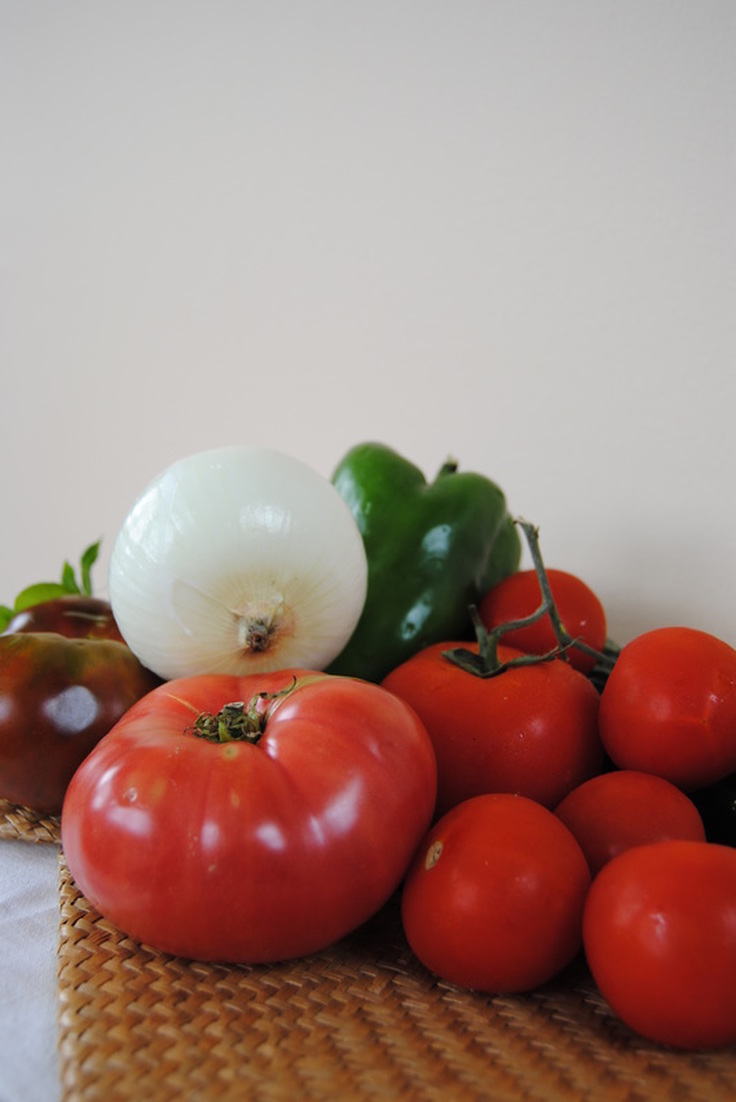 August Harvest Gazpacho PREP TIME: 10 mins TOTAL TIME: 15 mins Servings: 4 Ingredients 4 cups diced tomatoes (any variety) 1 large bell pepper (we used green) 1/4 sweet onion 1 large or 2 small cucumbers 2 cloves garlic 1 inch jalapeño pepper 1 Tbsp extra virgin olive oil 2 tsp balsamic vinegar 1/2 tsp sea salt 1/3 tsp cracked black pepper Optional garnish: fresh basil Rough chop onion, garlic, bell pepper, tomatoes, cucumber, and jalapeño pepper. Start by adding the onion, garlic, and jalapeño to a food processor. Pulse until minced. Add the bell pepper and pulse until finely chopped. Next add cucumber and tomatoes and do the same. By adding each component of the soup one at a time to the food processor you are able to create a variety of textures in your finished product - if you were to add all the ingredients to the food processor at the same time you would end up with a pureed vegetable soup. For this recipe, we prefer a textured gazpacho. Once all vegetables are chopped to preferred texture mix in olive oil, balsamic vinegar, sea salt and cracked black pepper. Garnish as you like and serve finished gazpacho at room temperature. It can also be stored in the fridge for up to five days but make sure to bring gazpacho to room temperature prior to serving. Also note that leftover gazpacho may thicken in the fridge, you can add a little water and extra sprinkle of salt prior to serving. 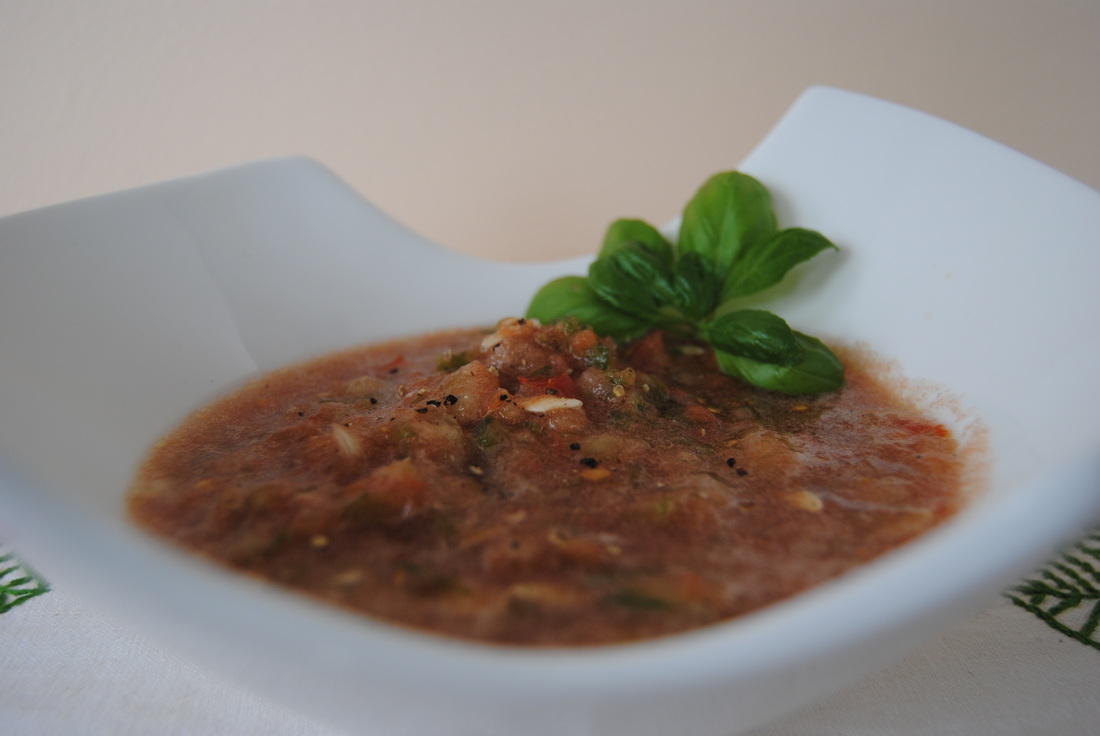 This gazpacho is cool, light, refreshing and oh so flavorful. The perfect dinner after a day outdoors. So stock up on tomatoes while the pickings good and make this cold soup before you're wanting a warm version (though you still have plenty of time, it's officially summer until 9/21 but let's not get ahead of ourselves!). We personally would be okay if August and tomato season would just last forever. Happy tomato season, Jess and Cecelia  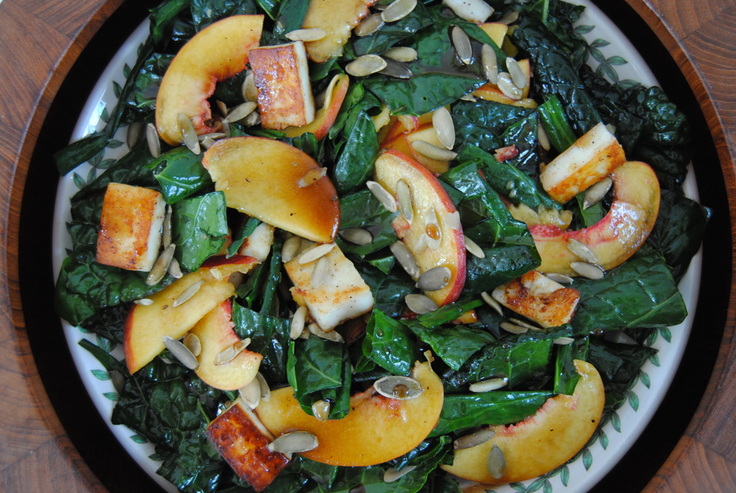 What do you do to pamper yourself? Many people will say manicures, pedicures, facials, and massages and hey we think everyone deserves pampering now and again. But we're here to remind you that your vegetables should be pampered as well (what the heck!?). No we're not going crazy but you might go crazy for raw kale once you try it massaged. Still wondering what massaged kale actually is? Ready more below before you get to the recipe for this stunning salad. 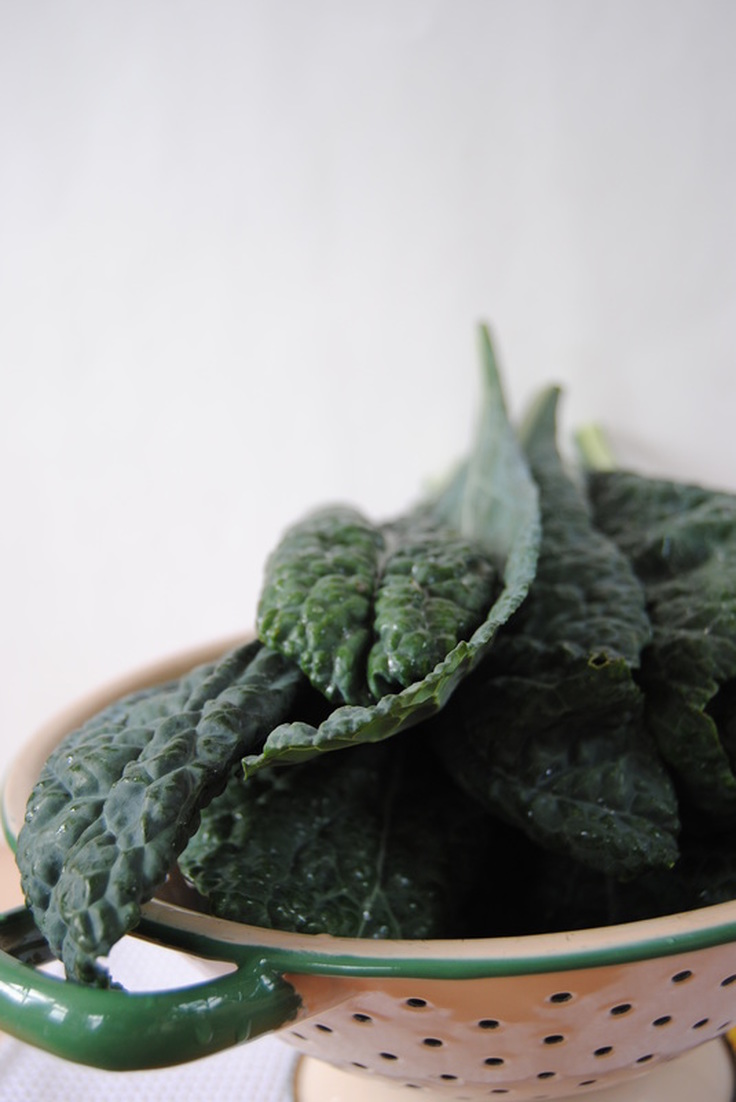 Kale can be prepared in many ways: steamed, sautéed, baked, and one of our favorites, massaged. So why do we want you to massage your kale? Kale is a tough, high fiber green. When untreated, kale has a bitter taste and can be on the chewier side. By massaging kale with olive oil and sea salt, the cellulose (fiber) begins to break down which may aid in digestion and absorption of nutrients and lighten up the flavor. Massaged kale leaves will become a deep green color and take on a soft and silky texture making it much more palatable and enjoyable raw (or at least we think so). And you know how much we love our raw foods! So before you give up on raw kale because it tastes too "green" please try it pampered/massaged and see what you think. Also a note about the cheese we chose for this salad. Paneer is a fresh, unsalted white cheese common in Indian cuisine. What is unique about paneer is that it won't melt under high heat like most other cheeses and therefore lends itself to frying, toasting, and using in hot soups and dishes. You should be able to find paneer at your local market or ethnic grocery store. If not you can always substitute with another version of frying cheese such as Greek saganaki or "bread cheese". Bread cheese is native to Finland and Sweden as juustalepia but versions are made in the U.S., a brand we see commonly is Brun-Uusto (you can find out more here). Okay so enough with the cheese talk, who's ready to pamper their vegetables? Paneer-Peach-Pepita Kale Salad PREP TIME: 15 mins TOTAL TIME: 20 mins Servings: 4 small or 2 large salads Ingredients Salad 1 bunch organic raw kale 1 Tbsp extra virgin olive oil 6 oz paneer cheese 1 Tbsp ghee 1 organic peach 1/4 cup pepitas Sea salt Coconut Balsamic Dressing 1/4 cup extral virgin olive oil 1/4 cup balsamic vinegar 1/4 cup coconut sugar 1/2 tsp salt 1/2 tsp minced garlic 1/8 tsp cracked black pepper Wash, de-stem and chop kale leaves and place in a large bowl. Drizzle 1 Tbsp olive oil over kale and sprinkle with sea salt. Using your hands, begin to massage olive oil and salt onto the kale until leaves are soft and dark green. Set aside. Add 1 Tbsp ghee to a medium sauté pan and allow to melt, making sure to cover the entire bottom of the pan. Cube paneer and add to hot saute pan. Sprinkle paneer with salt and pepper and pan fry for about 2 minutes on each side until golden brown. Turn heat off and set cooked paneer aside. Wash and slice peach into thin segments. For the dressing, combine olive oil, balsamic vinegar, coconut sugar, salt, pepper, and garlic in a bowl. Whisk ingredients together until a thick dressing is formed. To assemble the salad, combine massaged kale, cooked paneer, and sliced peaches, sprinkle with 1/2 cup pepitas, and drizzle coconut balsamic dressing over the top*. Serve and enjoy! *Note that you may not use all the dressing depending on how dressed you like your salad - leftover can be saved in an airtight container in the fridge for up to 2 weeks. 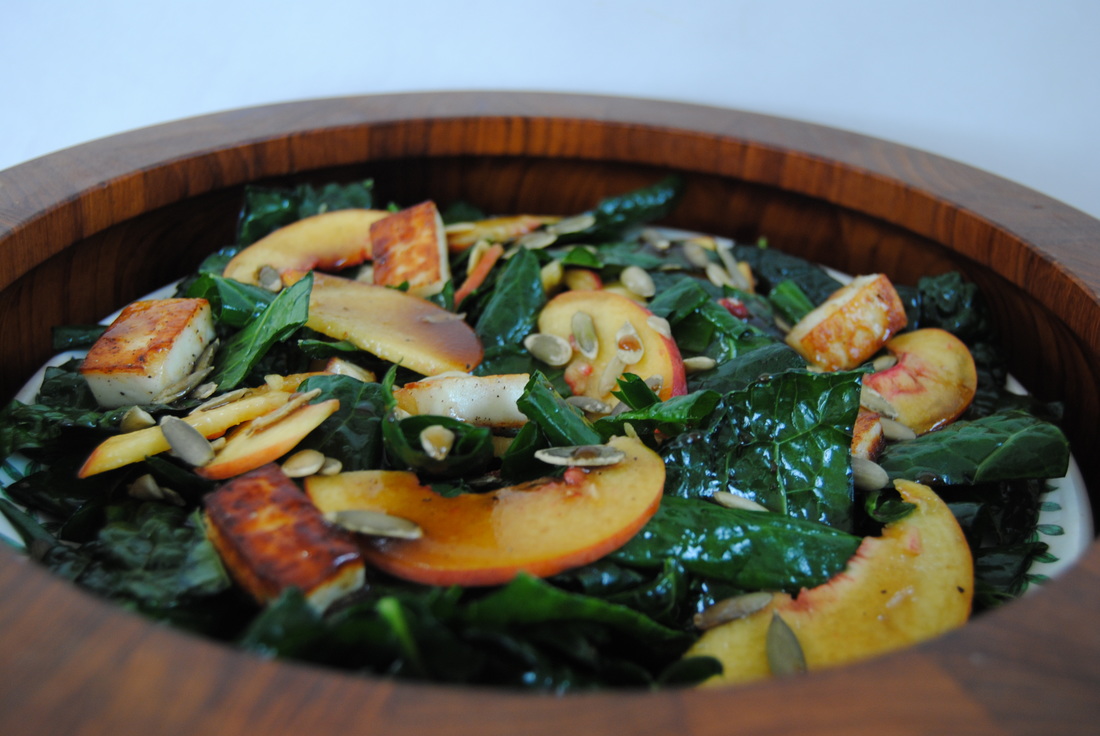 Now weren't we right? Massaged kale has actually changed your life hasn't it? We hope you share this kale secret with everyone you know and keep pampering your vegetables. Though we think this salad is a perfect combination of ingredients, we know that massaged kale will be great with any other fresh salads you dream up this summer. Pamper on, Jess and Cecelia 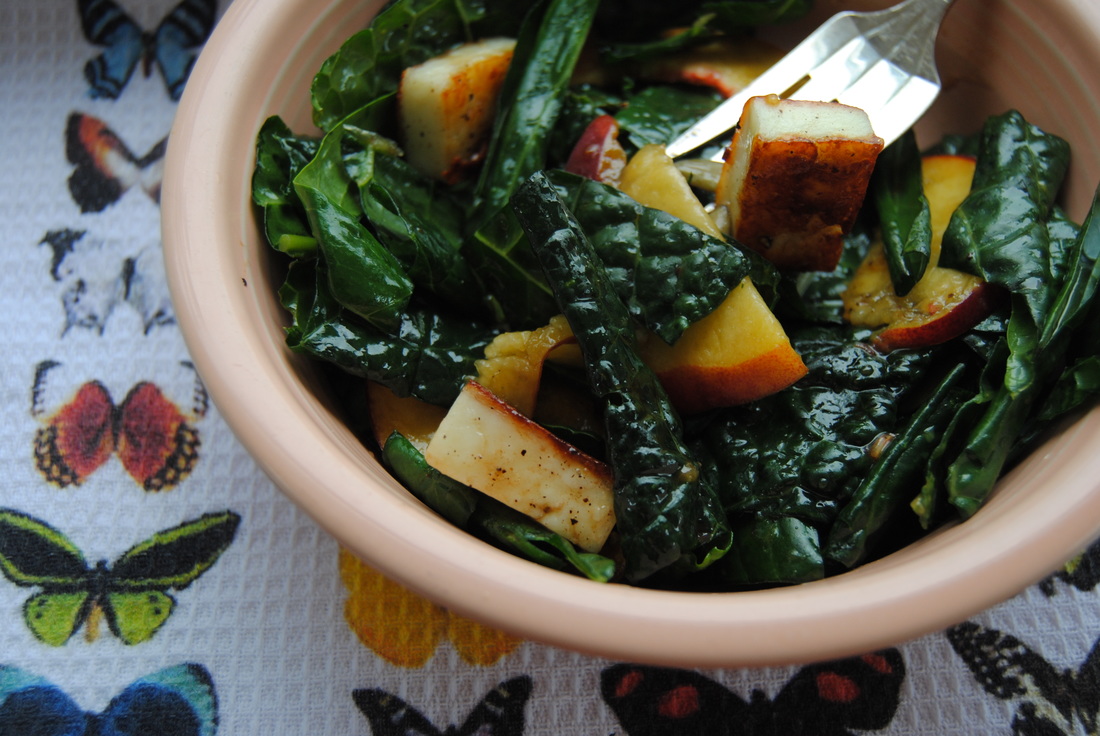 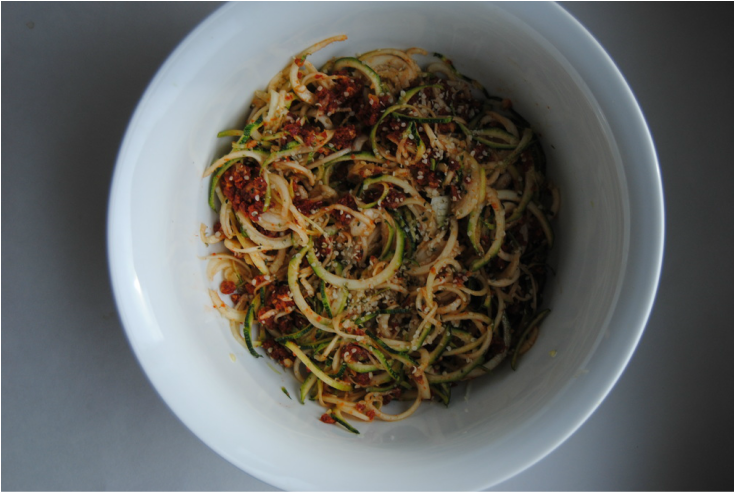 This week we are gong to blow your mind with zucchini pasta aka zoodles (zucchini + noodles)! Now we definitely love a good traditional pasta meal too, but it just doesn't have the same glamour on a hot day during bathing suit season if you catch our drift. To keep things fresh and lighter for the summer this is our go to and know it will be yours too once you try it. So lets find out how a zucchini becomes pasta, and raw pasta at that! 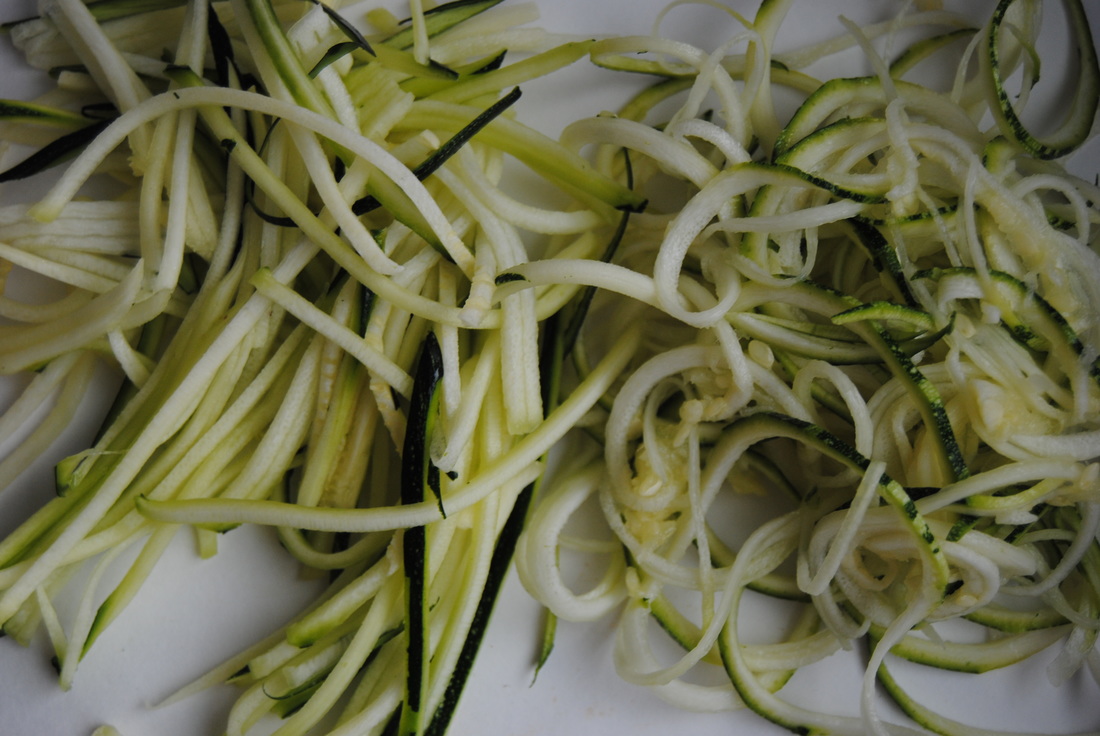 There are two ways to make your zoodles with slightly different final products (both pictured above). Using raw zucchini, grating with a juilieene vegetable peeler will create a liguiine shape (pictured left) and a vegetable spiralizer will create a spiraled capellini shape (pictured right). Both work great but we highly recommend a vegeatble spiralizer because the small investment is well worth it (for purchase here). Many vegetables can be spiralized and eaten raw or cooked, the possibilities are really endless and this tool can help you get more creative in the kitchen. And not the mention how beautiful spiralized vegetables look! After creating your zoodle shapes the zucchini is eaten raw which is very palatable because of the small size - it has a nice texture similar to al dente pasta and perfect for holding onto your favorite sauce topping. The whole meal is raw actually because the pesto is made with sun dried tomatoes (dried and not cooked, hence the name). Raw foods and whole raw meals are fabulous because raw food is wholesome and has not been refined, chemically processed, denatured, or heated above 118°F which means the nutritional value of the food is preserved. When we eat food in its natural state (raw) our bodies receive all the vitamins, minerals, phytonutrients, and enzymes which are naturally found in the plant. For this reason alone, why not eat raw especially this time of the year when the harvest is bounty!! Raw Sun Dried Tomato Pesto Pasta PREP TIME: 15 mins TOTAL TIME: 20 mins Servings: 2 Ingredients Pasta 3 medium zucchini (~5 cups finished noodles) 1 Tbsp raw hemp hearts (optional) Sauce 6 oz sun dried tomatoes 3 Tbsp extra virgin olive oil 3 Tbsp raw walnuts 1.5 Tbsp lemon juice 1 clove garlic 1/2 tsp salt A sprinkle of cracked black pepper Using a spiralizer, create your raw zucchini noodles (zoodles). If you do not have this handy kitchen tool you may also make your noodles with a handheld vegetable julienne tool, as shown above. Set noodles aside and begin making the raw tomato pesto. For the pesto, combine the sun dried tomatoes, olive oil, walnuts, lemon juice, garlic, salt, and pepper in a food processor (may also use a blender). Pulse on high until all ingreident are fully combined and a semi smooth sauce is formed. Lightly toss pesto over raw noodles/zoodles. Mix until fully incorported. Top with a sprinkle of raw shelled hemp seeds. 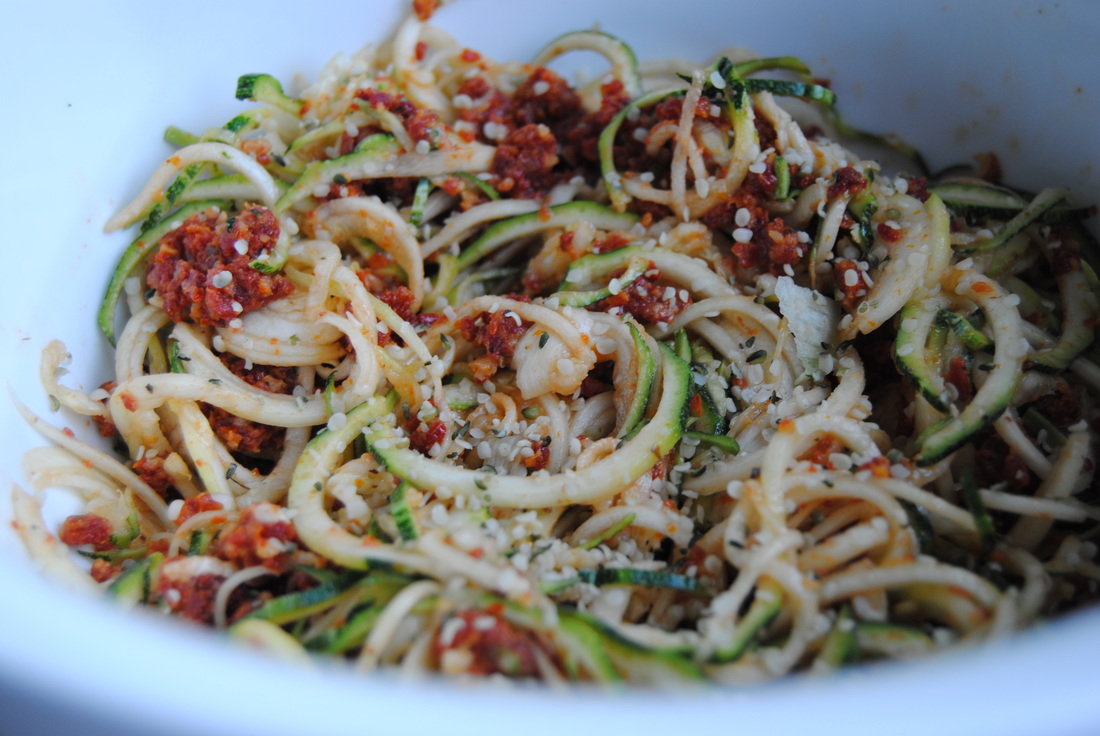 So make sure you don't pass up the zucchini at markets and offered from friends' gardens this summer. The uniqueness of textures and flavores in this recipe will make it a weekly favorite and guest pleaser this summer. Also get creative with your spiralizing to really make your veggies shine. We want to see what you come up with! Spiral away, Jess and Cecelia 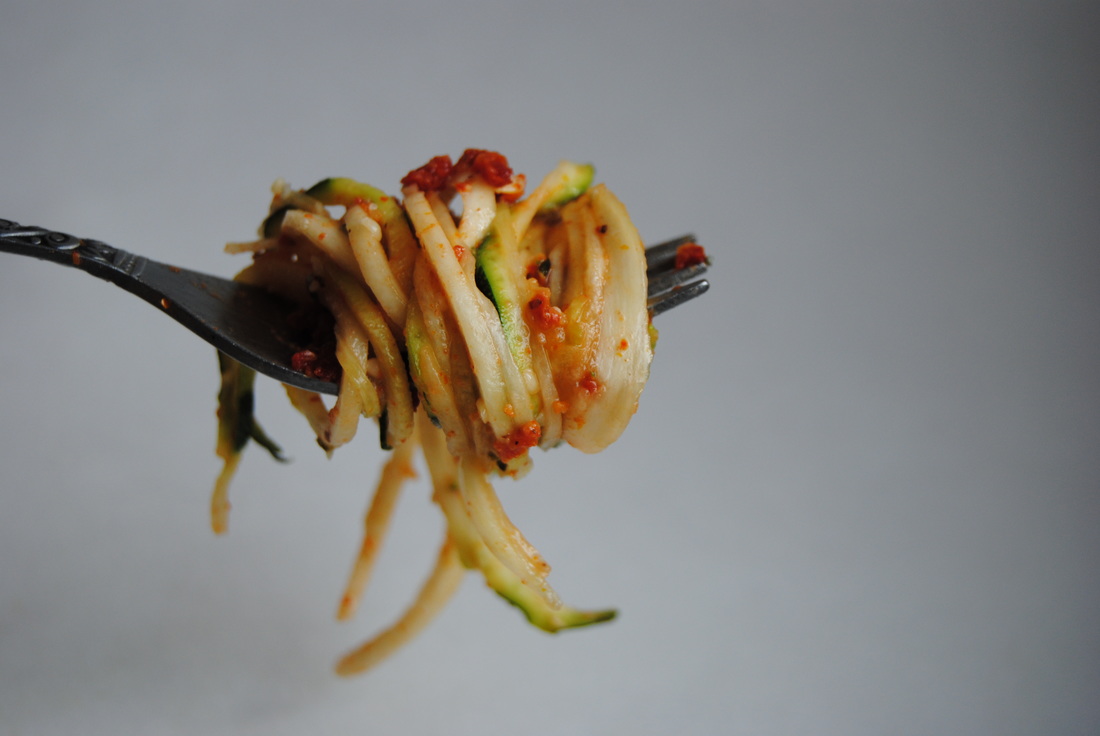 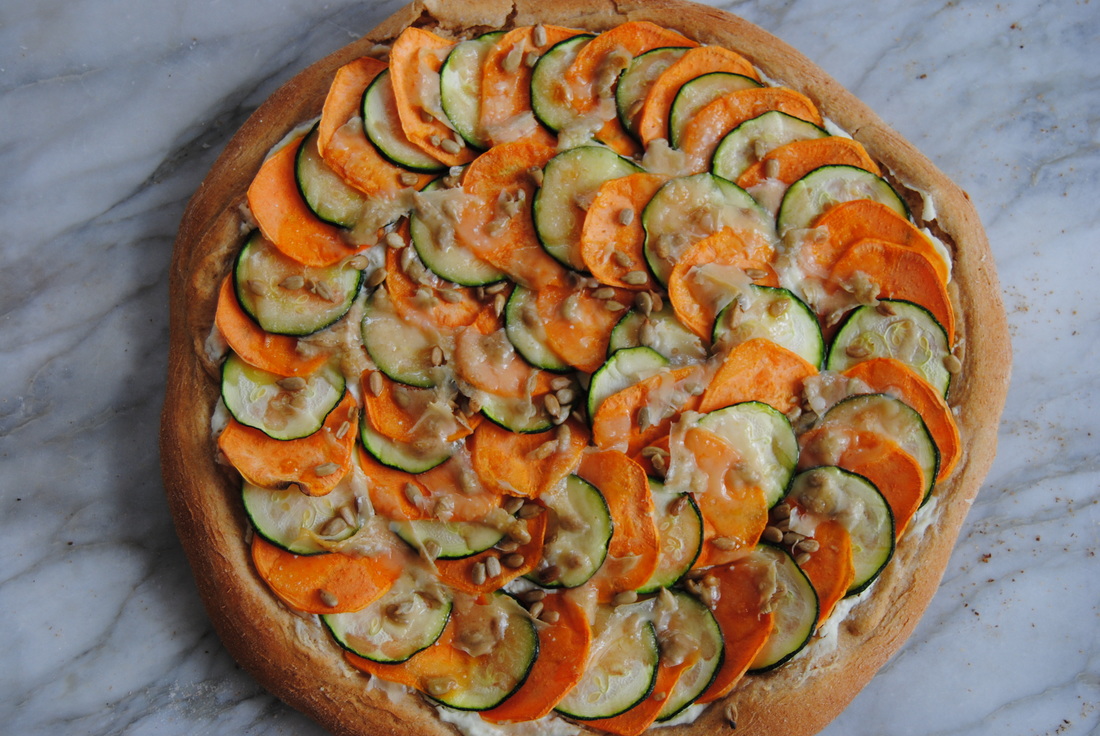 From TGBK we want to wish you a happy summer solstice! It is the longest day of the year today, meaning the sun rises the earliest and sets the latest than any other day this year, do don't waste the daylight sleeping in. Well what to do with all the extra time today then? How about experimenting with something else that rises...you got it, yeast bread! This pizza crust recipe was adapted from a favorite bun recipe of ours and we have to say it is quite the showstopper. If you haven't experimented with yeast baking yet today is the day, but let's explain the process a little more first. 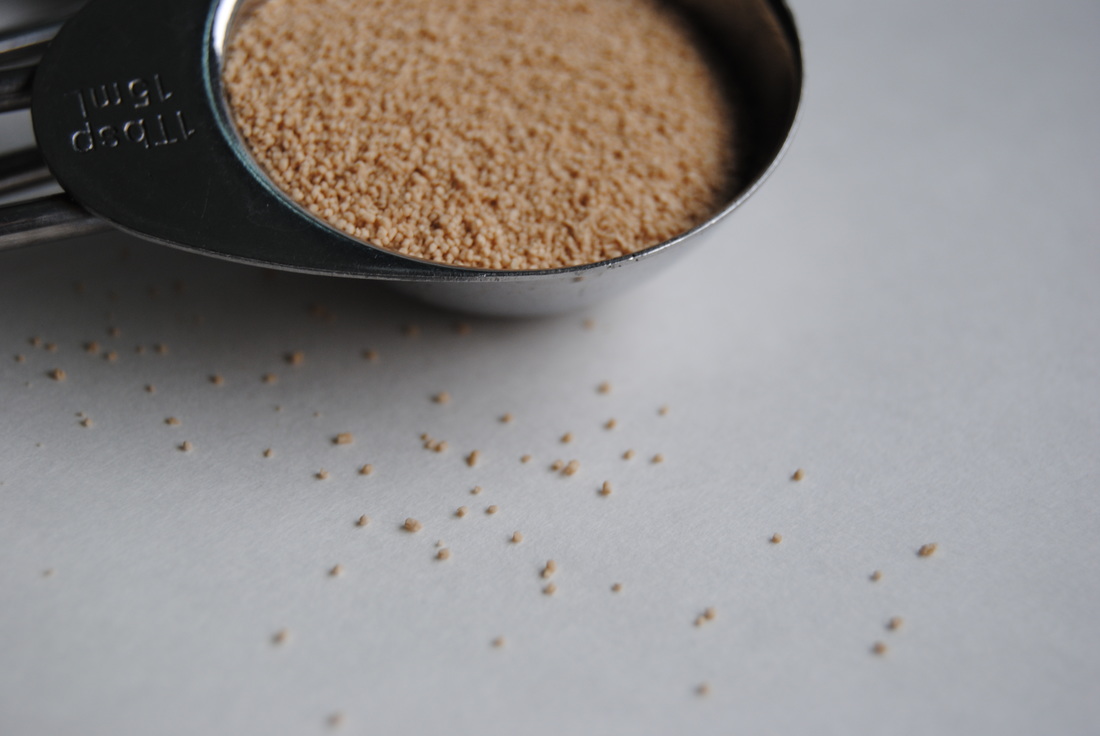 Yeast is a live, single-celled fungus of which there are about 160 species. The yeast we are most familiar with and most commonly used in baking is saccharomyces cerevisiae, or bakers yeast. This yeast lies dormant until it comes into contact with warm water. Once activated, yeast begins feeding on sugars (either added to the recipe or from the starch in the flour) and releases carbon dioxide. The carbon dioxide becomes trapped in the dough's elastic web of gluten (created through the kneading process) and makes the bread rise. Be careful though, since yeast are living they can be killed by overly hot water. Yeast prefer temperatures between 70-100 degrees Fahrenheit and liquids hotter than 139 degrees will kill yeast. So if your precious dough does not rise, this may be what happened. Though there are other reasons why you may not get the rise you were hoping for- we like this website for some more yeast bread tips and troubleshooting. So grab some yeast from the local store (active, dry yeast for this recipe) and lets get started! 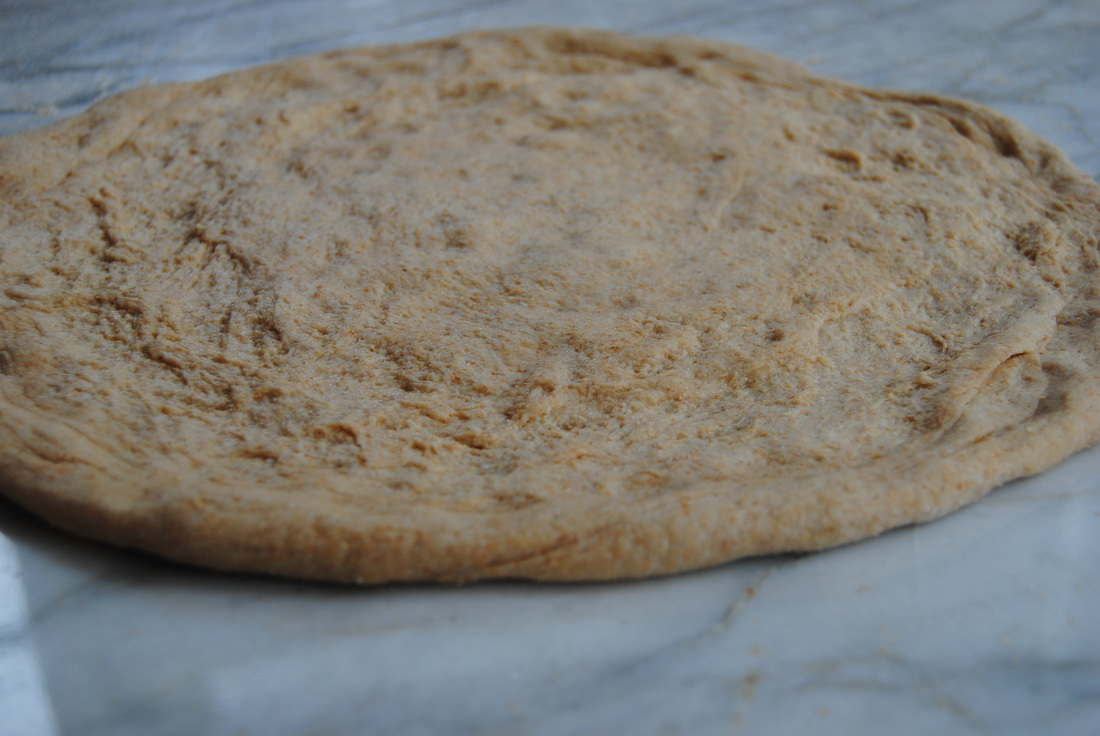 The Perfect Crust PREP TIME: 30 mins TOTAL TIME: 45 mins Servings: 2 pizza crusts Ingredients 3 1/2 cups flour of choice (we used 2 cups whole wheat flour and 1.5 cups spelt flour) 3 Tbs sugar 1 tsp salt 2 packages active dry yeast 1 cup milk of choice (we used unflavored hemp milk) 1/2 cup water 4 Tbsp extra virgin olive oil + additional for greasing dough 1-2 Tbsp ground flax In a large bowl thoroughly mix 1.5 cups flower, sugar, salt, and yeast. Combine milk, water and oil in a small saucepan. Heat over low heat until liquids are warm but not too hot. Gradually add to dry ingredients and beat for two minutes with an electric mixer, scraping bowl occasionally. Add 1/2 cup flour and beat at high speed another two minutes. Stir in enough additional flour to make a soft dough (approximately 1-1.5 cups). Turn onto a lightly floured surface and kneed until smooth and elastic, about 5 minutes. Place dough in a bowl sprinkled with olive oil, turning to grease the top of the dough. Cover the bowl with a wet dishcloth, place in a warm location and allow dough to rise for 15 minutes. Turn the dough out onto a floured table, divide in half, and roll each half into a 9x10 inch circle. Sprinkle ground flax seed onto two circular baking sheets to prevent dough from sticking. Lay dough onto baking sheets and create your preferred pizza. Once pizza is prepared bake at 425 for at least 10-12 minutes to allow dough to fully cook. Dough can also be saved in the fridge for 3-5 days. Summer Spiral Pizza PREP TIME: 15 mins TOTAL TIME: 35 mins Servings: 1 pizza Ingredients Sauce 1/2 cup full fat ricotta cheese 2-3 cloves crushed garlic, depending on how much garlic you like 1 Tbsp extra virgin olive oil Toppings 1/2 medium raw sweet potato 1 medium zucchini 3 oz sharp cheese, shaved (we chose Parmesan) 1/8 cup roasted and salted sunflower seeds Sprinkle of crushed red pepper flakes, optional Drizzle of reduced balsamic glaze, optional Using a mandolin or a large chef knife, slice sweet potato and zucchini into 1/8" slices. Mix together olive oil and crushed garlic with ricotta cheese. Evenly spread ricotta mixture on top of pizza crust. As pictured, layer sliced sweet potato and zucchini one after another starting from the outside of the crust working your way to the center. Sprinkle sunflower seeds on top of vegetables and spread shaved cheese evenly over the top. Place pizza in preheated 425 degree oven and cook for 16-18 minutes until golden brown. Once out of the oven, sprinkle with desired toppings- crushed red peppers and reduced balsamic glaze are delicious! 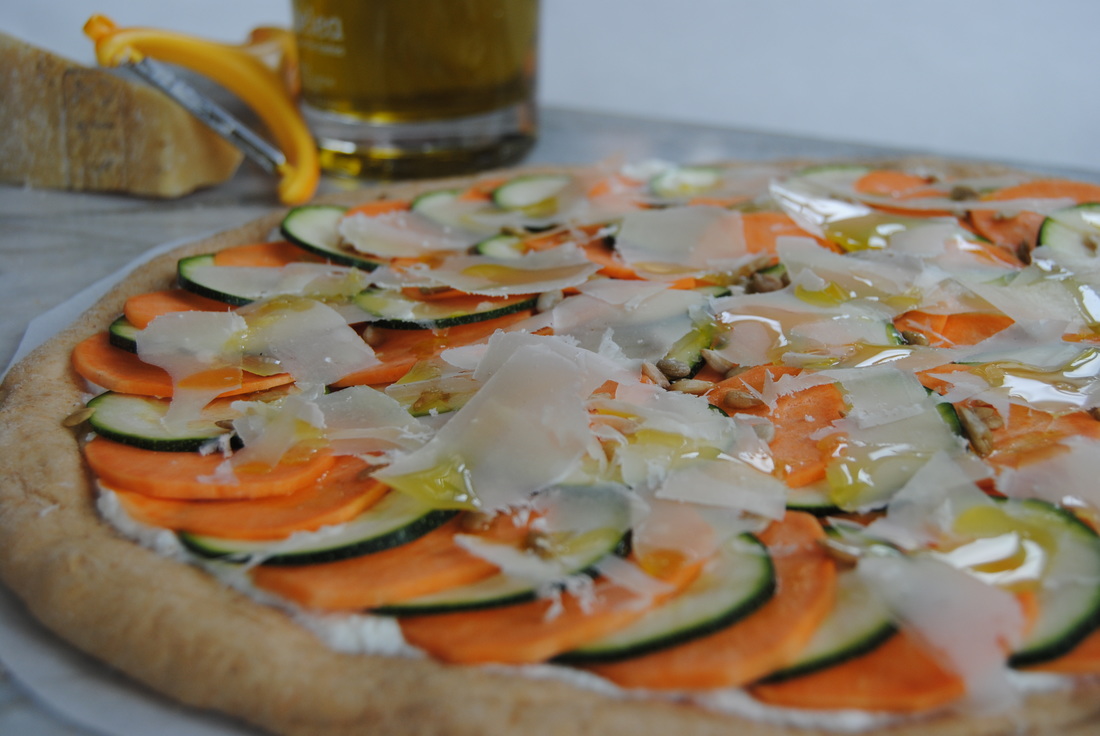 Okay, so how great was the crust? We promise you won't find that in the freezer aisle! This crust will be just as good with any variety of toppings so feel free to mix it up and create your own favorite. We loved showcasing zucchini topping for the summer but can imagine hundreds of other amazing combinations. Please experiment and let us know what you come up with, we love hearing from you! Rise and shine friends, Jess and Cecelia 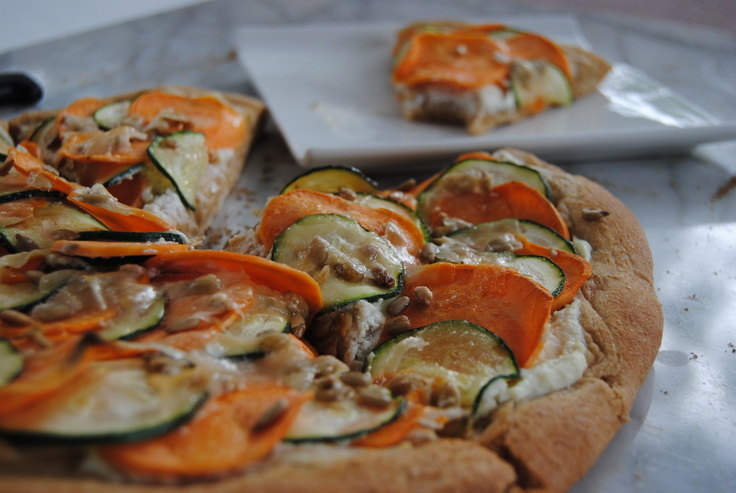 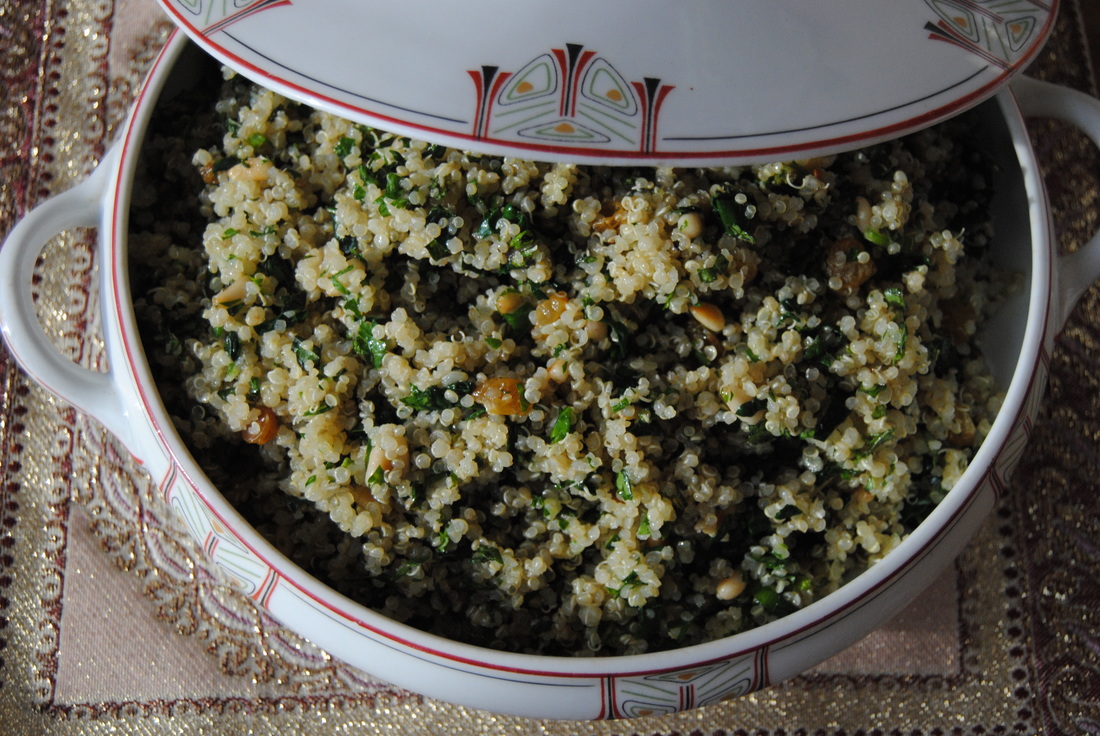 If you remember your school days and biology class (yeah right!) you may remember that an herbivore is an animal adapted to eating plant material. They have digestive systems that allow them to eat a wider range of plant material than say humans, whom are considered omnivores. Though some of us still choose to eat primarily plants. When considering the wide range of plants available to eat, we think there are some options that are underutilized- one being fresh herbs. Most fresh herbs can be found in dried and ground forms making them last longer and simpler to use. However, we believe fresh herbs to be superior in taste and nutritional quality. So what better time than spring to start adding more fresh herbs into your diet? And we're going to help you do that with this recipe. 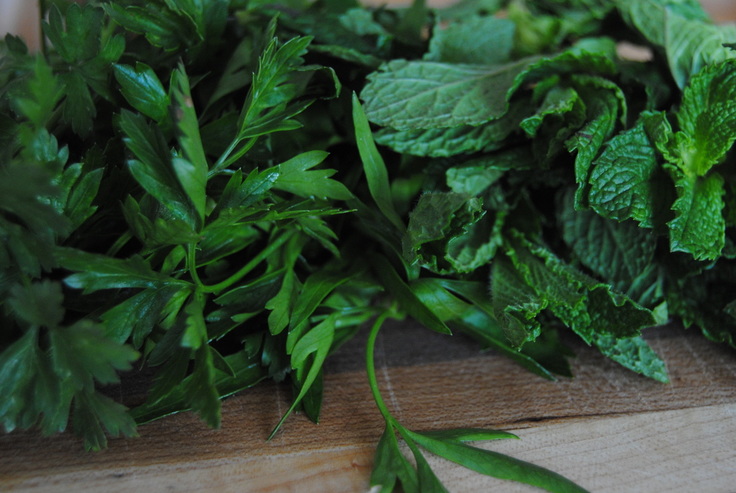 Herbs have pretty much been used since the start of civilization for decoration, flavoring and as remedies for illness. Besides their culinary uses, most herbs boast a variety of other qualities that you might not be aware of. Take parsley and mint for example (pictured above)- chewing these fresh herbs has been a natural remedy for bad breath for thousands of years. If the leaves are swallowed after chewing these herbs will continue to provide fresh breath during the digestion process. Also during digestion, parsley and mint may reduce the production of intestinal gas and odor promoting better digestion and combating indigestion. Now can any chewing gum do all that!? We recommend trying to find organic herbs whenever possible or growing at home. If you're worried about wasting these precious fresh herbs freezing is the next best alternative to fresh. Simply chop the remaining herbs and portion into ice cube trays, cover with some water and freeze into herb ice cubes. Once frozen remove from the trays and save in the freezer for your next recipe, just thaw under lukewarm water and voila! The taste will not be as strong as fresh but still delicious. Okay so whose ready for this recipe? Herbalicious Tabouli Inspired Salad PREP TIME: 20 mins TOTAL TIME: 25 mins Servings: 4 Ingredients Salad 1 cup dried quinoa (we used sprouted) 1 1/2 cups raw kale 1 1/4 cup organic parsley leaves 1 cup organic mint leaves 1/2 cup golden raisins 1/3 cup pine nuts, roasted 1 green onion (green top only) Dressing 1/4 cup extra virgin olive oil 2 Tbsp lemon juice 1 Tbsp honey 1 1/4 tsp sea salt 1/2 tsp cracked black pepper Add 1 cup dry sprouted quinoa to a pan with 2 cups water. If you are not using sprouted quinoa make sure to rinse quinoa under running water until water runs clear before cooking. Bring quinoa and water to a boil. Reduce the heat to simmer, cover pan and continue cooking for 12-15 minutes or until the liquid has absorbed. While the quinoa is cooking, begin preparing the kale. De-stem kale, add to a pot with a steaming basket over a few inches of boiling water, cover, and steam for 1-2 minutes until dark green in color. Set aside to cool. Rinse the parsley and mint and finely chop along with the cooled steamed kale. Thinly slice the green top of the onion and set aside. In a small pan, over medium heat, lightly toast pine nuts until golden and fragrant. About 3 minutes. Combine the dressing ingredients - olive oil, lemon juice, honey, salt, and pepper - in a small bowl and whisk until combined. In a large bowl, mix together the cooked quinoa, chopped kale, parsley, cilantro, onion, toasted pine nuts, and golden raisins. Pour the prepared dressing on top of your salad, lightly toss together and let sit for 15 minutes for the flavor to meld. Enjoy as a main dish, side dish, or as a healthy herbalicious snack! 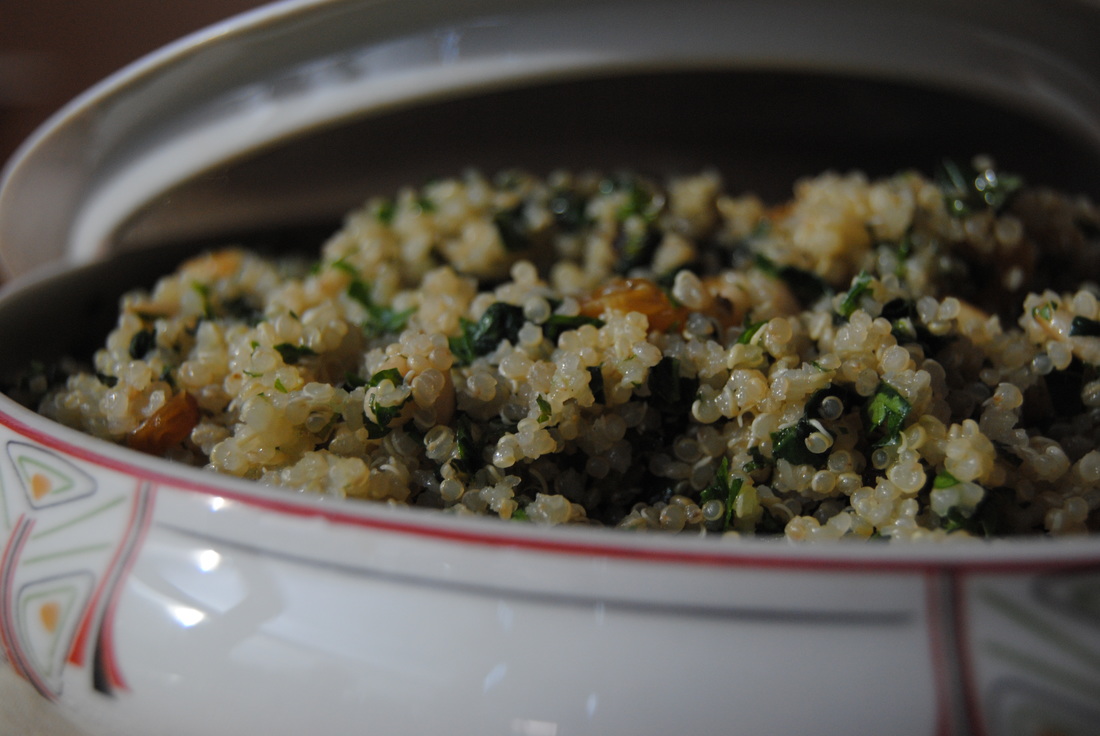 Is your breath minty fresh after that meal? Then you might want to add this dish to your date night repertoire instead of garlic toast (ha!). So keep your eye out for fresh herbs at the farmers markets this season or maybe think about starting a garden of your own, because as you can see, fresh herbs are a must in your culinary tool kit. See you next thyme, Jess and Cecelia 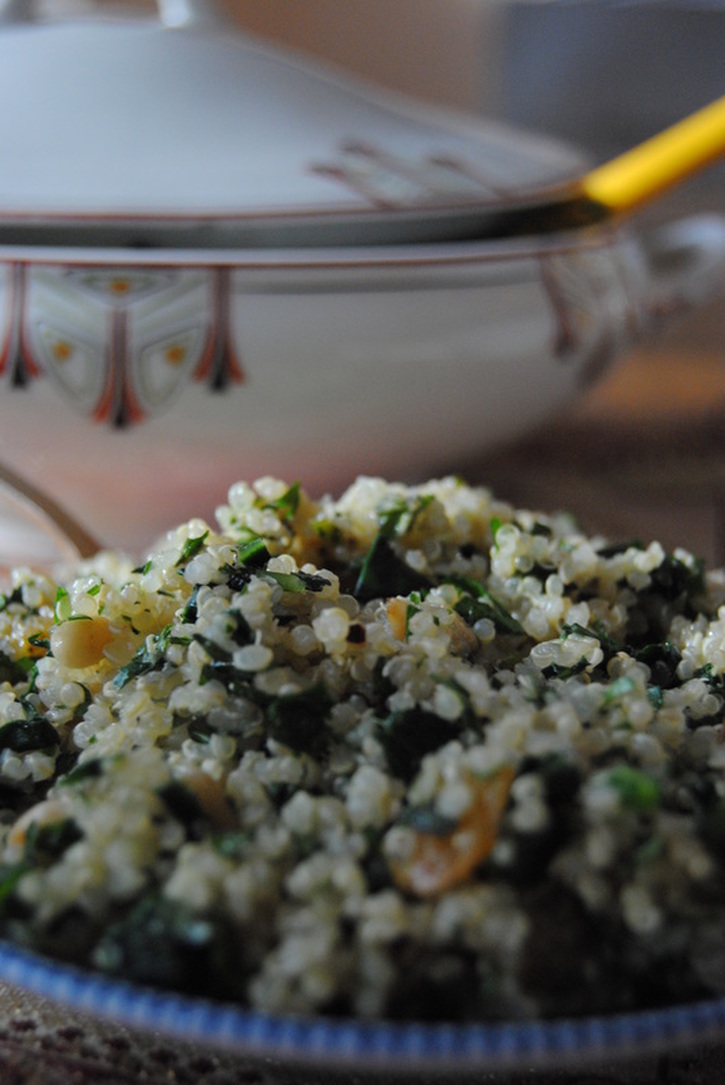 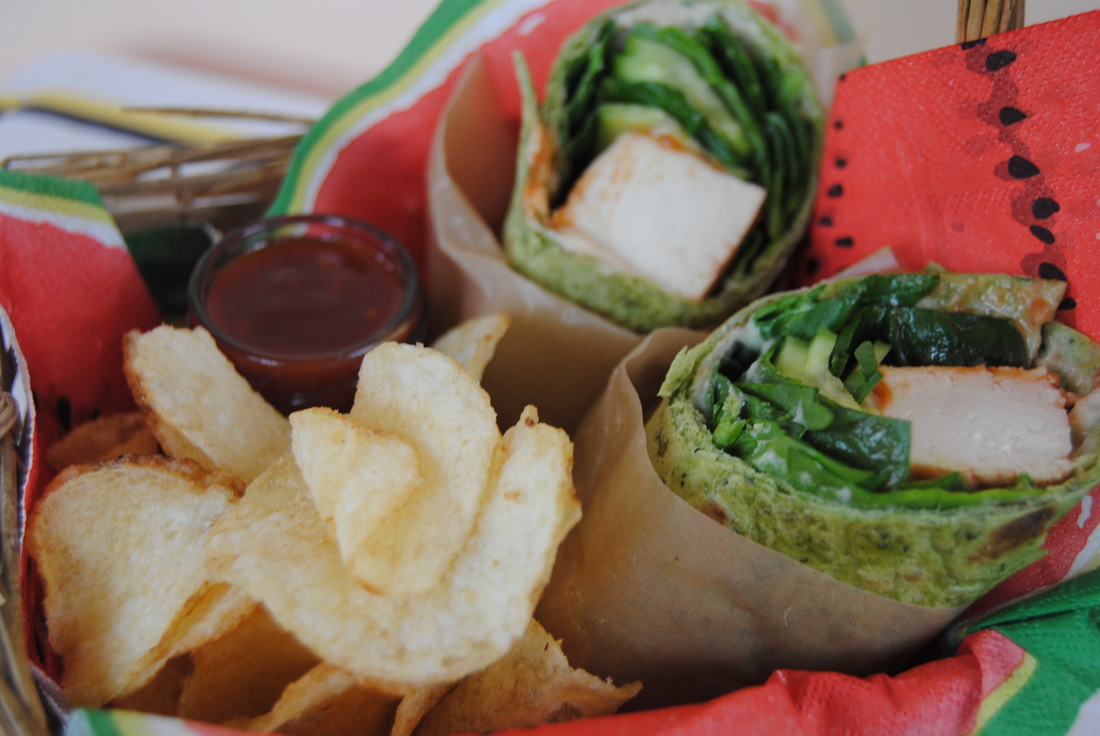 Does the start of May have you dreaming of barbeque and picnics? Us too! And fitting that May is national barbeque month. This recipe is perfect to pack for a picnic lunch even though we didn't technically barbeque but used a delicious BBQ sauce instead. But be careful! Processed sauces and condiments may have some secret ingredients that you might not even think to look for. Remember if it's not homemade (if you have the time, go for it!) then you always have to check ingredients lists. Not only is a quality product better for you, but quality ingredients will allow the flavors to really shine. And that's what we all want from a barbeque sauce right, that rich, spicy, sweet goodness? Okay so who's getting hungry? 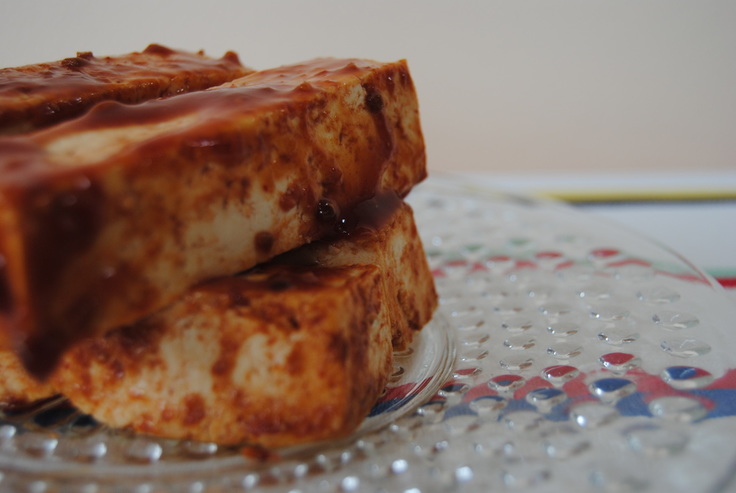 In the interest of time and wanting to get out to enjoy that picnic, we've used several food products in this recipe. But like we've said before, "easy eats" doesn't have to mean junk. Let's first talk about finding a quality wrap before we get to the BBQ sauce. Many wraps on the shelves contain over processed flour, poor quality vegetable oils and a whole bunch of gums and preservatives. And yes maybe they may last longer in the fridge but really it's not worth it. Your wraps will be gone fast with this recipe we promise! Try to look for a wrap containing whole wheat flour, an oil other than soybean or canola, no gums and minimal or natural preservatives; ingredients that you recognize and can pronounce are always best. It may take a little extra effort next time you're shopping to read those ingredients list but then you'll know which brands to reach for next time. Same goes for the barbeque sauce. Standard, big name BBQ sauce companies often sneak less than favorable ingredients into their products. A few being high fructose corn syrup and xanthan gum. Xanthan gum is used as a thickening agent and has some nasty side effects such as increased gas, abdominal bloating, and may act as a laxative. When it comes to quality sauces, we like ours pure and simple. Tomatoes, honey or sugar, vinegar, peppers, onions, and spices are the ingredients that you should look for. Other than the Trader Joe's BBQ sauce used in the recipe below, we also like JB's Fat Boy Products (don't let the name fool you!). 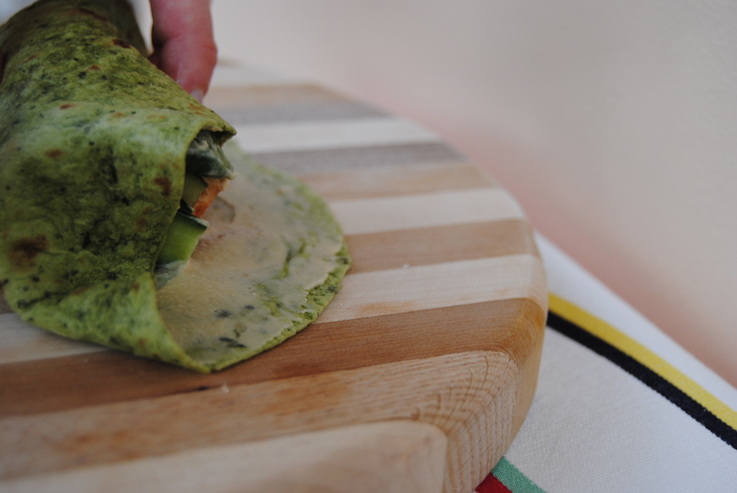 BBQ Tofu Wrap PREP TIME: 35 mins TOTAL TIME: 40 mins Servings: 4 wraps Ingredients 4 quality wraps (as discussed above) 8 oz organic tofu (we used Trader Joe's organic sprouted tofu) 1 cup spinach 1/4 cup quality BBQ sauce (as discussed above) + additional for slathering on your wrap when eating (we used Trader Joe's organic sriracha BBQ sauce) 1 mini cucumber 4 Tbsp plain hummus (use our recipe if you're making homemade) Sprinkle of sea salt Preheat your oven to 350 degrees. Drain the tofu from packing liquid. If you like a firmer tofu, place tofu between a clean dish cloth then place a weighted object (heavy cutting board or pan) on top of covered tofu. Allow the weighted tofu to sit for ~10 minutes to release additional liquid. Cut tofu, length wise into 4 equal blocks. Spread 1/4 cup BBQ sauce on tofu, making sure to cover all edges for even BBQ flavor! Cook in 350 degree oven for 30 minutes. Allow the tofu to completely cool before assembling the wraps. We cook our tofu ahead of time and keep it covered in the fridge. Cut cucumber as thin as possible. We used a mandolin to achieve an even thin slice. Now it is time to assemble your wraps. Evenly spread 1 Tbsp hummus on each wrap making sure to get all the way to the edges. The hummus helps hold the finished wrap together. Sprinkle each hummus covered wrap with sea salt. When adding the filling to the wraps, place all ingredients - 1/4 cup raw spinach, 2 thin slices of cucumber, and 1 block of tofu - on the bottom third of wrap, making sure to leave ~2 inches of "open space" on both ends to allow the edges to be folded in so your filling ingredients are snug and won't fall out when eating. As shown in the picture, grab the bottom end of your wrap and roll with all the ingredients. Fold in each side and seal the other end. Wrap in wax paper, cut in half, and slather with additional BBQ sauce!! 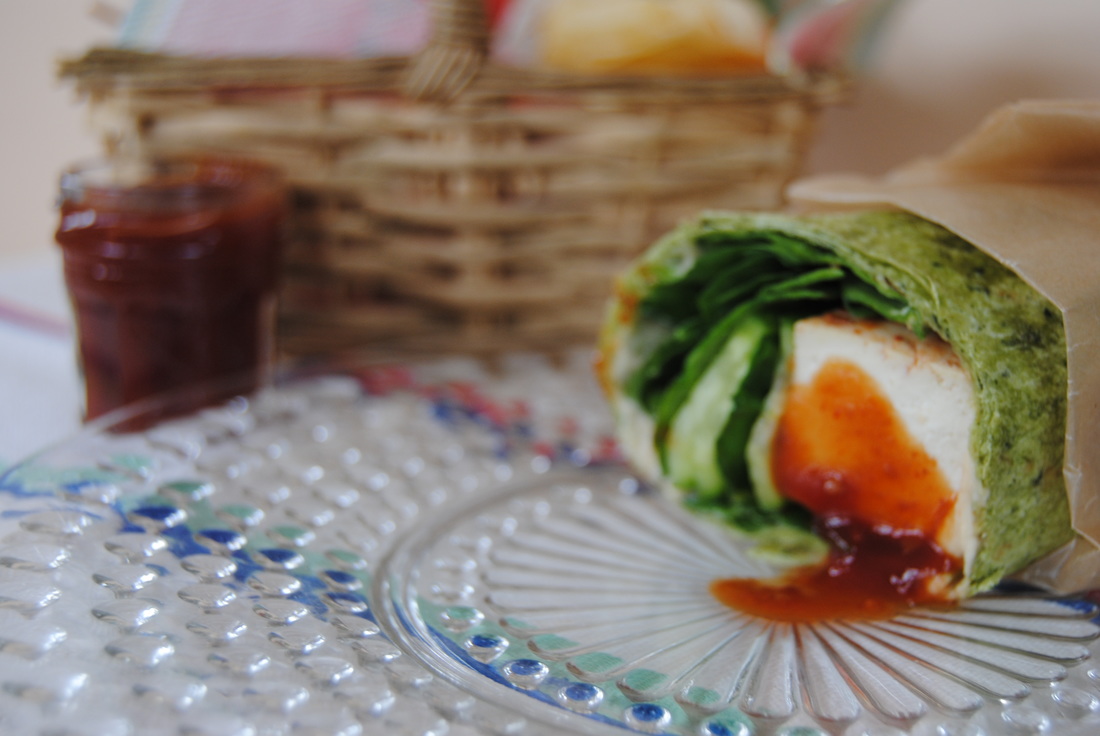 You know what else is great about a vegan wrap on a picnic? There's no question about weather that meat or cheese has been in the sun just a little too long! Pair with your favorite side (we went for the olive oil potato chips this time), pack some extra sauce for dipping, and plenty of napkins. And remember to keep reading your ingredients lists and supporting brands selling real, quality food with your purchases. That's a wrap, Jess and Cecelia 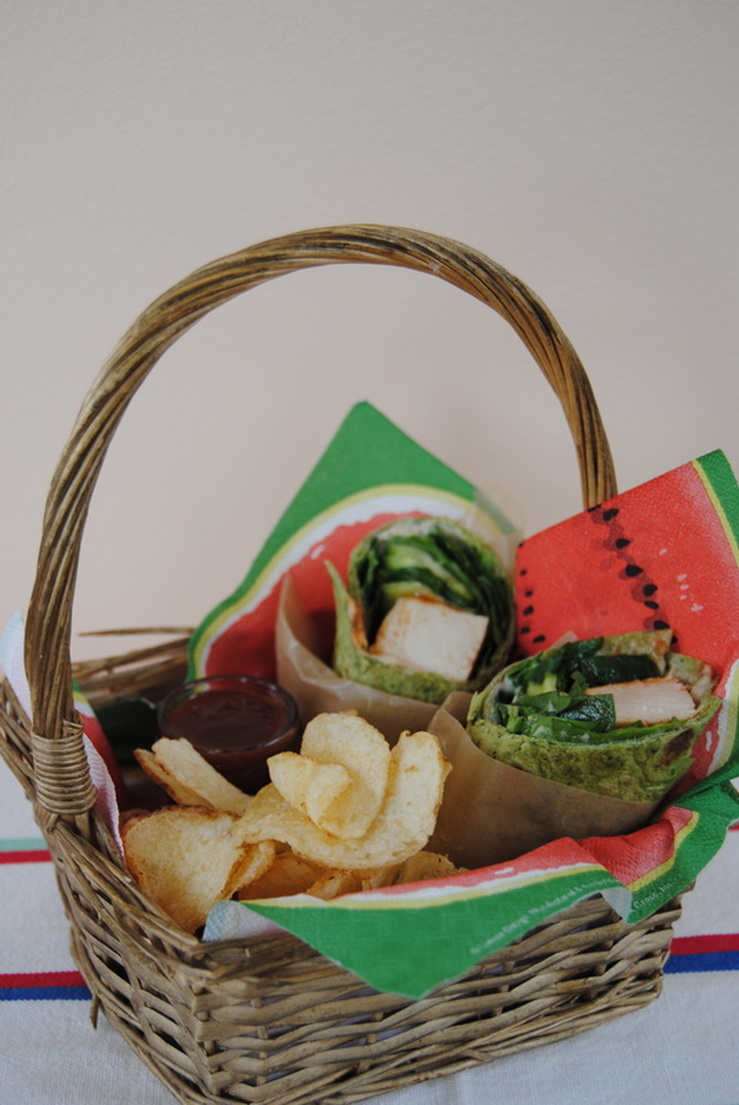 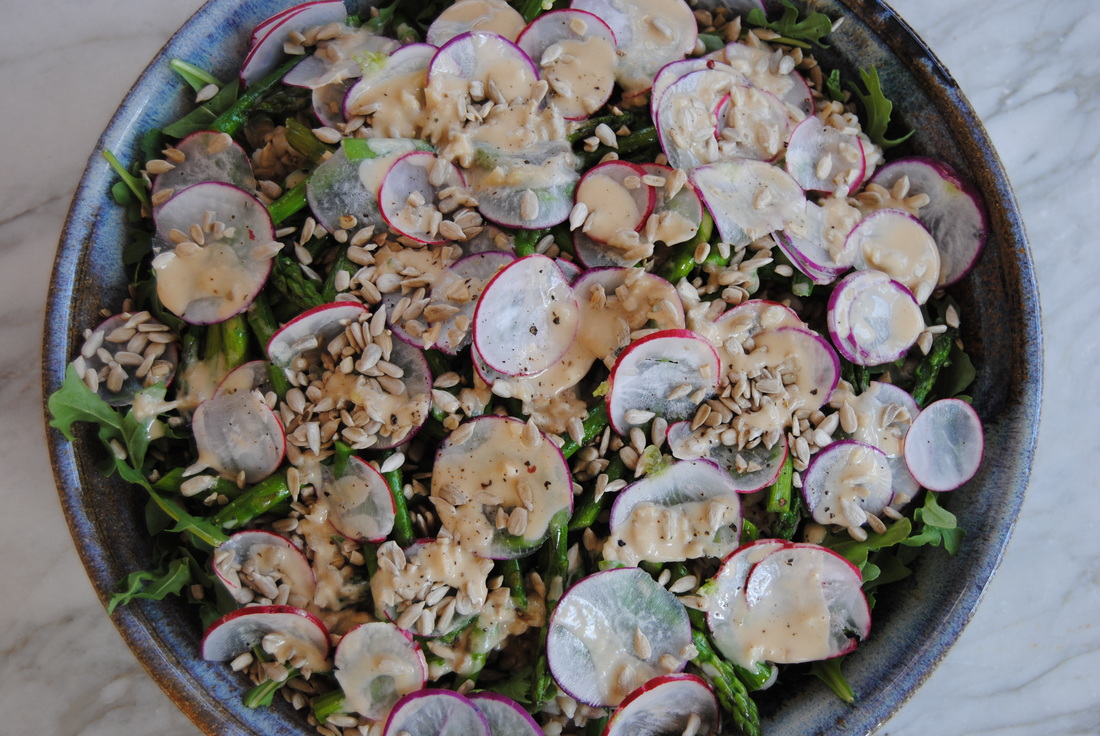 So we're sure you already know that nuts and seeds are a great plant based source of protein, but have you ever noticed that some nuts and seeds seem to get more attention than others? The last time you were reaching for a nut/seed to top a salad what did you pick? A good guess would be almond, walnut or sunflower seeds as some popular choices. Well, we are here to remind you about the nutritional benefits and culinary uses for the sesame seed! We know what you're probably thinking- aren't sesame seeds pretty much just a decorative sprinkle to top foods and add a little flavor? Let's find out... 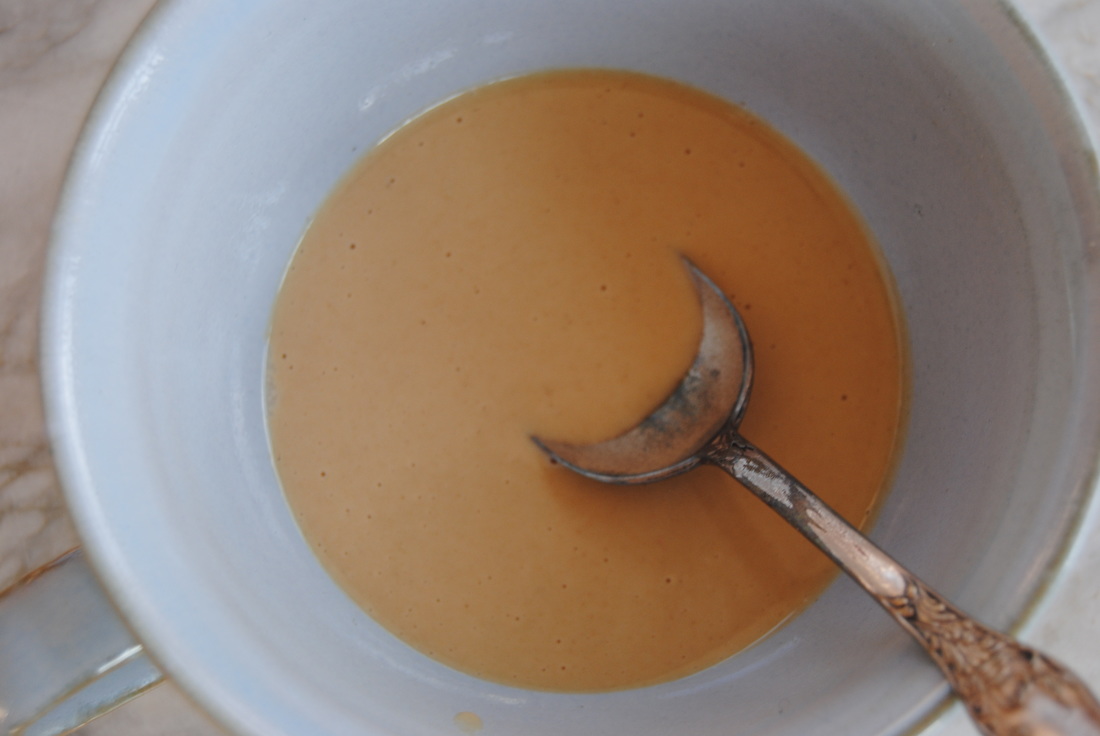 Okay so it's true, our salad is topped with sunflower seeds but the powerful sesame seed in our homemade dressing is the true star of this dish. So what's so fabulous about sesame? Well first, sesame is the oldest known plant cultivated for it's seeds and oil, meaning history is trying to tell us something! Sesame seed is used frequently in Asian cuisine and the paste created from ground seeds (tahini) is common in Middle Eastern, North African, Greek and Turkish dishes. Sesame seeds are a nutritional powerhouse and are rich in calcium, iron, magnesium, phosphorus, potassium and manganese. A two tablespoon serving of seeds contains 35% of your daily intake of copper, two grams of fiber and three grams of protein. It is important to note that this nutritional value is true of the whole sesame seed. To make tahini the seeds are pre-soaked and then crushed in order to separate the bran (fiber) from the kernel (heart of the seed). The hulling process (removing the outer skin) does decrease the total amount of calcium, fiber, iron, and potassium in tahini though it remains a source of these nutrients and high in protein- now five grams per two tablespoon serving. The flavor of tahini is nutty and slightly bitter so pairs well with sweet ingredients (think tahini and fig jam!). Tahini is a common ingredient in hummus and baba ganoush (eggplant dip). In some countries it is used as a spread over toast and topped with jam or preserves. One of our favorite ways to use tahini is in homemade salad dressing because of it's bold flavor. So that means if you make this salad please buy some tahini and make the dressing too, no cheating! 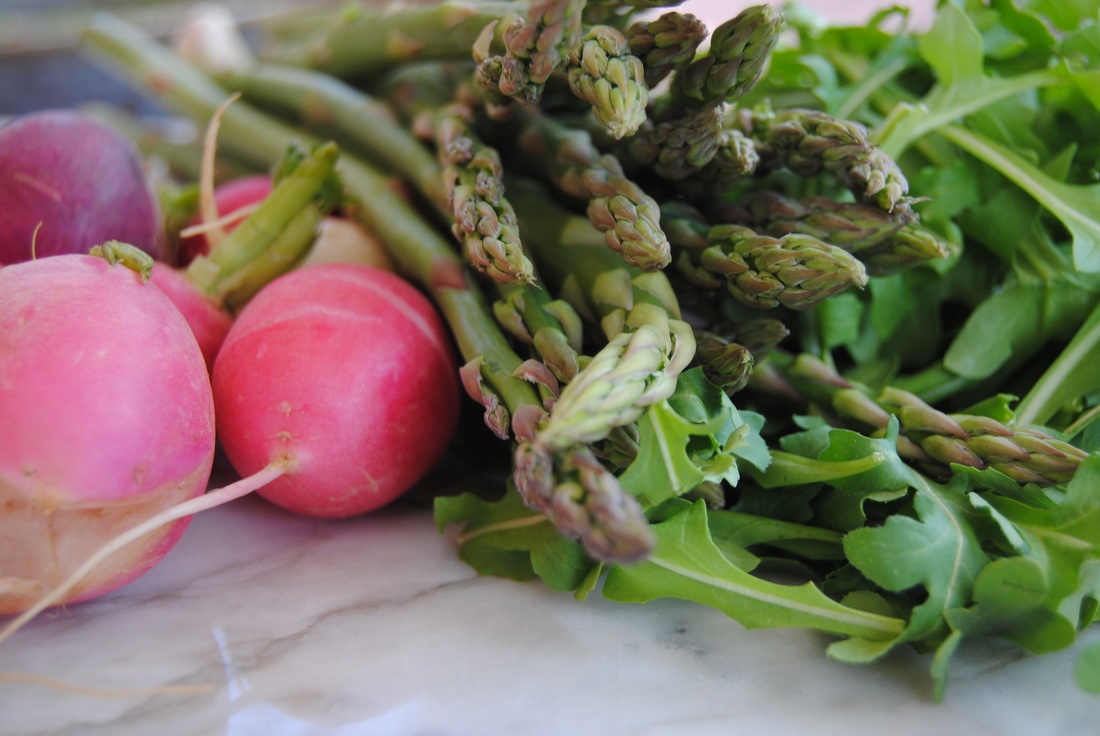 The Early Spring Salad PREP TIME: 25 mins TOTAL TIME: 30 mins Servings: 4-6 Ingredients Salad 4 -5 cups arugula 1/2 cup uncooked pearl barley small bunch of multicolor radishes small bunch of asparagus 1/4 cup sunflower seeds 3 Tbsp extra-virgin olive oil sprinkle of sea salt and cracked black pepper to taste Dressing 1/3 cup tahini paste juice of 1 lemon 1 clove garlic, minced 2-3 Tbsp water 1/8 tsp sea salt In a medium size pot, bring 1/2 cup pearl barley and 1 1/4 cup water to a boil. Reduce heat to a simmer, cover with a lid and allow barley to cook for about 40 minutes until all the liquid is absorbed. Fluff barley with a fork and set in the fridge to cool. Wash and chop asparagus into 2" pieces, cut on the bias (45 degree angle). Add olive oil to a large saute pan over medium-low heat. Once oil is warm add asparagus and cook until slightly tender, about 5 minutes. Sprinkle with sea salt and set aside to cool. For the dressing combine the tahini, lemon, garlic, water, and salt in a bowl. Whisk with a fork into a creamy consistency, set aside. Sprinkle sunflower seeds with salt and toast in a dry pan for about 5 minutes over medium heat until seeds are browned and fragrant. Wash and slice radishes paper thin. We used a mandolin here which works perfectly. If you do not have a mandolin, carefully cut radishes as thin as you can using a large chefs knife. Now it's time to assemble the salad! Using a large " family style" bowl layer the ingredients starting with the arugula. Top arugula with cooked pearl barley, tender asparagus, sliced radishes, and toasted sunflower seeds. Generously drizzle tahini dressing over the top. Sprinkle with additional sea salt and cracked black pepper to taste. 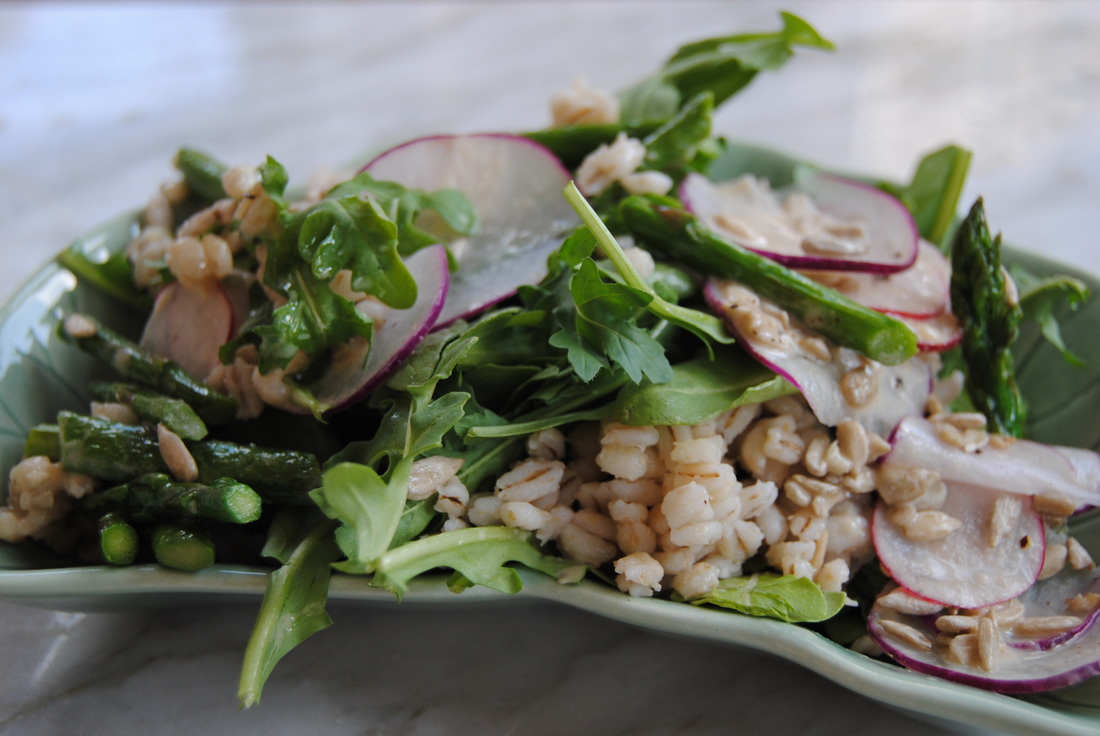 Now wasn't that the most perfect bite? The delicate flavor of early spring veggies with the rich tahini tang combine to make this a salad that will definitely need a second serving. And we hope you'll remember the sesame seed next time you experiment in the kitchen. Now finish up and go enjoy the early spring sun! Happy spring, Jess and Cecelia  |