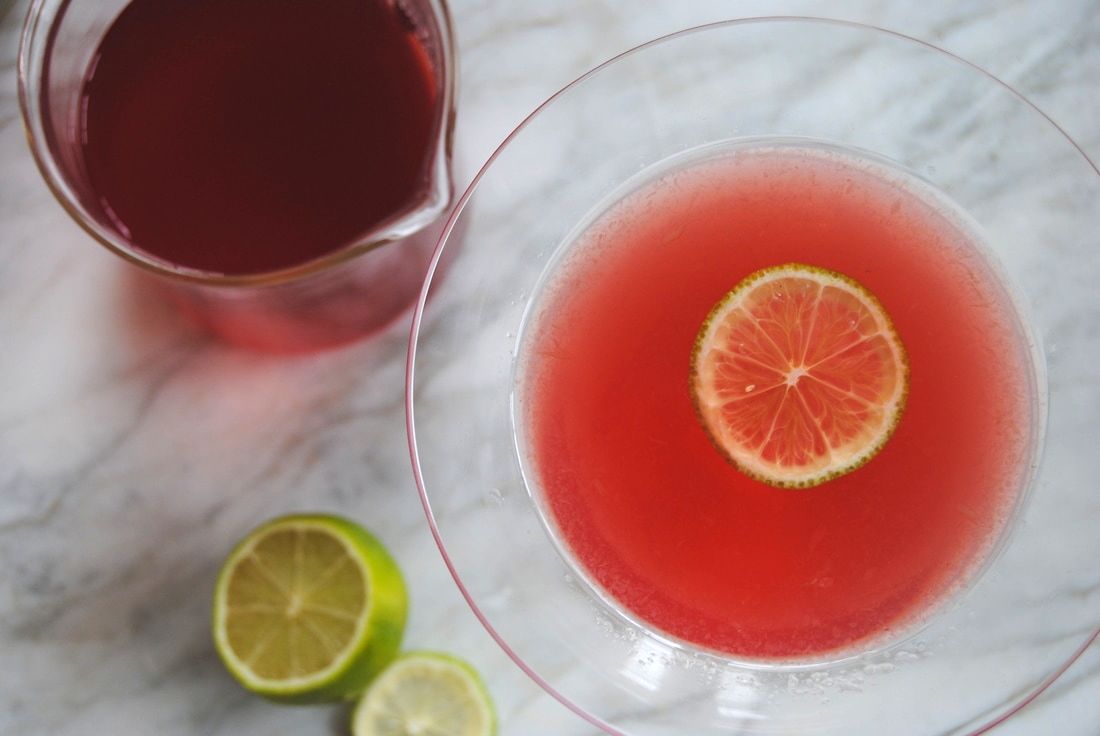
 As you guys know, here at TGBK we primarily focus on nutritious food recipes but love a good adult drink now and again. But we think that adult beverages can provide nutritional benefit too - believe it or not! This week we created a drink inspired by a Cosmopolitan (Sex and the City flashbacks anyone?) but with a very important ingredient swap. We switched out the traditional juice ingredient for a flavored kombucha. And if you remember from our previous kombucha post (here), kombucha is packed full of gut friendly probiotics to help support healthy digestion and immunity. So while enjoying your next hard drink, why not get your daily dose of probiotics while you're at it? This recipe can also be made as a "mocktail" without liquor so there are tons of ways to indulge! If this all sounds good to you, let's get to the recipes.  Kombucha Cocktail or Mocktail PREP TIME: 5 minutes (+ 48 hours to ferment kombucha with juice) TOTAL TIME: 5 minutes (+ 48 hours to ferment kombucha with juice) Servings: 2 Ingredients 4 oz cherry kombucha (homemade - instructions below or store bought) 2 oz vodka (for mocktail omit and add additional 2 oz cherry kombucha) 2 oz cherry juice 2 Tbsp simple syrup 2 Tbsp fresh lime juice 2 thin lime slices for garnish Ice Flavored Kombucha To make basic kombucha follow our directions here. Once basic kombucha is prepared, strain the kombucha from the SCOBY making sure to reserve at least 1/2 cup of basic kombucha liquid for your next batch. Fill a glass bottle/bottles 2/3 of the way full with basic kombucha and fill remaining 1/3 of the bottle/bottles with fruit juice of choice (we used tart cherry juice from Door County for this recipe) leaving 1-2 inches of space at the top of the jar. Place a tight fitting lid on each bottle and allow to sit out at room temperature to ferment for 48 hours. Keep in mind it is important to use a juice that contains sugar. Yeast in the kombucha will feed off of the sugar in the juice and continue to ferment the kombucha. The longer you let the kombucha ferment with the juice, the less sweet and the more acidic the final product will taste. This fermentation time may also create more carbonation in your final kombucha. A good rule of thumb is to taste the kombucha each day until it's to your liking then store in the fridge until ready to drink. If you do not have the time to make homemade kombucha but you would like to try out this recipe, store bought cherry, berry, or cranberry kombucha would also work well. Simple Syrup To make simple syrup combine equal parts sugar and water in a small sauce pan. Simmer mixture on low, stirring often until the sugar has dissolved and the mixture has thicken up into a syrup like texture, ~3-5 minutes. Allow to cool then store in a glass jar with a tight fitting lid. Simple syrup can be stored in the fridge for up to 1 month. Cocktail/Mocktail Add kombucha, vodka (if using), cherry juice, simple syrup, lime juice, and ice to a cocktail shaker and shake mixture well. Strain cocktail into 2 martini glasses, add a lime slice to each glass for garnish and serve cold.  This cocktail/mocktail has a nice amount of tartness from the cherry juice and fermented kombucha and easily disguises that this drink may contain vodka - so be careful! We love the unique taste of this adult beverage and use for kombucha and hope you do too. Cheers! Jess and Cecelia 
0 Comments
A holiday weekend is upon us friends and you know what that means - time to take a break and look back at some favorite recipes from last spring/summer. Please also spend some time remembering those who have bravely served our country. We hope your plans include relaxing, spending time with friends/family, and good food of course! 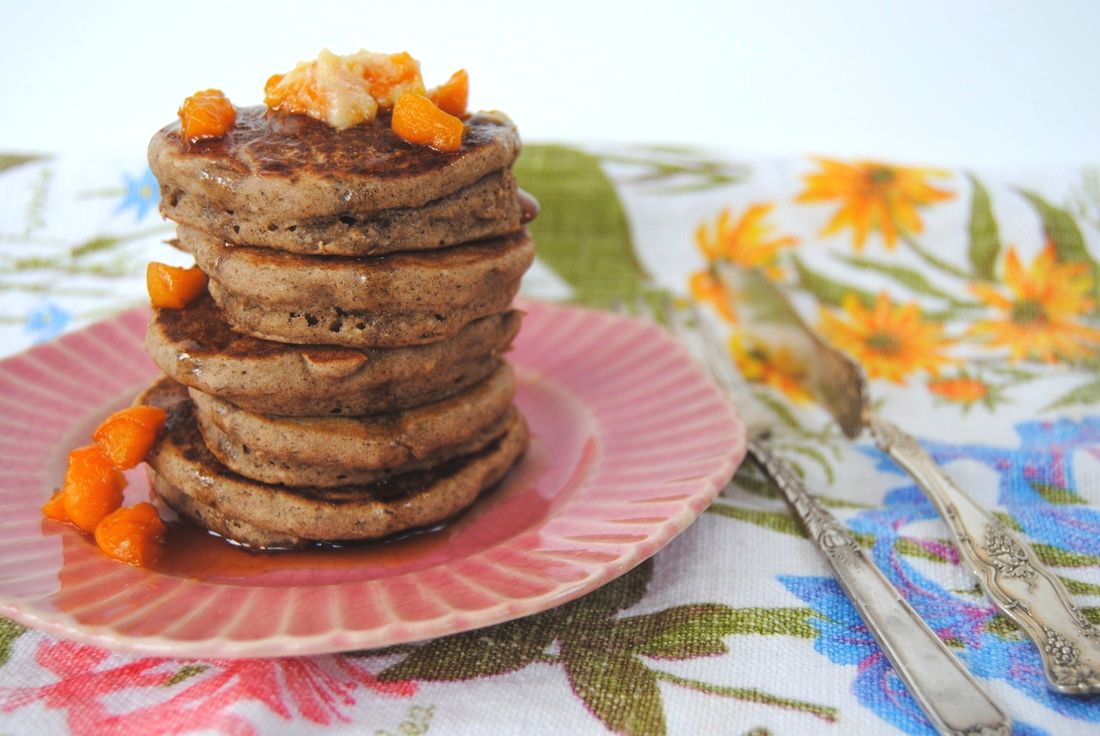 One of our favorite long weekend past-times is definitely sleeping well into the morning (or even afternoon!). Hey, we gotta catch-up on our sleep sometime! And after a restful sleep we are always ready for a hearty brunch. These buttermilk buckwheat pancakes with homemade apricot butter should definitely do the trick - get the recipe here. 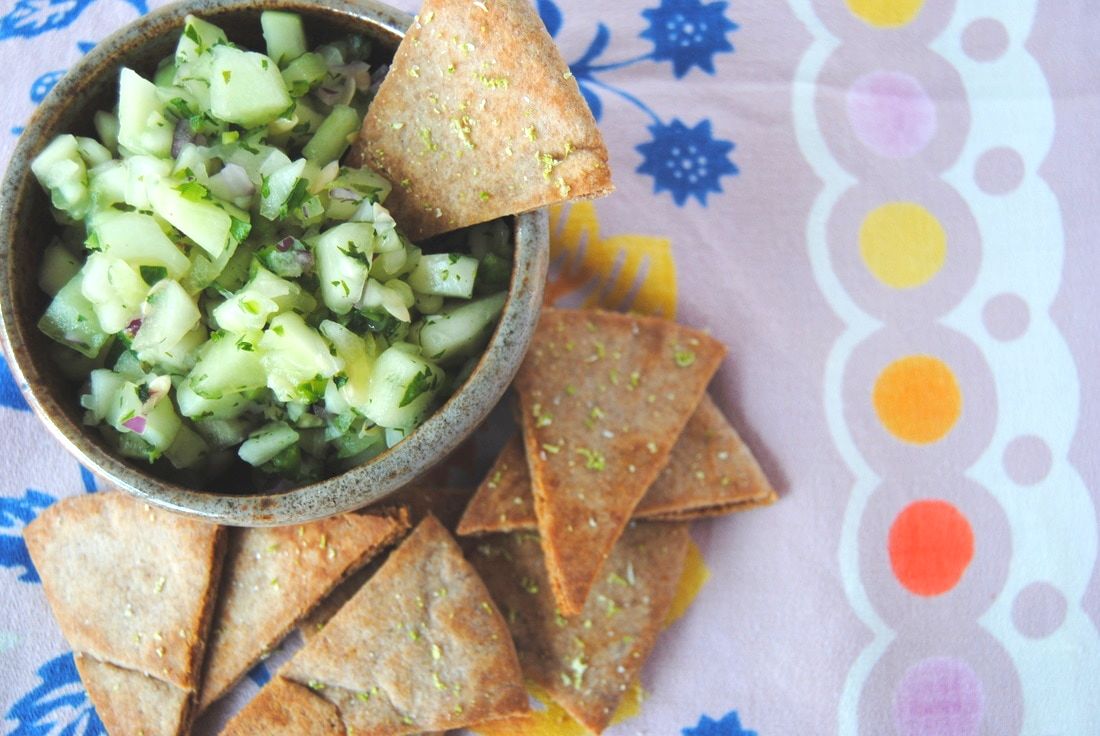 We are hoping the weather cooperates with a picnic this weekend. If it does, this honeydew salsa with homemade lime pita chips is coming along in our picnic basket. Recipe is here and shouldn't be missed! 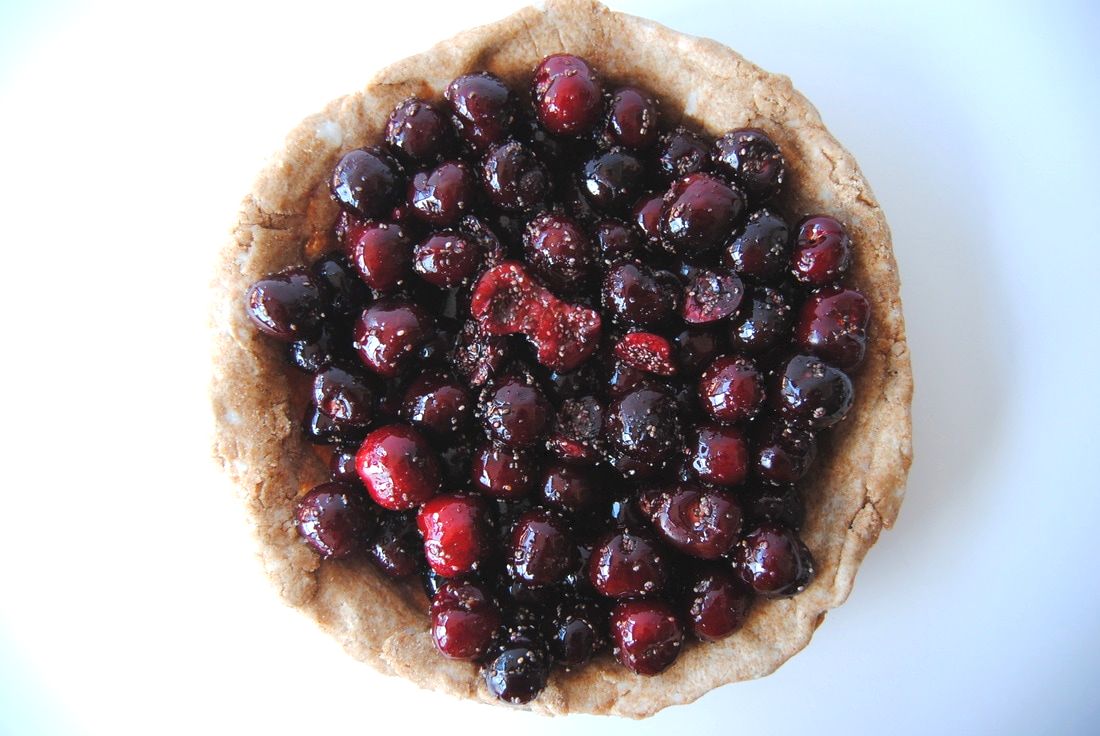 Every spring/summer holiday weekend should include a good pie, are we right? If you agree then making this cherry pie recipe - here - needs to be included in your plans. You won't be sorry!
Enjoy, Jess and Cecelia 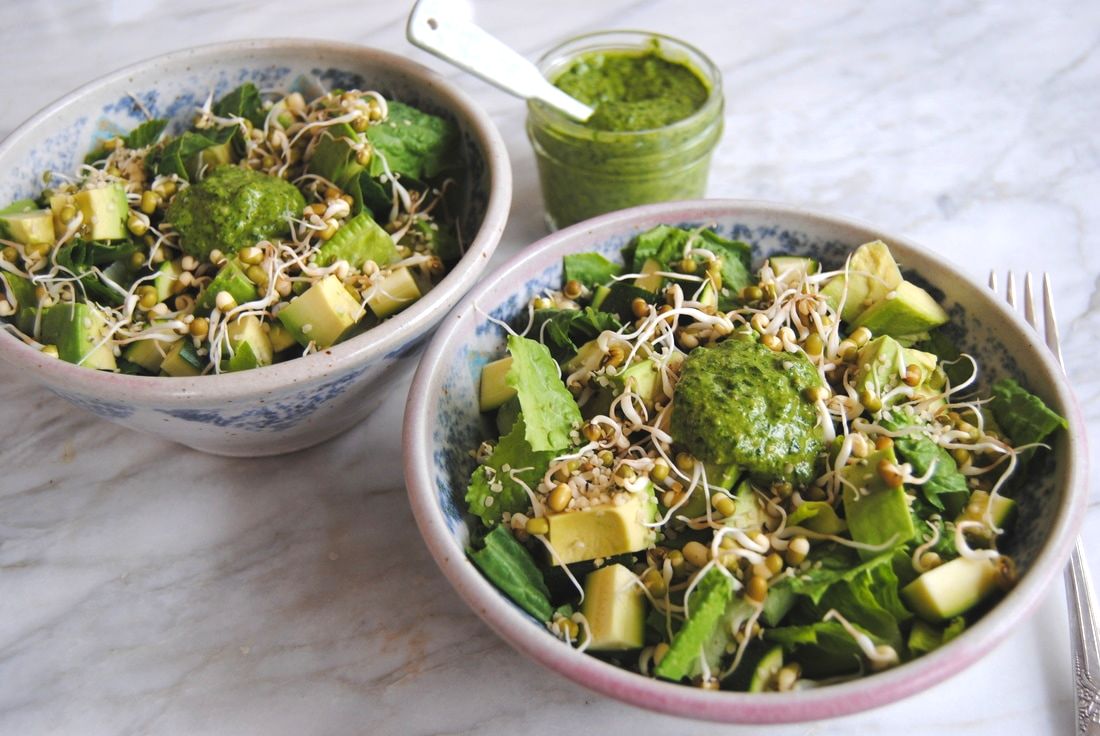 Ever wondered what those "sprouts" that you are sometimes offered on sandwiches or salads really are and why they are so darn good? Well it you have, you're in the right place! This week is dedicated to all things sprouts including how to instructions and a spring inspired, sprout containing recipe. Believe it or not, sprouting at home is very, very simple and is a great use for dried beans, lentils, grains, nuts, and seeds. We find it much easier than cooking dried beans as sprouting achieves the same as cooking - it makes dried beans edible but in a much different way than the typical warm cooking method. The taste of sprouts is fresh and unique and the nutrient value is actually improved with sprouting versus standard cooking methods. Sounds too goo to be true doesn't it? 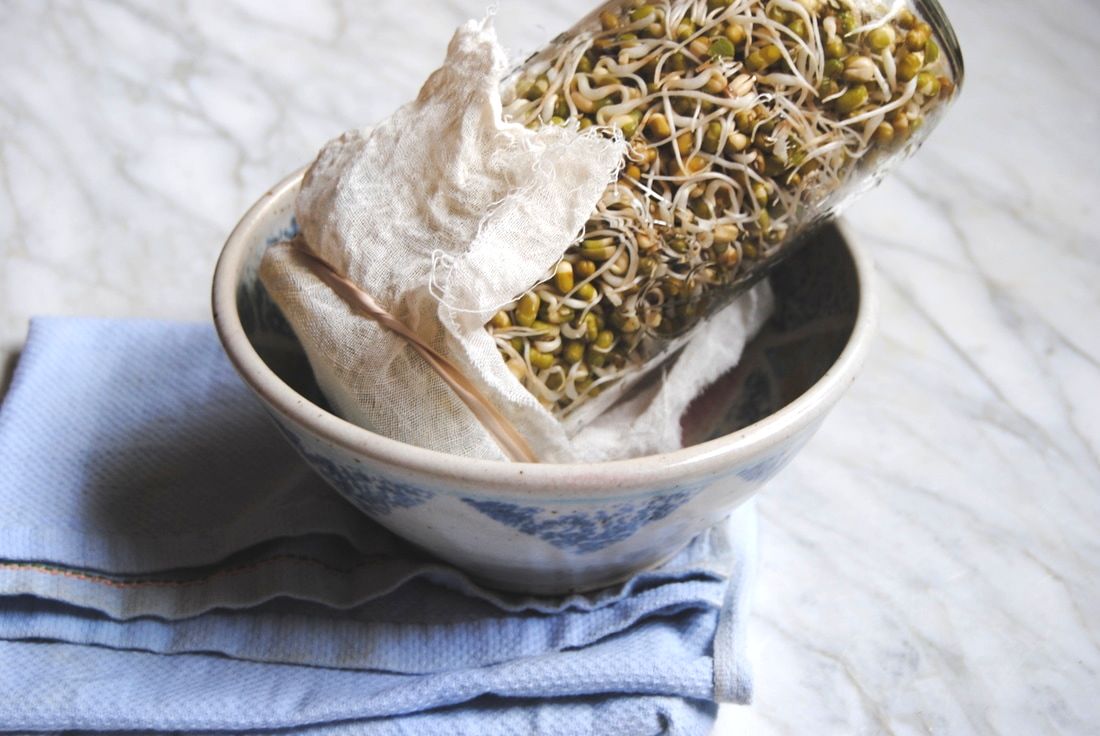 As mentioned, dried beans, grains, nuts and seeds can all be sprouted. Sprouting is essentially the process of initiating plant life but stopping at the sprout phase before a new plant is formed. This week we sprouted beans but the benefits and process discussed is applicable across different sprout varieties. Though beans are a great source of vegetarian protein they unfortunately get a bad reputation for being tough on digestion - especially for people who don't eat beans often. This is because beans contain carbohydrates, specifically oligosaccharides, that can cause increased intestinal gas in some people. Beans that have been sprouted are significantly lower in oligosaccharides which means less gas formation in the gut (yay!). Beans that have been sprouted are also easier for your body to digest due to the enzyme action that takes place during the sprouting process - starch is broken down into simple sugars, proteins are broken down into amino acids, and fats are broken down into fatty acids. Essentially, sprouting does the hard digestive work for you so your body can benefit from the nutrients without the extra work - sounds great right? Sprouting also makes more nutrients available to your body that wouldn't be if some of the bean fibers weren't pre-digested. So especially if you're eating beans as a large nutrient and protein source in the diet, sprouting is important to maximize their nutritional benefit and minimize your digestive effort! Just be sure to follow safe food handling practices and work with clean hands in a clean space as the sprouting process can harbor growth of bacteria if exposed. So are you ready to get sprouting?  Basic Sprouts PREP TIME: 2 minutes TOTAL TIME: 2-3 days sprouting time Servings: 1 cup sprouts Ingredients/Supplies 1/4 cup dried beans of choice (mung beans pictured above) Large glass jar and bowl Cheese cloth and rubber band Start by soaking 1/4 cup mung beans with room temperature water in a glass jar with cheese cloth or a mesh topping for 10-12 hours. Keep in mind you want a jar that is large enough for your beans to expand and sprout. A good rule is that the jar should be large enough for the beans to expand 8 times their original size. Following the soak, drain the soaking water and rinse the beans well then return the beans to the jar and cover with cheese cloth or mesh topping to allow air to circulate. Keep the jar tilted upside down in a bowl in a spot where there will not be large temperature fluctuations (cold drafts or hot humid breezes). Rinse and drain beans in the jar 3 times per day (add cool water, swirl, and drain) and make sure to angle the jar on its side to allow excess water to drain off while the beans are working hard to become a sprout. If excess water sits in the jar while the beans are germinating this can lead to sour, spoiled sprouts. Repeat the rinsing and draining process for 2-3 days or until the beans have transformed into the sprout length of your liking. Sprouts can be eaten right away, or stored in the fridge in an air tight container for 5-7 days. Super Green Sprouted Salad PREP TIME: 10 minutes + 2 days to sprout mung beans TOTAL TIME: 10 minutes + 2 days to sprout mung beans Servings: 4 salads Ingredients Salad 2 heads romaine lettuce 4 baby zucchini, diced (1/2" by 1/2") 1 avocado, peeled, pitted, and diced 1 cup sprouted beans (we used sprouted mung beans with recipe above though store bought would also work) 4 tsp hemp seeds Cilantro Pesto 1 bunch cilantro, de-stemmed 1/2 cup extra virgin olive oil Juice of 1/2 lemon, ~2 Tbsp 3 Tbsp walnuts 1 Tbsp hemp seeds 1/2 tsp sea salt 1/4 tsp pepper To make the pesto, combine the cilantro, olive oil, lemon juice, walnuts, hemp seeds, salt, and pepper in a food processor or blender and process on high until a smooth dressing is formed. Store in a glass jar fitted with a lid and place in the fridge. This dressing can be made a day in advance and kept in the fridge for later use. To prepare the salad, chop, wash, and dry romaine lettuce then place in a large bowl. Add diced baby zucchini, diced avocado, sprouted mung beans, and hemp seeds to the bowl. Divide salad into 4 servings then add cilantro pesto dressing to the top of each salad. Serve and enjoy! *Note, if you do not plan to serve all four salads at once keep salad ingredients in an air tight container in the fridge and wait to add dressing until just prior to serving. To keep the avocado from turning brown, toss in lemon juice prior to saving. 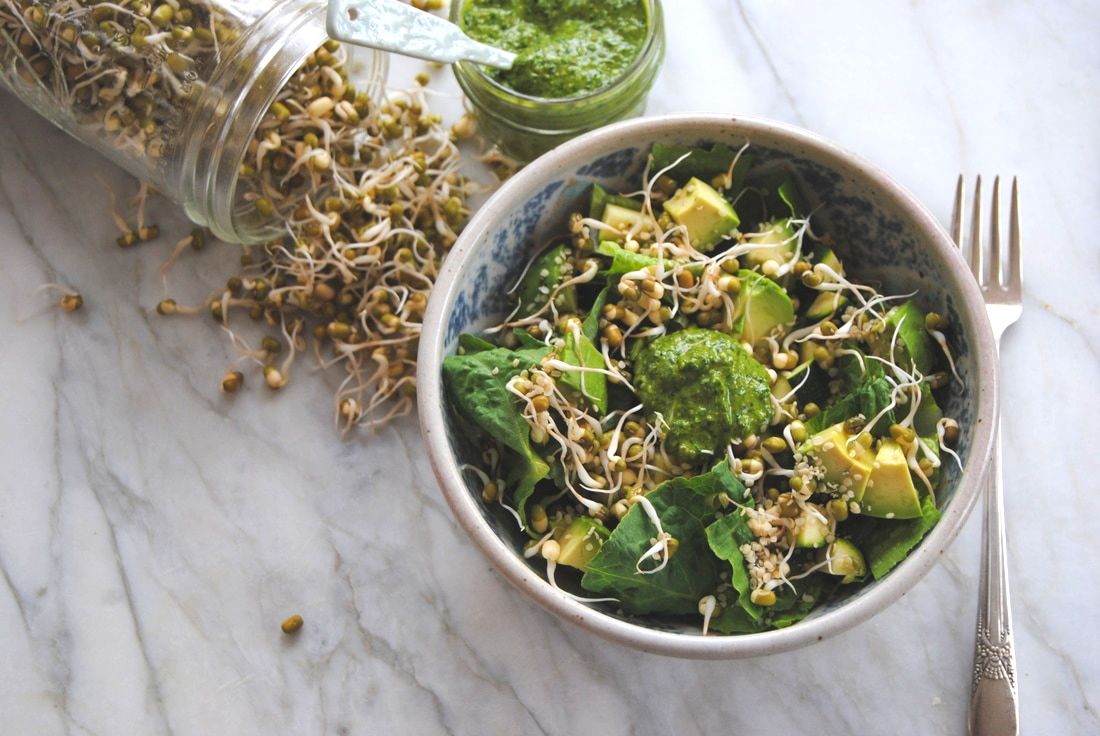 Weren't we right? Sprouting is so simple and such a fun use for the dried beans sitting in your pantry that you bought and then never cooked from scratch because, well, canned is just easier! We hope this post starts you on a lifelong sprouting journey that you, your gut, and your body will enjoy. Oh, and this salad - the perfect mix of the freshest green foods to awaken your Spring palate. Best enjoyed with a warm piece of crusty bread, or at least we think so. Enjoy and have fun! Jess and Cecelia 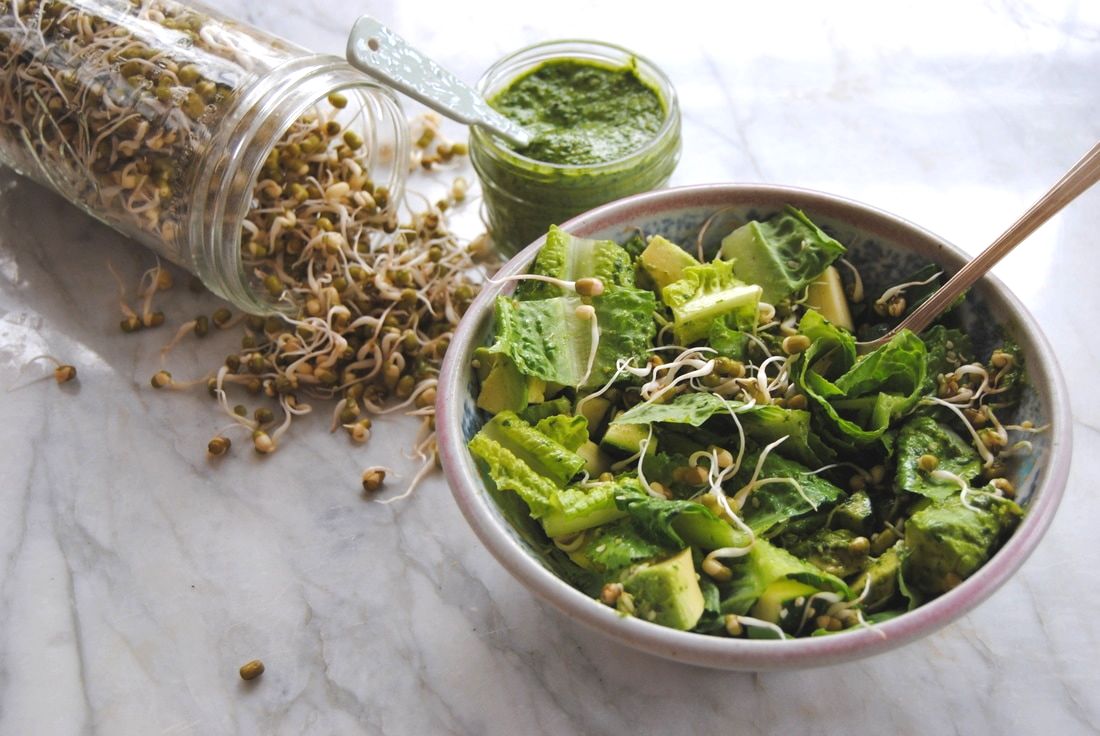 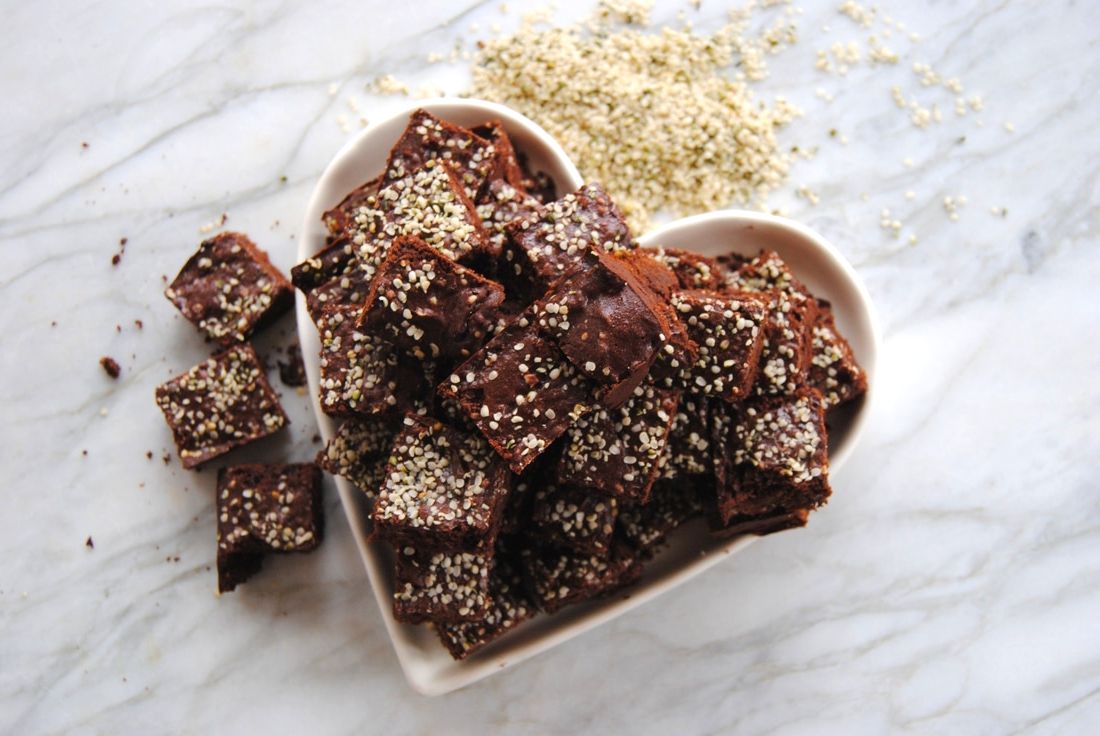 We've been SO busy and have packing on the brain as Cecelia is in the process of moving into her new home in Chicago. Besides the busyness, packing and moving require energy and strength (she's already starting to question the decision of a second floor walk up, ha!). But jokes and moving grumbles aside we decided to focus on protein this week and found a way to pack tons of protein into a beloved dessert - brownies! These bites are chocolatey and delicious and contain a good dose of protein from a variety of sources - one being hemp butter. Yes, hemp butter!  So now you're probably thinking "what is hemp butter and why have I never heard about it?" Well, hemp butter is just like any other nut/seed butters in that it is a blended version of hemp seeds. However, it is different than other nut/seed butters because the color, taste, and texture change significantly, in our opinion, once the hemp seeds are blended. As you can see from the picture above, hemp seed butter is a dull green which may not look all that appetizing. The hemp seed flavor is also enhanced in the butter which has a stronger flavor than the plain hemp seeds and the texture becomes quite thick. These changes may make hemp seed butter less appealing and underutilized in the kitchen - probably why you've never heard about it! We found that adding hemp butter to recipes for additional protein and nutrient value was a great use of this underused product. But if you find that you love hemp butter plain on toast - go for it! 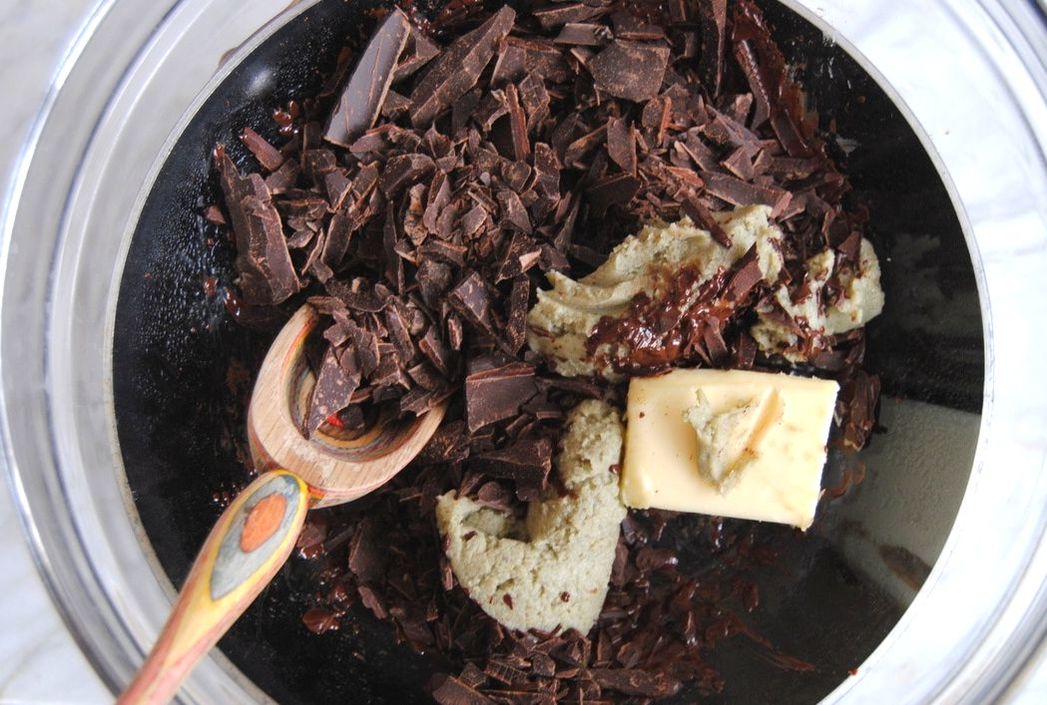 Hemp Protein Brownie Bites PREP TIME: 20 minutes TOTAL TIME: 55 minutes Servings: 26-30 bites Each bite contains ~2.8 grams protein Ingredients 3/4 cup + 1 Tbsp whole wheat flour 3/4 cup + 1 Tbsp coconut sugar 3 Tbsp hemp seed butter (make by blending hemp seeds in a high speed blender or purchase at your local specialty grocer, also available online, here) 3 Tbsp unsalted butter 1/4 cup cacao powder 6 oz coarsely chopped semisweet chocolate + 1/3 cup 60% cacao chocolate shavings 1/4 cup hemp seeds + 1 Tbsp reserved for top 2 eggs 2 tsp pure vanilla extract 1/4 tsp baking powder 1/4 tsp sea salt Preheat oven to 350 degrees. Line an 8"X 8" pan with parchment paper allowing 2 sides to hang over the edges for easy removal. Lightly butter the bottom and sides of the prepared pan with a dab of unsalted butter then set aside. Place 3 Tbsp butter, 3 Tbsp hemp seed butter, 6 oz chopped chocolate, and 1/4 cup cacao powder in a double boiler or a heat proof bowl placed over a pan with an inch or two of simmering water. Allow the butters and chocolate to fully melt, stirring often then set aside to slightly cool. Combine the flour, baking soda and sea salt in a separate bowl and whisk to combine. Combine the coconut sugar, eggs, and vanilla in the bowl of stand mixer fitted with the whisk attachment and mix on medium until light in color, about 3-4 minutes. Add the cooled melted butter and chocolate mixture then continue to whisk. Add in the flour mixture and mix until fully incorporated, avoid over mixing the batter. Stir in 1/3 cup chocolate shavings and 1/4 cup hemp seeds into the batter. Pour batter into the prepared pan, sprinkle 1 Tbsp hemp seeds over the top of the batter and place in the oven for 30-35 minutes or until a toothpick comes out clean. Allow brownies to cool for 15 minutes before cutting. Cut into 1" X 1" bites. Store leftover brownie bites in an air tight container at room temperature for 2 days or in the fridge for up to 5 days. 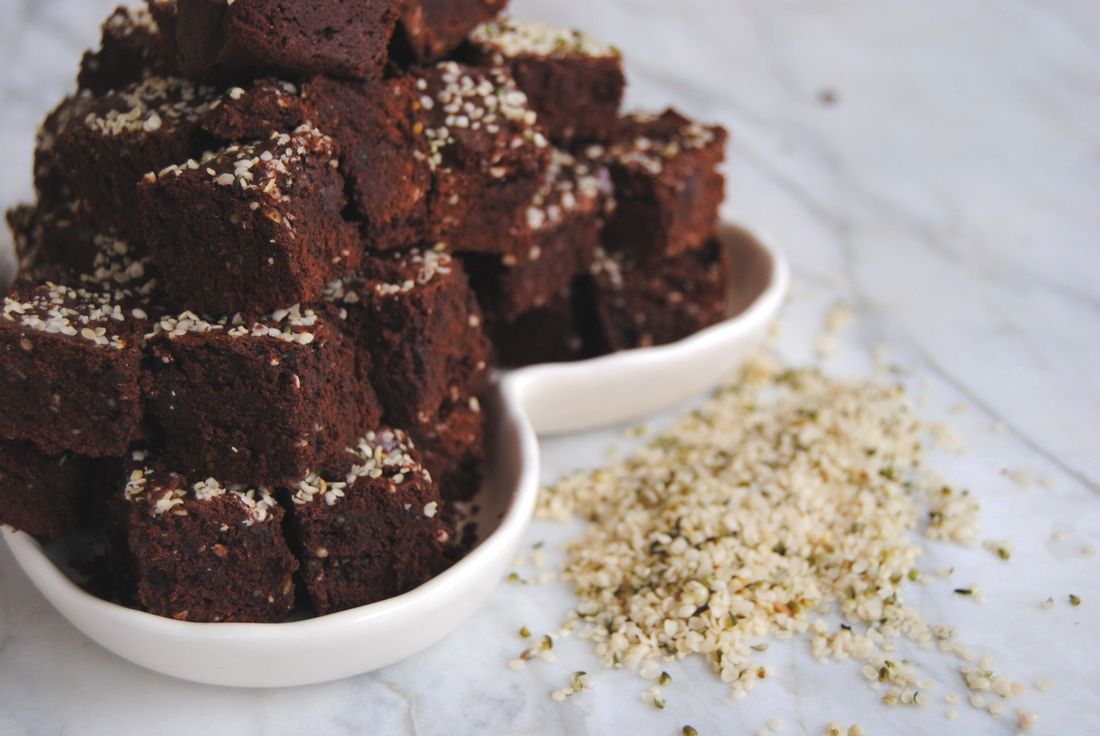 Thoughts? Is your mind blown that there is such a thing as hemp seed butter? Are you excited that you can now make "hemp brownies" that would be appropriate to eat at work (unlike another type of hemp brownie that may come to mind)? We are most excited that we can now ditch processed protein bars and make our own high protein goodies to keep us fueled during Cecelia's move and beyond. Enjoy, Jess and Cecelia 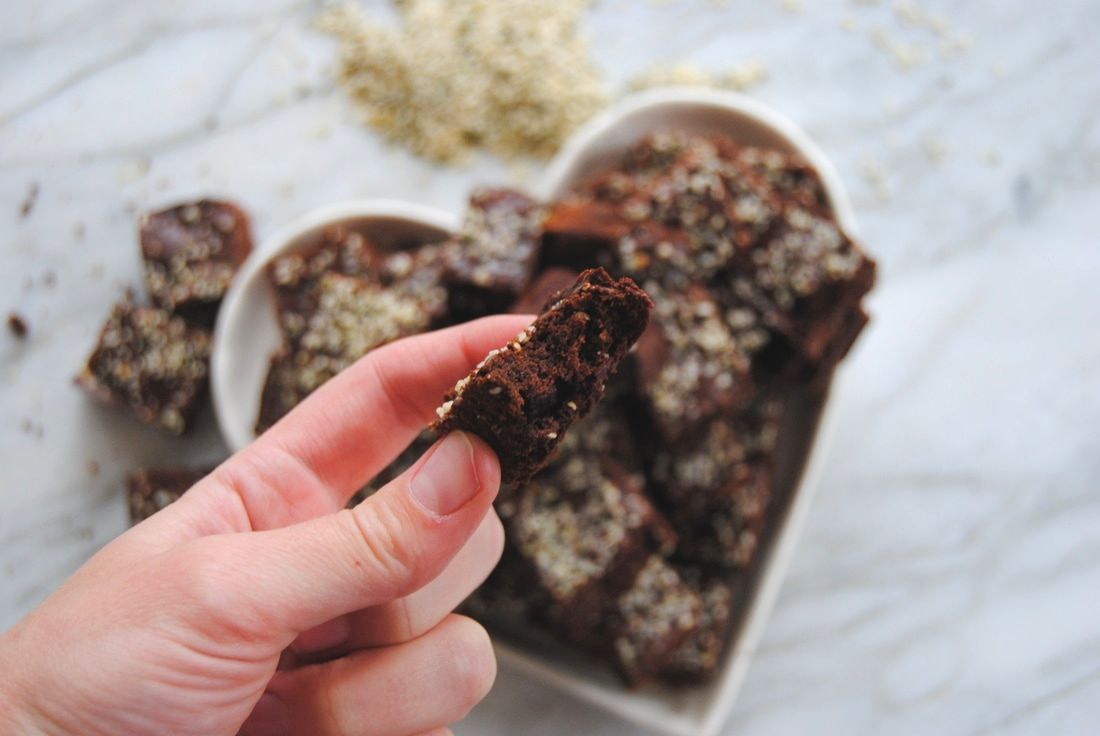 |

