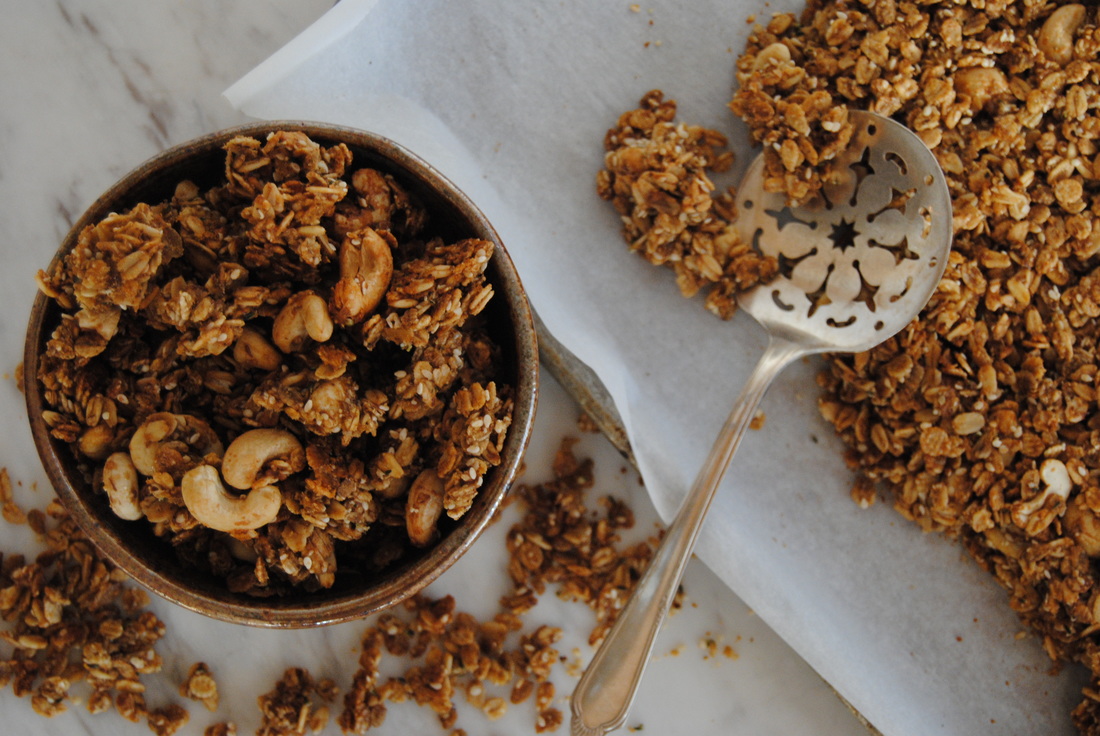
 Here at TGBK we just love when foods have almost magical qualities. Of course, all whole foods provide vital nutrients to our bodies but some, more than others, have additional benefits above and beyond what is expected. And maca powder is just one of those super (or magical!) foods for us. Even an ancient civilization utilized maca in a variety of ways. So let's learn why before we get to our magical granola recipe. 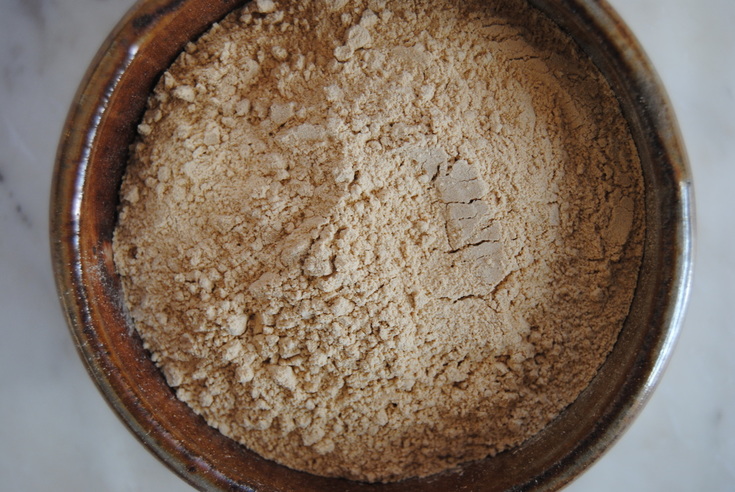 Maca powder comes from a root native to central Peru which grows at a high altitudes in the Andes mountains. Maca has been harvested and consumed for over 3,000 years and was known to be sacred to the Incas as food and medicine. Even to this day, maca is considered a super food for its superior nutritional profile. Maca powder contains primarily fatty acids, amino acids, fiber, electrolytes, and minerals. As mentioned, maca has been used historically for medicinal purposes and continues to be used today in efforts to balance hormones and aid in menstrual problems, symptoms of menopause, and fertility issues. This magical root has also been used to enhance energy and memory (yes please!). But please remember that like any other medicinal herb, maca may help with these problems/symptoms but is not a cure. The most common form of maca powder is ivory in color though it can be found more rarely in a variety of colors including red, purple, and black. In terms of flavor, maca has a slightly sweet and roasted butterscotch flavor and works well in baked goods, smoothies, ice cream, and of course granola! Magical Maca Maple Granola PREP TIME: 15 mins TOTAL TIME: 45 mins Servings: 18-24 quarter cup servings *Note that granola is quite rich and best eaten in small portions or as a crunchy topping Ingredients 2 cups thick rolled oats 1 cup rolled barley 1 cup rolled rye 1/4 cup oat bran 1/4 cup maca powder 1/4 cup ground flax meal 1/2 tsp sea salt 1 1/2 cups raw cashews 1/4 cup hemp hearts 1/8 cup white sesame seed 1/2 cup coconut oil 3/4 cup pure dark maple syrup 1/2 cup coconut sugar 1/4 cup water 1/2 vanilla bean pod (scrape the inside) or 1 tsp pure vanilla extract Preheat the oven to 350°. Line a large baking sheet with parchment paper and set aside. In a large bowl, mix together the oats, barley, rye, oat bran, maca, flax, salt, cashews, hemp, and sesame seeds. In a sauce pan, combine coconut oil, maple syrup, coconut sugar, and vanilla. Turn burner on to medium heat and stir until the oil has melted and sugar has dissolved. Pour warm oil and sugar mixture over dry ingredients and stir until evenly covered. Add 1/4 cup water over the granola and stir to combine. Evenly spread mixture onto parchment lined pan. Bake for 30 minutes or until granola is golden brown. Let sit until cooled. Using a large spoon, break granola into large chunks. Place granola back into the oven and continue cooking for an additional 7-10 minutes. Make sure to stir granola at least once while it is cooking. Again, allow granola to completely cool before storing in air tight container. Adding granola to the container before it has completely cooled will add moisture and soften the granola. *Note that you can use 4 cups of rolled oats and omit rolled barley and rye which may be more difficult to find. Hemp hearts and sesame seeds can also be used interchangeably, just keep the total amount the same (~2/3 cup). 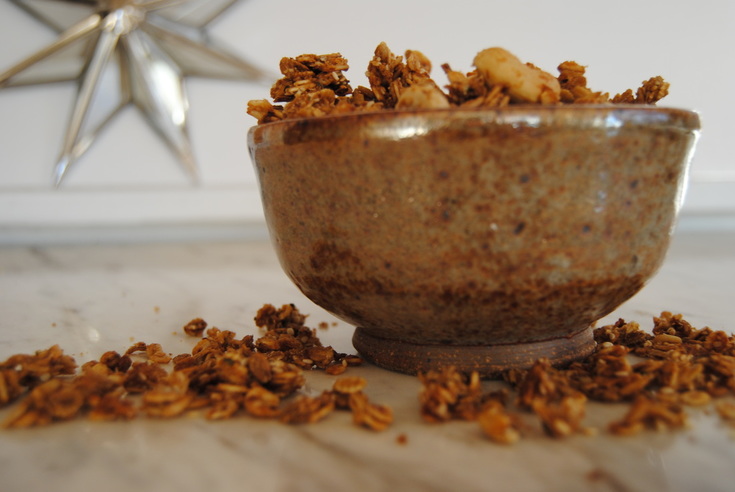 After a snack of this granola we hope you are satisfied, energized, and hormonally balanced. And even if you're not in it for maca's magical qualities, this granola is just plain delicious! So savory, sweet, crunchy, and with a full maca flavor that can't quite be explained - so you'll just have to try it. Enjoy the magic, Jess and Cecelia 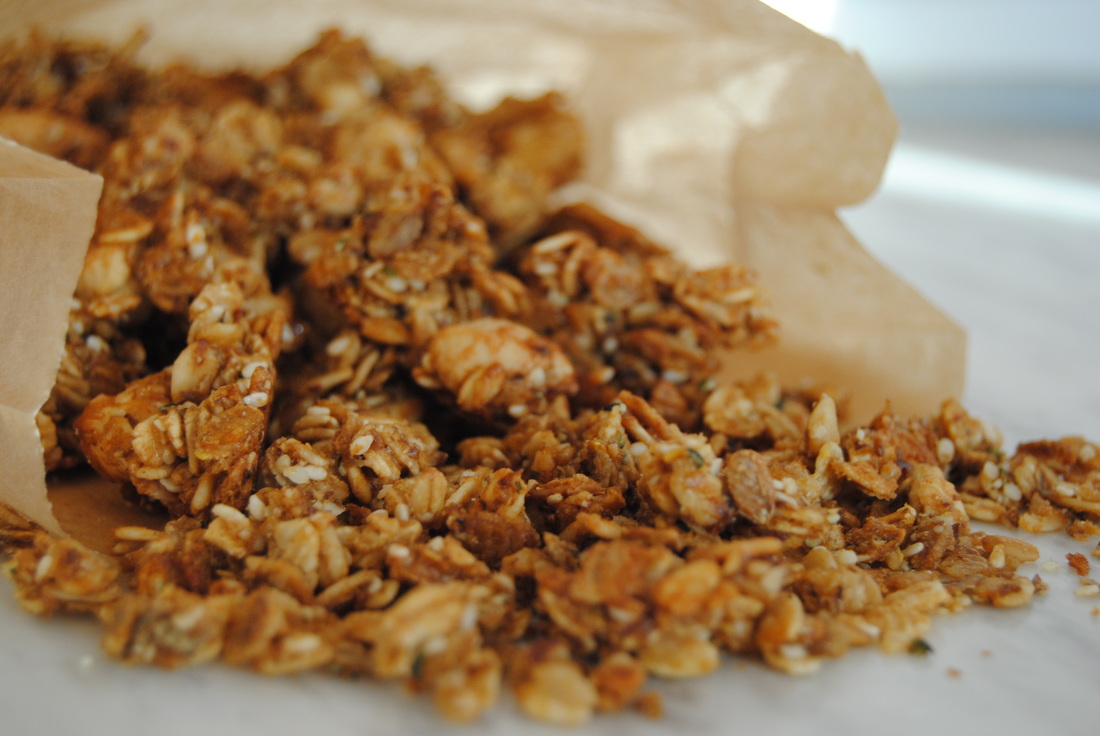
0 Comments
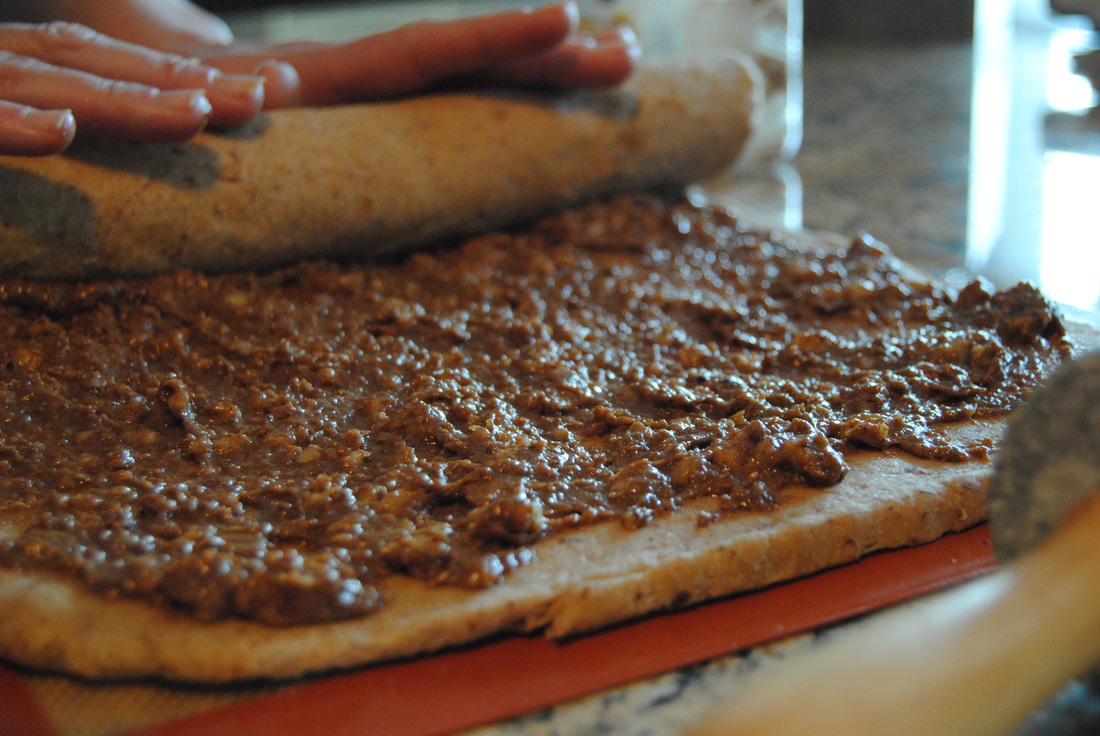
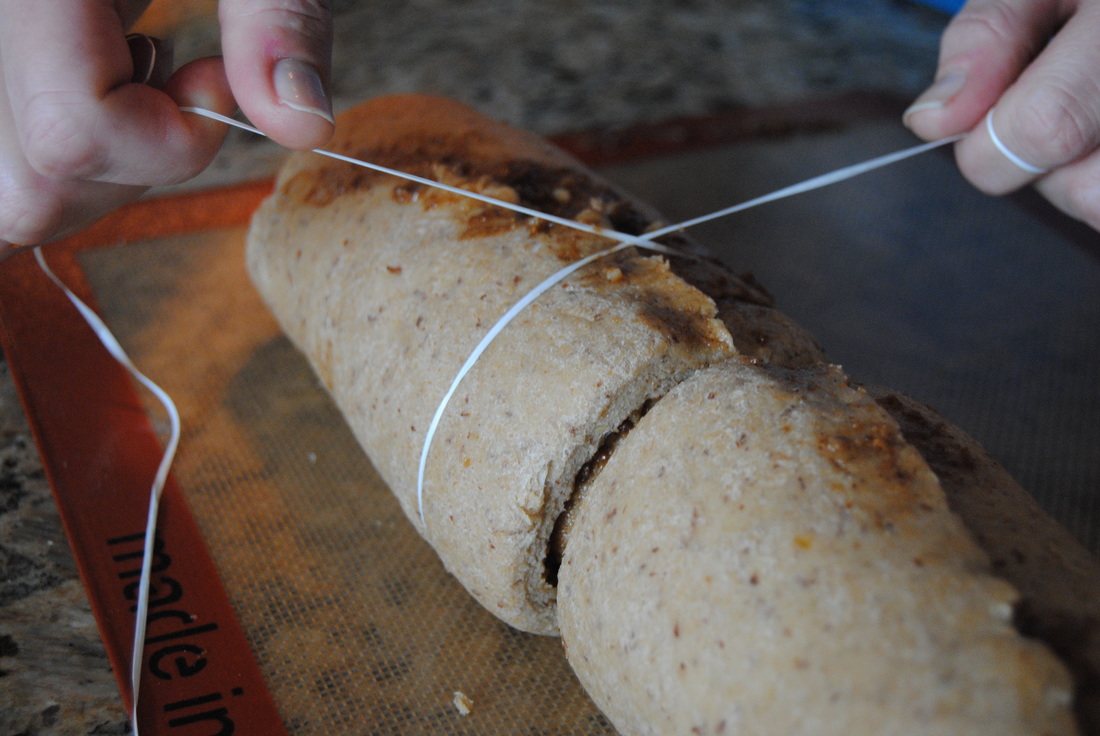
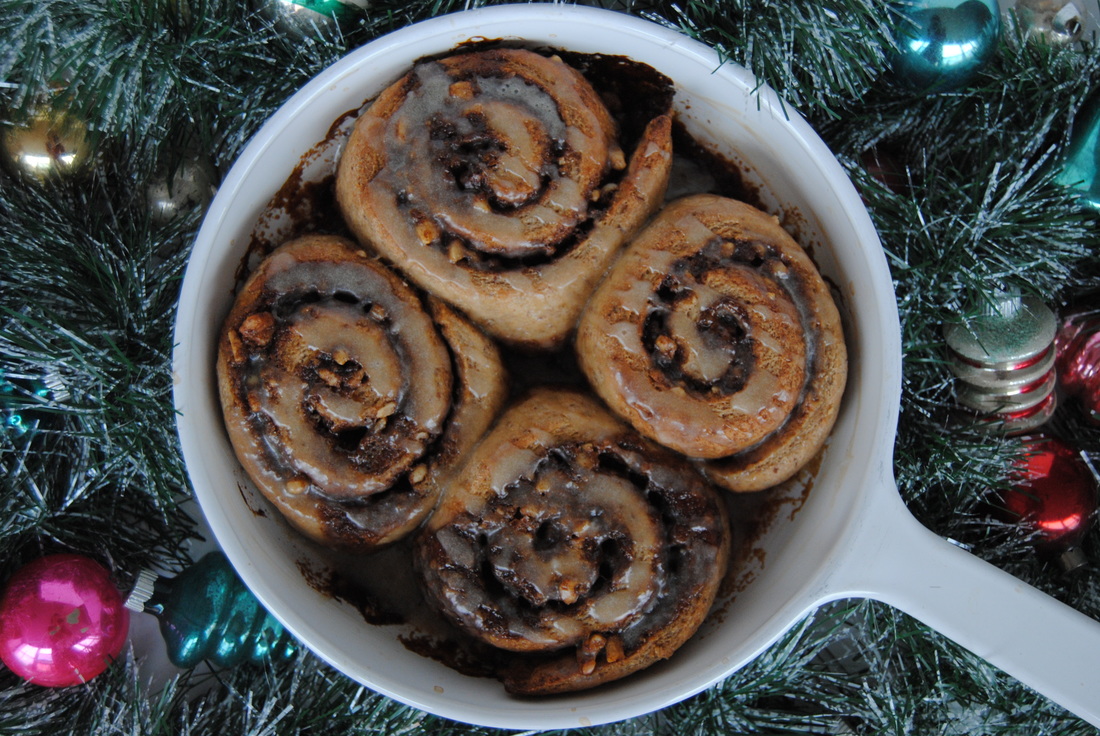 We've been busy preparing for the holidays and are sure that you are too! So much to do between decorating, shopping, baking, cooking, and spending time with friends and family. But we hope that you're also finding time to relax this holiday season and cherish all the special moments. And if you are in need of good food to share for any of the many gatherings you attend, we hope that you might take a peek around our kitchen for that perfect recipe. Maybe even this recipe will be the one! But first some more on holiday traditions before we get to our last recipe of the year. 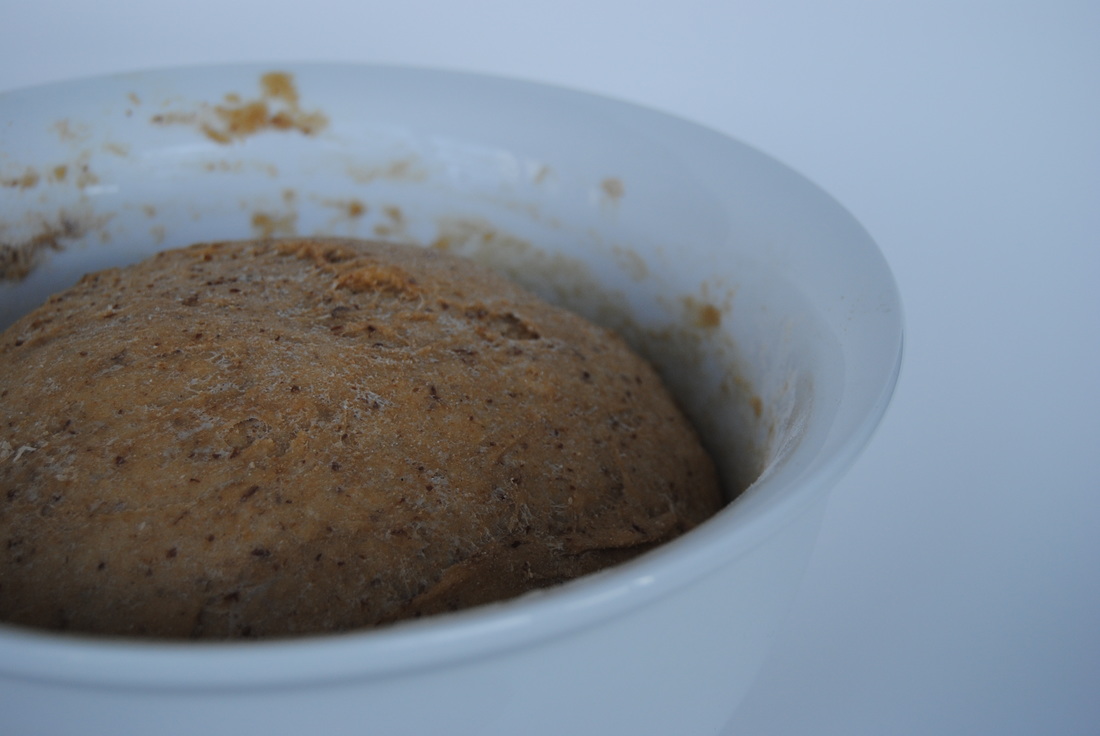 We all have our favorite traditions around the holidays, and for many of us these traditions focus on delicious foods. Whether it be a favorite dinner, dessert, beverage, or breakfast these recipes and meals can remind us of holidays past and time spent with loved ones. Many traditions will stay the same throughout the years but some will change with our ever changing lives. If you're looking for a new tradition this year, these cinnamon buns may be just the thing. A perfect treat for Christmas (or any!) morning. Now we aren't trying to pretend that these buns are healthy by any means, but they are homemade with whole food ingredients and superior to any buns you might find pre-made or ready to bake. So put aside a little extra time for this recipe this year and we promise it will stick around for years to come! Now on to the recipe and back to the holiday festivities... Traditional Cinnamon Buns Adapted from The Joy of Vegan Baking Cookbook PREP TIME: 2 hours 30 mins (includes rising time) TOTAL TIME: 3 hours (includes rising time and cooking time) Servings: 8-10 buns Ingredients Dough 3 Tbsp ground flax seed + 6 tablespoons water 4 1/2 to 5 cups white whole wheat flour (any gluten containing flour will work) 1 packet active dry yeast 1 cup organic soy milk (or milk/milk substitute of your choice) 1/3 cup organic unsalted butter 1/3 cup granulated cane sugar 1/2 teaspoon salt Organic soy milk to brush on the top of each bun Filling 3/4 cup coconut sugar 1 tablespoon cinnamon 1/2 cup organic unsalted butter, softened 3/4 cup chopped walnut or nut of your choice Icing 1 cup confectioners’ sugar 2 tablespoons organic unsalted butter, melted 1/2 teaspoon pure vanilla extract 2 tablespoons organic soy milk To make the dough first combine the ground flax and water. Whip with a fork and allow to sit for 5 to 7 minutes until a thick mixture is formed. Using the paddle attachment of a stand mixer, combine 2 1/4 cups flour and the yeast. In a small saucepan on low, heat the milk, butter, cane sugar, and salt. Stir unil the sugar has dissolved and the butter is almost melted. Slowly pour the milk mixture into the standing mixer with the flour and mix on low speed. Now add the flaxseed mixture and turn the speed to high and beat the for about 3 minutes. Replace the paddle attachment with the dough hook (or do by hand) and knead in as much of the remaining 2 1/4 to 2 3/4 cups flour as needed until the dough is soft, smooth, and elastic. This should take about 3 to 5 minutes. You know the dough is ready when it is no longer sticky. Shape dough into a ball, and place in a greased bowl. Cover with a clean towel and allow the dough to rise in a warm place for 1 to 2 hours or until doubled in size then punch it down. Place on a lightly floured surface, cover with a towel, and allow it to rest for another 10 minutes. To make the filling, mix the coconut sugar, cinnamon, butter, and nuts then set aside. Roll dough out into a rectangle (14x10). Evenly spread the filling onto the dough making sure to come close to the edges. Starting with the short end, carefully roll the dough into a log. Using unscented dental floss, make a crisscross on top of dough (pictured above) carefully pull floss through the dough. Repeat until you have 8-10 equal cinnamon buns. The purpose of the floss is to cut the dough without smashing it down. Place buns on buttered pan and allow to rise for 30 to 60 minutes at room temperature. You may also place in the fridge at this point if you wish to cook them the next morning. If buns are placed in fridge overnight, allow them to sit out at room temperature for 30 to 60 minutes before placing in the oven. To make the frosting, combine confectioners sugar, butter,milk, and vanilla. Stir until smooth then set aside. Preheat oven to 375°. Lightly brush the top of the buns with milk and cook for 25 to 30 minutes or until golden brown. Spread icing over the top, serve warm and enjoy with good company. 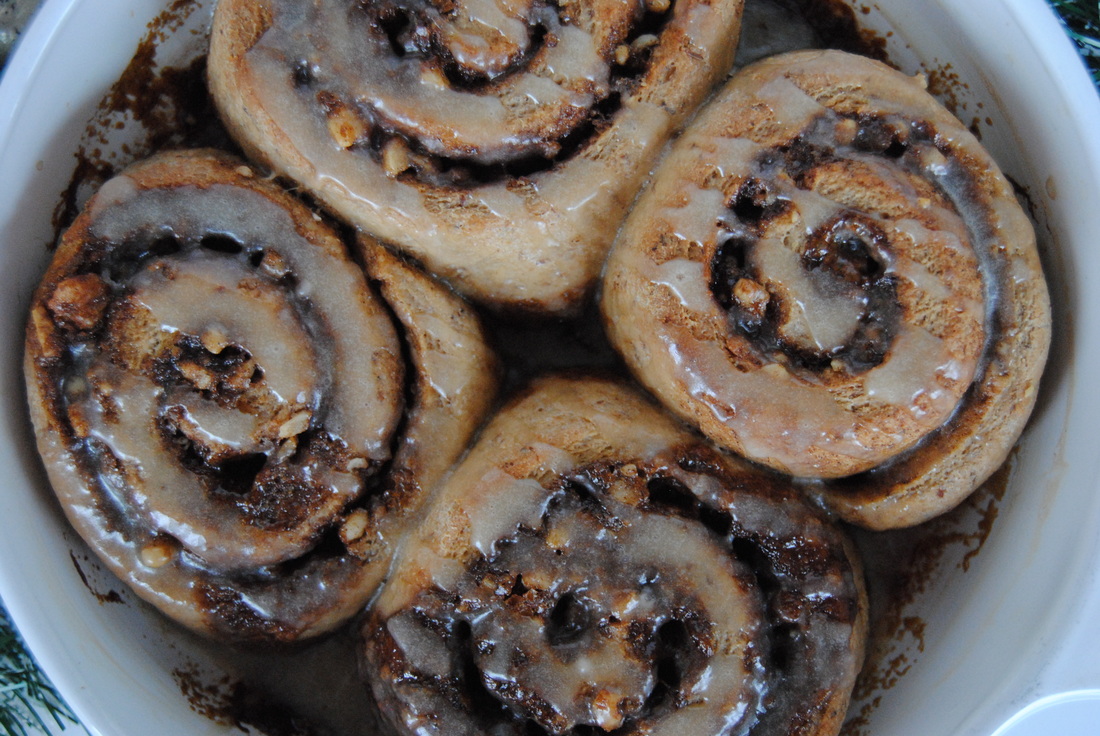 A complete hit right? With a cup of coffee or tea and a table full of loves ones, these buns will brighten any special morning. Remember, this will be our last post of 2015 friends but we can't wait to see you all in the New Year. We wish you for laughter, love and good food this holiday season! Happy Holidays, Jess and Cecelia 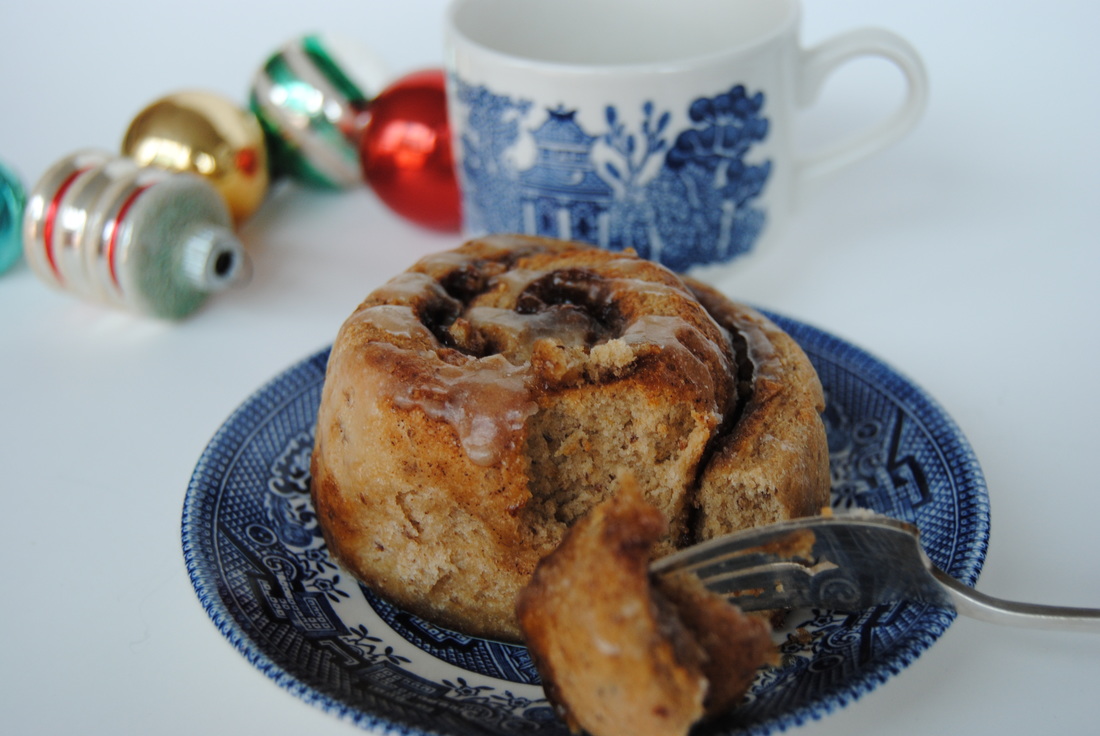  We are going to take a bet that you've all been nice this year TGBK friends! And with Christmas quickly approaching that means that you deserve a special gift from us. This cookie recipe is just the thing - it's a special recipe that Jess once received as a gift and has been perfecting over the years. And oh how perfect it now is! We even made this recipe vegan for those of you who prefer your diet that way - but of course you can't go wrong with butter as a substitute. Let's first learn more about the spice in these spice cookies before we get to baking. 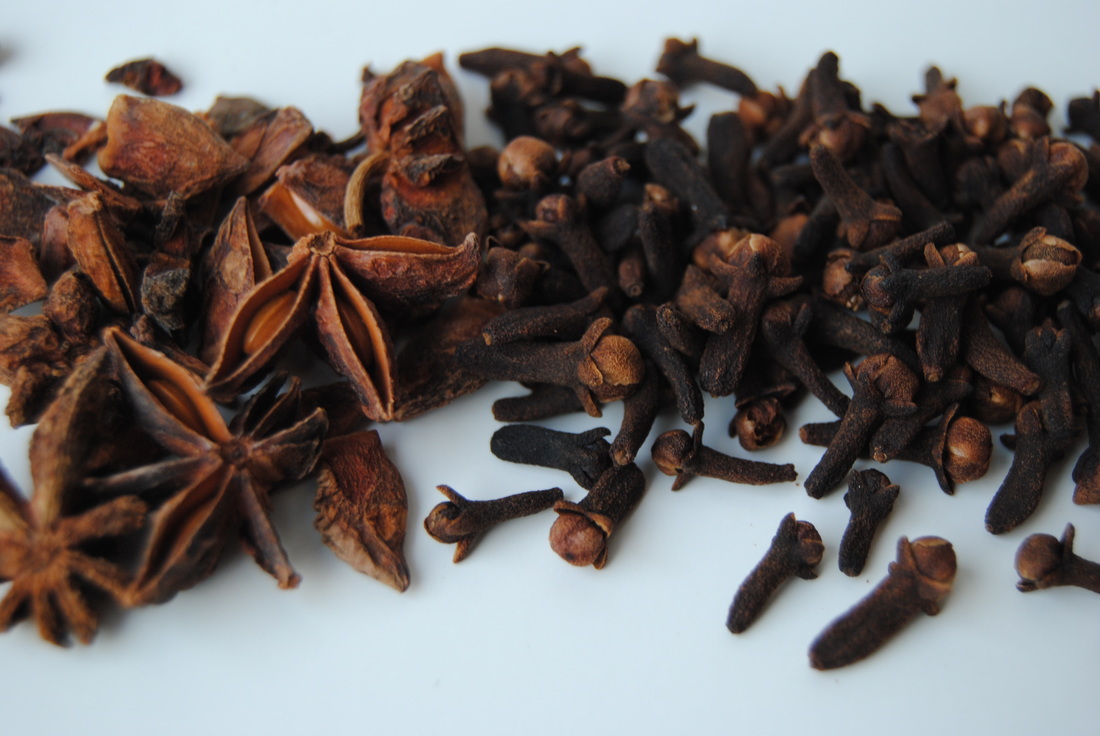 As you may have guessed, the star of these cookies is truly the spice - one of those spices being star anise. Star anise has a strong licorice flavor that is complimented by clove, which can also have a sweet licorice taste. Clove is actually the dried, unopened flower bud from a tree primarily found in Indonesia. One interesting fact about clove is it's use as an antiseptic. Clove contains eugenol, an active component known to kill bacteria and viruses helping to keep food fresh longer. And we can't forget about the cinnamon in these cookies which provides a warm and subtle sweetness. What we also want to highlight is how exceptional a flavor profile you can produce when these spices are ground from whole dried products, specifically clove and star anise. Each spice truly shines and can be distinguished, unlike when compared to using pre-combined spice blends. An electric spice grinder works best for this use. If after grinding you still notice large pieces of spice we suggest straining through a small metal strainer to avoid tough, large pieces of spice in your final product. Okay, so it's time to grind your spices and get to the recipe! 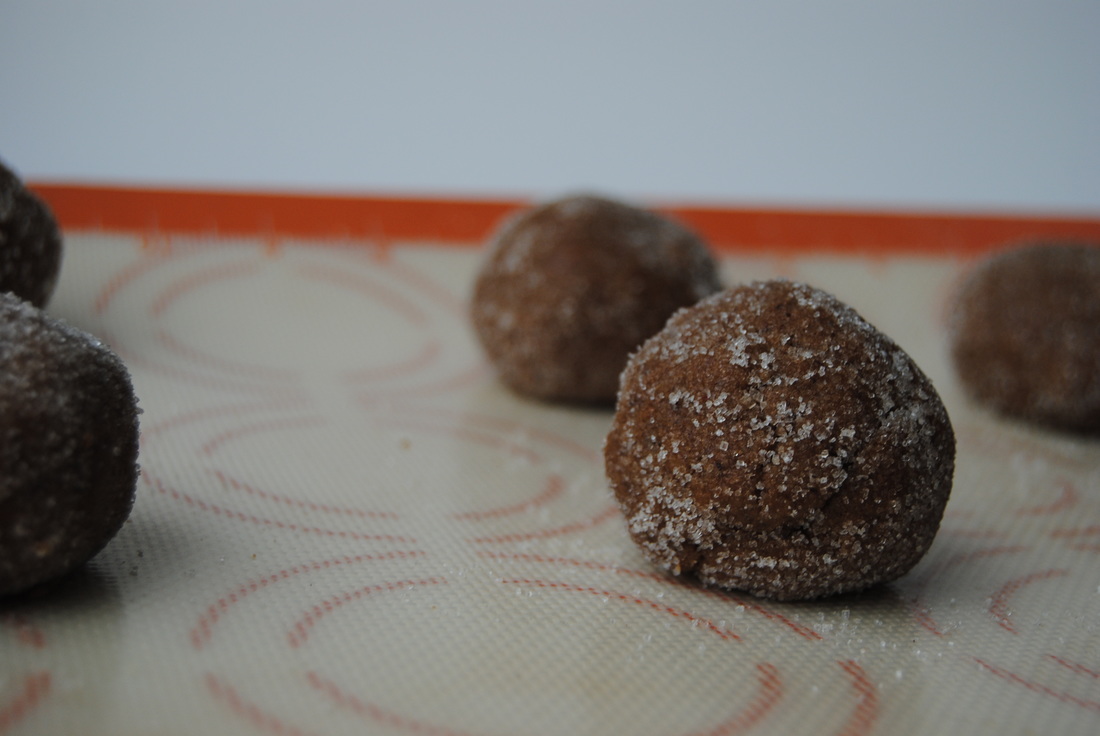 Giant Spice Cookies PREP TIME: 20 mins TOTAL TIME: 33-35 mins Servings: ~24 large cookies Ingredients 4 ½ cup flour (4 Cups white whole wheat flour* & 1/2 Cup buckwheat flour) 2 Tbsp fresh ginger juice OR 1 ½ Tbsp ground ginger 2 tsp baking soda 1 tsp ground clove 1 tsp ground star anise 2 Tbsp ground cinnamon ½ tsp salt 3/4 Cup melted coconut butter 3/4 Cup room temperature coconut oil (soft but not melted) 1 1/2 Cups coconut sugar 1/2 Cup pure maple syrup ½ cup raw sugar (reserved to roll the dough in) 2 Tbsp ground flax mixed into 6 Tbsp liquid (if using fresh ginger juice mix 2 Tbsp ginger juice with 4 Tbsp water) ½ cup dark molasses Preheat oven to 350°. In a large bowl mix together flour, spices, salt, and baking soda, then set aside. In a small bowl, combine the ground flax seed, ginger juice and water. Let sit until gelatinous, about 3-5 mins. In a bowl of electric mixer fitted with a paddle attachment, mix the melted coconut butter and coconut oil on high until smooth—about 2 mins. Add coconut sugar and maple syrup to the bowl and mix on high until light and fluffy. Add in flax seed mixture and molasses and continue to mix, scraping down the sides of the bowl as needed. Slowly add the flour/spice mixture into the bowl of the electric mixer. Continue to add flour mixture until fully combined making sure to not over mix the dough. Roll dough into golf ball size balls, then roll in raw sugar. Place cookies on parchment lined baking sheet and cook at 350°for 13 mins. If needed, mid-way through cooking lightly press dough down with a flat bottomed glass. Allow to cool then store in an air tight container for 3-5 days if there is still any left! *We used King Arthur brand (info here), but if you can't find white whole wheat flour then substitute with white, whole wheat, or a mixture of both.  These cookies represent everything nice about the holidays; delicious treats, simple pleasures, and sharing love and time with friends and family. The balance of sweet and spice and cakey texture make these cookies a yearly favorite. Once you try them we can bet you won't let a Christmas go by without them. We know we sure don't. Stay nice, Jess and Cecelia 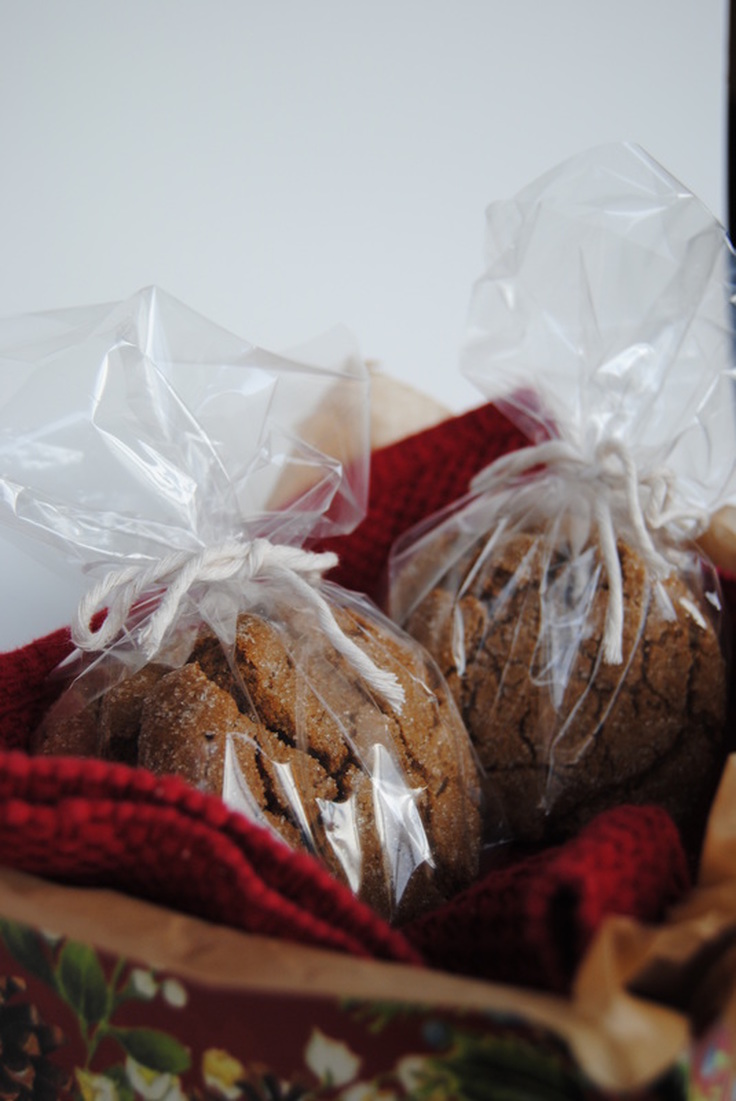 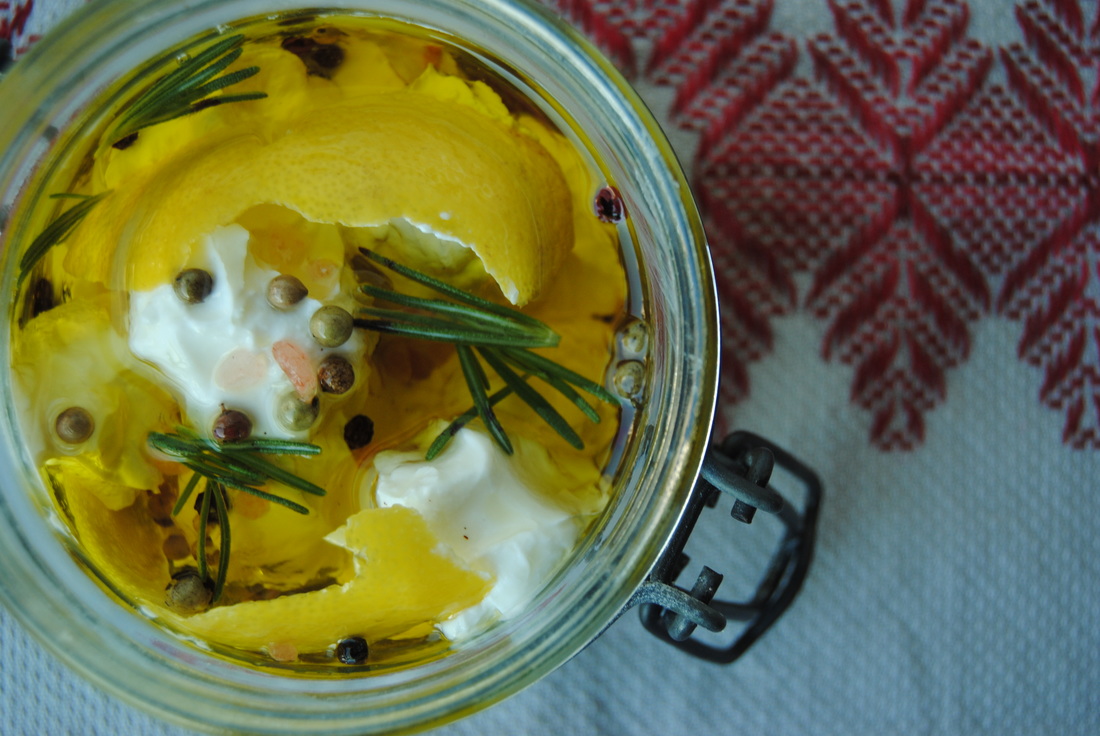 It's that season friends! We are well underway with holiday parties and gatherings with friends and family. And here at TGBK we know what all of these events will have in common, plenty of food! Now of course, not all of this food will align with the way you may try to eat throughout the rest of the year and that's okay. But we're here to remind you that treats and festive foods can still fit your whole foods based and nutrient packed lifestyle. With the right recipes, you can be the one impressing your friends and family with healthy foods that are still delicious and craving worthy! We think that this recipe fits the bill; festive, delicious and still on the lighter side compared to what else you mind find at holiday gatherings. 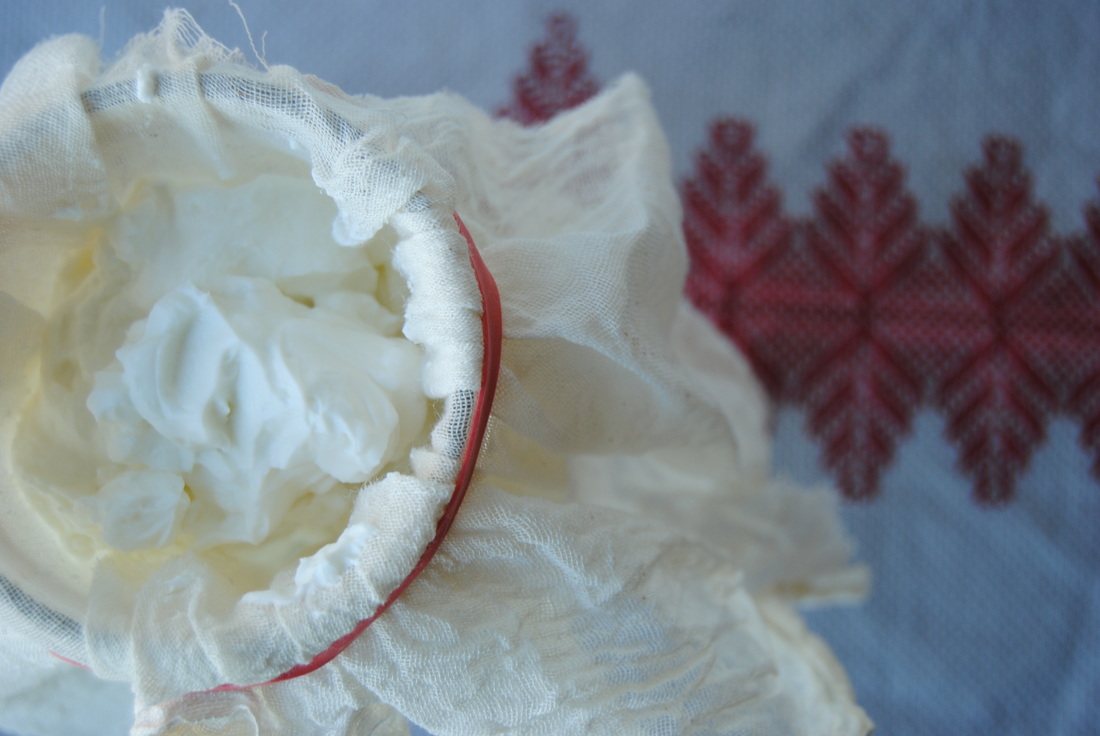 This recipe features skyr which is an Icelandic cultured dairy product (basically a type of yogurt). Even though this term may be new to you, skyr has been around more than 1,100 years! Skyr is traditionally made with raw milk, however, brands found in grocery stores are made with pasteurized milk. Similar to Greek yogurt, skyr is strained which condenses the nutritional value and means more protein in the final product. Skyr has a mild, tangy taste and a thick, creamy texture. Being a fermented food, skyr of course provides a generous serving of those wonderful probiotics that we just can't get enough of. Skyr is nutritionally similar to Greek yogurt but superior to regular yogurt because of the high protein content and large amount of probiotics contained in many brands. Siggis is a brand we absolutely love and can be found readily at many grocery stores. For this recipe, we used strained, fat-free skyr in lieu of cheese for this marinated spread. This substitution maximizes protein and probiotic content while decreasing fat content, which can be a welcomed change at many holiday buffets! Salt Brined Icelandic Yogurt Balls PREP TIME: 5 mins (additional 24 hrs to strain yogurt) TOTAL TIME: 10 mins (additional 24 hrs to strain yogurt + 2 hrs to marinate prior to serving) Servings: 4-6 Ingredients 12 oz fat free, plain Icelandic yogurt or Greek yogurt ~1/2 tsp pink Himalayan sea salt 1 tsp rainbow peppercorns (whole) 2, 2" organic lemon rinds ~1/3 cup extra virgin olive oil Thin, crispy cracker of your choice* (we like Raincoast Crisps brand sold at Whole Foods) Garnish with green herb of your choice (we chose rosemary) Additional items needed 10"x10" cheese cloth Large jar at least 10" tall Rubber band Mix 1/4 tsp ground sea salt into yogurt. Place cheese cloth over the opening of a large jar allowing the cloth to sag a little into the jar. Place rubber band around the top of the jar to tightly hold cloth in place (pictured above). Add salted yogurt to the cloth and allow mixture to strain for ~24 hrs in the fridge. Within a few hours you will notice a cloudy liquid at the bottom of the jar, this is the whey straining off. You want as much liquid to strain off as possible, making a very thick spreadable "cheese like" texture. After 24 hours the yogurt should be ready to shape into balls. Using the palm of your hand, carefully form the strained yogurt into small balls. The less you handle the yogurt balls the better, avoid rolling between your palms. Instead, form into shape with fingertips. If yogurt is very difficult to work with, try placing in the freezer for five minutes .Place formed balls into a serving jar/bowl. Repeat until all the yogurt has been used. Add lemon rind, peppercorns, 1/4 tsp whole sea salt and herb of choice to the jar. Pour enough olive oil over the top until the yogurt balls are fully submerged. Allow yogurt balls to marinate in olive oil mixture for a few hours in the refrigerator. Serve with a thin and crispy cracker. *Look for a cracker made with whole wheat flour and sunflower or olive oil 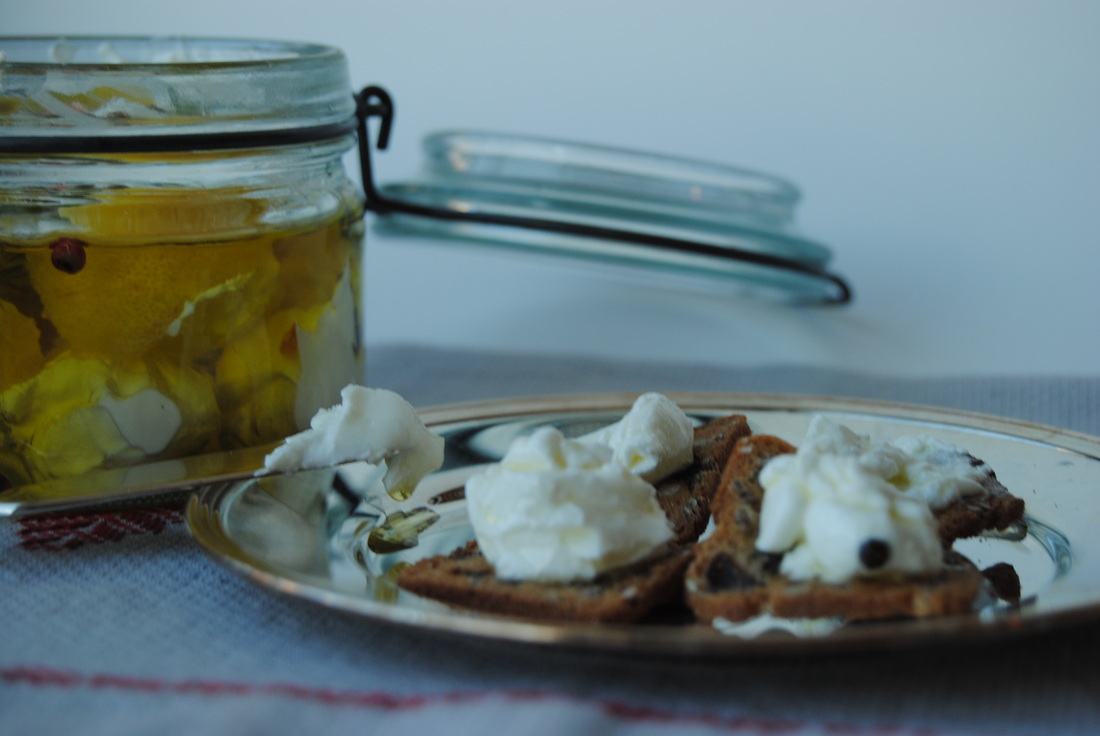 So who's impressed? This spread is so rich, so creamy, and so packed with flavor, that you won't even miss those extra fat calories you left behind with this amazing substitute! Whip this up for any holiday gathering this year and you're sure to be the talk of the party. Just remember to strain your yogurt (skyr) 1-2 days ahead and you'll be ready to shine! Stay festive (and lite!), Jess and Cecelia 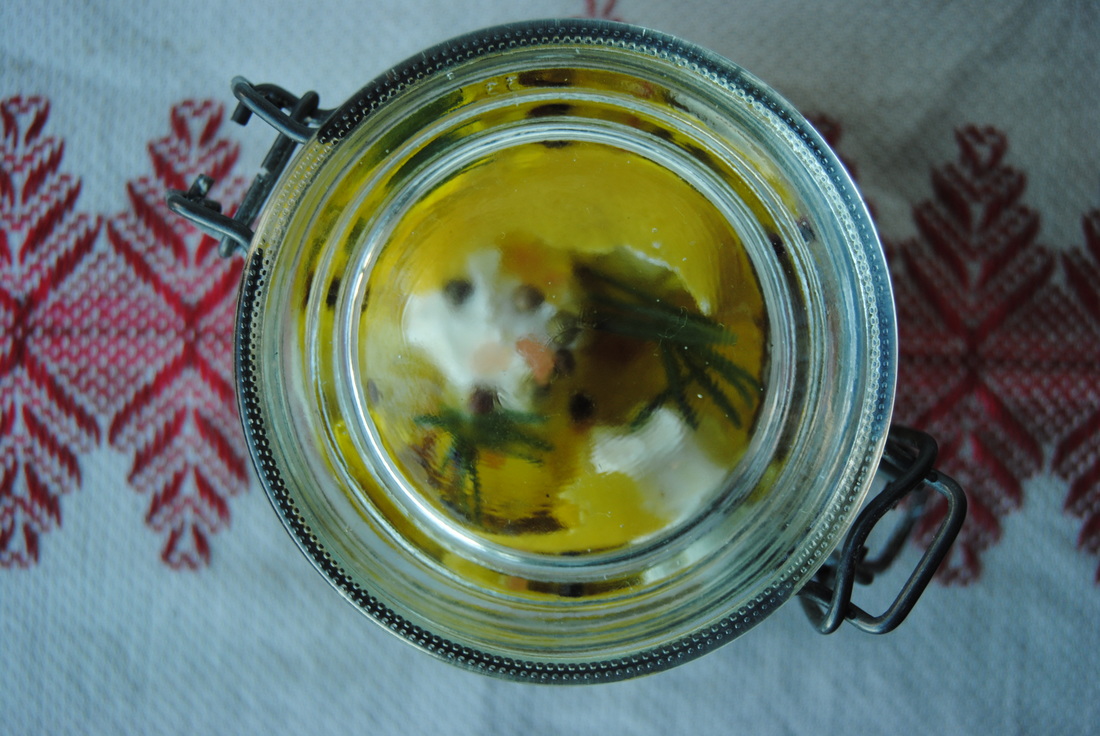  This Thanksgiving, TGBK would like to sincerely thank our amazing followers for all of your support and enthusiasm for our recipes. It truly has been an honor cooking for you over the last nine months. We've prepared a special holiday meal this week with three savory and satisfying veggie recipes. If this is your first "bird free" Thanksgiving we know that you won't be disappointed. With this combination of unique and seasonal foods and flavors we bet that you won't even miss the standard stuffing and gravy. Traditions aside, get your shopping list together, tie on your apron, and get creative with us in the kitchen this Thanksgiving! 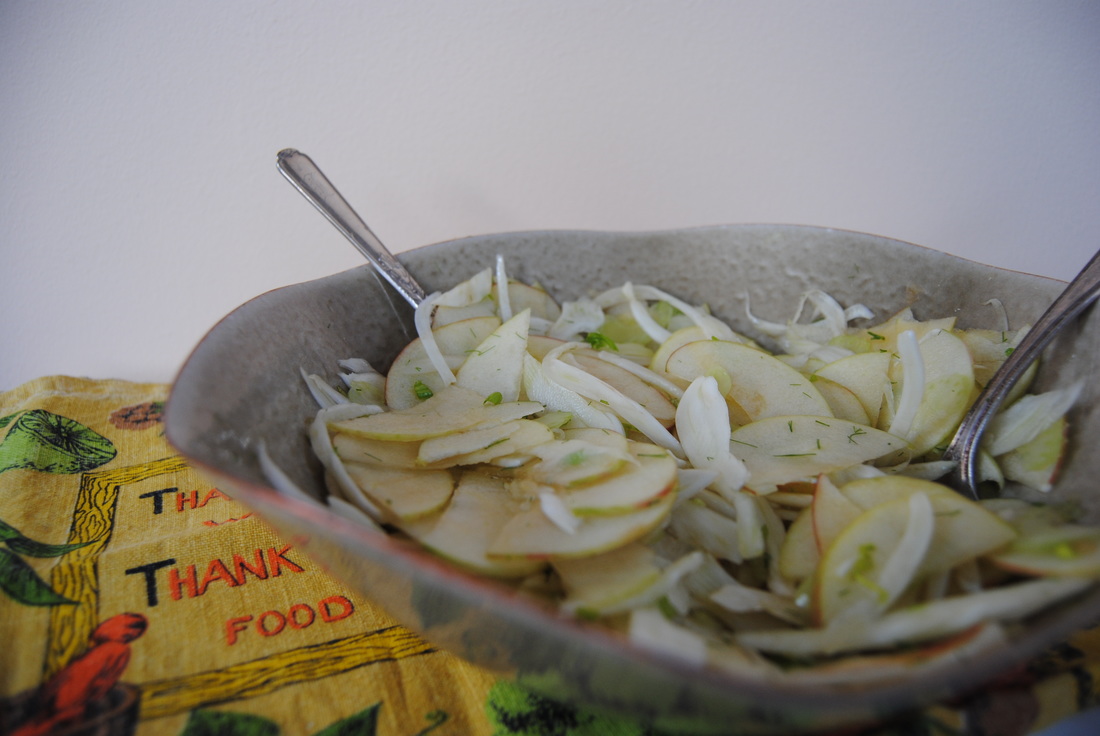 Braised White Beans and Leeks with Massaged Kale Adapted from The Sprouted Kitchen cookbook PREP TIME: 20 mins (+ 24 hour soaking time) TOTAL TIME: 2.5-3 hours (+ 24 hour soaking time) Servings: 6 Ingredients 1 pound dried white navy beans (*canned beans do not work for this recipe) 3 leeks 2 stalks celery 3 cloves garlic or 2 tsp chopped garlic 1 Tbsp grass fed ghee 4 cups unsalted vegetable stock 1/2-1 1/2 cups water 2 tsp dried thyme 2 Tbs herbs de Provence 1/2 tsp crushed red pepper flakes Sea salt and pepper to taste 1/2 cup grated Parmesan cheese 1/2 cup grated mozzarella 1 bunch of organic lacinato kale Sprinkle of sea salt Drizzle of olive oil In a large bowl soak beans in water for 24 hrs. Once beans are tender rinse and set aside. Preheat oven to 300°. Slice leeks down the middle and rinse thoroughly to remove any trapped dirt. Dice leeks into half circles and set aside. Rinse celery and roughly chop. Mince garlic and set aside. Place a large Dutch oven on the stove top and set to medium high heat. Add ghee, allow to fully melt, and add chopped leeks, celery, and garlic to the Dutch oven. Cook vegetables until soft, ~5 to 7 minutes. Add beans, vegetable stock, 1/2 cup water, herbs, pepper flakes, salt and pepper to the Dutch oven and bring to a boil. Take off the heat, cover with a lid or tin foil, and place in preheated oven. Cook beans for 2 1/2-3 hours or until beans are tender (not falling apart and mushy). About 1 hour into cooking, add 1/2-1 cup water as needed if beans appear dry. Once beans are tender and most of the liquid has evaporated, cover the top of beans with grated cheeses. Place under the broiler for 3 to 5 minutes until cheese is bubbly and golden brown. Wash and roughly chop kale making sure to remove middle rough stem. Sprinkle kale with sea salt and a drizzle of olive oil and lightly massage until kale has reduced in size by at least 1/3. Serve warm beans over a bed of messaged kale. Honey Sweetened Chia Seed Corn Muffins PREP TIME: 20 mins TOTAL TIME: 45 mins Servings: 12 muffins Ingredients 1 cup yellow organic cornmeal 1 cup whole wheat flour (spelt would also work) 1/4 cup honey 1 Tbsp baking powder 1/4 teaspoon salt 1 cup full fat canned coconut milk 1 Tbsp apple cider vinegar 2 Tbsp chia seed 3 Tbsp warm water 5 tablespoons unsalted butter, melted Preheat oven 350°. Line muffin tin with parchment liners or coat with a thin amount of coconut oil or butter to prevent the muffins from sticking. Sift corn meal, flour, baking powder, one tablespoon chia seed, and salt into a bowl and set aside. Shake coconut milk well prior to opening can to help disperse the fat. Measure out one cup coconut milk and add one tablespoon apple cider vinegar. Allow mixture to sit without stirring for 5-10 minutes. Whisk one tablespoon of the chia seed and three tablespoons warm water in a small bowl and let sit until mixture becomes thick and gelatinous. In a separate bowl melt the butter. Combine melted butter, chia seed and water mixture, and coconut milk. Add wet ingredients to dry and stir until fully combined, making sure to not over mix the batter. Evenly disperse mixture into 12 muffin tins. Bake in preheated oven for 20-25 mins or until toothpick come out clean and muffins are golden. Optional to add a small drizzle (~2 teaspoons total) of honey over the top of warm muffins. Serve warm or room temperature. Fennel and Apple Slaw PREP TIME: 10 mins TOTAL TIME: 15 mins Servings: 6 Ingredients Salad 2 medium honey crisp apples (sweet tango or pink lady apples would also work well) 1 medium fennel bulb 1 celery stalk 1 Tbsp chopped celery leaves 1 tsp chopped fennel leaves Dressing 2 Tbsp dark pure maple syrup 2 Tbsp raw apple cider vinegar 1 tsp fresh ginger juice (or minced fresh ginger) 1/8 tsp sea salt Remove the outer layer of the fennel and discard. To make the salad, thinly slice apple, celery, and inner fennel bulb on a mandolin or by using a sharp chefs knife and place in a large bowl. The key is to make uniform thin slices for the optimal texture. We preferred thin apple slices, diced celery and matchsticks of fennel but any thin shape will do. Chop fresh celery leaves and fennel leaves and add to bowl. In a separate small bowl, combine maple syrup, apple cider vinegar, ginger juice, and salt then stir until fully incorporated. Pour dressing over salad and place in the fridge to cool. *Optional to garnish plates with orange segments sprinkled with cinnamon for extra color and sweetness 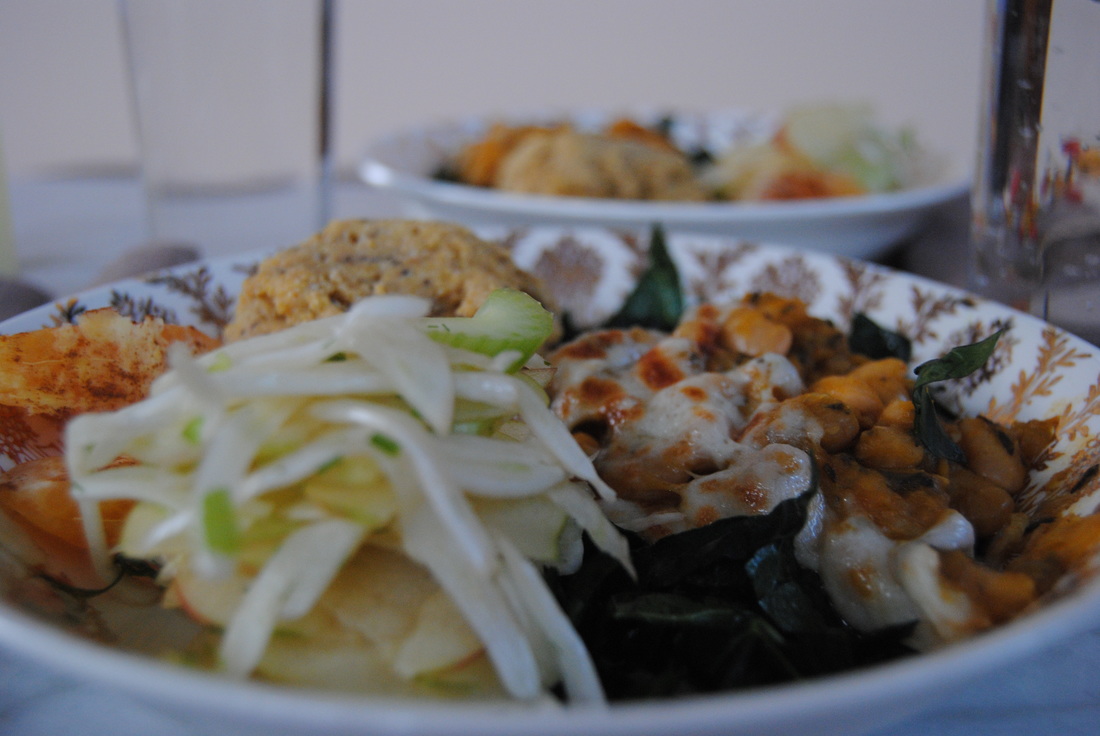 Such a beautiful and satisfying holiday feast! This bean dish is so savory that you won't even believe it's vegetarian, the cornbread so sweet and crumbly, and the apple and fennel slaw a perfect, fresh crunch to round out the meal. Enjoy with good company and a thankful spirit. Good, nourishing food is definitely something to be thankful for! Happy Thanksgiving, Jess and Cecelia P.S. We will be taking a break from posting next week to spend time with friends and family. See you in December!  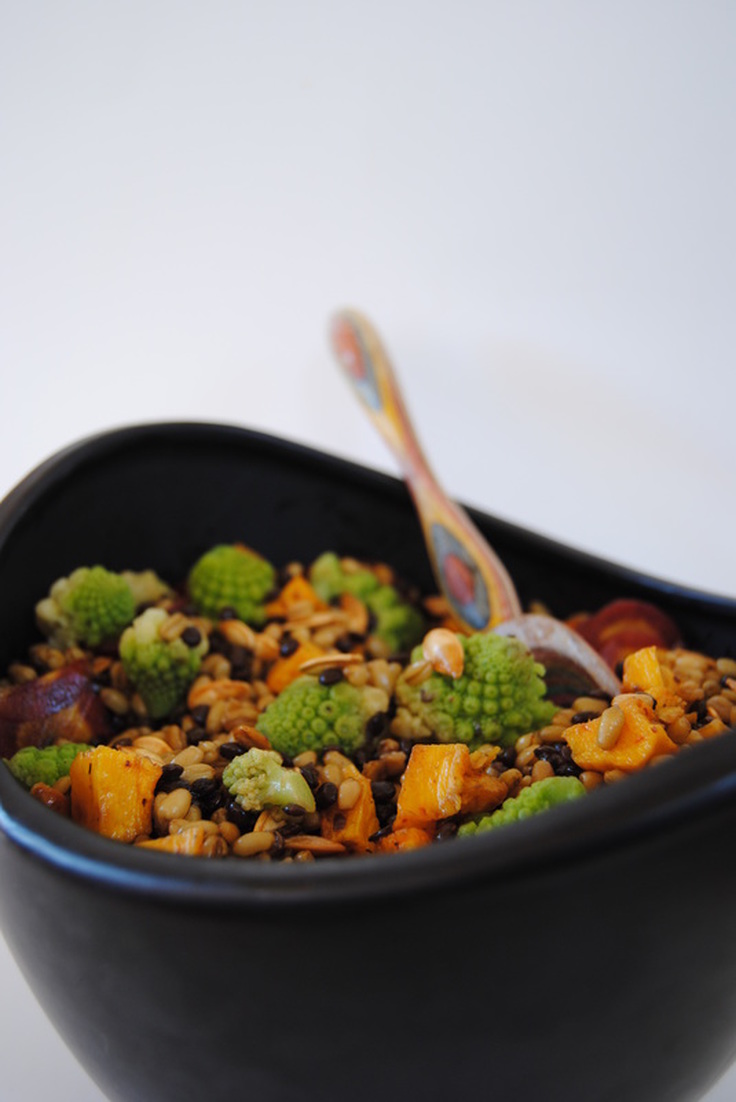
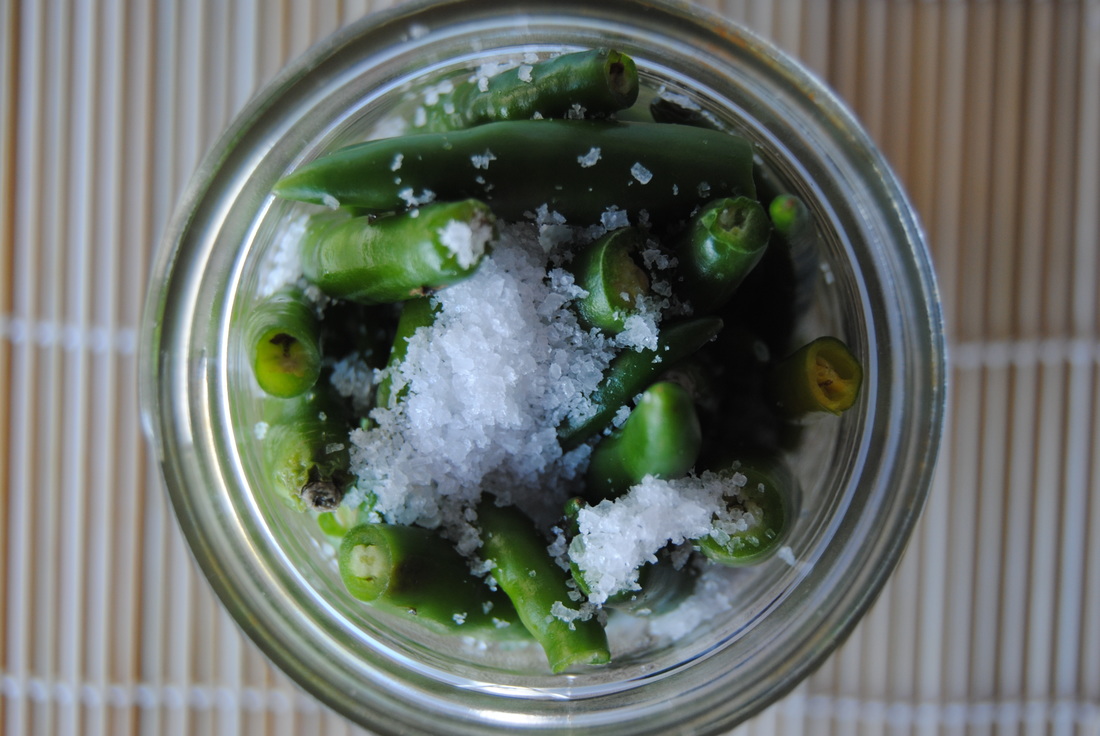
We don't know about you, but when creating this recipe we realized that there are very few (if any!) classic Halloween foods or meals. Of course there are plenty of favorite Halloween treats and sweets but what are people eating for dinner? Or is it just all dessert all day? We have so many questions and one great answer....this salad. It really is the first food we've ever had that gives us a Halloween feeling, and all holidays should have a classic meal right? And what's more is that this salad features a grain with a spooky name, freekah! Read on to find out what freekah is and why this salad is a must for dinner this Halloween.
Freekah, also known as roasted young green wheat, is freakin' amazing! Now you may be asking, how does this grain compare to standard wheat? Well freekah is harvested from a wheat plant when the grain is still young which means it retains more nutrients such as protein, vitamins, and minerals (yay!). With eight grams of plant protein, four grams of fiber, essential nutrients such as potassium, selenium, magnesium, and a little zinc and iron all packed into a 1/4 cup uncooked serving, this grain definitely needs a spot in your pantry! When cooking freekah it is best to use a ~2:1 ratio of liquid to grain. Uncracked freekah will take longer to cook (~50-55 minutes) versus cracked which takes ~20-25 minutes. This grain has a bite to it and even when fully cooked has a semi-hard chewy texture adding a unique element to your pantry. So it's about time you stock up on this amazing grain and start on this Halloween recipe before it's too late.
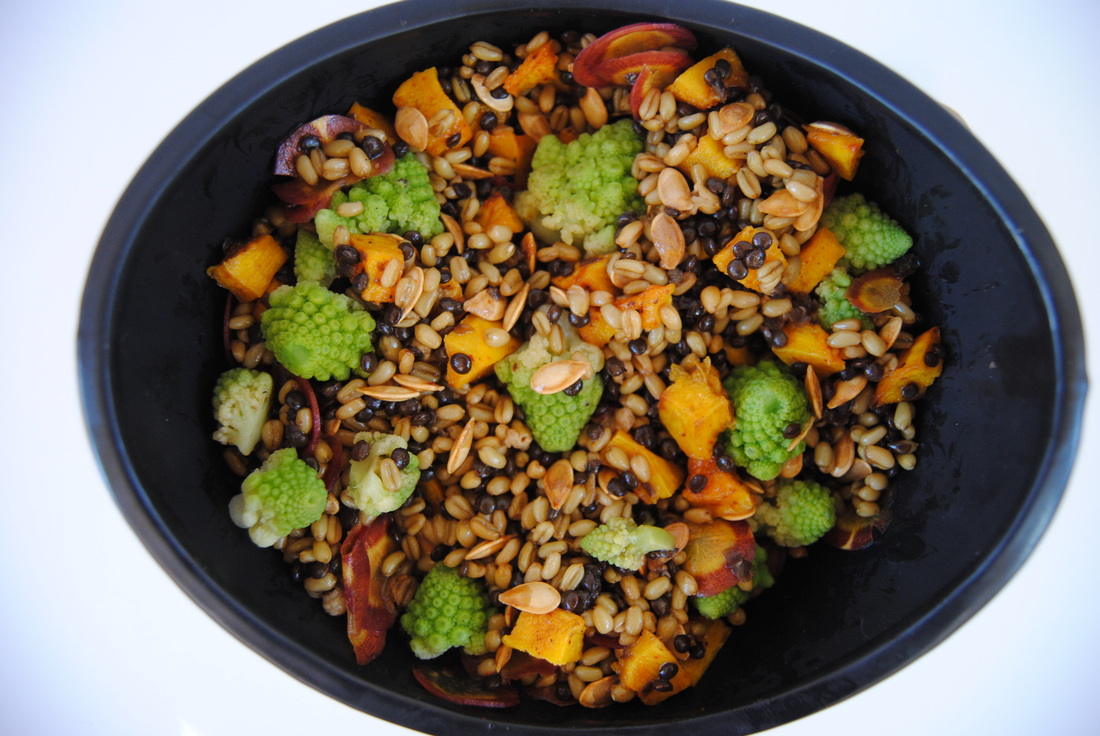
Freaky Freekah Halloween Salad
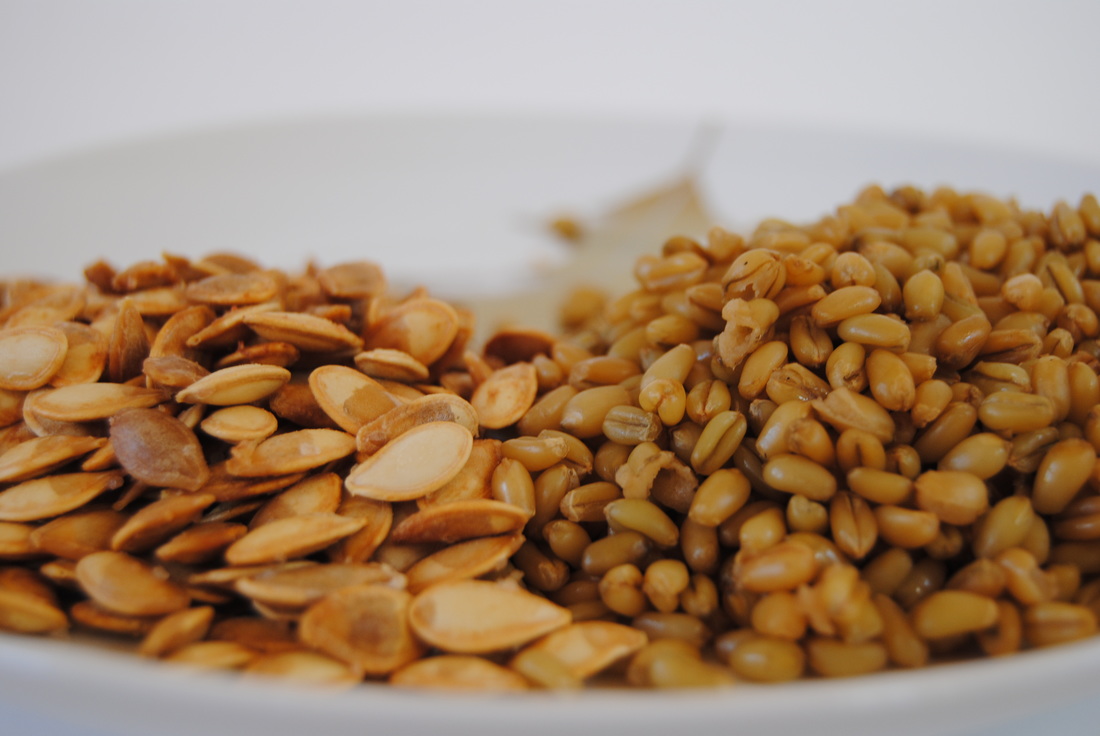
PREP TIME: 90 mins TOTAL TIME: 95 mins Servings: 4 large salads Ingredients Salad 1 cup dry Freekah 1/2 cup black lentils 1/2 small sugar pumpkin, reserve the seeds for roasting (~1/3 cup seeds) 1 medium purple carrot 1 small head Romanesco broccoli 5 Tbsp olive oil Sea salt Dressing 2 oz sweet soy sauce (or 4 Tbsp regular soy sauce with 4 tsp honey added) Juice of 1 lime 1-2 tsp sriracha hot sauce In a large pot combine 1 cup freekah and 2..5 cups water. Bring to a boil then reduce to a simmer and cover with a lid. Cook for 50-55 minutes or until freekah is slightly tender. Drain freekah then place in a bowl to cool. While the freekah is cooking begin the lentils. Rinse lentils until running water until water runs clear. Combine 1 cup rinsed lentils with 4 cups water in a pan over medium to high heat. Bring lentils to a boil, then reduce heat to a simmer, cover with a lid, and cook for 30 minutes. Once lentils are fully cooked, drain remaining water and set lentils aside. While the lentils are cooking, carefully take the skin off of the pumpkin and cut into 1"x1" cubes. *Note if you can find raw cubed pumpkin this would be a lot easier! Reserve the pumpkin seeds for roasting. Rinse the pumpkin seeds under running water until clean. Pat dry with a paper towel and add to a parchment lined baking sheet. Add 2 Tbsp olive oil and 1 tsp sea salt on seeds. Roast at 350° for 12-15 minutes or until crunchy. Drizzle pumpkin cubes with 2 Tbsp olive oil and sprinkle with sea salt. Roast on a parchment lined baking pan at 350° for 25-30 minutes or until soft. Remove from the oven and set aside. Using a mandolin or very sharp knife, slice the carrots paper thin into circular rounds then set aside. Chop broccoli into small florets and pan saute with 1 Tbsp olive oil and a sprinkle of sea salt for 5-7 minutes or until slightly soft with golden edges. Finally make the dressing by combining the juice of 1 lime, sweet soy sauce, and sriracha. Phew! You're still with us? Now it's time to assemble the salad! In a large spooky bowl, combine the freekah, lentils, pumpkin, pumpkin seeds, carrots, and broccoli. Pour dressing over the top of salad and fully mix to combine flavors. Enjoy warm or at room temperature. 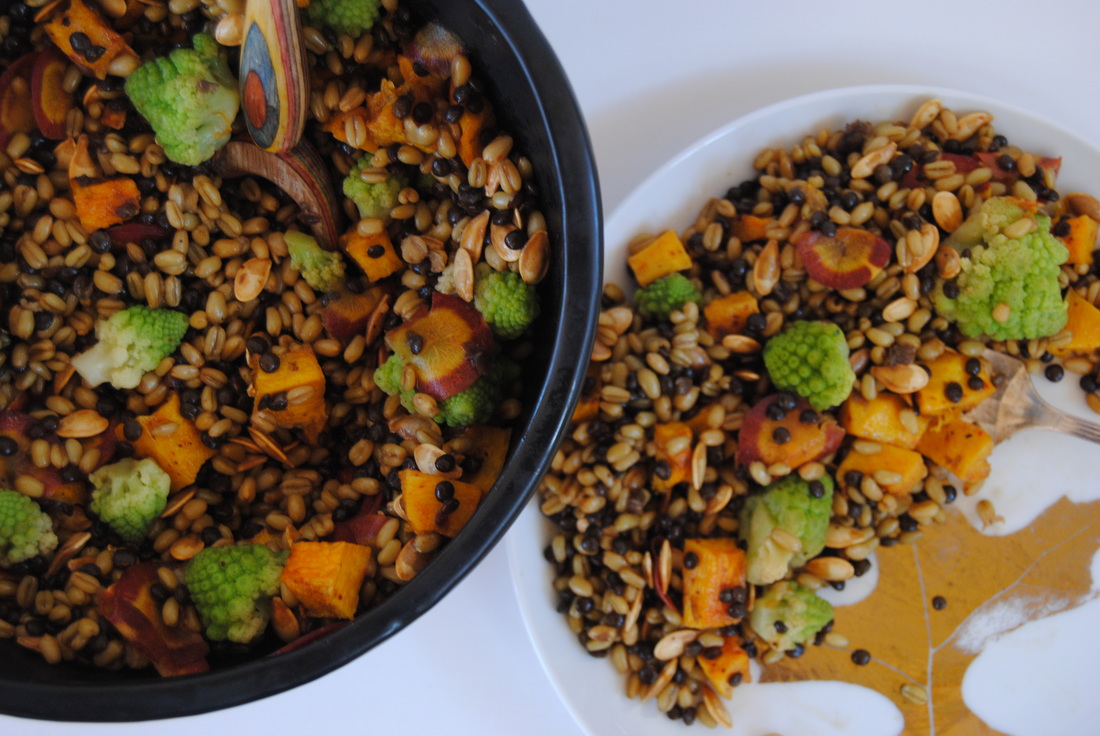
The combination of flavors and textures in this salad is so good that it's well, spooky! A perfect addition to your Halloween this year as a filling and fall themed meal prior to hitting the streets (for trick or treating that is!).
Happy Halloween from TGBK, Jess and Cecelia 
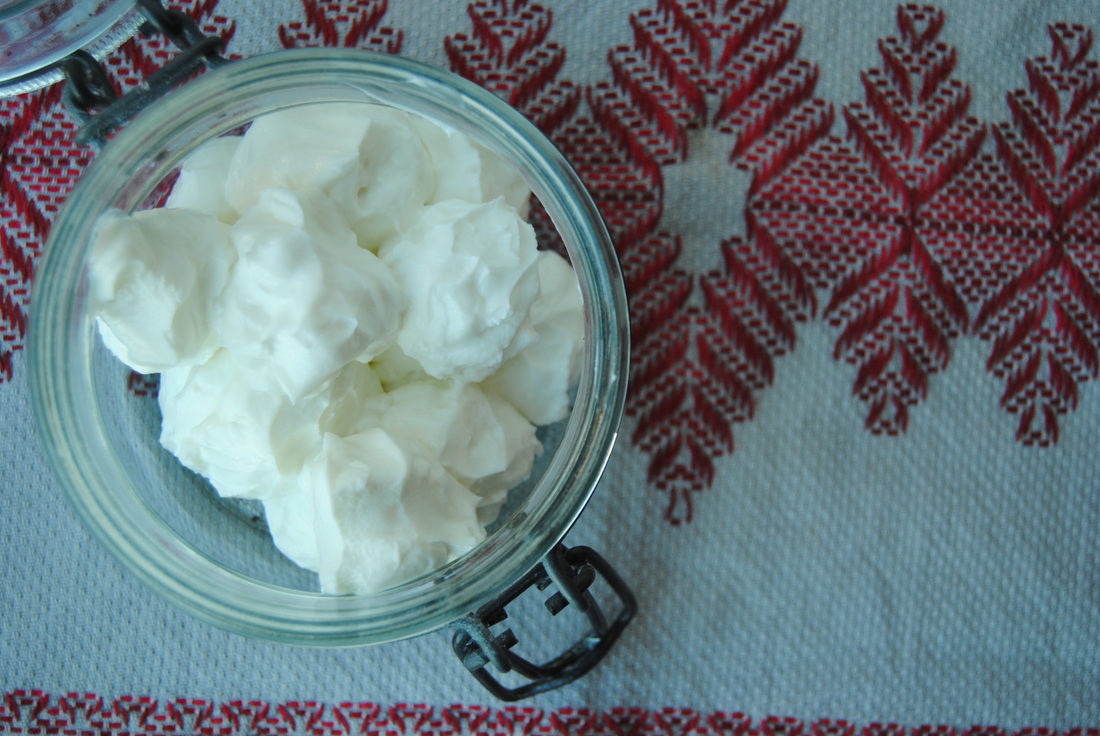
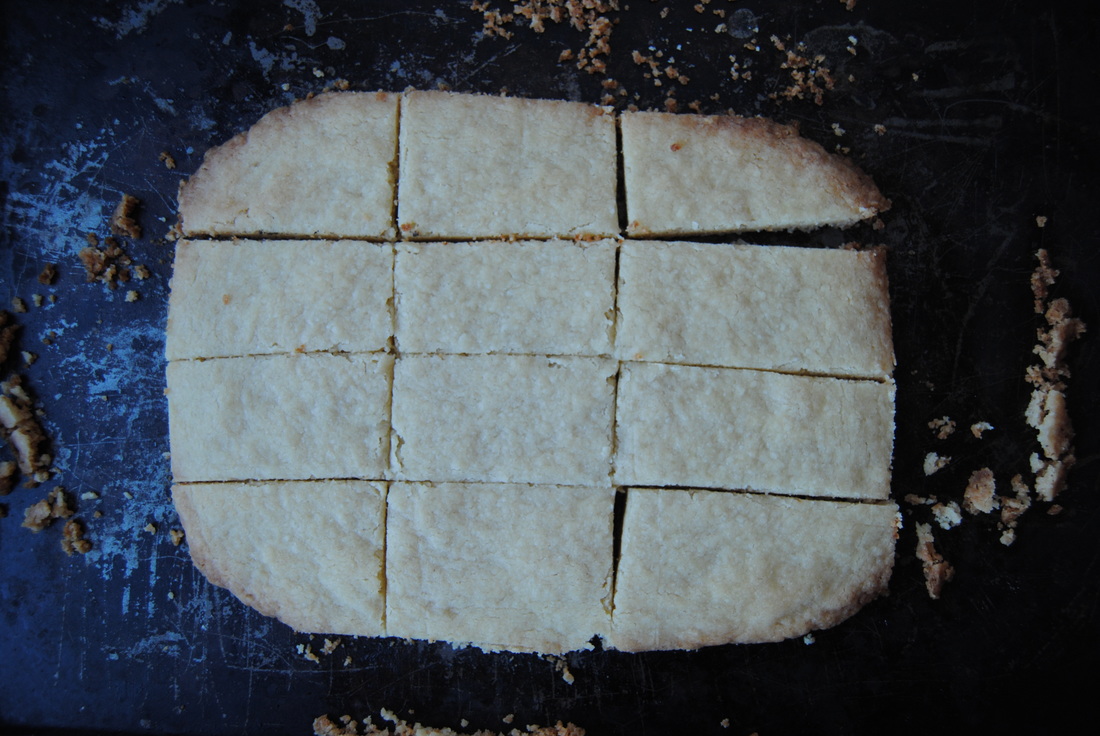
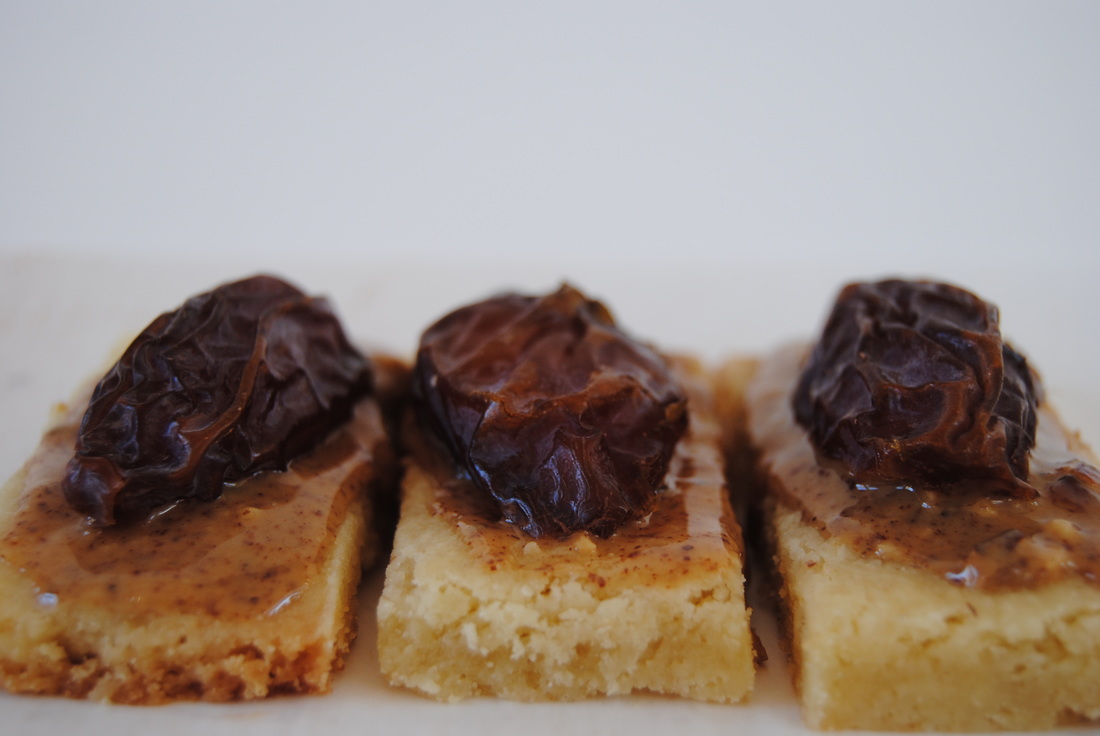
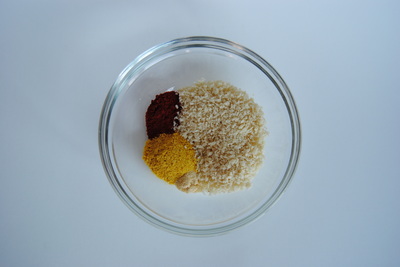
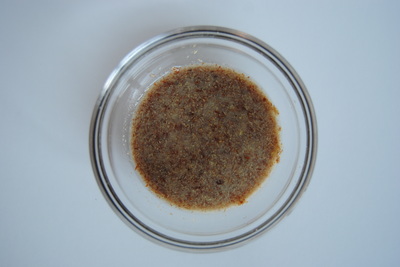
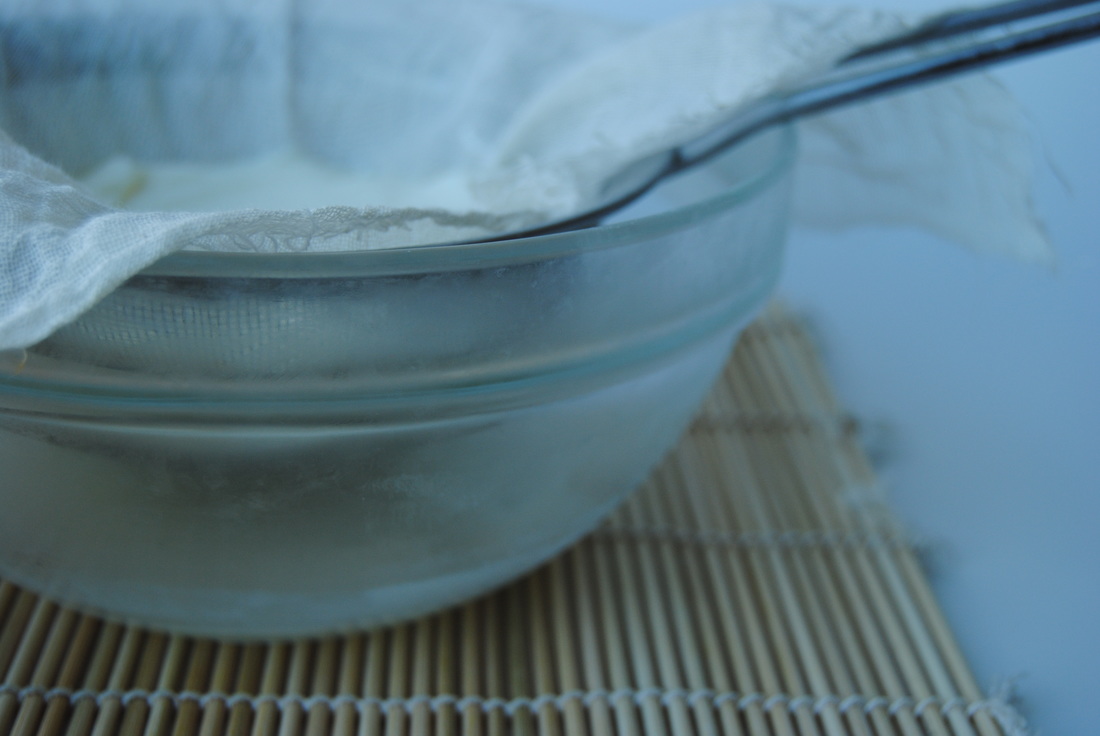
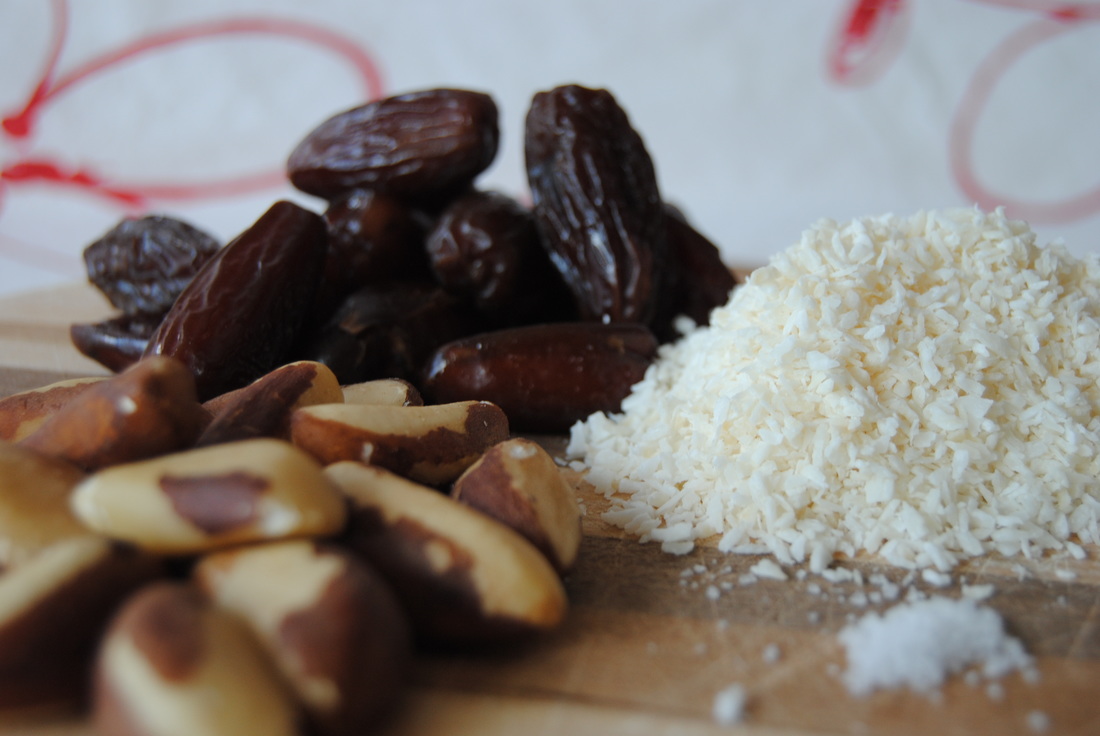
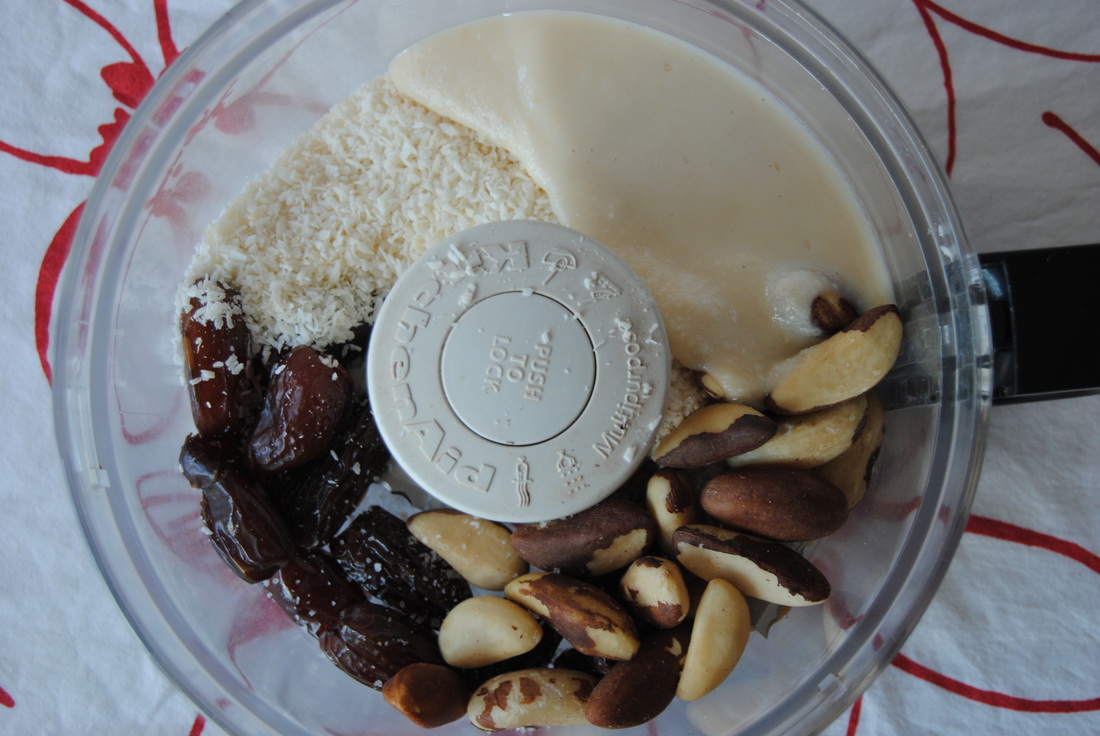
 With October being the start of a long season of treats, we thought it would be fitting to give you an amazing homemade candy recipe. Because let's face it, even though homemade candy is more work, the quality and flavor profile just can't be beat. Our favorite way to make homemade candy is to pick a standard store bought classic and recreate it with awesome (and better!) ingredients. So go ahead and try to guess our candy inspiration for this post and we'll give you a hint at the end just in case! 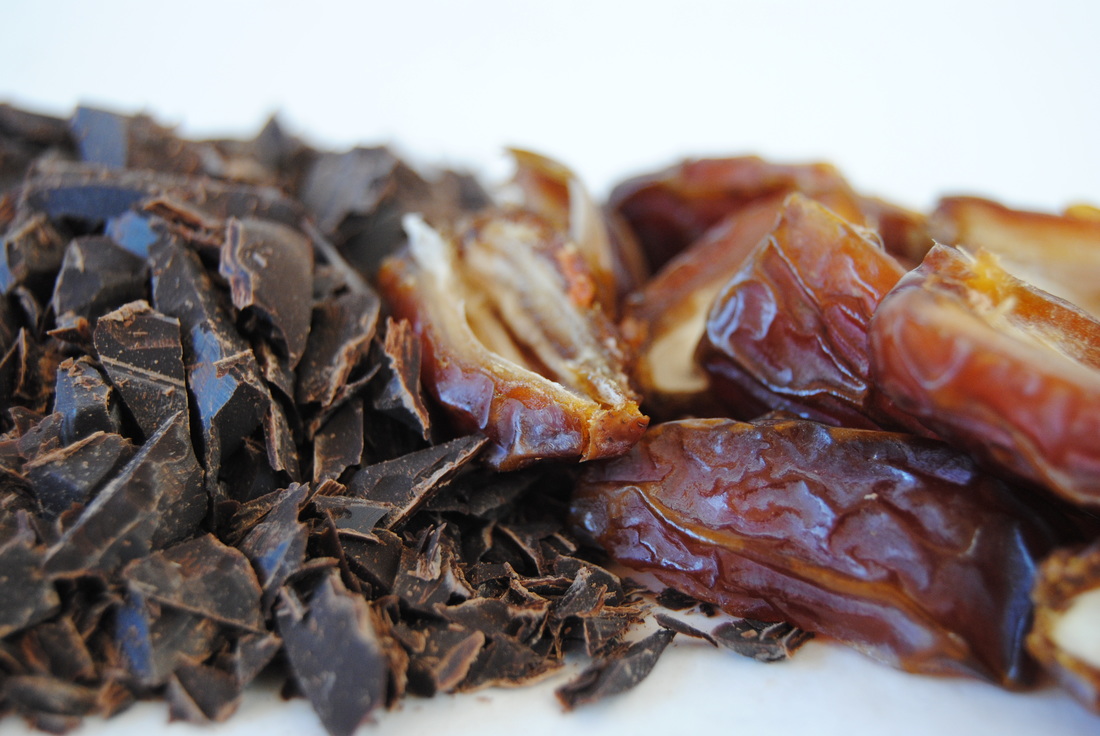 Since this post is close to a holiday (Halloween!), we are going to take a break from trying to bombard you with fabulous nutrition information. Instead, you can refer back to this post if you are wondering why homemade candy is so nutritionally superior. But let's face it, we think those nutrition labels do all the talking... Shortbread Candy Bars PREP TIME: 25 mins TOTAL TIME: 60 mins Servings: 12 candies Ingredients 1 stick butter, room temperature 1/4 cup sugar 1/2 tsp vanilla extract 1/8 tsp salt 1 cup flour 6 Medjool dates, pitted and cut in half 1-2 Tbsps almond butter 8 oz dark chocolate, finely chopped 1 tsp coconut oil sprinkle of sea salt Preheat oven to 375. In a large bowl combine butter, sugar, vanilla and salt and mix with a fork until well combined. Sift flour over butter mixture and blend with a fork until a soft dough forms. Transfer dough to an ungreased baking sheet and press into a 8" x 5" rectangle with your fingertips. Score the dough with a knife two times widthwise and four times lengthwise creating 12 small rectangles. Bake until the edges are golden brown, about 15 minutes. Let pan cool for ten minutes and then cut dough into 12 individual cookies while still warm. Uneven and crispy edges can also be cut off (as pictured above). Once shortbread cookies are cool cut dates in half and remove pits. Carefully spread an even layer of almond butter on top of each cookie and place half a date on top of almond butter, pit side down. Once complete, place cookies in the freezer for 10-15 minutes until almond butter is firm. Meanwhile, chop chocolate and add to a double boiler. Add coconut oil and allow mixture to fully melt stirring frequently. Once chocolate is melted, remove cookies from the freezer. Using a wide bottom fork, carefully dip cold cookies one at a time into the melted chocolate and use a spoon to completely cover with chocolate. Allow excess chocolate to drip from the bottom of the fork for a few seconds before placing the complete bars on wax paper to cool. Before the chocolate is fully cooled, sprinkle the top with sea salt. Store in an air right container in the fridge for 5-7 days.....if they last that long! Allow bars to warm to room temperature before eating if they have been chilled. *Cookie recipe adapted from The Gourmet Cookbook Shortbread recipe 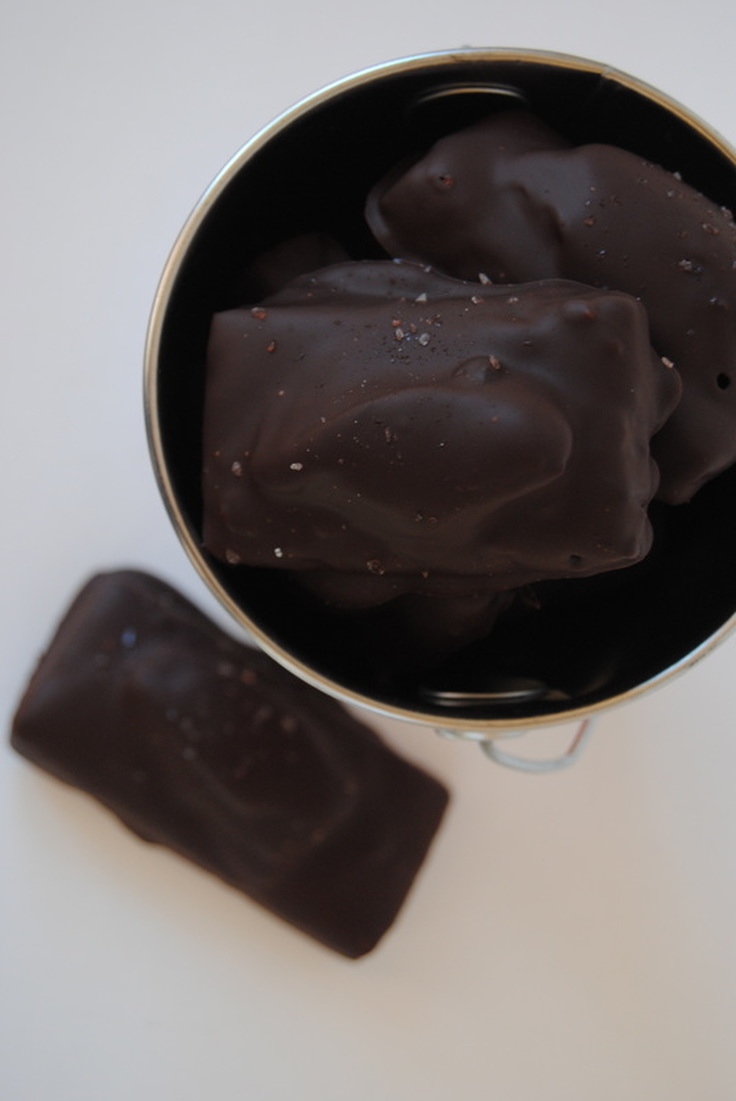 These candy bars are a perfect addition to your Halloween treats this year, you can make now or save this recipe until next week. And the fun you will have making them can become another holiday tradition. If you haven't figured out the classic favorite we are replicating let's just say that this candy's name rhymes with tricks (as in trick or treat) and you can share one with a friend and pick a side. If you're still stumped leave a comment and we'll help you out! Trick or treat (we pick treat!), Jess and Cecelia  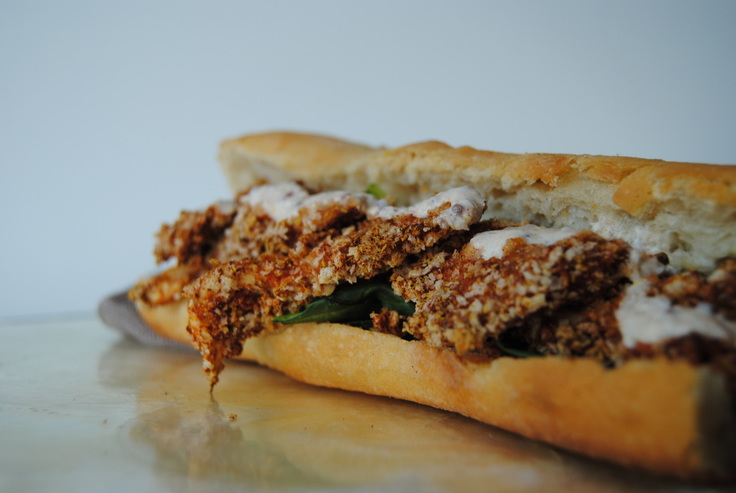 Hi there TGBK friends! The month of September sure did fly by for us and we just can't believe that fall is already here. Since September is National Mushroom Month (true fact!) we wanted to celebrate with a mushroom post. As we said....September has been very busy....but better late than never! Now you can reminisce about the late summer September days while you enjoy this recipe and learn more about why mushrooms are so amazing (they even have their own month!). 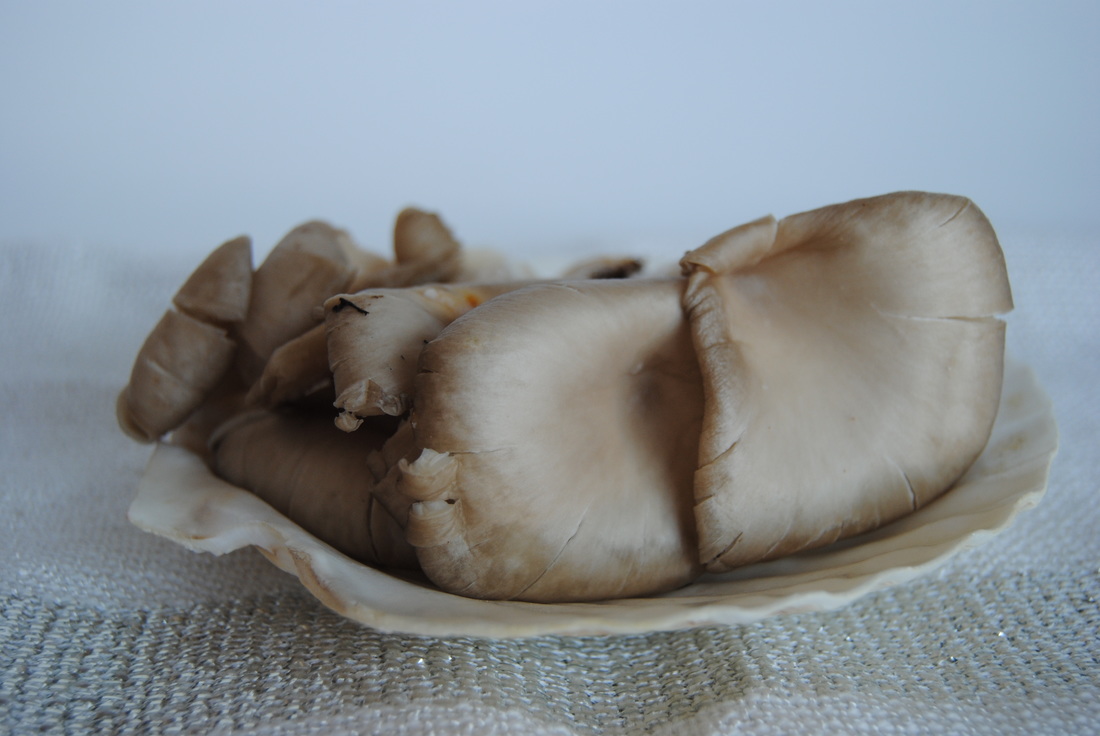 Vitamin D is one of those nutrition "hot topics" recently because 1. it is important to our bodies, 2. many people are deficient in vitamin D, and 3. there are very limited food sources of this vitamin. Vitamin D is found naturally in fatty fish (ex: tuna, salmon and mackerel) and in very small amounts in beef liver, cheese and egg yolk. There are many more fortified foods including milk and diary products, breakfast cereals, some orange juice, and multiple other food products. But if you're like us and like to keep your diet natural and lower in animal products then we need some other options! Other than the sun of course because our amazing bodies can produce vitamin D with skin exposure to sunlight. This option is also limited however by weather, seasonal changes, and the importance of skin protection to limit sun damage and risks that come along with it. We think that a balance of a little of both may be your best bet and mushrooms are here to help. Just like the human body, mushrooms when exposed to sun light increase in the level of vitamin D they contain (amazing!). About three ounces of mushrooms (levels vary based on the type) contain between 100-300 international units of vitamin D2 which is about 16%-50% of the daily recommended intake! Whenever possible, especially if you live in he Midwest during the fall and winter months, remember to incorporate sun exposed mushrooms to your diet to increase your vitamin D intake. And now you can add this mushroom recipe to your repertoire. 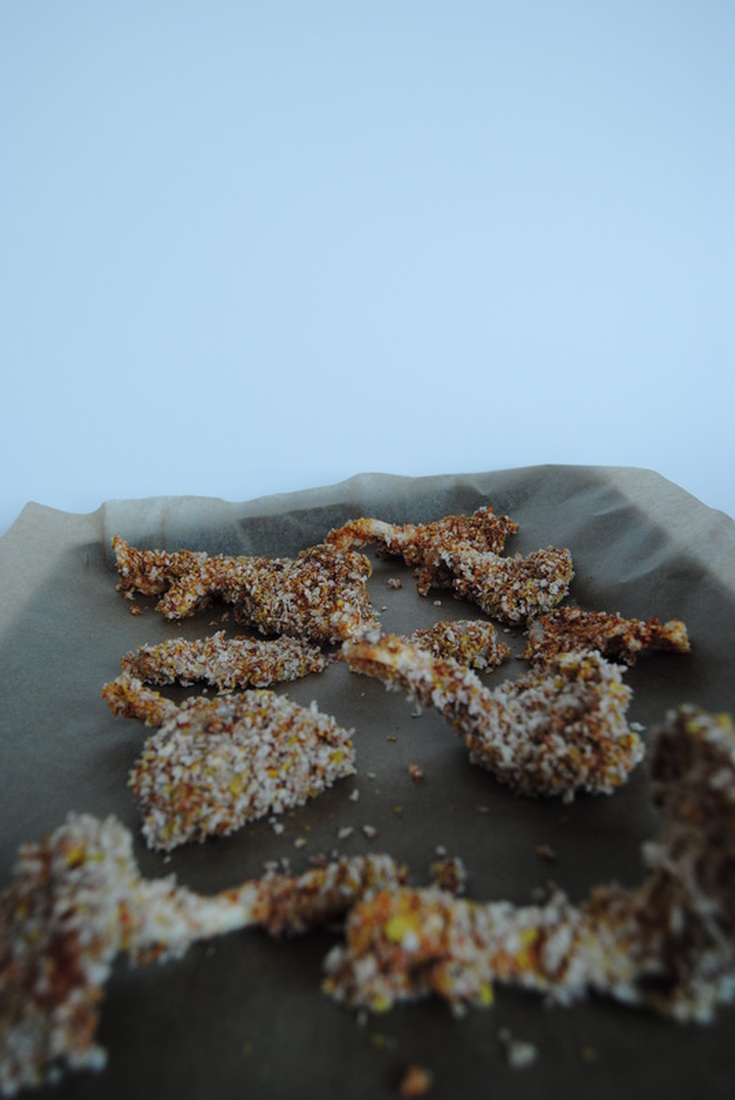 Mushroom Po' Boy PREP TIME: 15 mins TOTAL TIME: 30 mins Servings: 2 Ingredients Sandwich 2, 4-6" sub rolls (we used French baguette*) 5 oz raw oyster mushrooms 1 tsp extra-virgin olive oil Juice of 1/2 lemon 1/8 tsp sea salt 9 Tbsp water 3 Tbsp ground flax seed 1/2 cup bread crumbs (store bought* or homemade) 1 Tbsp nutritional yeast 1 tsp paprika 1/4 tsp onion powder 1/8 tsp sea salt 1/4 cup fresh spinach, chopped Remoulade Inspired Sauce 2 Tbsp plain organic yogurt 1/2 tsp stone ground mustard 1/4 tsp horseradish 1/4 tsp raw apple cider vinegar 1/8 tsp crushed or minced garlic Sprinkle of sea salt Dash of paprika Heat oven to 425°. Line a large baking sheet with parchment paper. Separate mushrooms into individual pieces. Using a clean damp cloth, carefully clean mushrooms. In a bowl combine olive oil, lemon juice, and 1/8 tsp sea salt. Add mushrooms to the bowl and allow to marinate while you prepare the rest of the breading. In a small bowl combine ground flax seed and water. Using a fork, carefully mix until thoroughly combined. In a shallow dish combine bread crumbs, nutritional yeast, paprika, onion powder, and sea salt and set aside. Working carefully, dip each mushroom in the flax seed mixture then cover with breadcrumb mixture and place on lined baking sheet. Repeat process until all mushrooms are breaded. Bake for 10 minutes, flip mushrooms over, and continue baking for an additional 5 minutes or until golden brown. While the mushroom are baking, begin making the sauce. Add all sauce ingredients to a bowl and mix until combined. Now it's time to assemble the sandwich. Cut baguette into 4-6" pieces and slice open making sure to not cut all the way through so that your ingredients are snug and will not fall out. Add chopped spinach and half of the mushrooms to each sandwich.Generously drizzle remoulade sauce on top and enjoy!! *Remember to look for bread and breadcrumbs with minimal ingredients- primarily flour, water, yeast, salt and little else! 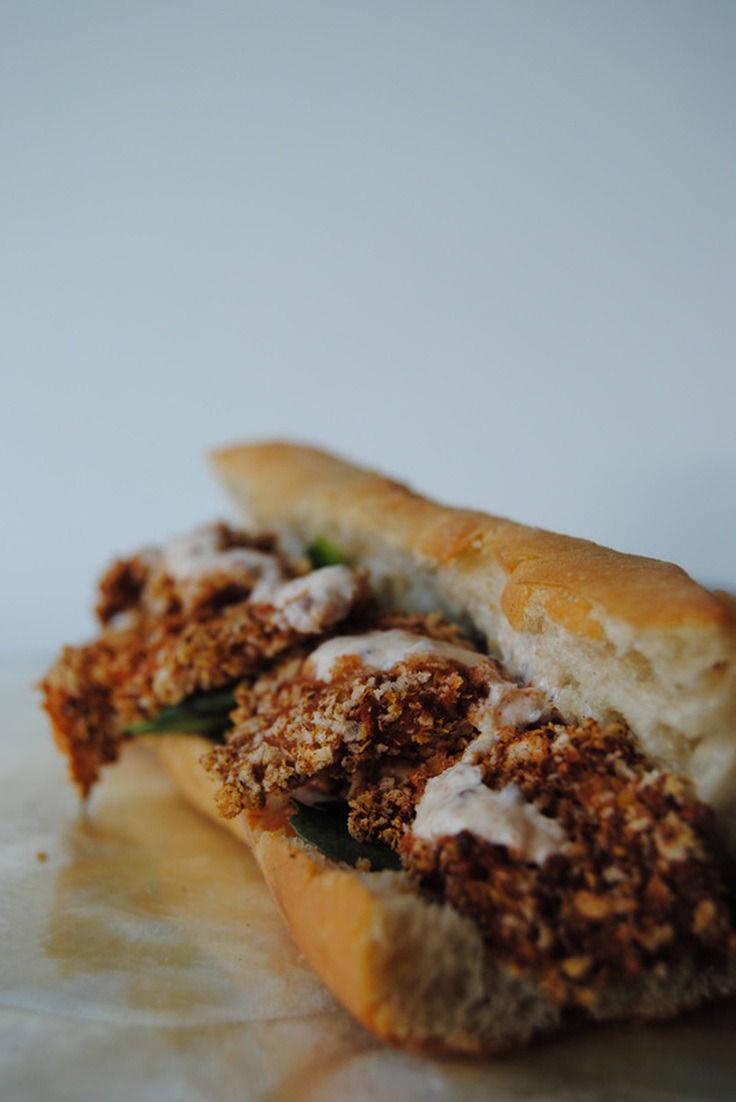 This sandwich is so right is so many ways. The crispy, breaded mushrooms and fresh spinach pair perfectly with the tangy, fiery sauce and soft bread. Such a different way to enjoy mushrooms and another way to get your vitamin D now that summer is long gone. But don't fret, we have a ton of amazing fall recipes on the way! See you soon, Jess and Cecelia 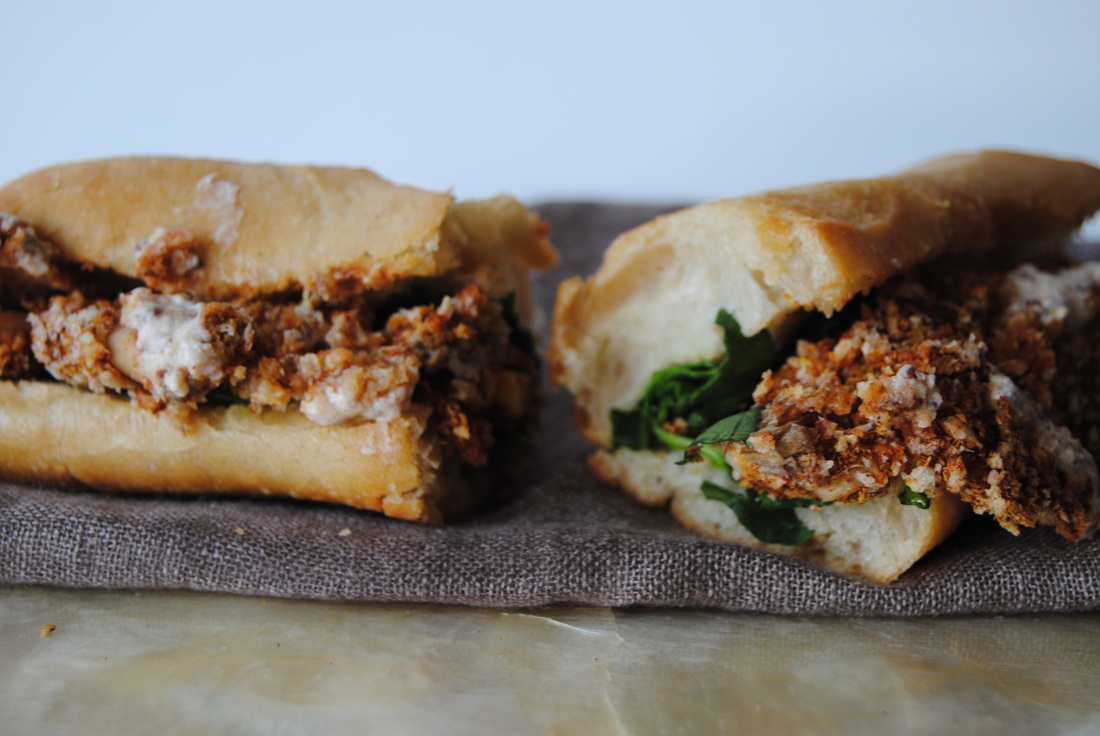 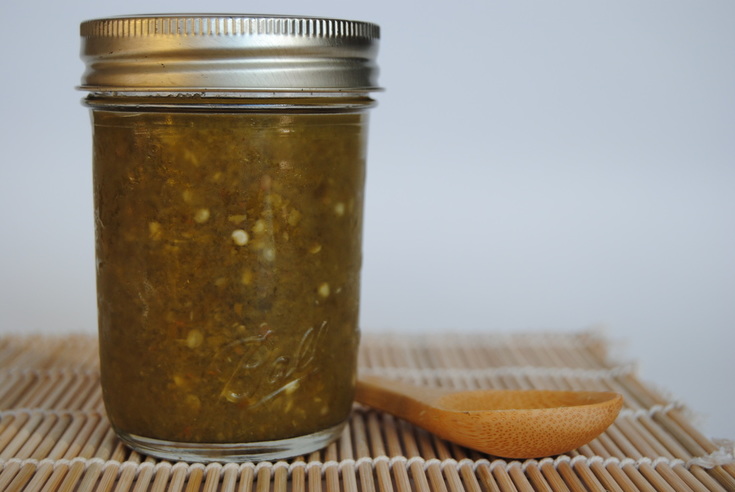 Okay we have to admit, one of the ways we have a ton of fun on a Friday night is experimenting with fermented foods. It may sound lame but if you get started we promise you'll never look back! There are just so many possibilities for homemade fermented food and drinks (if you catch our drift). But today we'll get you started with lacto-fermented hot sauce. It's quick, easy, and oh so tasty. Read on! In basic terms, fermentation is the process of exposing food to bacteria and yeast (the good kind!). The bacteria and yeast consume carbohydrates in foods creating different flavors and benefits in the final food product. The benefits of fermented foods are immense and mostly due to the presence of large amounts of probiotics ("good bacteria") that thrive in our intestinal track supporting healhty digestion and immune function. We have talked about fermented foods before in this post. The type of fermentation we experimented with this week is called lacto-fermentation because lactobacillus is the primary bacteria doing all the hard fermentation work. This type of fermentaion is nice and easy becuse you can get lactobacillus from a food that might already be sitting in your fridge. We got our lactobacillus from fresh whey. You may have noticed whey before when you let a tube of yogurt sit after scooping out a serving - the next day you come back and see a yellowish liquid that has separated from the yogurt. That's fresh whey! And it contains the lactobacillus we want for lacto-fermentation. Whey can be collected through the process we show you in this recipe (described below and pictured above) and used in many different ways. You can freeze fresh whey into ice cubes for smoothies, use it to make fresh whey cheese, lacto-fermented beverages, or just how we did to make lacto-fermented hot sauce! Now how easy is that? You're already on your way to becoming a fermentation pro. We'll get to our recipe now but it you have to know more about fermentation we love Sandor Ellix Katz's book Wild Fermentation and Cultures for Health website where we got the inspiration for this recipe and so much more! Green Chili Lacto-Fermented Hot Sauce Recipe adapted from Cultures for Health PREP TIME: 35 mins TOTAL TIME: 35 mins plus 7 days of fermentation Servings: makes ~12 ounces hot sauce Ingredients Whey Culture 4 oz organic plain yogurt (Greek or regular) Hot Sauce 1 cup green or red thai chili peppers, washed and stemmed 1 1/2 tsp sea salt 1 Tbsp fresh whey Un-chlorinated filtered water 1/2 cup raw apple cider vinegar To make the fresh whey culture, place Greek yogurt in a colander lined with cheese cloth and set over a bowl (as shown in the above picture). Place in the fridge for 30 minutes to allow the whey to drain off of the yogurt. The whey is the liquid that collects in the bottom of the bowl. Wash and de-stem peppers (leave the seeds) and pack tightly into a glass jar. Add salt, whey, and enough water to cover peppers. Lightly screw lid on and give the peppers a good shake to help dissolve salt. Place in a warm, dark spot in your kitchen and let the fermentation begin! It's important to "burp" the jar daily (quickly unscrew lid to allow air out). Let sit on the counter for 5-7 days. The liquid should take on a cloudy appearance. Feel free to taste the liquid at day 5 and keep fermenting until it's to your liking. Once fermenting is finished drain the peppers over a bowl reserving the fermentation liquid. Blend peppers in a blender or food processor until they are fully pureed, using a small amount of the fermentation liquid as needed. Once pureed, return peppers to the glass jar with 1/2 of the fermentation liquid and about 1/2 cup apple cider vinegar. Close with a tight lid and let sit on the counter again for another 12-24 hour ferment before placing in the fridge for storage. *Remember to save the yogurt that you strained. It will be thicker without all that whey but still delicious. You can eat it plain, use as a dip, or spread on toast! 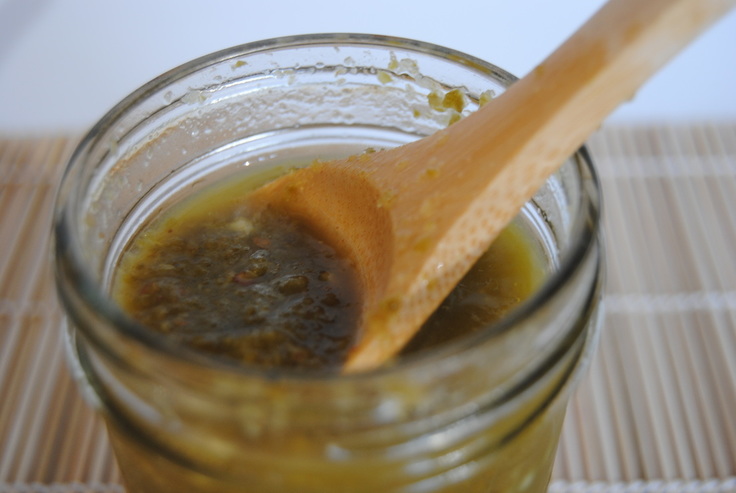 This hot sauce is nice and spicy (as it should be!) and has a sweet tang from the fermentation process. Overall it's a total winner and won't last long. Add this to anything and everything you love hot sauce on. And stay tuned for more home fermentation to come. Have fun, Jess and Cecelia 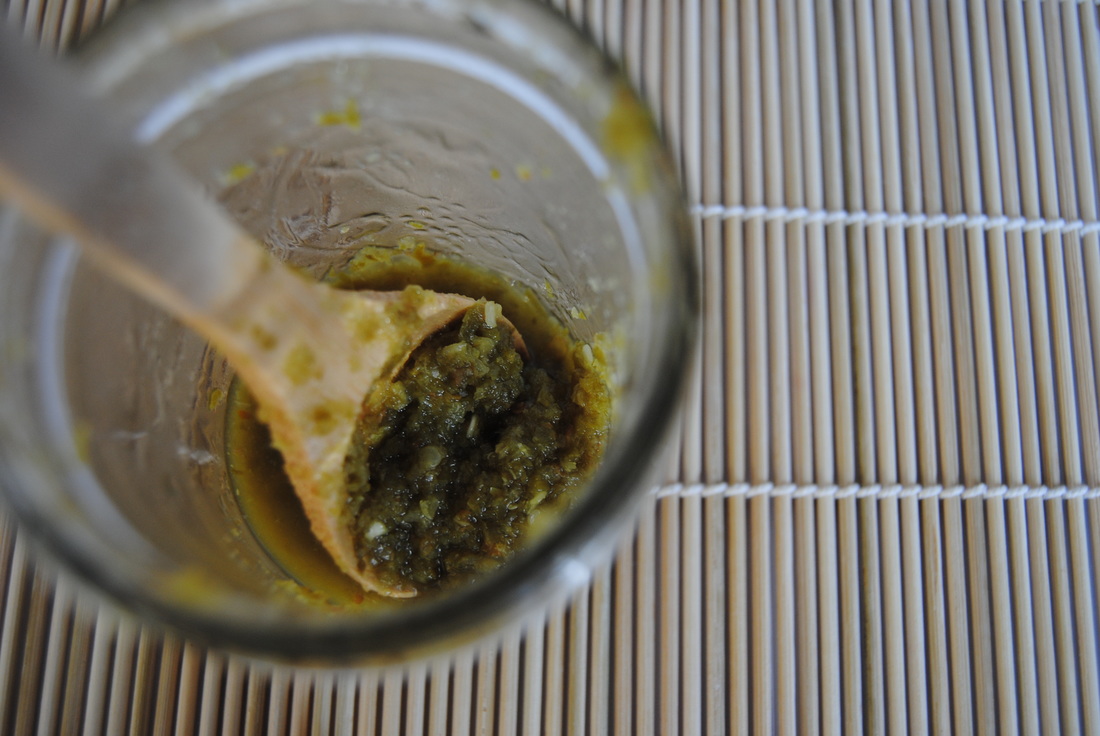 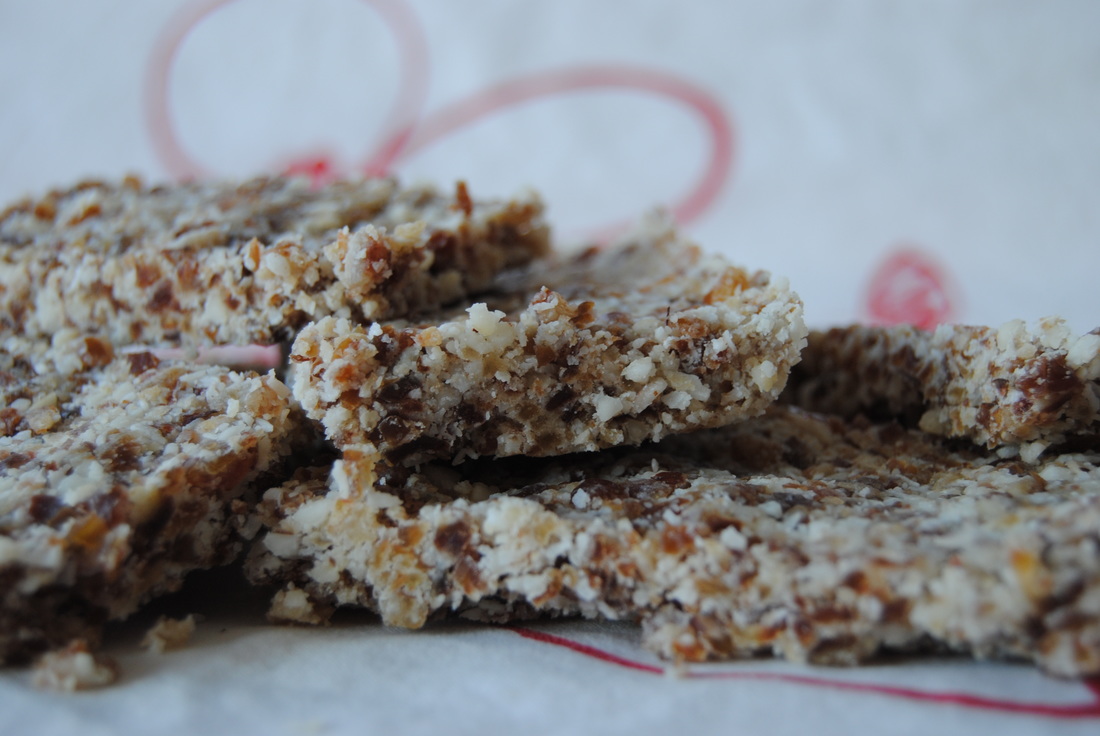 Oh the coconut - an amazing plant with so many culinary uses in so many different forms: coconut sugar, coconut oil, coconut water, coconut milk, coconut meat, coconut flakes, and the list just goes on and on. We just can't pick our favorite but we don't have to! All we have to do is decide which form we want to use in our recipes. For this delectable bar we chose coconut butter or manna that we made right in our kitchen. So let's find out more... 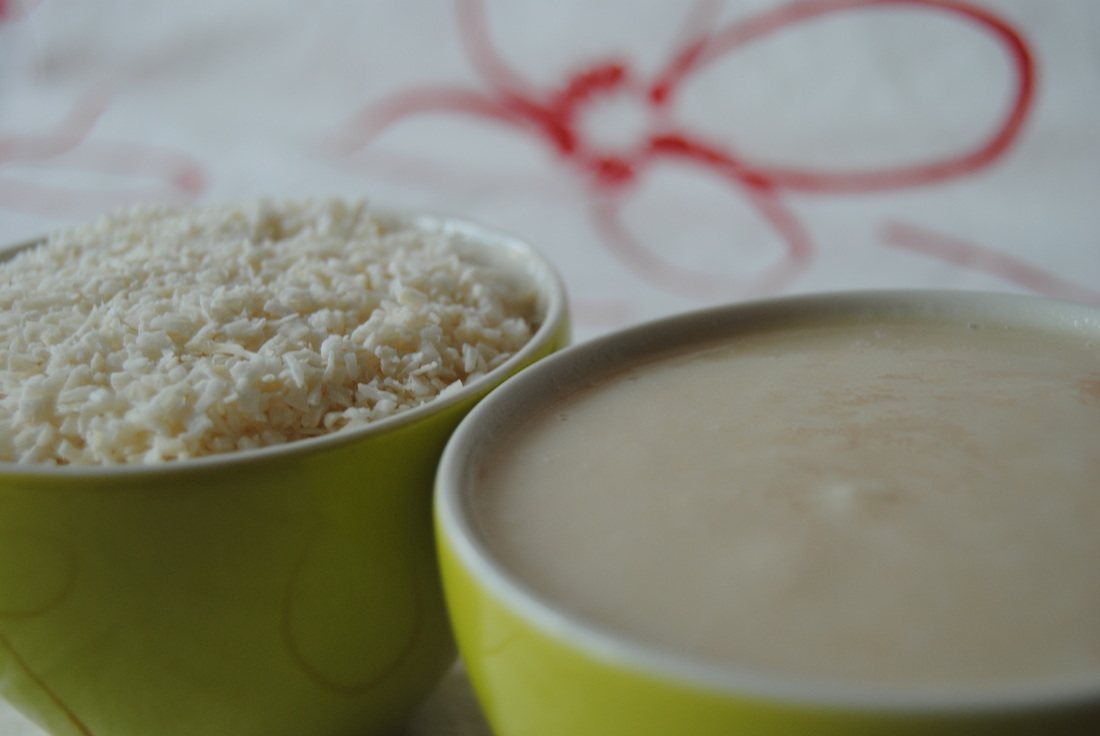 Surely you're wondering what coconut manna is, well it's a fancy name for coconut butter. Coconut manna is coconut meat blended into a smooth "butter". You may be more familiar with coconut oil which is purely fat extracted form coconut meat, whereas, coconut butter is the whole coconut meat which contains about 65% fat but also other key nutrients including fiber. When purchasing coconut manna (most likely labeled as coconut butter), always look for a raw product processed at a delicate temperature of 115 degrees or less to allow the vital nutrients to be preserved. One product that meets our high coconut standards can be checked out here. But if you have a good quality, high speed blender such as a Vitamix or Blendtec you can make your own coconut manna right in your kitchen. There is only one ingredient, coconut meat! We blended raw, unsweetened coconut flakes on high for several minutes and wallah! A creamy, coconut spread worthy of your favorite toast or recipe- just replace for standard butter one to one. Now on to those bars. 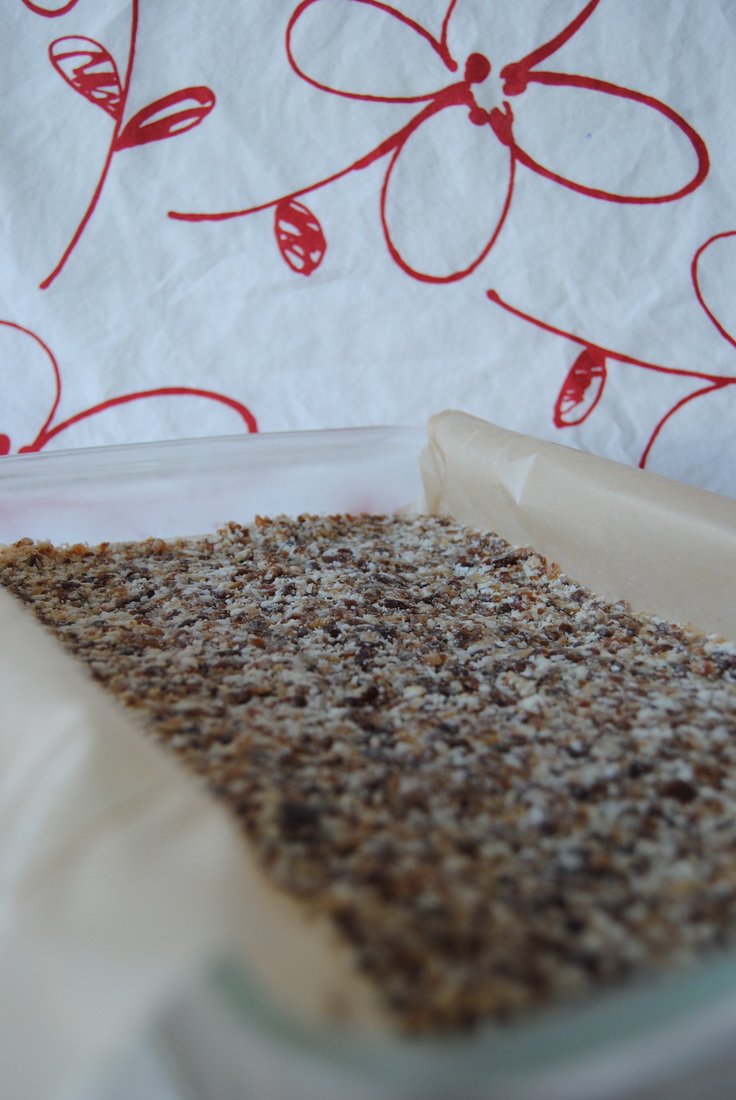 Coco Loco Bars PREP TIME: 5 mins TOTAL TIME: 45 mins (includes 30 mins in the fridge) Servings: 12 bars Ingredients Coconut Butter 7 cups dried, unsweetened coconut flakes Bars 2 1/2 cups pitted dates 1/2 cup dried, unsweetened coconut flakes 1/2 cup raw brazil nuts 3/4 cup coconut butter Sprinkle of sea salt To make the coconut butter, add 7 cups of dried, unsweetened coconut to a good quality, high-speed blender such as a Vitamix or Blendtec and blend on high for 2 to 3 minutes until a smooth butter is formed. Pour butter into a glass jar and store at room temperature. Please note, the butter will harden as it sits on the counter. If you want pour-able butter you will need to heat it prior to using. To make the bars, start by lining a 9 x 12 inch pan with parchment or wax paper. Combine the dates, dried coconut, brazil nuts, coconut butter, and sea salt to a food processor and pulse until a crumbly mixture is formed. Try forming the mixture into a ball and it should hold together. If you notice that the mixture is too crumbly and does not hot it's shape, add one or two more dates to the food processor and pulse again until the mixture will hold together. Pour mixture into prepared pan and spread evenly. Using a piece of wax paper, evenly press the mixture down forming one giant coconut bar. Allow to firm up in the fridge for 30 minutes. Once chilled cut into 12 bars. Wrap each in wax or parchment paper for a quick on the go snack. Store bars in the fridge. Bars can be eaten cold or at room temperature. 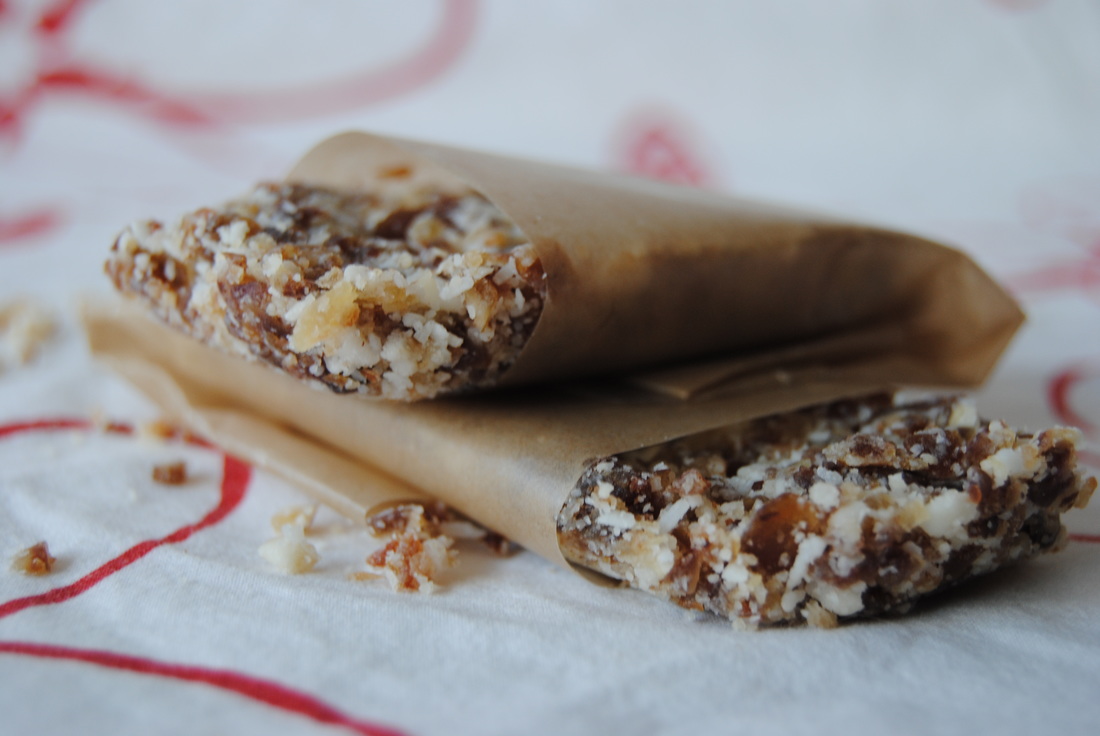 This bar is so full of coconut flavor and such a perfect use for coconut manna. The coconut fats makes this a satisfying snack or mini-meal that will keep you happy until your next food break. Heart, Jess & Cecelia 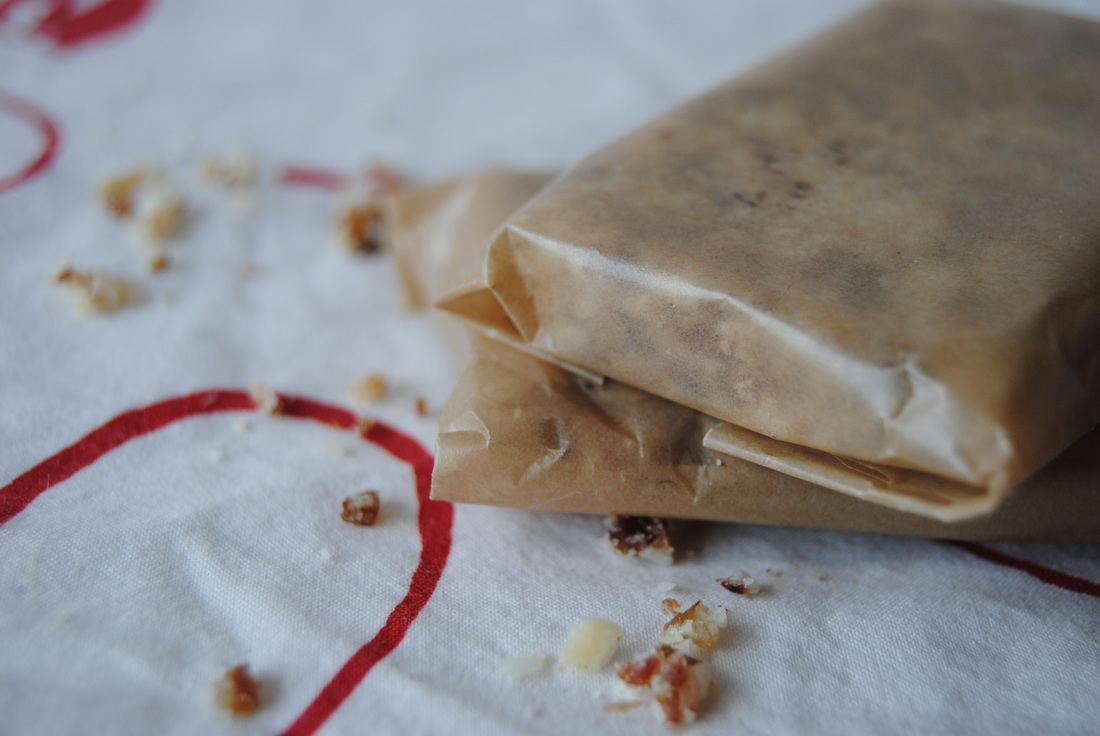 |