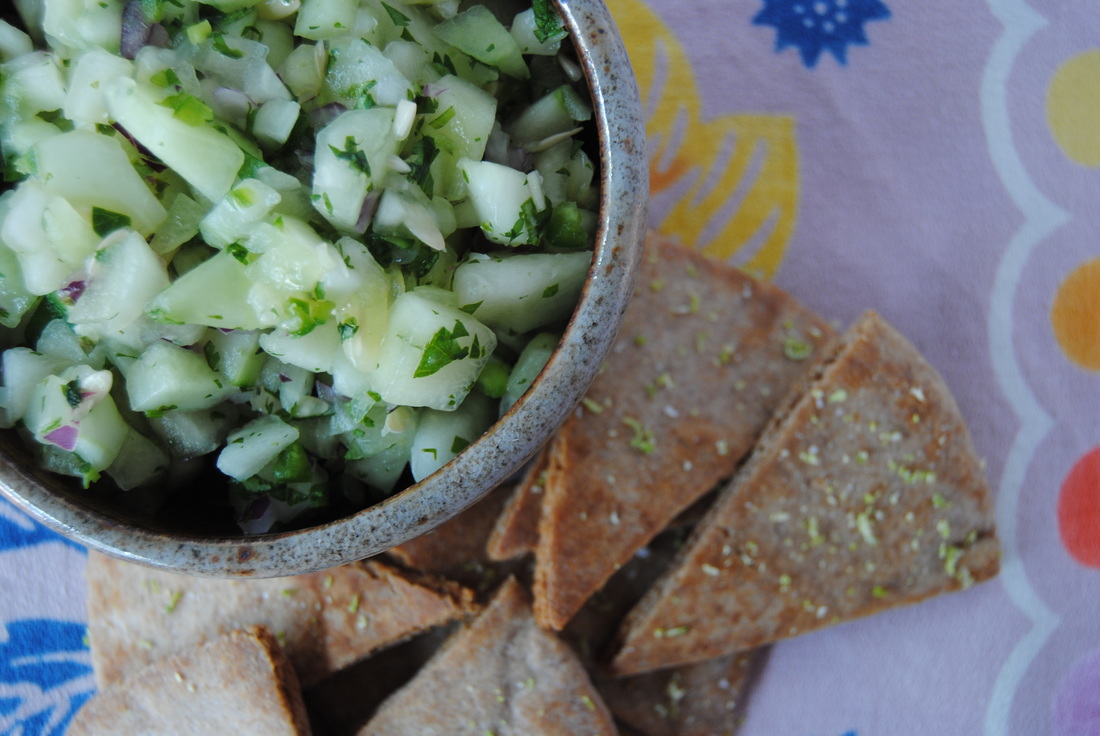
 We have a very special post for you this week friends because it was inspired by two loyal TGBK followers. One requested unique cucumber recipes to utilize all those garden spoils, and of course we couldn't disappoint! The other shared a family secret when she introduced us to the simple deliciousness of honeydew melon dressed in fresh lime juice. The two combined and inspired this fresh summer recipe that we just know you are going to love. And in the spirit of enjoying summer we will skip on the food education this week and get straight to the eats. 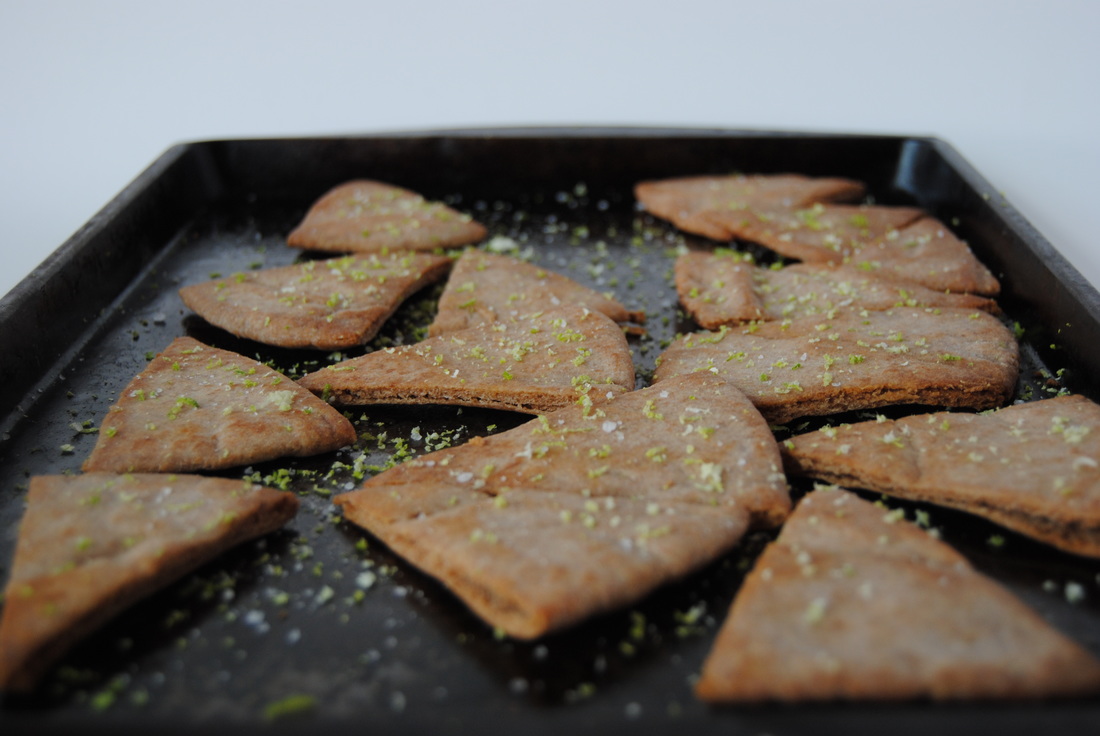 Cucumber Honeydew Salsa with Lime and Sea Salt Pita Chips PREP TIME: 25 minutes TOTAL TIME: 40-45 minutes with cooking time Servings: 8-12 (makes ~8 cups salsa) Ingredients Salsa 2-3 large cucumbers, ~4 cups chopped 1 small honeydew melon, ~4 cups chopped 1 small jalapeño pepper, ~1/4 cup diced 1/2 medium red onion, ~1/2 cup diced 1/2 cup fresh, chopped cilantro 1/4 cup fresh, chopped mint 2 organic limes (reserve peels for pita chips) 3/4 tsp salt Pita Chips 4 whole wheat pitas 2 Tbsp coconut oil 1 Tbsp lime juice Zest of 1-2 limes Sea salt to taste Begin by preparing the pita chips. Preheat oven to 350 degrees and cut each pita into 8 triangle shaped pieces using a pizza cutter. Place in a single layer on un-greased baking sheets. Combine liquid coconut oil and lime juice in a small bowl and brush onto both sides of each pita chip. Bake in preheated oven for 15-20 minutes until golden brown. Flip chips halfway through cooking. Remove from oven and sprinkle with sea salt and lime zest. While pita chips are cooking prepare salsa ingredients. Peel and chop cucumber into small squares. Discard honeydew seeds, remove melon from rind, and chop into small cubes. Finely dice jalapeño and red onion and chop cilantro and mint. Combine prepared ingredients in a large bowl. Add the juice of two limes and 3/4 tsp salt and stir well to combine. Allow to sit at room temperature 5-10 minutes prior to serving. Uneaten salsa can be stored in an airtight container in the fridge for 2-3 days though is best day of. Pita chips will keep well in an airtight bag or container for up to a week. Salsa can also be enjoyed as garnish for veggie burgers or sandwiches, on top of salad, or combined with garbanzo beans and feta cheese for a more complete meal. 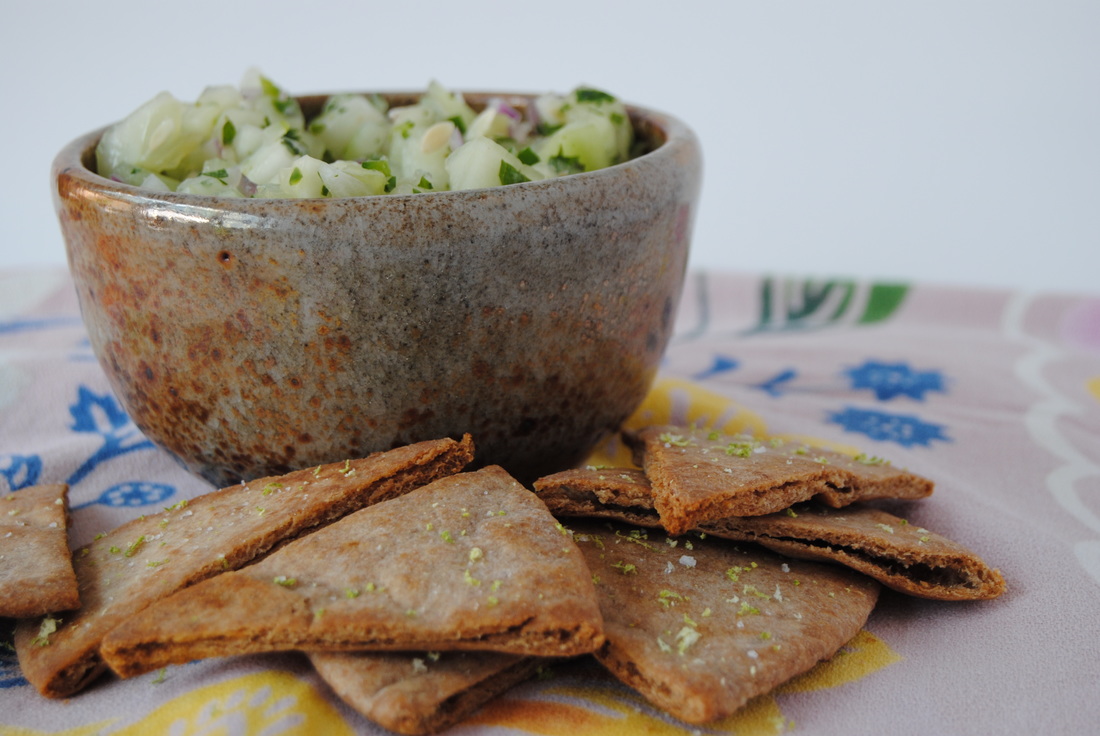 This salsa is a fresh flavor explosion and we think a perfect use for both cucumbers and honeydew. Being the same color they are difficult to tell apart in the recipe until you take a bite - the cucumber provides the fresh summer crunch we all crave and the honeydew with lime is a perfect sweet and sour flavor combination that can't quite be explained. Not to mention the lime and salt covered, perfectly toasted pita chips for dipping. And remember, this recipe is inspired by YOU. We'd love to hear more about what you like, love, and want more of from TGBK. Comment or contact us, we'll be waiting. Enjoy, Jess and Cecelia 
0 Comments
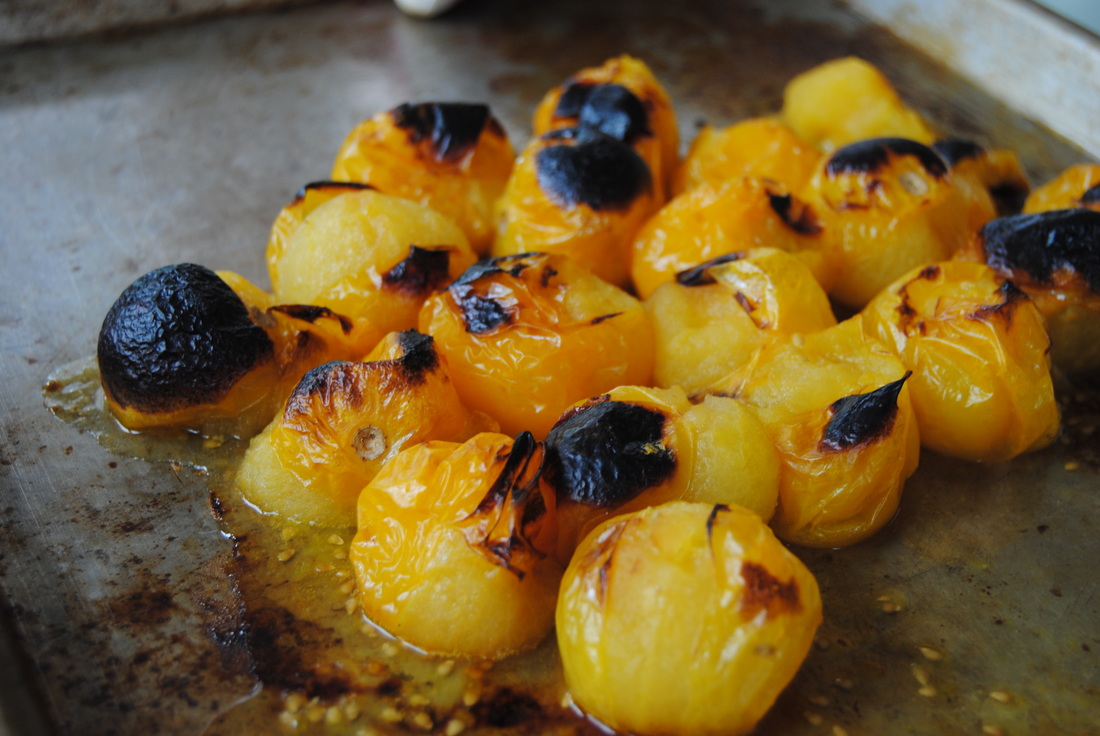
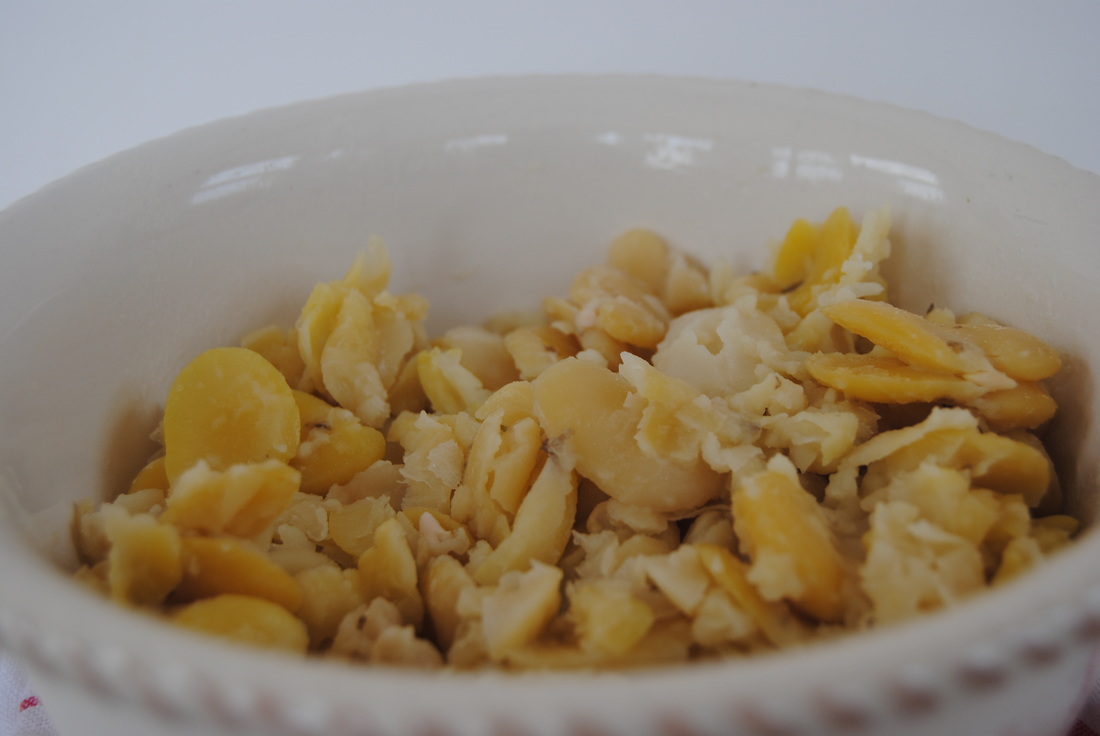
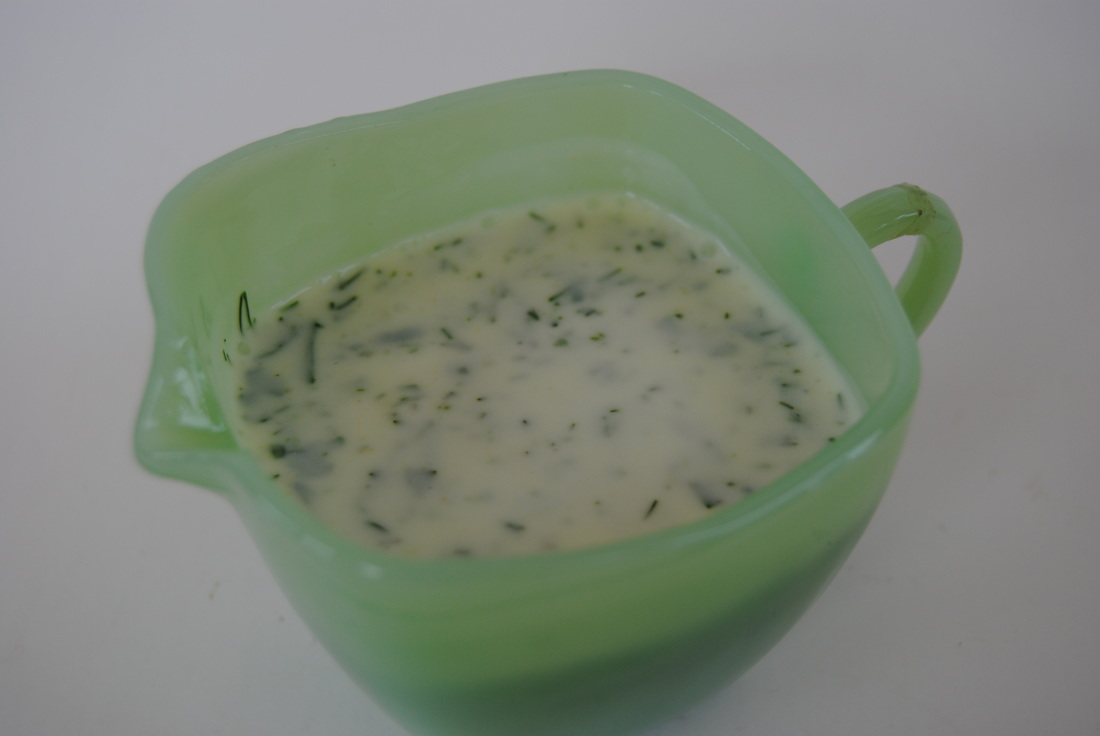
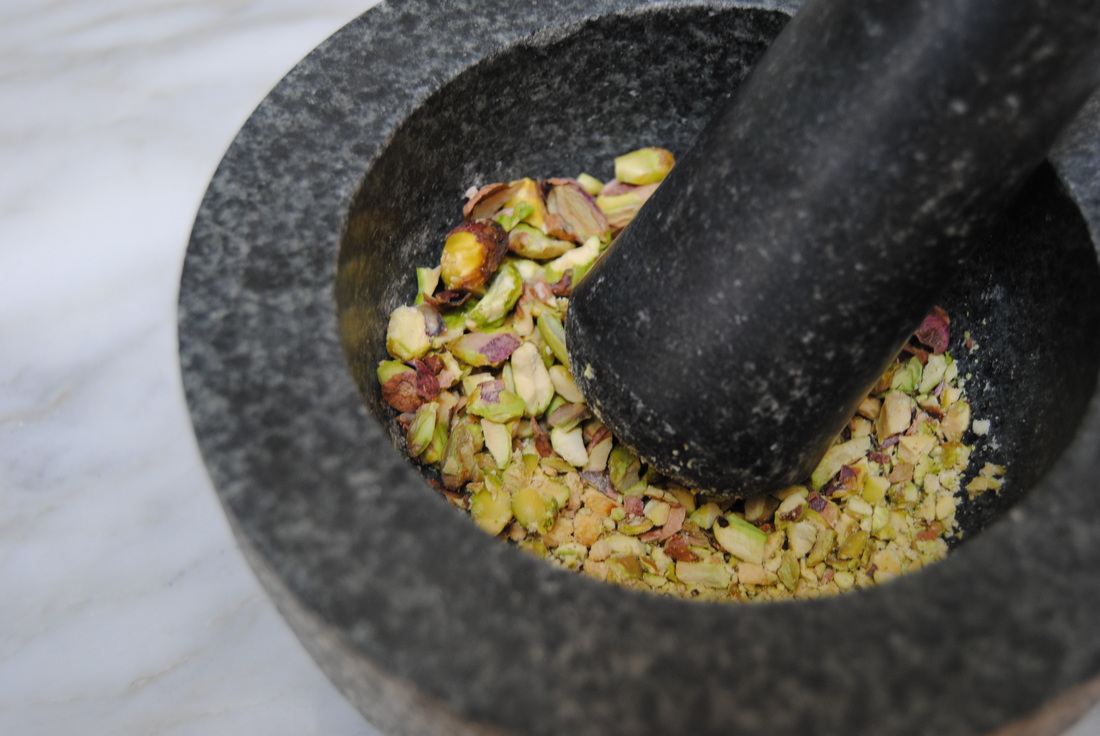
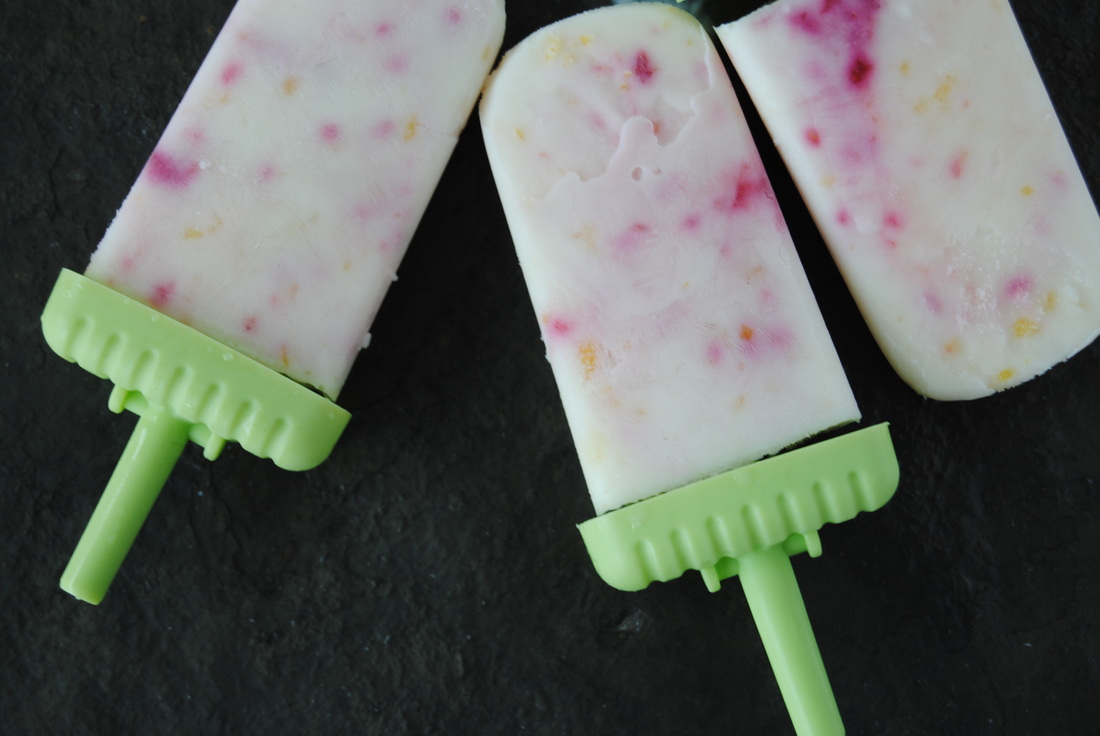 Of the many ways to stay cool during hot and humid August days, one of our all time favorites is enjoying frozen treats. Though often frozen treats are dessert (ice cream!) and provide mostly calories and added sugar without much nutritional benefit. Sometimes frozen yogurt is chosen as a healthier alternative but we are usually less than impressed with this lower fat (and lower taste!) option. But this doesn't have to be the case! With full fat yogurt products and the right flavorings, homemade frozen yogurt popsicles can and will be delicious. We are making frozen yogurt cool again with this recipe, join us! 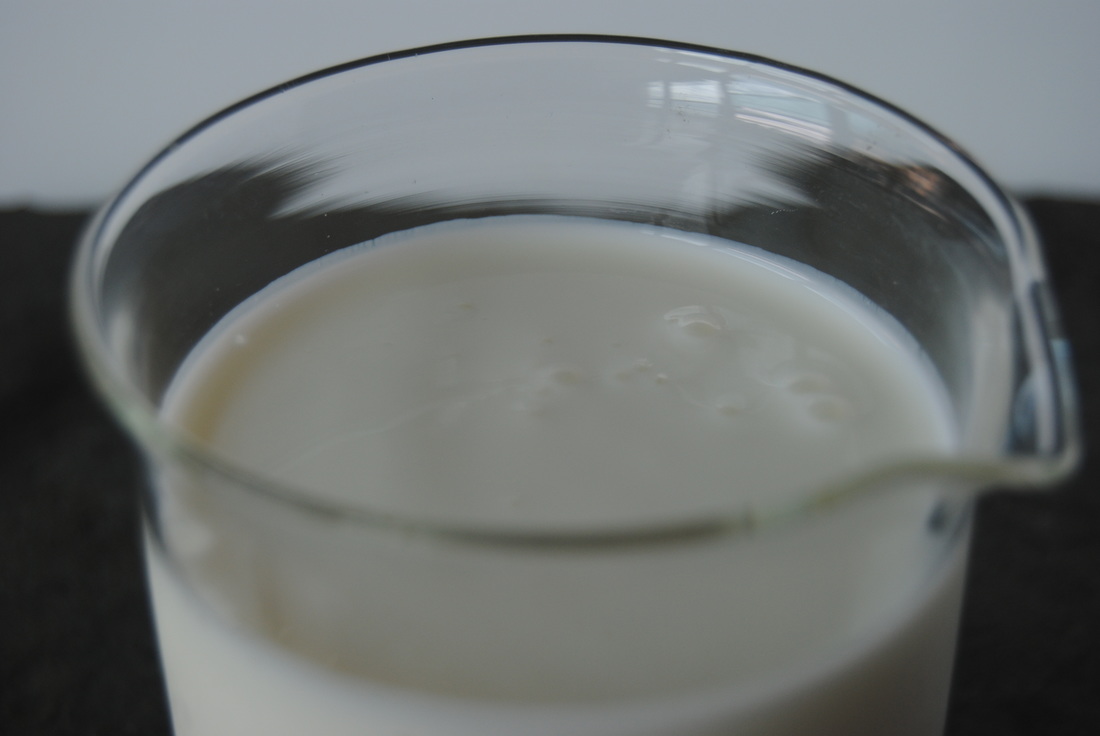 Our secret ingredient for this popsicle recipe is Kefir - a probiotic beverage made from milk and kefir grains. So you are now probably wondering, what are kefir grains? Kefir "grains" are not actual grains such as wheat, rye, or barley but are referred to as grains because of their similar appearance and size. Kefir grains contain bacteria and yeast that work together to culture dairy milk or coconut milk creating a finished fermented product loaded with gut friendly probiotics. Dairy kefir is also a great source of protein with eight ounces containing eleven grams of protein to help keep you satisfied until your next meal. Dairy kefir is also a great source of calcium with an eight ounce serving containing 30% of your daily calcium needs and is very low in lactose making it a better dairy option for people who are lactose sensitive. Plain dairy kefir has a slightly sour/tangy flavor similar to yogurt and can be used in a variety of ways. We love kefir to drink plain, in smoothies, chilled soups, and frozen into popsicles as we did in this recipe. And not to worry, those amazing probiotics will survive freezing! They will become dormant when frozen but re-activate after consuming to provide the many benefits of probiotics to your gut. Also, a note that we chose full fat kefir for this recipe. We find the full fat option to be the richest and tastiest, so perfect for a frozen treat. Full fat dairy in general provides a balanced dose of both diary protein and fat in its natural state, meaning less processing (yay!) and more satisfying. And despite historical nutrition recommendations to chose skim and low-fat dairy, current research has not shown improved outcomes to support this recommendation. This makes sense to us - the less you mess with the natural form of a food the better. Except of course when you ferment something and make it a probiotic containing superfood like kefir! So let's get to making those kefir popsicles shall we? 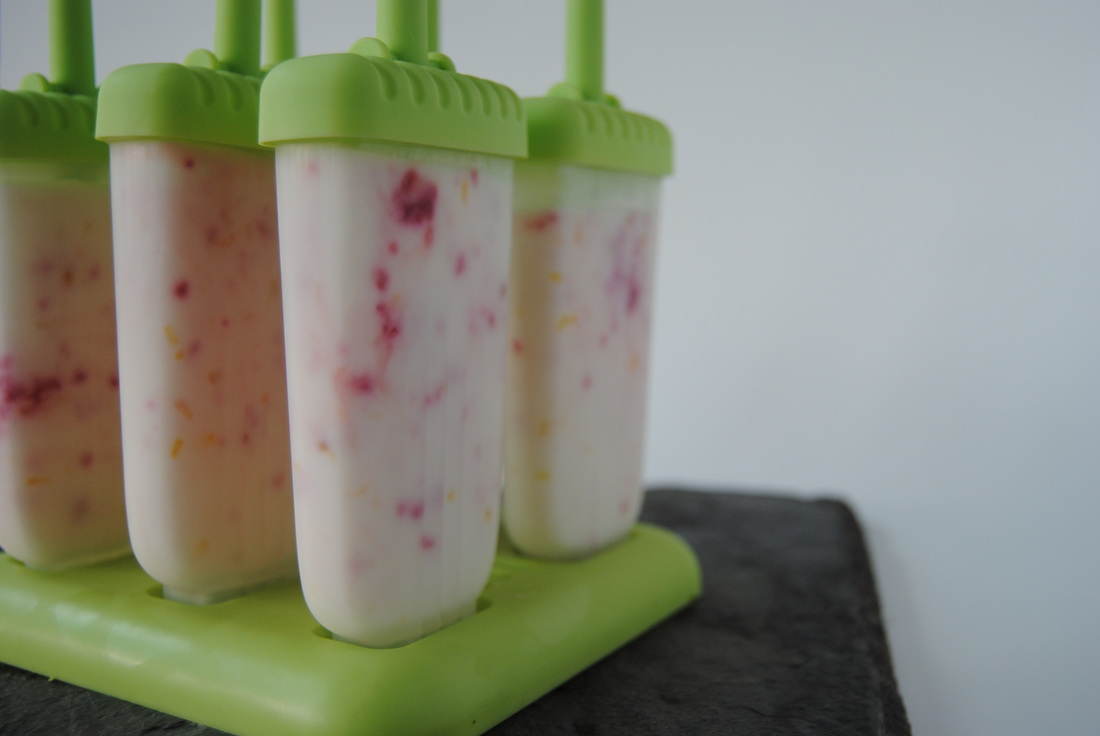 Sour Raspberry Kefir Popsicles PREP TIME: 10 minutes (+ 4 hours freezing time) TOTAL TIME: 15 minutes Servings: 6 popsicles Ingredients Flavored kefir 8 oz plain whole milk kefir 4 oz plain whole milk Greek or Icelandic yogurt 3 Tbsp raw honey (regular honey or light maple syrup will also work) 1 oz fresh ginger juice Zest of 1 medium organic lemon, ~2 tsp Sprinkle of sea salt Raspberry swirl 1/4 cup fresh or frozen raspberries, thawed 1 Tbsp raw honey (regular honey or light maple syrup will also work) 2 tsp bee pollen (optional) In a medium bowl, mix together kefir and yogurt. Stir in honey, ginger juice, lemon zest, and salt then set aside. To make the raspberry swirl, add the raspberries, honey and bee pollen to a small food processor and whip to combine. If you do not have a small food processor mix by hand using a whisk. Please note, you may need to add 1-2 tsp of water to thin the raspberry puree slightly. Evenly pour ~2 tsp raspberry puree into each popsicle mold and top with kefir mixture. As you pour the kefir you should notice the raspberry sauce begin to swirl throughout the popsicle, if not you can swirl by hand with a thin utensil (knife, chopstick etc.). Place popsicle stick into each pop and freeze according to popsicle mold directions. Run molds under hot water to easily remove popsicles once frozen. 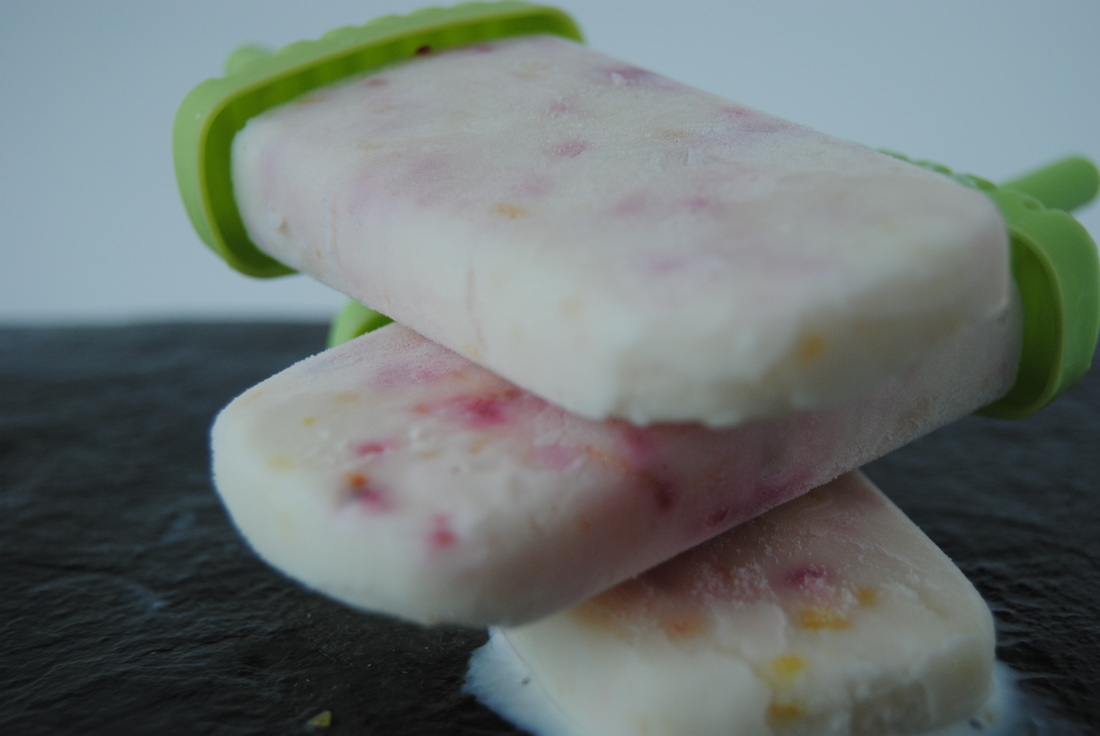 Frozen yogurt is making a comeback with these popsicles! So rich and filling from the kefir and with an amazing balance of sweetness and tang from the lemon, ginger and fresh raspberry swirl. You can bet that our freezers will be stocked with these for the rest of the summer season. And as you enjoy this recipe make sure to share the good news about full fat dairy - it's cool again too. Stay cool, Jess and Cecelia 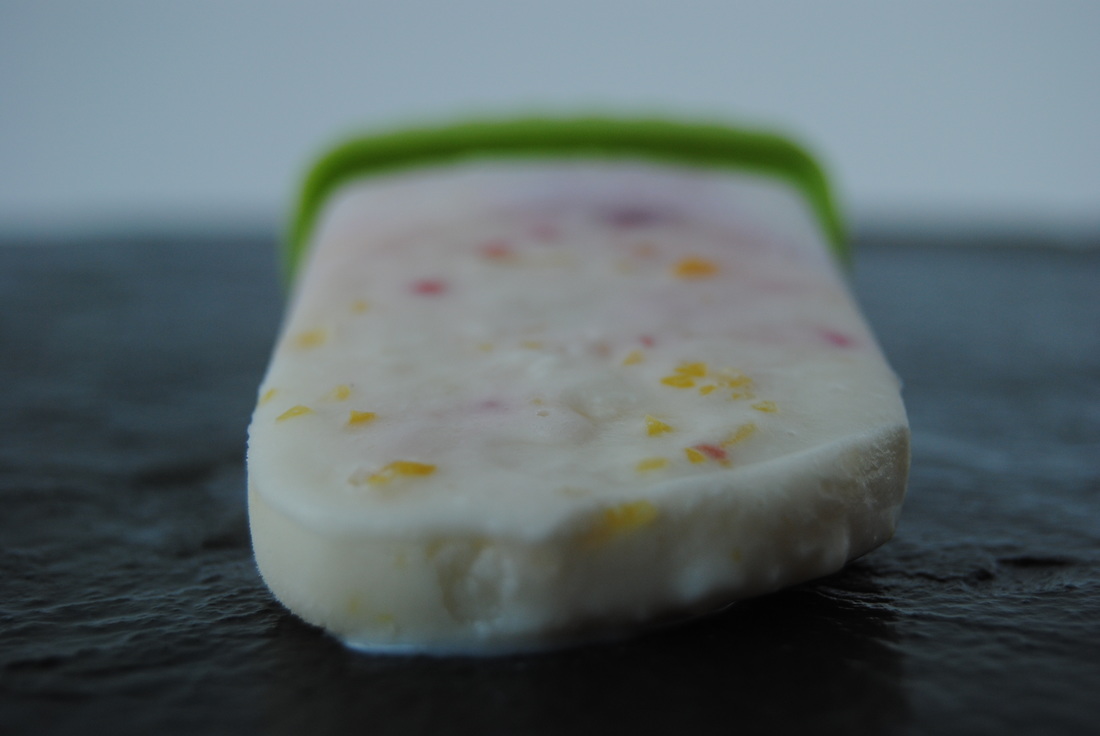 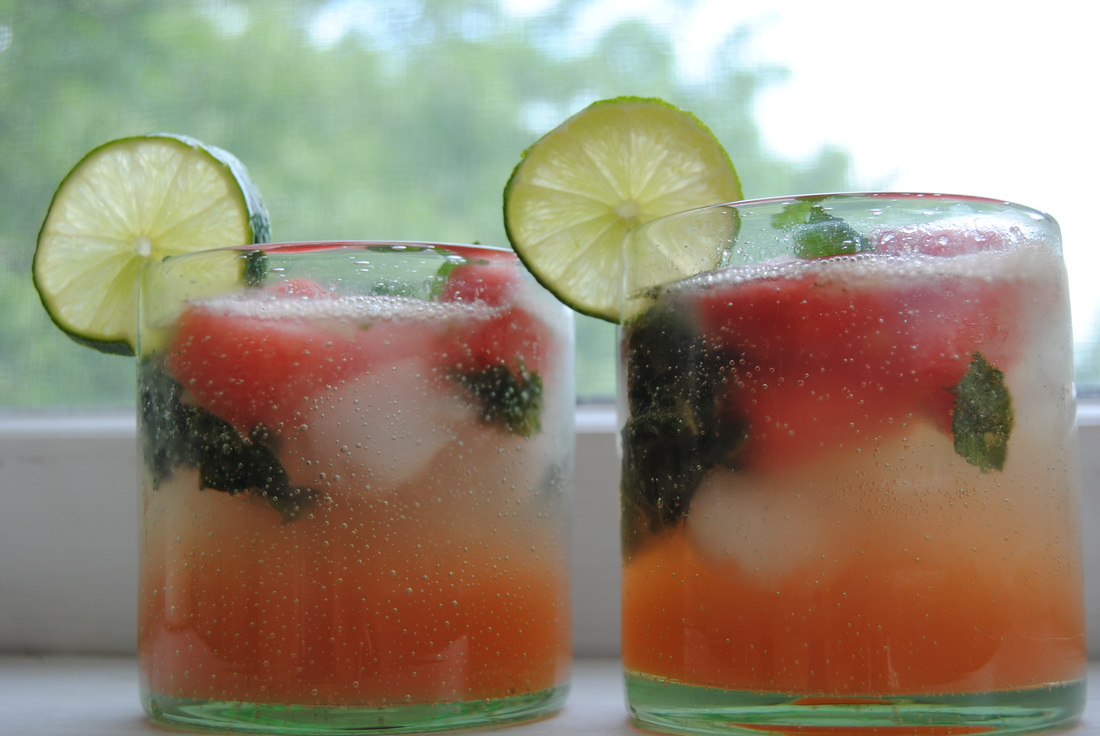 We can just about bet that these long summer days and warm nights have you craving some fresh adult drinks. If we're right than this recipe is for you! We've combined one of our favorite staple drinks with fresh produce of the season and a Caribbean twist. Thirsty? Read on! 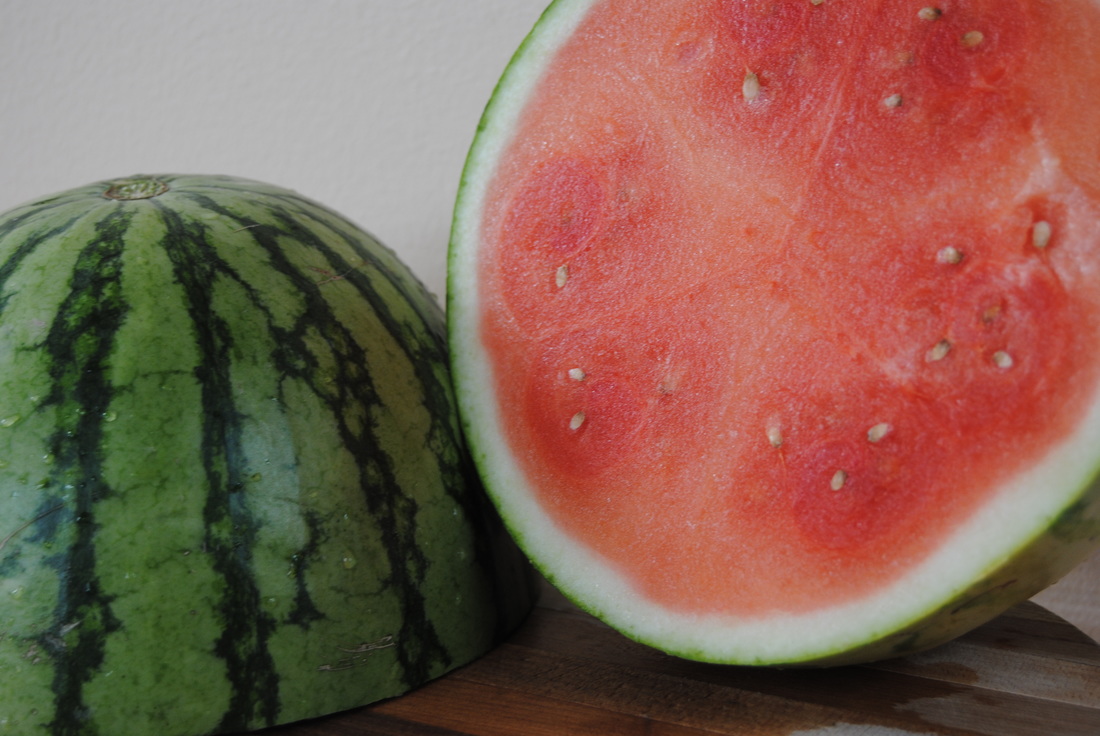 As you'll see, this recipe features fresh watermelon juice and takes some preparation and time. And we know that drink mixers can be enticing for just this reason. But we're asking you to drop that drink mixer! Widely available in every different combination, mixers may seem like a no-brainer. Though many drink mixers on the market today have high fructose corn syrup, artificial flavorings, preservatives, and artificial dyes. And calorically speaking these mixers can add up pretty quickly because of all the added sugar. Even adult beverages can have nutritional benefit, instead of sugary excess, when prepared with fresh pressed juice and whole food ingredients. Because summer drinks should be fresh, refreshing, and packed with the flavors (and nutrients!) of the season. 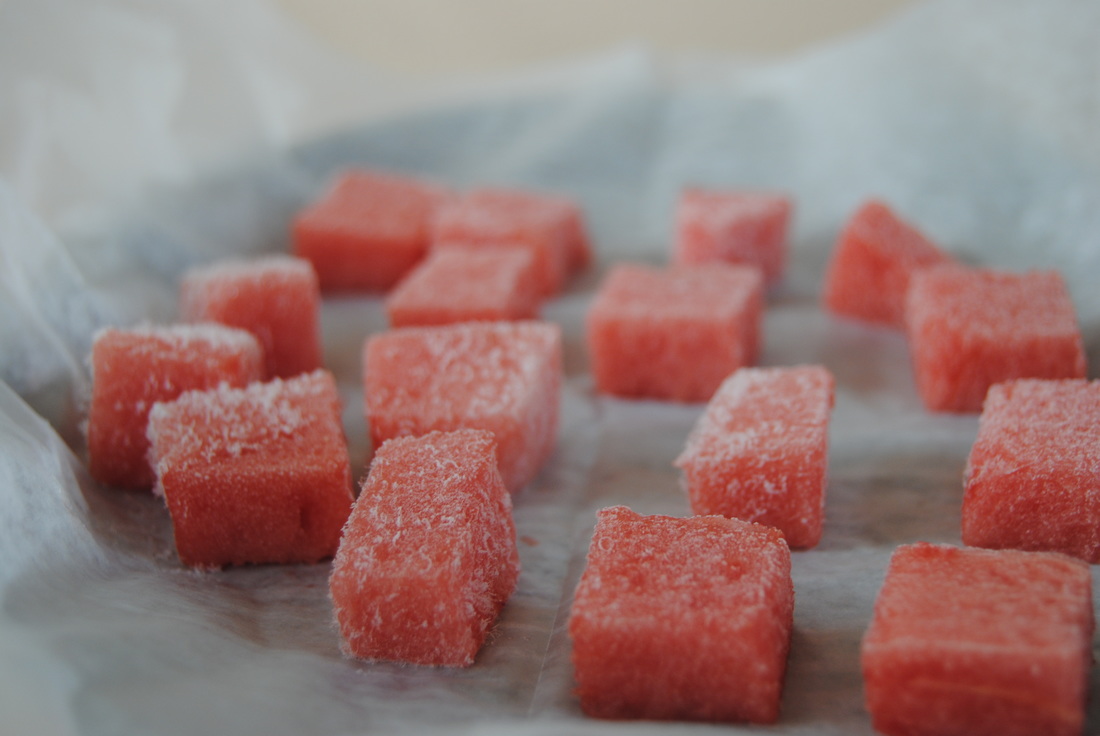 Watermelon Coconut Mojitos PREP TIME: 30 mins (includes freezing time) TOTAL TIME: 35 mins Servings: 4 Ingredients Mojitos 12 oz fresh watermelon juice 8 oz coconut rum Juice of 4 limes 20 large mint leaves 4 Tbsp simple syrup 12 oz sparkling water 1 cup 1" cubed watermelon, frozen 4 thin slices of lime for garnish Simple Syrup 1/4 cup cane sugar 1/4 cup water Cut watermelon into 1" x 1" cubes and place on wax paper in the freezer to chill for ~25 minutes. Using a juicer*, juice 1.5 cups (12 oz) watermelon juice. To make the simple syrup combine equal parts cane sugar and water in a small sauce pan on medium-high heat. Bring liquid to a gentle boil making sure to stir constantly then reduce to a simmer. Allow mixture to simmer for 8-10 minutes or until liquid becomes syrup-like and sticks to the back of a spoon. Remove from heat and allow to cool to room temperature. Using a mortar and pestle, muddle the mint leaves until fragrant then set aside. Using a drink shaker, combine 3 oz watermelon juice, 2 oz coconut rum, juice of 1 lime, 1 Tbsp simple syrup, 1/4 of the mint leaves, and a handful of ice. Shake vigorously until fully chilled. Pour into a glass and top with 2-3 oz sparkling water and 1/4 cup cubed frozen watermelon. Garnish with a slice of lime and a sprig of mint. Repeat process to make all four drinks. *If you do not have a juicer you can blend the watermelon in a high speed blender and strain through a fine sieve to catch any pulp. 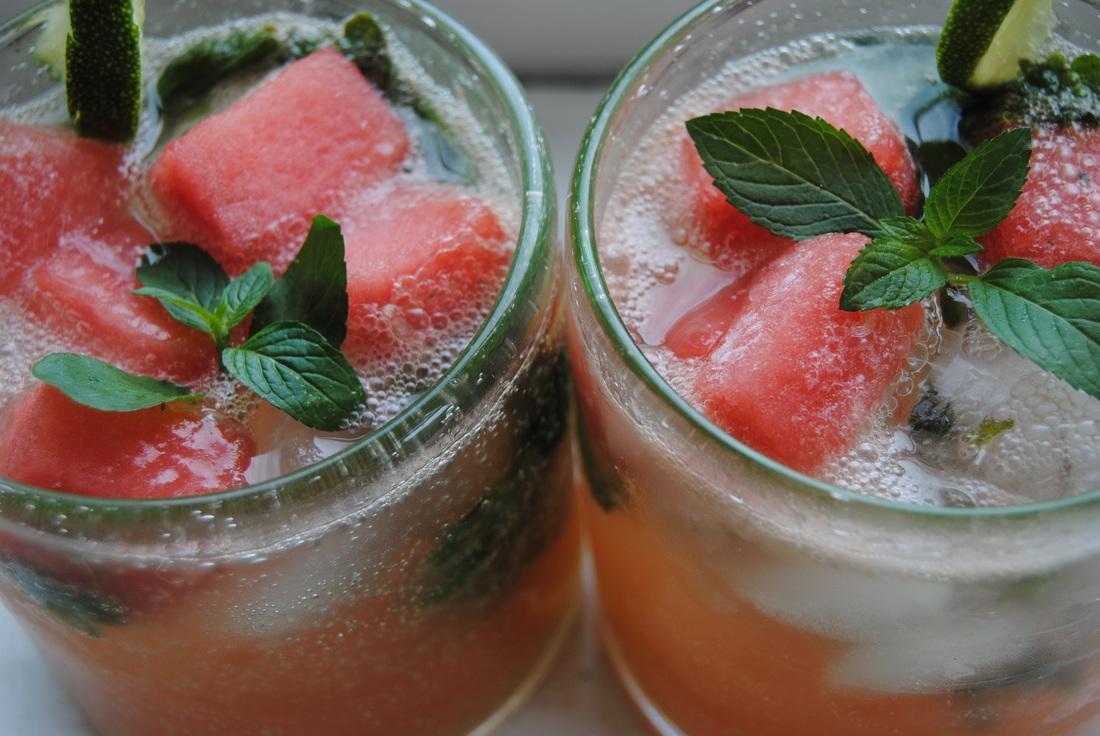 Ahhhhhh. One sip and you'll be transported to a lounge chair in the sand gazing at clear blue waters even if you're really sitting with your feet up in the living room. This drink is the perfect combination of mint and lime like a traditional mojito, with a unique sweetness from the fresh watermelon, and a warm, tropical finish from the coconut rum. Once you've tried this one we know it will be a favorite for the rest of your glorious summer. Cheers, Jess and Cecelia 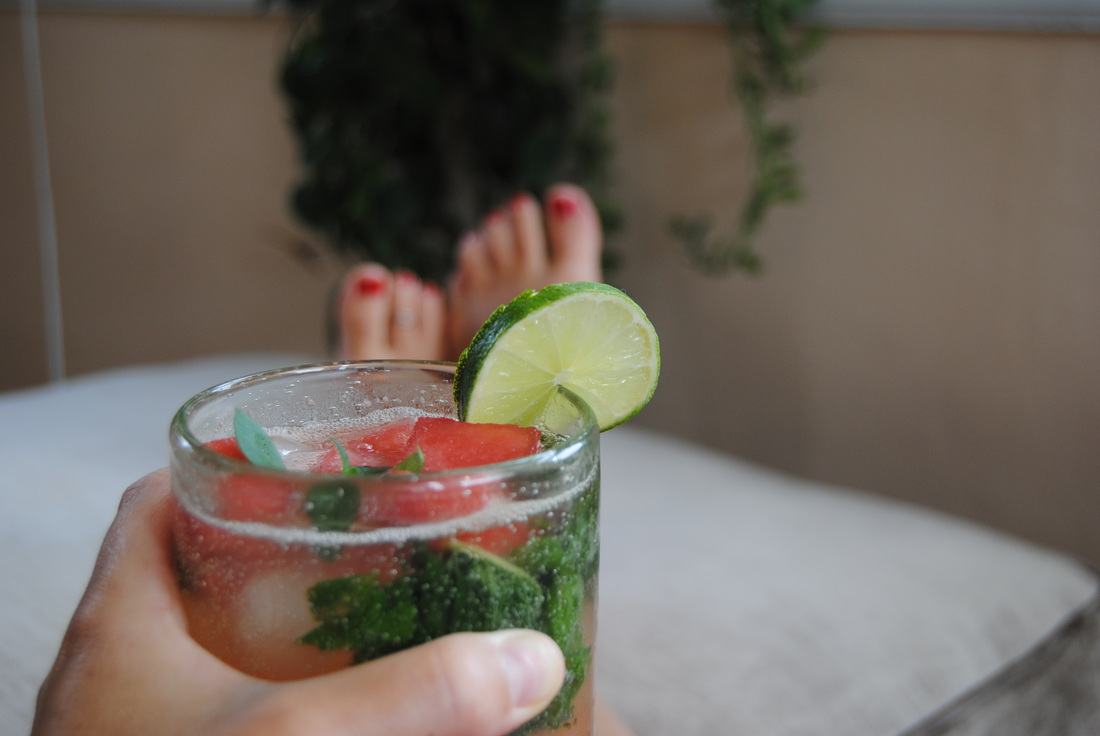 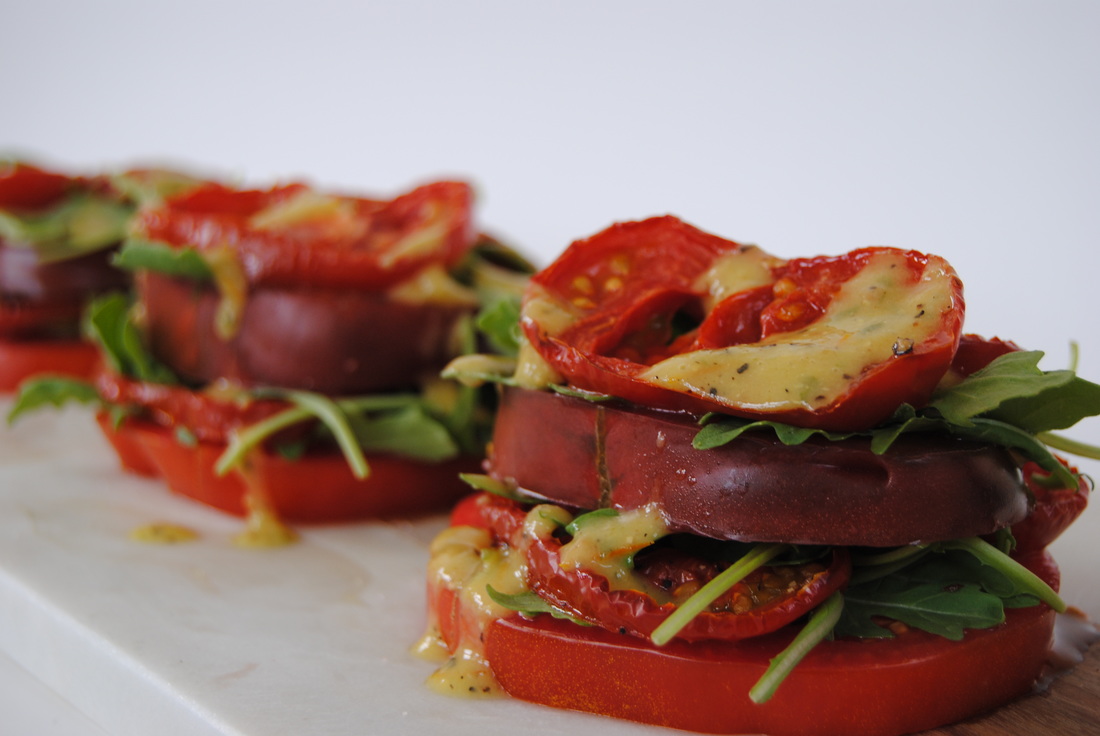 Oh happy day! It's tomato season again friends and we just couldn't be happier. There are truly few things better than a fresh, local, sun-ripened tomato in the middle of summer. You may remember our love of tomatoes from this post last year, but if not we have plenty more tomato fun where that came from. This year we're pulling out all the stops and preparing four different types of tomatoes in three different preparations. How? Read on to find out!  You may also remember from another post last summer our love for eating local. So we hope that this current post is a reminder to get to your local farm stand, farmers market, or grocer with local produce ASAP. This is the time for fresh, local produce and we don't have to remind you that it doesn't last long at this latitude. Or maybe even hit up that friend or neighbor with an abundant garden if they are willing to share. Fresh produce just can't be beat in terms of quality, nutrient density, and most of all taste! This week we've scoured Chicago and come up with four varieties of local tomatoes: Black Krim, Better Boy, Beefsteak and Yellow Cherry tomatoes. Any varieties of tomatoes that you like will work though, just adjust the portions you use accordingly. Stacked Tomato Salad PREP TIME: 30 mins TOTAL TIME: 35 mins Servings: 2 Ingredients Salad 1 large Black Krim tomato (or any heirloom) 1 large Beefsteak tomato (or any large, red variety) 2 medium-large Better Boy tomatoes (or any medium, red variety) 1/2 cup baby arugula 1 Tbsp extra virgin olive oil Sprinkle of salt and pepper Vinaigrette 1/2 pint yellow cherry tomatoes (~5 ping-pong sized tomatoes, can be any variety) 1/4 cup extra virgin olive oil 1.5 tsp raw apple cider vinegar 1.5 tsp fresh lemon juice 1 tsp stone ground mustard 1 Tbsp chopped fresh basil salt and pepper to taste Preheat oven to 350 degrees. Slice Better Boy tomatoes into half inch thick slices and place on a parchment lined baking sheet. Drizzle 1 Tbsp olive oil and a sprinkle of salt and pepper over the top of the tomato slices and roast in the oven for ~25 minutes or until candied. Remove tomatoes from the oven and allow to cool. Meanwhile, turn oven to broil and place cherry tomatoes on a baking pan under the broiler for 10-12 minutes or until well charred with a generous amount of blacked skin. Note that while broiling the cherry tomatoes they will begin to pop open - this is expected given the high heat. Removed charred tomatoes from the oven and place tomatoes and their juices in a blender or food processor along with the olive oil, vinegar, lemon juice, mustard, basil, salt and pepper for the vinaigrette. Blend ingredients on high until a smooth consistency is formed and set aside. To assemble the salad, slice the Black Krim and Beefsteak tomatoes into 1/2 inch slices. Layer 1 slice of Beefsteak tomato, 2 slices of roasted Better Boy, and 1 slice of Black Krim tomato on top of each other. Place baby arugula in between each tomato layer. Repeat with the remaining tomato slices and arugula. This should make 3-4 stacks about 3-4 layers thick. Sprinkle the top with salt and pepper to taste and drizzle charred tomato vinaigrette over the top of each stack. Serve as is or enjoy with thick sliced bread. We chose a seeded fennel anise bread from our local farmers market. Extra dressing can be stored in an air tight container in the fridge for ~1 week. 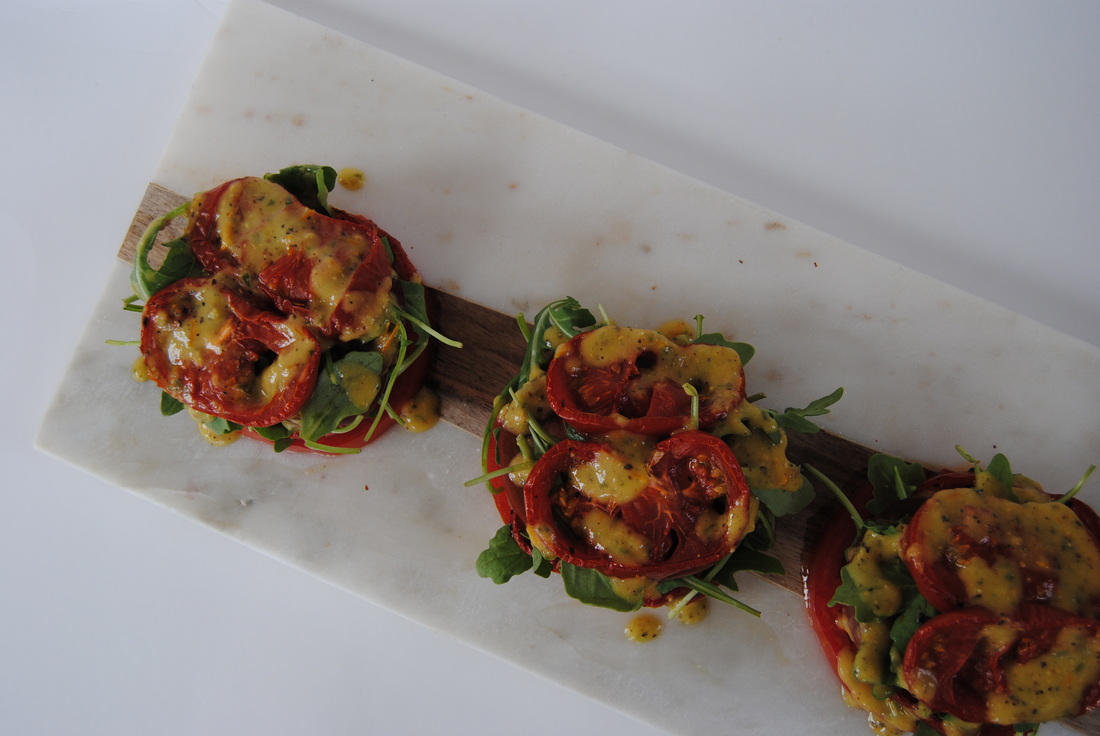 This salad is just so, summer. Each preparation highlights the tomato in a unique and exciting way. The charred vinaigrette is smokey and bold, the roasted tomatoes have a depth of tomato flavor and a perfect sweetness, and the fresh tomatoes are juicy and well, fresh! With this recipe you'll never have to think twice about buying an extra tomato (or four!) while they are abundant this season. Enjoy, Jess and Cecelia   Refreshing drinks are a staple on hot summer days and one of our ultimate favorites is a tall, frosted glass of iced coffee. We've noticed that cold brew has become the new coffee drink recently and wanted to give it a try ourselves. After learning more about this brewing method and loving the results we just had to share this one with you friends! 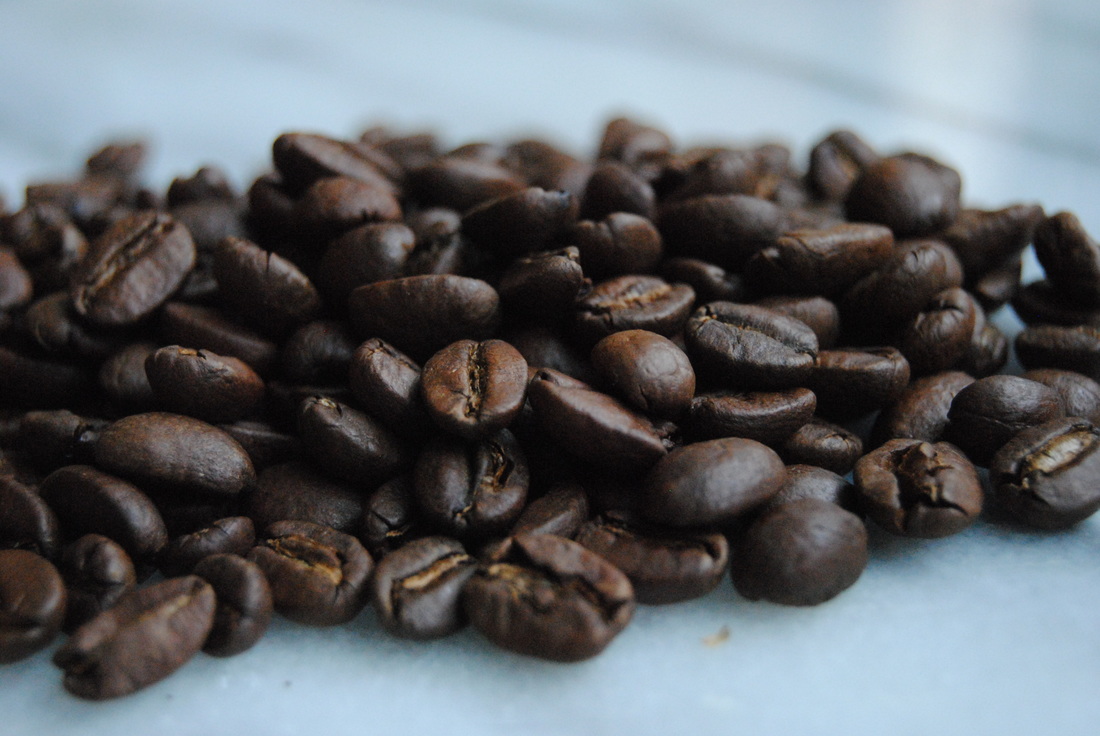 Cold brew is popping up everywhere which might make you ask, like we did, what the difference is between cold brew coffee and regular iced coffee. The answer is A LOT! Cold brew coffee is brewed with patience...literally 10-12 hours of soaking coarsely ground coffee beans in cold or room temperature water to extract the flavor, oils, and caffeine of the beans. This long soaking time is what gives cold brew coffee its distinct smooth, semi-sweet, chocolatey flavor. Cold brew's temperature along with its long extraction process verses quick, traditional hot coffee extraction naturally decreases the acidity in the final cup of coffee. This is wonderful news for anyone who may shy away from coffee because of acid reflux or upset stomach following coffee consumption. The ratio of grounds to water in cold brew is higher than that of traditional hot brewed coffee which leads to a higher concentration of caffeine in cold brew, meaning good news for caffeine lovers (guilty!). Cold brew is often enjoyed with creamer, milk, and whipped cream, as shown in our pictures. So if you're ready to change up your coffee game this summer, let's hit the recipe! 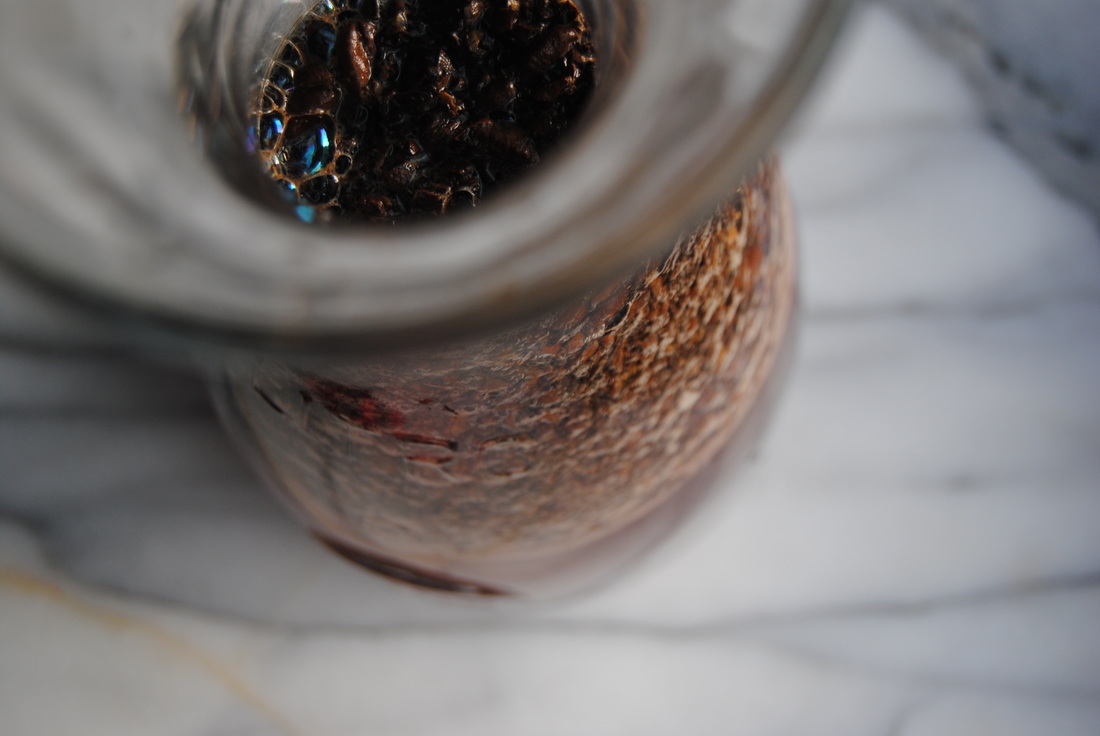 Cold Brew Iced Coffee PREP TIME: 10 mins + 10-12 hour soaking time TOTAL TIME: 15 mins + 10-12 hour soaking time Servings; Makes 4 cups of strong cold brew Ingredients Cold Brew 1 1/3 cups ground coffee (we used La Colombe Nizza) 4 cups room temperature or cold water Glass jar (make sure it will fit 6-8 cups; 1.5-2.0 quarts) Coffee filter + string or rubber band Fine mesh strainer or cheese cloth Minty Coconut Whipped Cream 1 can (13.5 oz) full fat coconut milk 2 Tbsp fresh chopped mint 2 Tbsp pure cane sugar 1 Liter whipped cream canister + N2O cartridge Using a coffee grinder, grind coffee to a coarse grind. Measure out 1 1/3 cups coffee grounds and add to a glass jar with 4 cups room temperature or cold water. Make sure that all the grounds are completely submerged in the water. Place a coffee filter on top of the jar and secure with a string or rubber band. Allow to sit out at room temperature for 10-12 hours. Once coffee is done soaking, remove coffee filter from the top and strain coffee through the cheesecloth or a fine mesh strainer making sure to not allow any of the grounds to come through. Pour cold brew over ice and top with whipped cream (our recipe below) or creamer of your choice. Cold brew can be stored in an air tight container in the fridge for 1-2 weeks. To make homemade coconut whipped cream, combine full fat coconut milk, 2 Tbsp cane sugar, and chopped mint in a bowl and whisk until combined. Add liquid to whipped cream canister, screw on the lid, and charge with N2O cartridge. Allow to cool in the fridge for at least 30 minutes prior to using. Whipped cream can be stored in the fridge for 5-7 days. Store bought, traditional whipped cream is also fine to use if you don't own a whipped cream canister. Note that coconut milk will not whip into whipped cream using a hand beater like heavy cream will. 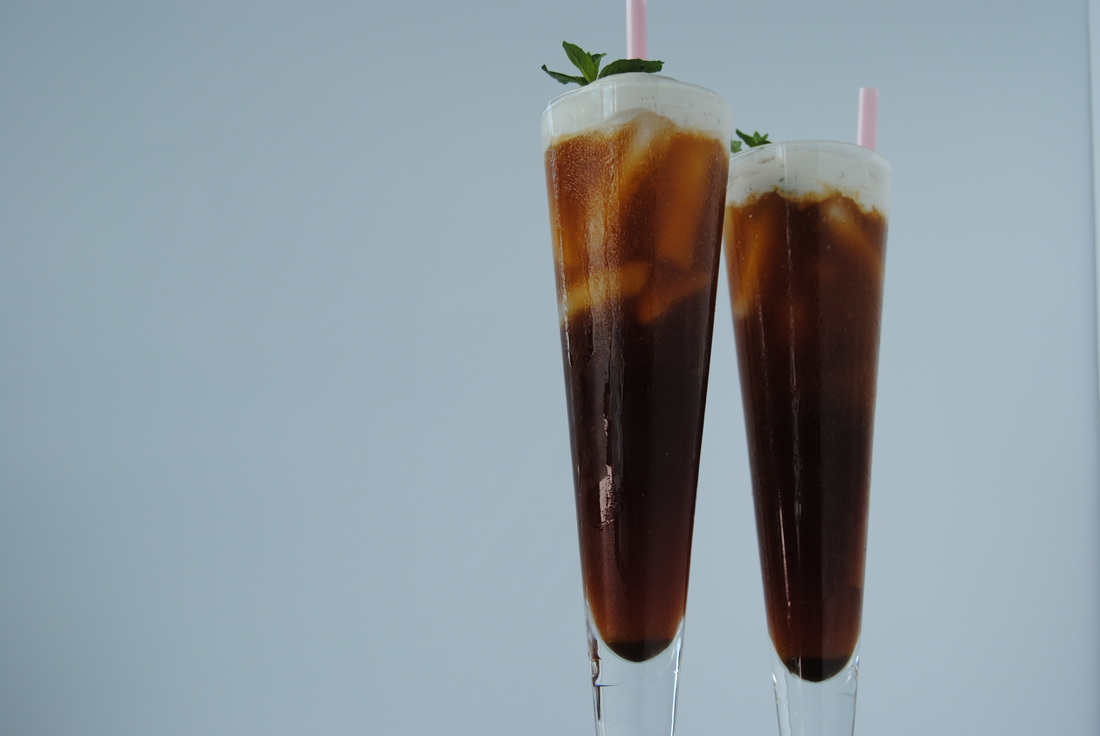 Cold brew is going to be your new summer favorite once you give this a try. The taste is so full and smooth and pairs perfectly with our rich, minty whipped cream. And while those bean soak for hours, put your feet up and enjoy the long, lazy days of summer. This brew is for you, Jess and Cecelia 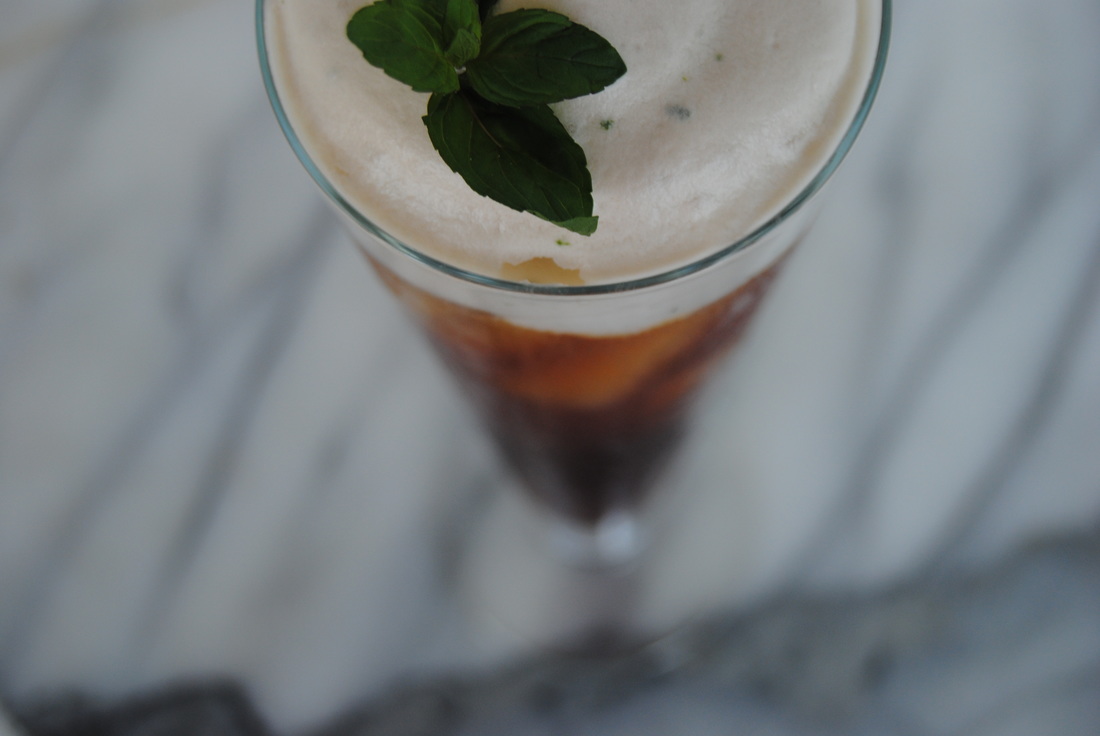  We got to wondering this past week why peas get such a bad reputation. Maybe it's because of their traditional presentation as overcooked, off-color mush next to a steak and potatoes dinner. Well not in this kitchen! We are elevating peas back to their rightful (and sexy) place in our diets with this week's recipe. We swear you'll never think of peas the same again. 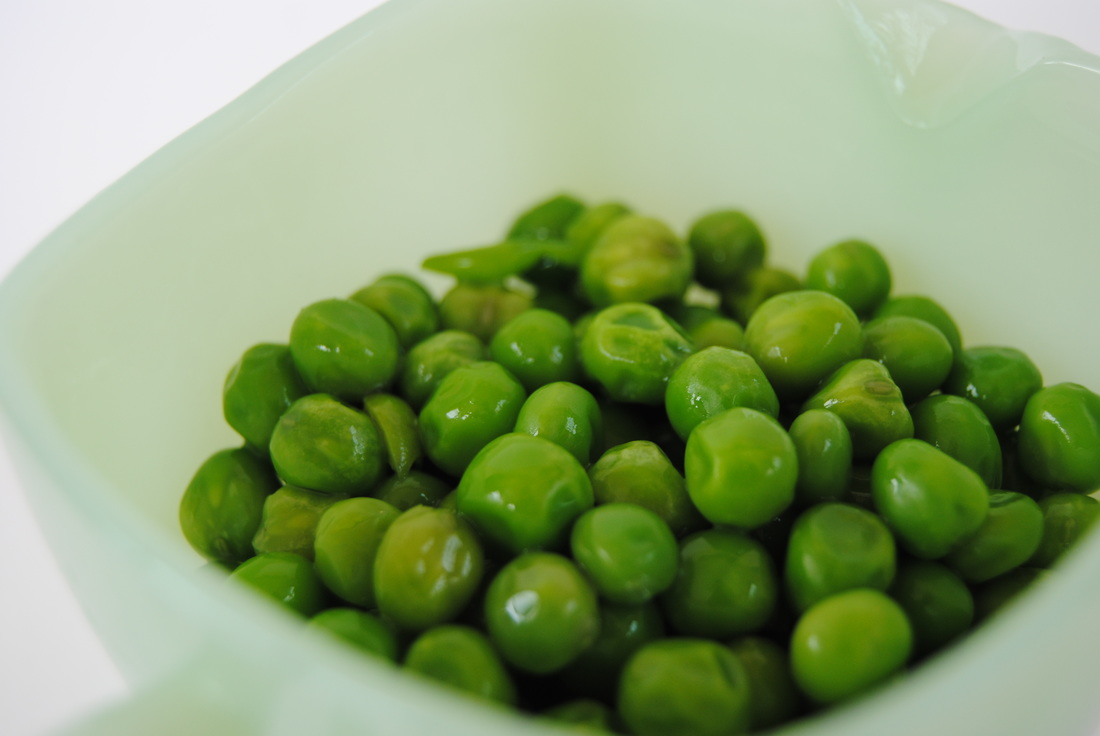 The first problem we've found with pea preparation is that they are often served cooked, when really we find them to shine when served raw. Now there are many varieties of peas but what we are referring to this week are "green peas" also known commonly as garden, English, or pod peas and not to be confused with snow peas or sugar snap peas which are served in the pod. Green peas should be removed from the pod, or shelled, and can be served raw or cooked though we much prefer raw. Peas are sweet and starchy and when raw have a nice firm texture similar to grapes. And though commonly thought of as a vegetable, peas are high in complex carbohydrate and nutritionally more similar to corn or potatoes. During the spring and early summer peas can be found raw in the pod or pre-shelled and are very easy to find frozen year round. When using frozen peas we suggest steaming until just thawed because once cooked they can start to become off color and mushy, which is fine if that's what you like but we prefer our peas on the sexy side. Yes, peas are sexy. Don't believe us? On to the recipe... Spring Pea and Fava Bean Salad PREP TIME: 45 mins + 8-12 hour soaking time TOTAL TIME: 50 mins + 8-12 hour soaking time Servings: 4 Ingredients Salad 1 cup green peas, shelled (fresh or frozen) 1/2 cup dry shelled fava beans (1 cup cooked) 1 Tbsp olive oil 1/8 tsp sea salt 1/8 tsp cracked black pepper 5 oz butter lettuce 1/2 cup bean/vegetable sprouts of choice 1/4 cup grated cotija cheese (or fresh grated parmesan) Dressing 1/2 cup whole milk plain kefir 2 tsp chopped parsley 1 tsp chopped dill 1 tsp lemon juice 1/4 tsp garlic powder 1/4 tsp sea salt Cracked black pepper to taste Begin by pre soaking dried shelled fava beans for at least 8 hours, or overnight, in room temperature water. Once the beans have soaked, drain and add beans to a large pot and cover with water. Bring water to a boil, reduce to a simmer, and slightly cover with a lid allowing a little air to escape. Continue to cook the beans until tender but not falling apart ~40-50 minutes. Carefully drain beans then add 1 Tbsp olive oil, 1/8 tsp sea salt, and 1/8 tsp cracked black pepper and set aside to come to room temperature. If using frozen peas, allow to thaw by letting them sit out while the fava beans are cooking, or lightly flash steam until soft in texture ~2 minutes in a basket steamer and allow to cool to room temperature. If using fresh peas make sure to rinse peas well then set aside. Meanwhile, to make the dressing combine kefir, chopped parsley, chopped dill, lemon juice, garlic powder, sea salt, and pepper. Mix dressing with a fork until fully combined. Wash and tear butter lettuce and divide among 4 plates. Wash and dry sprouts and add to each plate. Add cooled fava beans, peas, and cheese to each salad. Generously add dressing to the top of each salad. Serve and enjoy! 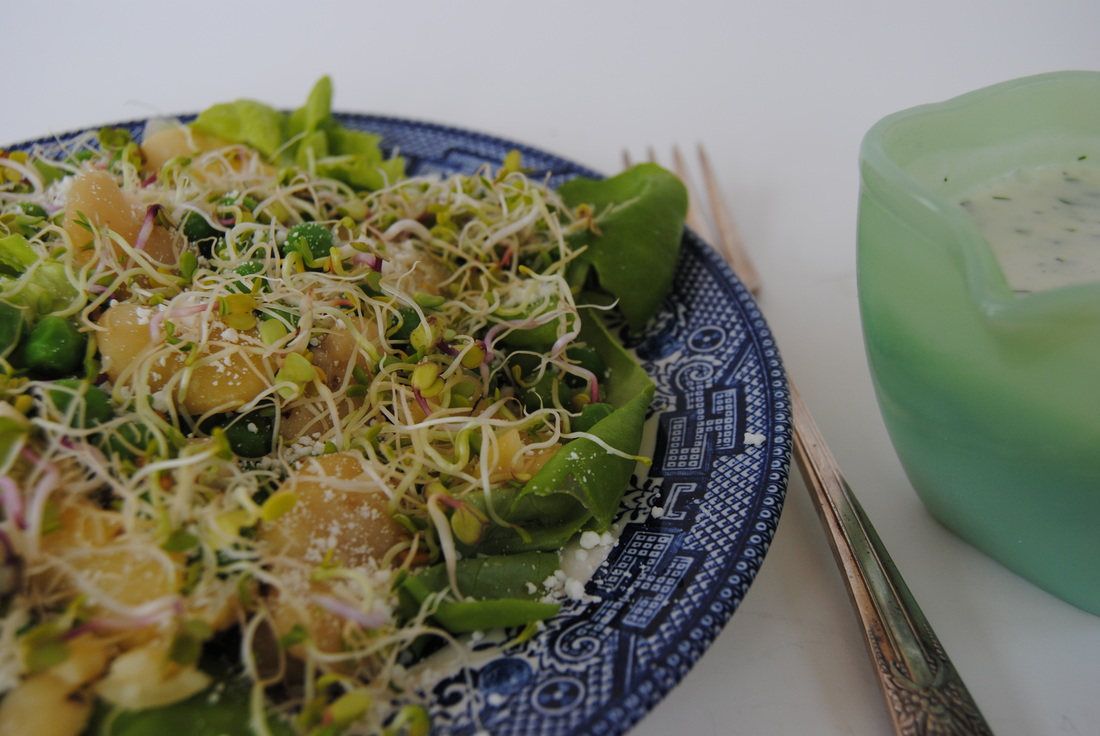 Okay so you get it now? Peas are amazing! And they deserve a spot in our kitchens and diets. Not to mention this salad which is basically spring perfection with the fresh crunch from the butter lettuce and sprouts, satisfying starchiness from the peas and fava beans, and all topped with salty cheese and a too good to be true "ranch" style dressing. So join the pea revolution and spread the word starting with this recipe. Stay sexy, Jess and Cecelia 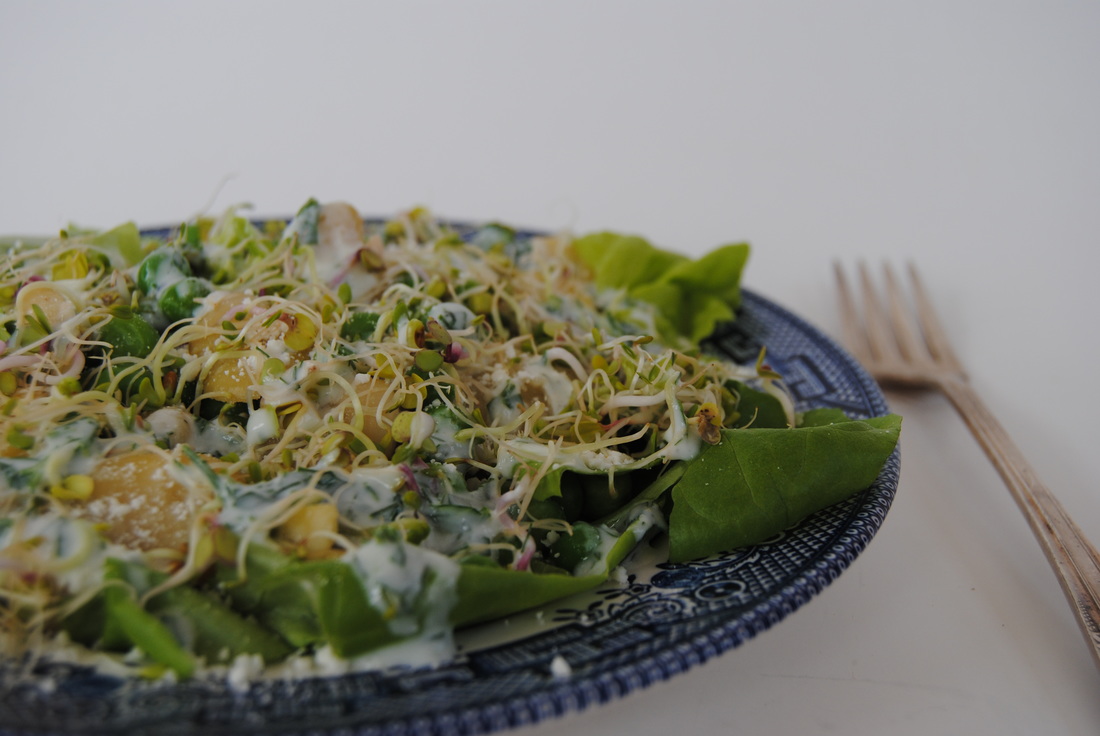 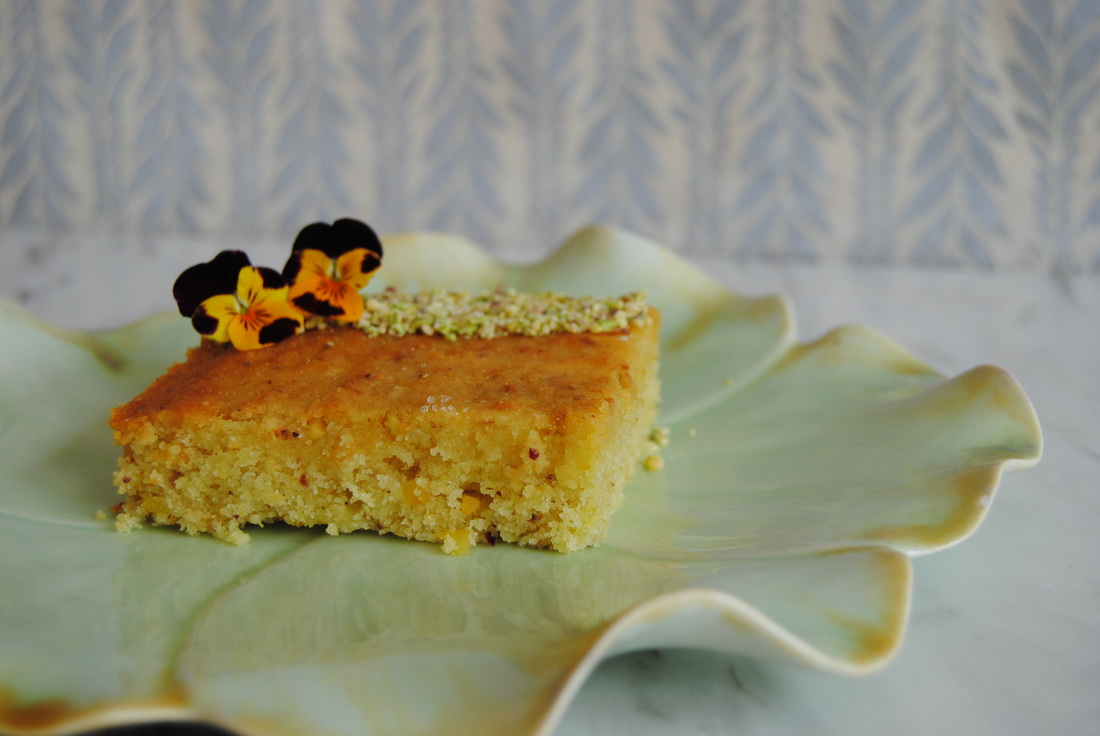 Oh mamma, this cake is delicious! So delicious, actually, that we've been eating it all week for breakfast but that can be our little secret. Though when making this cake we weren't just thinking about ourselves. We've been taste testing, preparing, and now perfecting a recipe to dazzle your amazing mothers with this Mother's Day. And we've given you a whole week to make it, you're welcome! 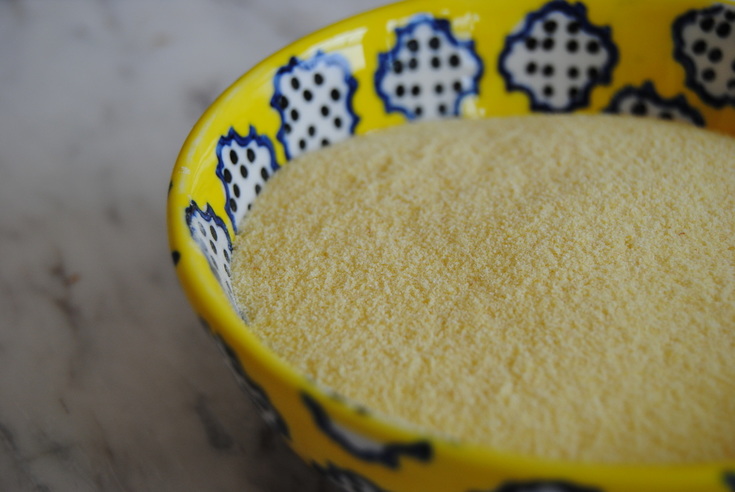 Quickly, before the recipe we'd like to introduce you to a new ingredient this week, semolina flour. Semolina flour is first of all, beautiful, as you can see from the picture above. It is made by coarsely grinding a variety of wheat known as durum wheat, a hard wheat with a high protein content. The durum wheat is milled to remove the bran and germ leaving the yellow endosperm granules known as semolina which are then ground into flour. Semolina flour is traditionally used for pasta making because of it's high content of wheat protein, or gluten. The properties of gluten allow pasta to be molded, stretched, and cooked without falling apart. And we all love us some pasta don't we? But we've taken a different approach this week and made a cake from this beautiful flour. Not only unique and impressive, semolina flour provides a lovely color and dense, crumbly texture much different from cakes made with traditional cake flours. So now that we've convinced you to make this cake for your mamma this year, let's get to the recipe. Pistachio Semolina Cake PREP TIME: 15 mins TOTAL TIME: 50 mins Servings: 10-12 Ingredients Cake 2 cups semolina flour 1 cup cane sugar 1 1/2 cups raw unsalted shelled pistachios (makes 3/4 cup powdered with 1/4 cup reserved for the top of the cake) 10 Tbsp unsalted butter 1 cup + 2 Tbsp plain milk kefir (We prefer Siggi's kefir) 1/3 cup thick vanilla yogurt; Greek or Icelandic (We prefer Siggi's 4% milk fat) 1 tsp baking powder Syrup 4 Tbsp freshly squeezed orange juice 2 Tbsp light clover honey 1/4 tsp sea salt Preheat oven to 350°. Lightly butter a 9x13" pan and set aside. In a small bowl melt butter in the microwave and set aside. Using mortar and pestle grind pistachios into a fine powder similar to the texture of coarse sand. Note if you do not have a mortar and pestle, place nuts in a sealable plastic bag and crush with a rolling pin until desired texture. In a large mixing bowl combine the kefir, yogurt, and sugar. Stir the semolina flour, 1/2 cup ground pistachios, and baking powder into the yogurt mixture. Finally, stir in the melted butter and mix until just combined. Avoid over mixing the batter. Pour batter into prepared pan and cook in preheated oven for 35 minutes or until a toothpick comes out clean. Once the cake is fully cooked turn the oven to broil and move the cake to a higher rack for 3-5 minutes so that the top becomes a golden brown (pictured above). Though watch carefully the entire time you are broiling to avoid burning the top of the cake. While the cake is baking, prepare the orange syrup. Combine orange juice, honey, and sea salt and mix well. Once the cake comes out of the oven, use a toothpick to carefully poke holes (making sure to reach the bottom of the pan) every one inch across the surface of the cake. The purpose of this is to help the cake absorb the syrup. While the cake is still warm, evenly pour the orange syrup over the top of the cake. Sprinkle the outside edges of the cake with the reserved 1/4 cup powdered pistachios. Serve and enjoy! 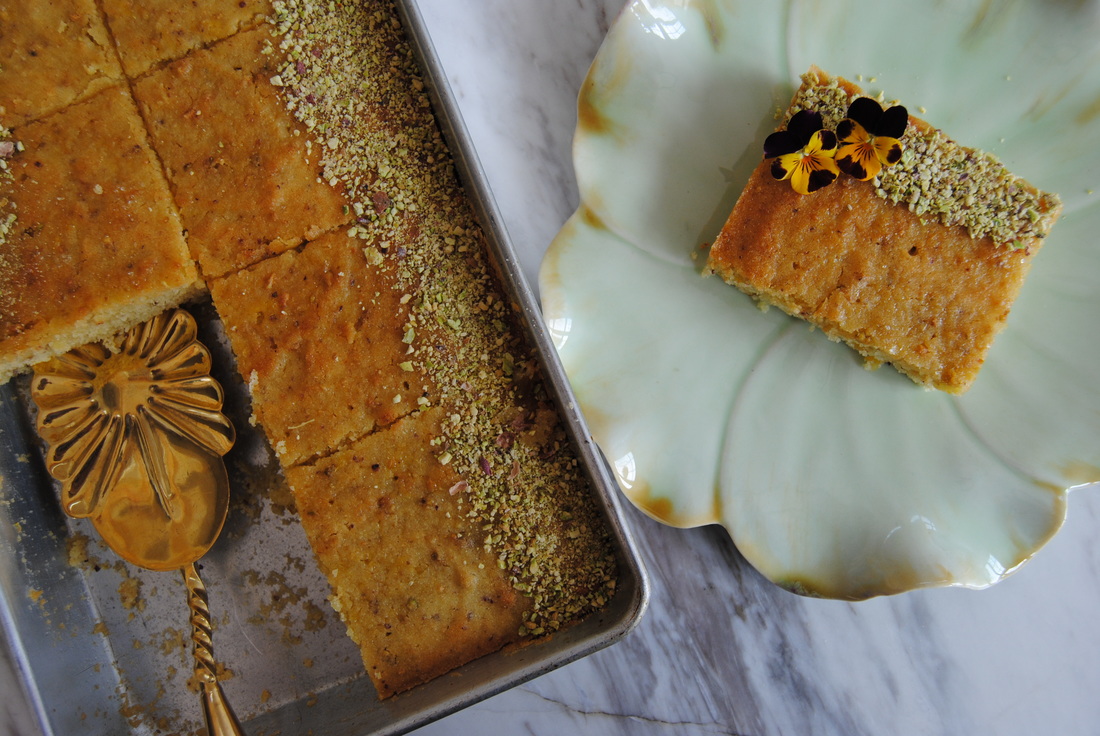 Now doesn't this fancy tea and cake celebration look like every childhood tea party dream? Well it is! This cake is dense, crumbly, savory, and sweet all at the same time. And lends itself well to any toppings or decor (we chose edible flowers) that you know your mother will love. And we are sending all of our love to you mamma superheroes out there, this one is for you. Happy mother's day, Jess and Cecelia 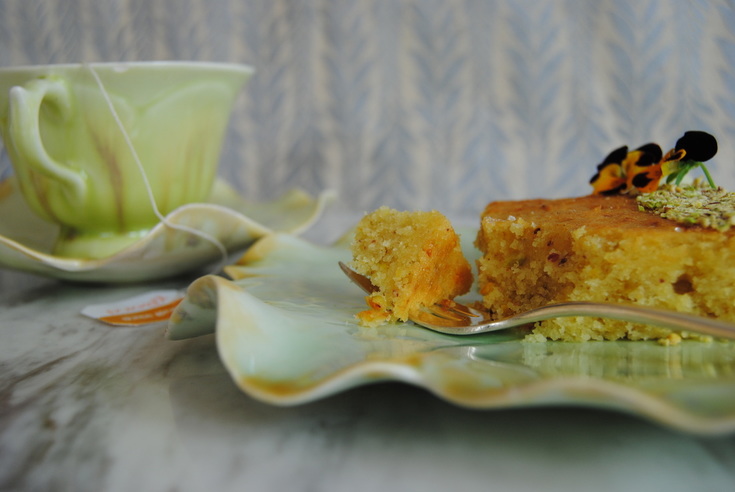  Do things ever get so busy that you just can't find the energy to keep up? Trust us, we feel you. And that's exactly why we created these Sunshine Energy Bites. Also, of course, to acknowledge the longer days with the clocks turning ahead this weekend. Right, just when we can't keep up we lose an hour! So whip these up quick to keep you energized this week. 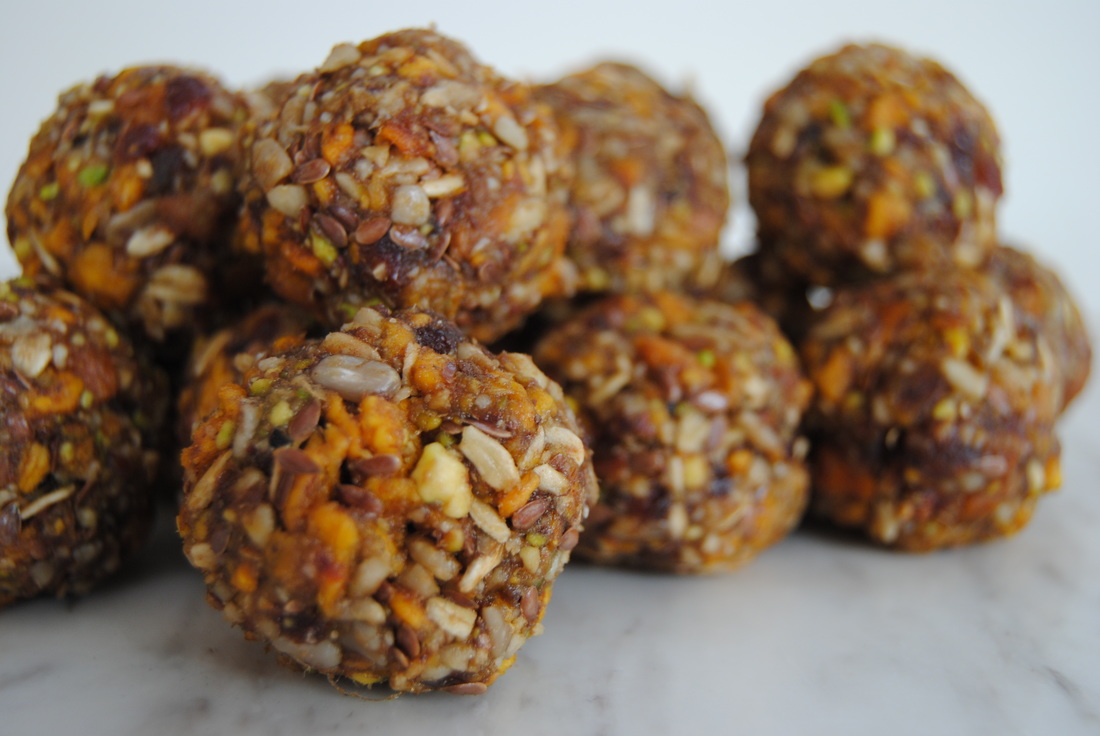 Sunshine Energy Bites PREP TIME: 10 mins TOTAL TIME: 15 mins Servings: 18 bites Ingredients 6 oz dried unsweetened mango 1/2 cup shelled raw pistachios 1/2 cup raw sunflower seeds 10 soaked pitted dates + 2 Tbsp reserved date water 1/3 cup thick rolled oats 2 Tbsp ground flax seed 2 Tbsp whole fax seed 2 Tbsp sunflower seed butter (we used salted) 1/8 tsp sea salt Pre-soak dates in warm water for about 10 minutes to soften. Chop the mango into half inch pieces and set aside. Using a food processor pulse the oats until a thick flour like texture is formed then place in a separate bowl. Avoid over processing as you want to be able to see some whole oats. Add the ground and whole flax seed to the oat bowl. Combine the chopped mango, pistachios, sunflower seeds, soaked dates, and 2 Tbsp reserved date water to the food processor. Pulse until mixture comes together then pour contents into the oat/flax bowl. Add sunflower seed butter and salt and stir to fully combine. Form into bites about the size of ping pong balls. If your mixture is too dry (the balls crumble and easily fall apart) add a few teaspoons of additional date water as needed. Continue to form until you have about 18 energy bites. Keep in an air tight jar in the fridge for freshness. 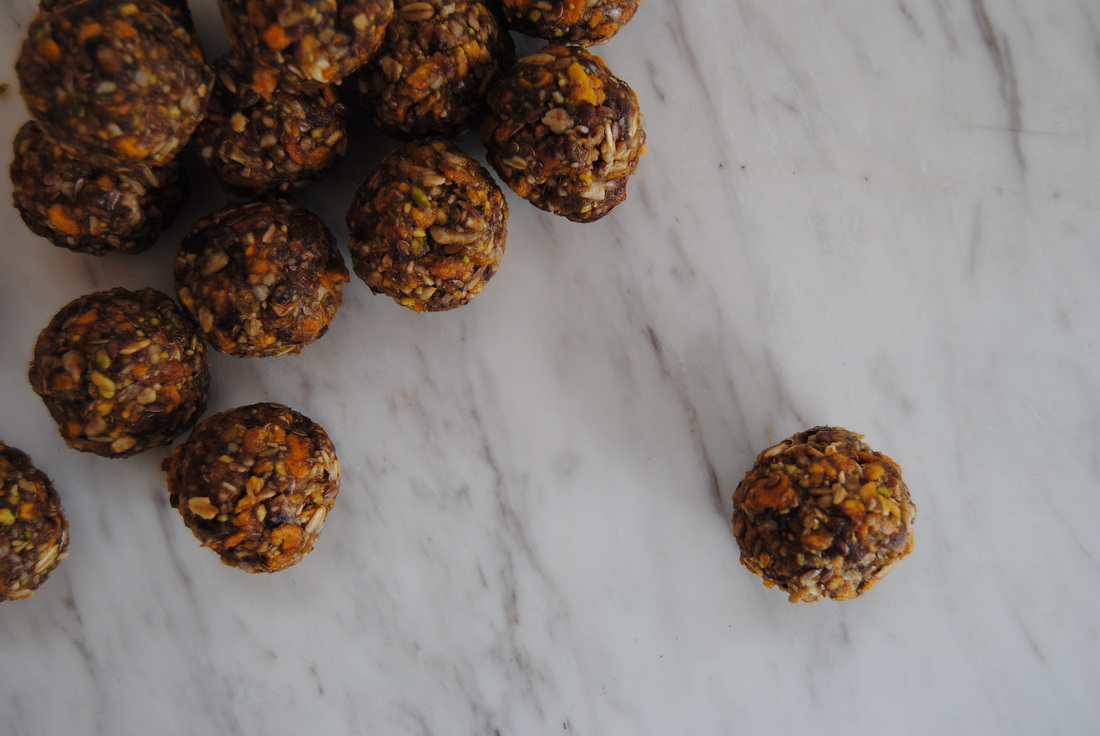 They are sweet, salty, and sunflower buttery - basically everything you need to keep you going through all your endeavors. Trust us, we've been busy in the kitchen and have tons of great recipes coming your way, thanks to these bites of course. Jess & Cecelia 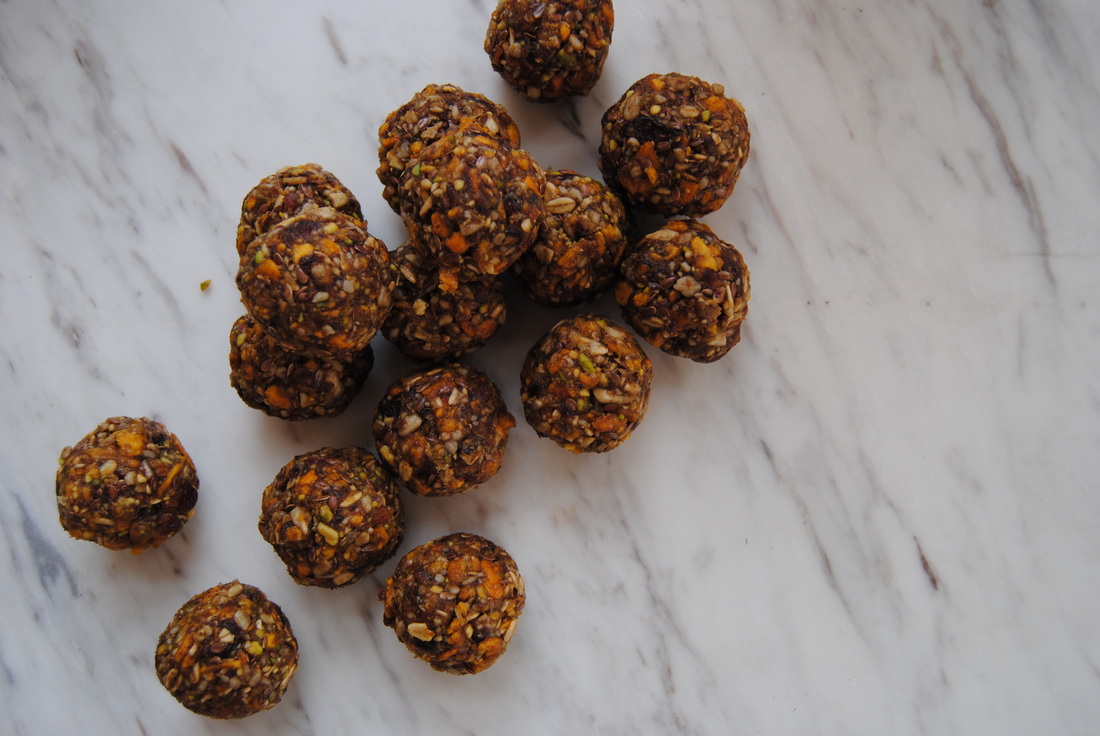 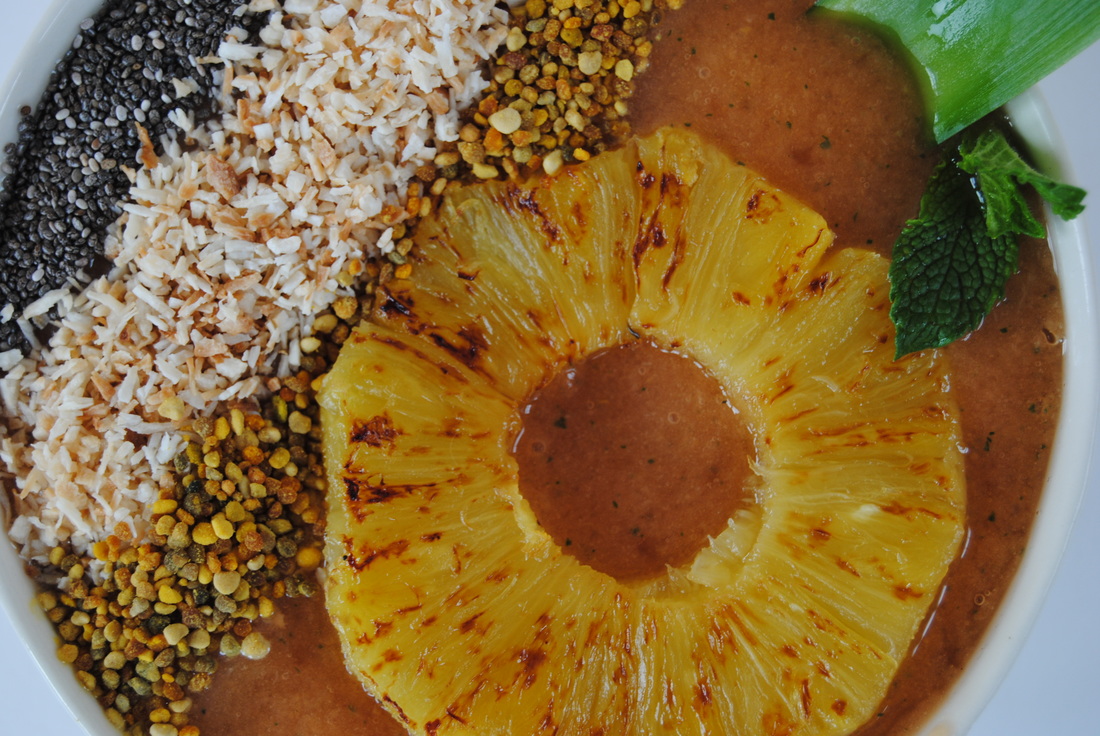 Our post this week is inspired by many things including hard work, honeybees, and honeymoons. Now this may seem like a random assortment of unrelated items but we can explain! First, Cecelia has just returned from a relaxing, belated honeymoon getaway in Belize where she enjoyed an endless supply of tropical fruits. Second, relaxing on vacation always reminds us of how hard we work from day to day and how important it is to take a break now and again. And finally, hard work reminds us of the amazing honeybee who epitomizes hard work and provides us with a very special food that we are highlighting this week as a smoothie bowl topping, bee pollen! 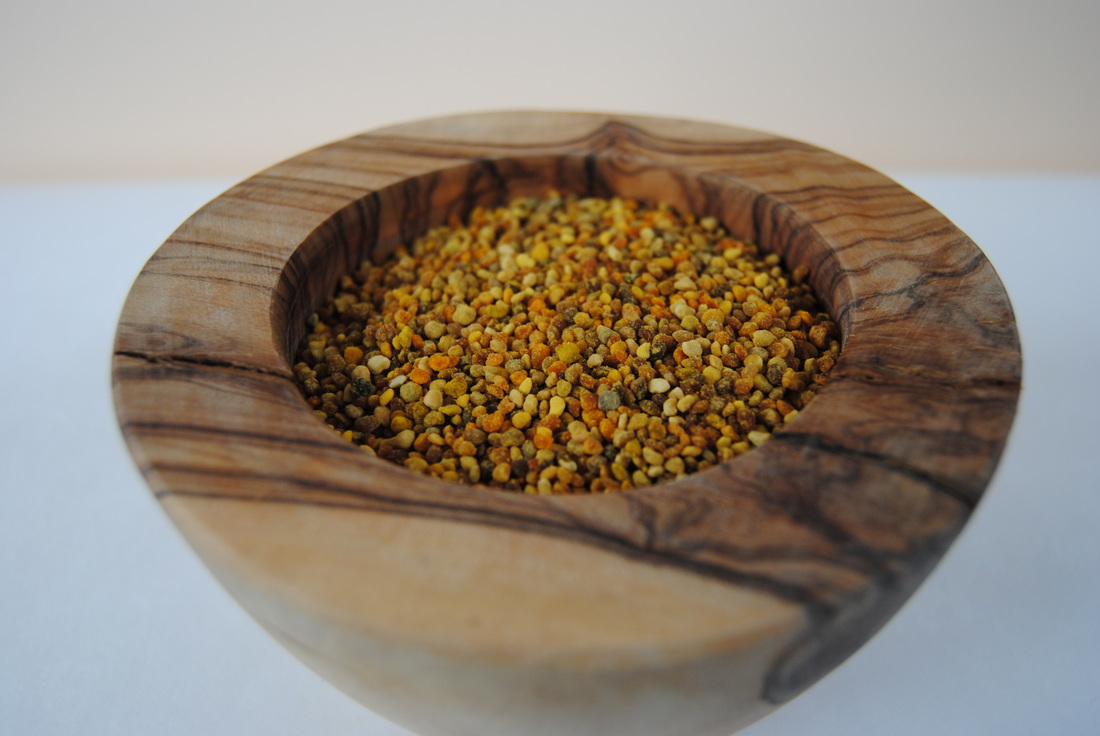 The name bee pollen is a little misleading because the source is actually flower pollen. When small grains of flower pollen are collected by worker bees they are packed into semi-hard pellets for transport back to the beehive, thus creating what we consume as bee pollen. Bee pollen is considered one of nature's most perfect foods because of it's unique nutrient profile including a variety of vitamins, minerals, all essential amino acids making it a complete protein, and digestive enzymes. It even contains vitamin B12 making it one of very few plant sources of this vitamin! Bee pollen is so nutritious that even the worker bees use it as their primary fuel (once it is slightly fermented back at the hive). As a plant food, bee pollen contains more amino acids and vitamins than animal proteins when compared by weight, though bee pollen is not typically consumed in the same quantities. If you are new to bee pollen, it is best to gradually increase your intake starting with 1/4 tsp per day and increasing by a few pellets per day until you reach a 2 Tbsp daily intake. It is important that bee pollen be consumed in it's natural, raw form to preserve the nutrient qualities. Bee pollen can be found at specialty grocers, health food stores, or online. When purchasing, look for organic brands from companies who follow good farming practices. To preserve freshness it should be stored in the refrigerator once opened. And remember, when enjoying your bee pollen, to be thankful for the hardworking honeybees that make this superfood possible! 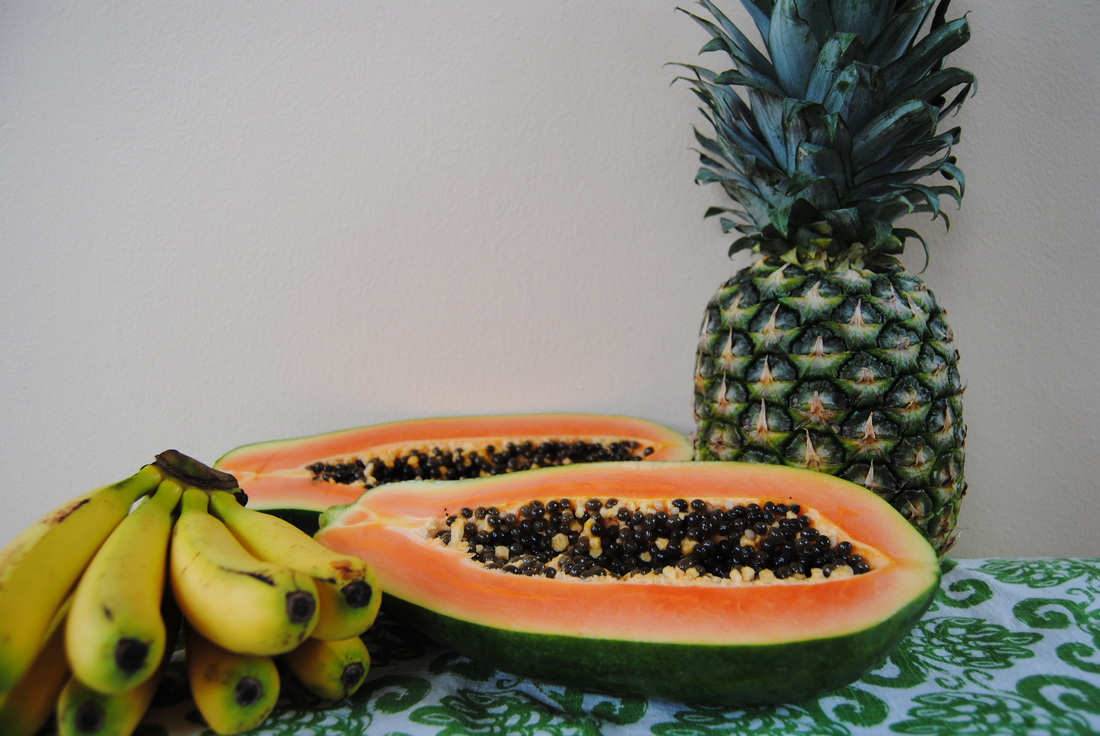 Caribbean Smoothie Bowl PREP TIME: 10 mins TOTAL TIME: 15 mins Servings: 2 bowls Ingredients Smoothie 1 papaya, peeled, seeds removed and cubed 1 pineapple, peeled (recipe will use ~1/2 of the pineapple) 1 frozen banana 1 Tbsp fresh mint leaves, chopped 1 cup ice cubes Toppings 2 Tbsp unsweetened coconut flakes, toasted 4 tsp chia seeds 4 tsp bee pollen 2 tsp honey 2 slices of pineapple Over low-medium heat, lightly toast coconut flakes in a small pan. Once toasted, remove from heat and set aside. Peel the pineapple and cut in half. Core and cut two rings from one half of the pineapple and chop the other half into cubes. Carefully place two pineapple rings in a hot pan on the stove top over medium heat. Sear pineapple until golden then place in the fridge to cool. Meanwhile, combine papaya, about half of the pineapple cubes, frozen banana, mint, and ice in a high speed blender. Blend on high into a thick smoothie texture. Pour smoothie into bowls and creatively top with toasted coconut, chia seeds, bee pollen, cooled seared pineapple and drizzle of honey over the top. Feel free to add additional ingredients on top of your bowl (fruit, nuts, granola). Now grab a spoon and a friend and dive in! 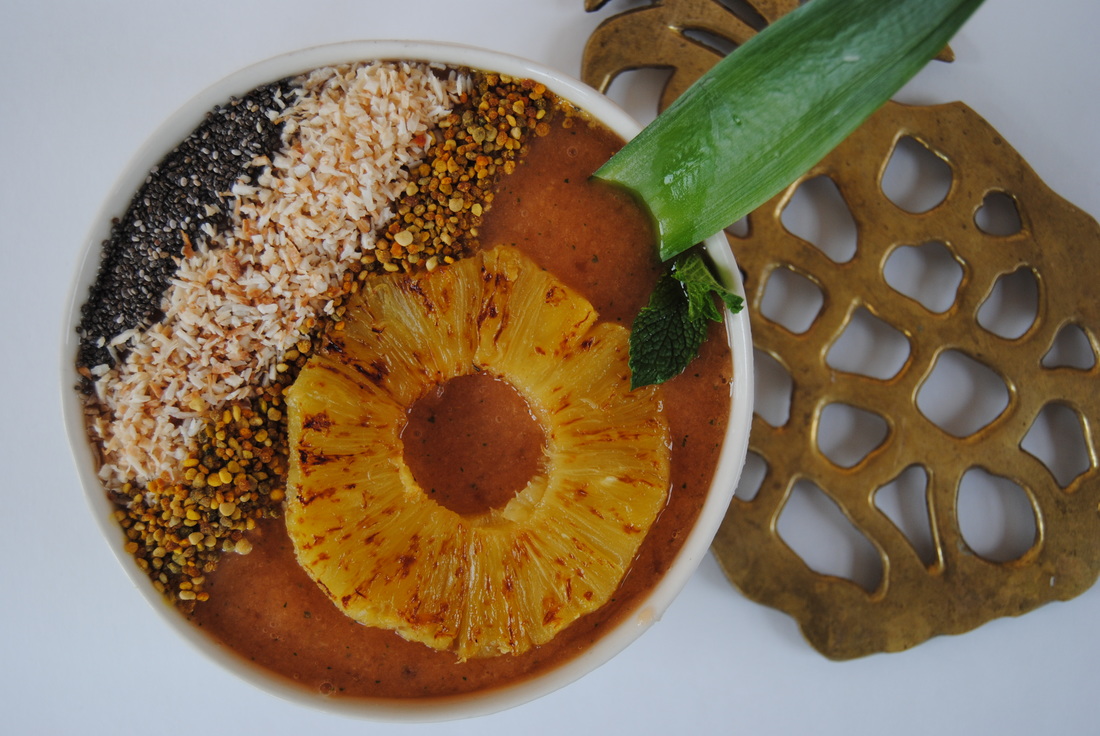 If you're new to smoothie bowls and are thinking that this looks amazing then you're right! There is something about eating, instead of drinking, a smoothie that makes it much more satisfying. Plus, the bowl presentation allows for tons of fun toppings! This smoothie is so crisp and fresh utilizing tropical fruits and fresh mint. Feel free to mix up the toppings any way you like. But remember to give bee pollen a try one of these days and send a huge thank you to the hard working honeybees as you enjoy it! Relax and enjoy, Jess and Cecelia 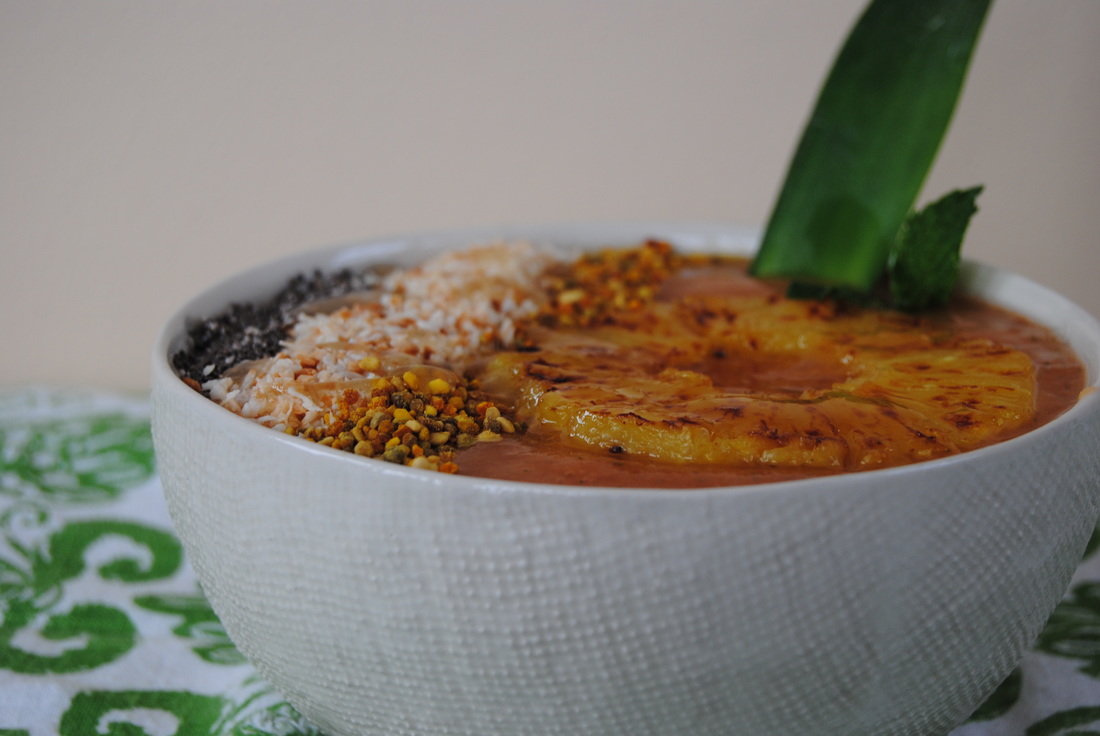 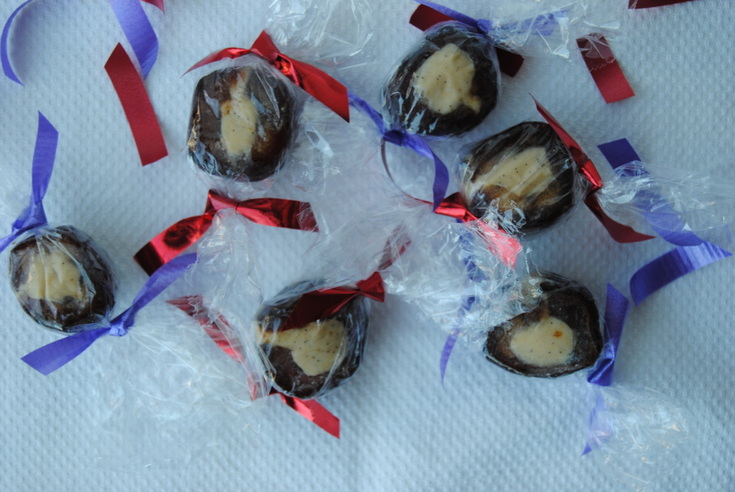 The sweet celebration of Valentine's Day this past weekend got us thinking about candy - big surprise! And though chocolates are the traditional sweet during this time, we were thinking a little differently. We wanted to try to make a candy with no added sugar, sounds crazy right?! Well not if you utilize nature's candy, a little piece of food perfection called the date. 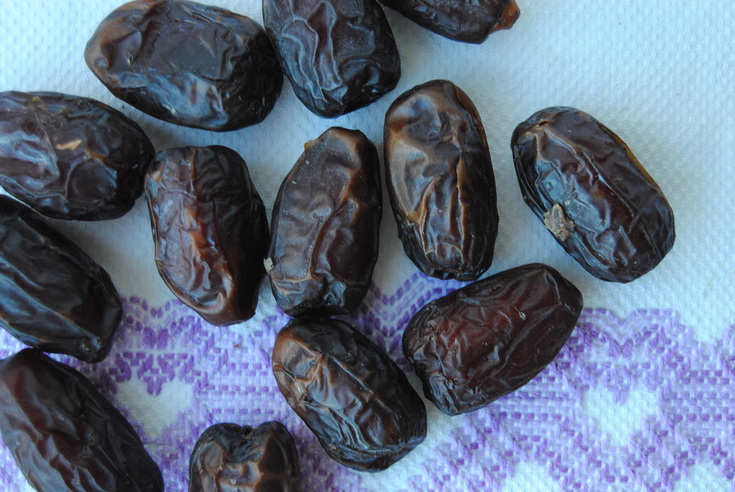 Dates are a flowering edible plant from the palm family that grow in hot climates. They grow in clusters on a species of palm tree well named "date palms" and are most commonly eaten once dried. A date palm can take up to 7-10 years to mature and once mature may produce a crop of up to 300 lb per harvest season. Our favorite variety of date is the Medjool date native to the Middle East and North Africa but also grown in other desert like regions across the globe. In our opinion, Medjool dates are superior to all other dates because they are the largest in size, have the softest texture, and the sweetest taste.....AKA nature's candy! Dates can be enjoyed on their own as a sweet snack, blended into beverages to add a little sweetness, or chopped up and added to baked or raw recipes. They are also great stuffed in savory or sweet recipes similar to our post this week. They provide, of course, sweetness but also a caramel reminiscent flavor and a chewy and slightly sticky texture. If blended, this sticky texture can even be used as a binder in raw granola bar recipes. But we will save that for another post. Today, no-added sugar candies! 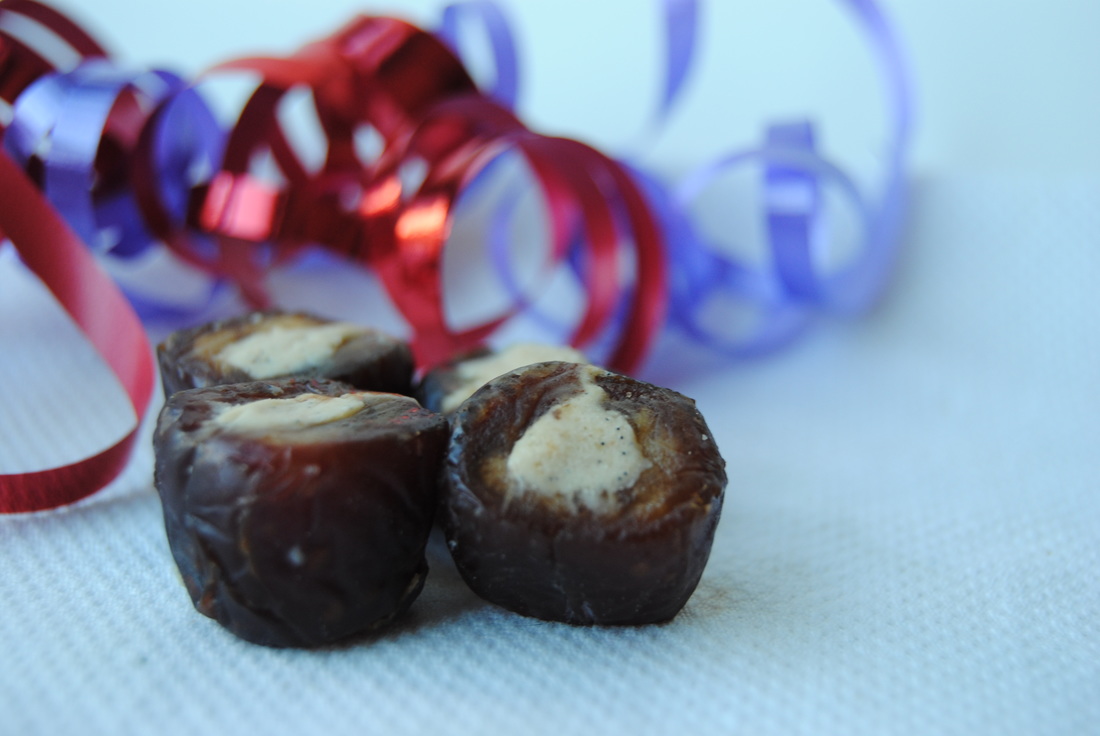 Raw Coconut-Cashew Butter Filled Dates PREP TIME: 5 mins TOTAL TIME: 30 mins (includes chilling time) Servings: 24 candies Ingredients 12 Medjool dates 1/8 cup raw cashew butter 1/8 cup raw coconut butter 1/4 vanilla bean, inside scraped out 1/8 tsp salt, or to taste In a microwave safe bowl, carefully melt cashew butter and coconut butter in 10 second increments making sure to stir frequently to prevent the butters from burning (this should take about 20-30 seconds). Add vanilla bean and salt to the butters, stir mixture thoroughly, then set in the fridge to cool for at least 10 minutes. Remove the pits from 12 dates by slicing open one side with a small, sharp knife but not cutting the dates all the way through. Once filling has completely cooled, add 1 tsp of filling to the center of each date and carefully pinch closed. Repeat until all the dates are filled. Place the filled dates back in the fridge and allow to cool for about 10 minutes. Using a sharp knife, cut the ends off of each date making two flat sides in which you can see the cream filling. Then cut each date in half making 2 candies per date. Repeat until you have made 24 individual candies. Place prepared candies in a candy box or tin or simply wrap each candy in plastic wrap. Keep candies in the fridge for taste and freshness. 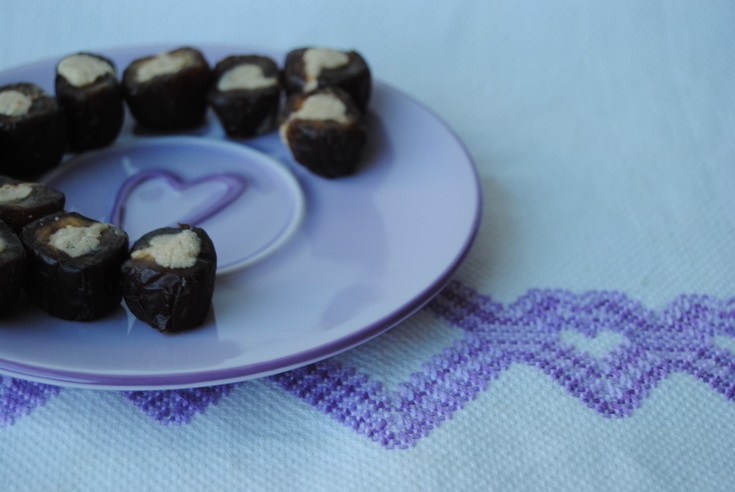 So how's that for satisfying a candy craving the natural way? The dates are gooey and oh so sweet and pair nicely with the rich coconut-cashew filling. This might be just what you need if you may (or may not have) had too many boxed chocolates this past weekend. And don't forget about the wonderful date as a sweet ingredient in your kitchen from now on. Much love, Jess and Cecelia 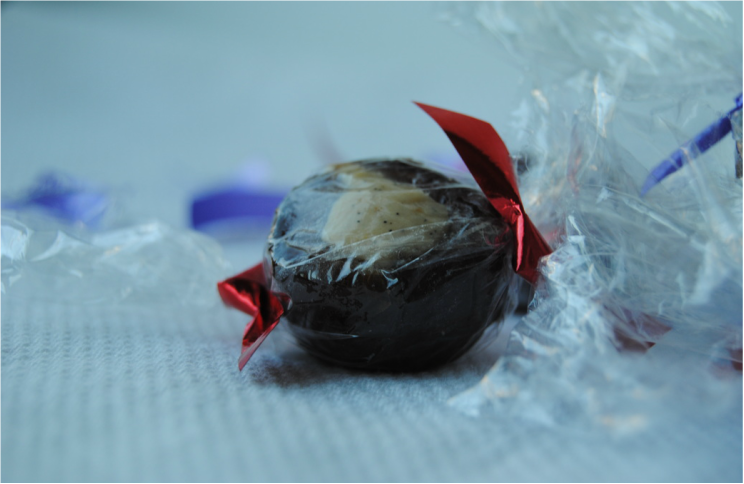 |